
project frosty the snow man

hey guys,
i looked for ages to find a nice sport, couldn't get the insurance for the turbo so hey ho.
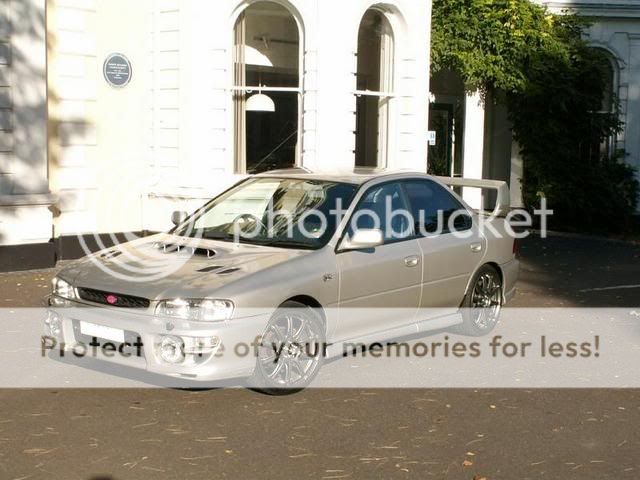
i finally found what i was looking for, a 2000 w sport, quite clean, big alloys and a turbo look alike, full service history, clutch changed, cambelt done, and 65,000 mile on the clock, not to mention a full clifford alarm system and a ninja back box.
here it is in all its glory:
a bit about me:
im 23 and work at my family run bodyshop up here in the north west, this is us www.panelcare.com were fairly large and aswell as the office/estimatin work i do im also the painter/prep/colour matcher.
my previous cars:
1.4 nissan sunny, full respray in rover tahiti blue pearl, was actually quite nice
pug 306 2.0hdi
seat leon cupra r 1.8 20v turbo
and now the scooby.
what im going to be doing:
now although the car is clean, i was looking for sound mechanics as body is no problem, but its silver, i hate silver. its a common color and you can really tell if its been painted and at my cars age it has.
the faults:
the red dots show the dents on the car, the passanger side has one tiny dent on the n/s/f wing,

the drivers side is a litle worse, not major mainly car park dents.
colour wise the bonnet has been done obviously as its a turbo bonnet, the wings have been blown over and you can see how the wrong colour shade has been blended in, a part from a few other things thats it.
my goal:
i will be repairing and repainting the car, i have toyed with the idea of white pearla but they result in this:

you never get a clen white, they always look more enamel tooth white, above is a normal pearl, other ones i have tried have been white base 3 stage blue pearl but this turns the colour even yellower. my last idea was to use the next gen paints called xirillic's they cost about �100 per quarter of alitre but alas they didnt look right, so im pretty much left with a solid white, but painted as a clear over base.
other things i will be doing:
adding a p1 splitter
shaving the rear door handles
full inside outside respray
things i have bought to add to the car:
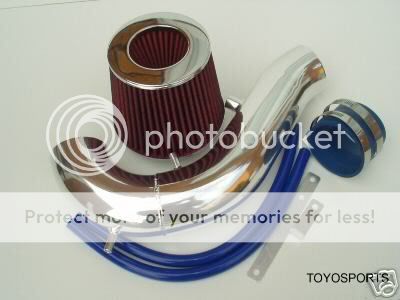
induction kit

fog covers

p1 splitter
(no pic yet)
turbo interior


this only cost me �100 and was a bargin, its actually cleaner than the pics potrait.
finallythis is my general aim for a result


my final maybe i should/shouldn't is red sti mud flaps

the ht autos p1 splitter came i have just offered it up for the pic, but looks real good,
one of the better molding companys about
here's the pic

will be keeping the wheels they anthracite, as white cars suit it. and my style of wheel would look overkill in white, to many prongs.
my lamp covers arrived this morning, and they look like a very good quality mold, they also fit good, so i went ahead and ordered the p1 splitter, �85 seen as im trade hehehe wish i had phone ordered my fog covers now lol
i will be starting the work after christmas as now is the time the gritter come out and i dont want to be trapping our strong salt inbetween my metal and paint,
it just gives me time to source everything i need before then
with mine being silver the under bonnet paint is a straight grey which will tie in more with the white paint work, i will paint back of the boot and under bonnet in new factory primer colour for continuity.
i will also be cleaning off all over spray from previous paint, as its blathered on the vents and air box, but thats goins, a few outer trims have be touched with paint too.
i want it mint lol
3nice coats of base and 3 to 4 nice coats of laquer and polish the nuts off it haha
im lucky i can do this with me having the body shop in the family,if i were a paying cutsomer the job would cost around �1500, but most of that is labour the wet goods would cost around �400 max, i can do all the work myself you see,
its like some one being a joiner he can fit his own kitchen, so it costs less get the idea
jake
i looked for ages to find a nice sport, couldn't get the insurance for the turbo so hey ho.
i finally found what i was looking for, a 2000 w sport, quite clean, big alloys and a turbo look alike, full service history, clutch changed, cambelt done, and 65,000 mile on the clock, not to mention a full clifford alarm system and a ninja back box.
here it is in all its glory:
a bit about me:
im 23 and work at my family run bodyshop up here in the north west, this is us www.panelcare.com were fairly large and aswell as the office/estimatin work i do im also the painter/prep/colour matcher.
my previous cars:
1.4 nissan sunny, full respray in rover tahiti blue pearl, was actually quite nice
pug 306 2.0hdi
seat leon cupra r 1.8 20v turbo
and now the scooby.
what im going to be doing:
now although the car is clean, i was looking for sound mechanics as body is no problem, but its silver, i hate silver. its a common color and you can really tell if its been painted and at my cars age it has.
the faults:
the red dots show the dents on the car, the passanger side has one tiny dent on the n/s/f wing,
the drivers side is a litle worse, not major mainly car park dents.
colour wise the bonnet has been done obviously as its a turbo bonnet, the wings have been blown over and you can see how the wrong colour shade has been blended in, a part from a few other things thats it.
my goal:
i will be repairing and repainting the car, i have toyed with the idea of white pearla but they result in this:
you never get a clen white, they always look more enamel tooth white, above is a normal pearl, other ones i have tried have been white base 3 stage blue pearl but this turns the colour even yellower. my last idea was to use the next gen paints called xirillic's they cost about �100 per quarter of alitre but alas they didnt look right, so im pretty much left with a solid white, but painted as a clear over base.
other things i will be doing:
adding a p1 splitter
shaving the rear door handles
full inside outside respray
things i have bought to add to the car:
induction kit
fog covers
p1 splitter
(no pic yet)
turbo interior
this only cost me �100 and was a bargin, its actually cleaner than the pics potrait.
finallythis is my general aim for a result
my final maybe i should/shouldn't is red sti mud flaps
the ht autos p1 splitter came i have just offered it up for the pic, but looks real good,
one of the better molding companys about
here's the pic
will be keeping the wheels they anthracite, as white cars suit it. and my style of wheel would look overkill in white, to many prongs.
my lamp covers arrived this morning, and they look like a very good quality mold, they also fit good, so i went ahead and ordered the p1 splitter, �85 seen as im trade hehehe wish i had phone ordered my fog covers now lol
i will be starting the work after christmas as now is the time the gritter come out and i dont want to be trapping our strong salt inbetween my metal and paint,
it just gives me time to source everything i need before then
with mine being silver the under bonnet paint is a straight grey which will tie in more with the white paint work, i will paint back of the boot and under bonnet in new factory primer colour for continuity.
i will also be cleaning off all over spray from previous paint, as its blathered on the vents and air box, but thats goins, a few outer trims have be touched with paint too.
i want it mint lol
3nice coats of base and 3 to 4 nice coats of laquer and polish the nuts off it haha
im lucky i can do this with me having the body shop in the family,if i were a paying cutsomer the job would cost around �1500, but most of that is labour the wet goods would cost around �400 max, i can do all the work myself you see,
its like some one being a joiner he can fit his own kitchen, so it costs less get the idea
jake
Last edited by cuprajake; Jan 6, 2007 at 08:40 PM. Reason: name change


Christ thats a spit for mine : 
Good luck, these project threads are all time consuming have a look at mine.
https://www.scoobynet.com/projects-4...ssic-2-0l.html
Good luck, these project threads are all time consuming have a look at mine.
https://www.scoobynet.com/projects-4...ssic-2-0l.html
dam it does dont it hahaha
i wont be going exactly like that, it was more of a colour illustration,
i have the full fog covers and the normal crystal head lights which i prefer.
on a side note where do you get the small number plates from
jake
i wont be going exactly like that, it was more of a colour illustration,
i have the full fog covers and the normal crystal head lights which i prefer.
on a side note where do you get the small number plates from
jake


hey guy's
well today i decided to start taking the car to bits, seen as i was already at the garage from helping my dad,
i had a good 2 hrs this aft and got a good emount of work done,
so what im going to do each time is list day, time spent and work accomplished
here we go
day 1 : time spent 2hrs
work done:
removed-
2xhead lights
2xflasher lights
2xwing indicators
n/s/mirror
2xweather strip
2xwindow glass
2x n/s door handles
2xn/s doors(completely empty shells)
2xside skirts
a/b pillar trim
2xdoor apteure rubbers
front grille
boot spoiler
2xrear lights
bootlid
here are some pics
side

back

front

bits


tidy bit room

jake
well today i decided to start taking the car to bits, seen as i was already at the garage from helping my dad,
i had a good 2 hrs this aft and got a good emount of work done,
so what im going to do each time is list day, time spent and work accomplished
here we go
day 1 : time spent 2hrs
work done:
removed-
2xhead lights
2xflasher lights
2xwing indicators
n/s/mirror
2xweather strip
2xwindow glass
2x n/s door handles
2xn/s doors(completely empty shells)
2xside skirts
a/b pillar trim
2xdoor apteure rubbers
front grille
boot spoiler
2xrear lights
bootlid
here are some pics
side
back
front
bits
tidy bit room
jake
day 2
started at dinner(12) and just need to sweep up now, so thats a total of 4hrs today.
got alot more done today, removed basically everything
interior out
other doors off and stripped
bonnet and vents off
front bumper off
dirt guards off
well you get the picture,
only thing i couldn't get off was the bloomin rear bumper so im leaving that for someone else hahah
here are some pics


also started to make my plates for shaving the rear doors,
template

cut to shape

grinded to bare metal

copper weld ready for welding after new yr.
think i'll let one of our body lads do it as the subaru metal is pi$$ thin
jake
started at dinner(12) and just need to sweep up now, so thats a total of 4hrs today.
got alot more done today, removed basically everything
interior out
other doors off and stripped
bonnet and vents off
front bumper off
dirt guards off
well you get the picture,
only thing i couldn't get off was the bloomin rear bumper so im leaving that for someone else hahah
here are some pics
also started to make my plates for shaving the rear doors,
template
cut to shape
grinded to bare metal
copper weld ready for welding after new yr.
think i'll let one of our body lads do it as the subaru metal is pi$$ thin
jake
Trending Topics


update
day 3
1.5 hrs of work dinner time and brew times
fitted the p1 splitter and have welded shut and filled the other rear door
pics


also give the car a good chemical wash to get all the dirt,grease and grime off. never been so clean. circled all the dents to theres a few of them
forgot to say priced up all my new clips and ordered them �20 odd quid, and ordered new header gaskets for the borla replica thats on its way
jake
day 3
1.5 hrs of work dinner time and brew times
fitted the p1 splitter and have welded shut and filled the other rear door
pics
also give the car a good chemical wash to get all the dirt,grease and grime off. never been so clean. circled all the dents to theres a few of them
forgot to say priced up all my new clips and ordered them �20 odd quid, and ordered new header gaskets for the borla replica thats on its way
jake
cars in to final filler, tbh its the first/last skin as the dents were that minor.
i finished the bumper off, prepped it for primer and gave it a good couple of coats, along with the toe eye cover and fog covers. i also flatted the boot lid
pics


jake
i finished the bumper off, prepped it for primer and gave it a good couple of coats, along with the toe eye cover and fog covers. i also flatted the boot lid
pics
jake


well, end of the day for my repair guy, the cars now into primer, two of the doors are complete, the other two are in the last skim, so will all be primed tomorrow.
also painted the underside of the boot lid. in factory primer colour.
pics


jake
also painted the underside of the boot lid. in factory primer colour.
pics
jake
well seems most of the doors were done :P
so got them in to primer to

so to recap:
day 4
time spent me 2hrs time spent repairer 6.5 hrs so a total of 8.5hrs total
work complete
car repaired and into primer
doors repaired
3 doors into primer
p1 lip filled
bumper and lip primed
fog light covers primed
boot lid debadeged/prepped
boot lid back painted in factory primer colour
jake
so got them in to primer to
so to recap:
day 4
time spent me 2hrs time spent repairer 6.5 hrs so a total of 8.5hrs total
work complete
car repaired and into primer
doors repaired
3 doors into primer
p1 lip filled
bumper and lip primed
fog light covers primed
boot lid debadeged/prepped
boot lid back painted in factory primer colour
jake
day 5
time spent 3hrs
work done:
car prepped
final door ready for primer
bonnet ready for primer
car masked
car painted


tbh pics in the spray booth are crap because of all the light, it screws up my camera
jake
time spent 3hrs
work done:
car prepped
final door ready for primer
bonnet ready for primer
car masked
car painted
tbh pics in the spray booth are crap because of all the light, it screws up my camera
jake


thats me done for the night now, going home.
got a good deal done today aswell as my normal work lol
work completed
bonnet in primer
last door into primer
car painted
all doors blocked flat and prepped
back of bonnet into factory primer colour
front bumper prepped
boot prepped
all thats left now are the niggley bits like handles,mirroes,sills
then the spoiler and back bumper. they'll get done tomorrow.
before i paint them the doors will be filled with sound deadening pads the the heat will bake them on
time spent after car was painted
2hrs
jake
morning all,
put the sound deading pads into the doors at brew time, and have just painted all the doors and the boot lid, there now baking in the booth,
time spent this morning 1hr.
jake
put the sound deading pads into the doors at brew time, and have just painted all the doors and the boot lid, there now baking in the booth,
time spent this morning 1hr.
jake
end of day 6
work done this afternoon,
i put the sill plates, clips door rubbers and interior back in, just enough so i can get the doors on for a polish
time taken 1.5 hrs
so hopefully tommorrow i will be able to get the doors and boot hung, and then paint the remaining bits, then its polishing over the weekend before the final fit up next week, then i can have the car back yeah.
pics


jake
work done this afternoon,
i put the sill plates, clips door rubbers and interior back in, just enough so i can get the doors on for a polish
time taken 1.5 hrs
so hopefully tommorrow i will be able to get the doors and boot hung, and then paint the remaining bits, then its polishing over the weekend before the final fit up next week, then i can have the car back yeah.
pics
jake
staurday,
got my doors and boot on this morning, going to be flatting and polishing for the rest of the afternoon, also got the rest of my bit painted bar spoiler. so then its a case of blacking what should be black tommorow and the fitting up.
just in time for the snow lol
really please with how the doors have come out
pics


jake
got my doors and boot on this morning, going to be flatting and polishing for the rest of the afternoon, also got the rest of my bit painted bar spoiler. so then its a case of blacking what should be black tommorow and the fitting up.
just in time for the snow lol
really please with how the doors have come out
pics
jake
right ho, polishing stage.
first you flat the car, this is all done with a d-a(dual action sander) when you use these, the grit of the paper doubles, so 1000=2000 on a sander.

first you dry flat with 1500 discs,

then you wet flat with 1000 trizact pad,

and then you trizact with 3000

all this does is to take out all the little scratches you put in with the d-a.
finally wiped clean ready for polishing.

these are the products used.

jake
first you flat the car, this is all done with a d-a(dual action sander) when you use these, the grit of the paper doubles, so 1000=2000 on a sander.
first you dry flat with 1500 discs,
then you wet flat with 1000 trizact pad,
and then you trizact with 3000
all this does is to take out all the little scratches you put in with the d-a.
finally wiped clean ready for polishing.
these are the products used.
jake


hi.
it just pull's off, if your carful you can get them out without breaking, one side broke the other didn't, but i've got a feeling the clip is part of the trim hence you need a new trim to replace the one clip to expensive, a little bit og stika flex will do the trick, the rest of the clips along there will go again but i ordered new, the only other trims you have to becareful of are the window weather strips, they break reall easy, you need to take them out last.
and agian those clips are part of the trim.
jake
hey guys,
got in at 11 this morning, first i painted my spoiler, and blacked the front bumper, and the bonnet vents. also tinted the lower section of the rear lights, hope its not to dark lol
then i got about buffing again, car is now buffed just needs a hand glaze,
next im going to flat and buff the bonnet,
as per request larger photo's


jake
got in at 11 this morning, first i painted my spoiler, and blacked the front bumper, and the bonnet vents. also tinted the lower section of the rear lights, hope its not to dark lol
then i got about buffing again, car is now buffed just needs a hand glaze,
next im going to flat and buff the bonnet,
as per request larger photo's
jake
got the bonnet polished, and started to fit bits up, front bumper is nearly ready to go on, the a/b pillar trims are on, petrol flap and lights also. getting there slowly but surely now
pics


jake
pics
jake
