
STi Manifold Refurbishment

Thread Starter
Scooby Regular
iTrader: (3)
Joined: Oct 2002
Posts: 2,787
Likes: 0
From: Aberdeenshire
-----------------------------------------------------------------------
UPDATE 8th February 2009
The red VHT Wrinkle-Plus paint is no longer suitable for this refurbishment process, see here.
-----------------------------------------------------------------------
Not so much of a project but more of a technical guide. I set myself the target of refurbishing one of my STi manifolds to the best of my abilities without cheating, i.e. shot blasting and powder coating were out. I wanted to achieve a decent result in:
A: as short a time span as possible
B: by spending as little money as possible
C: with as little talent as possible
I have never been a confident sprayer. Generally i shy away from the tiniest piece of paintwork scarred by history of running or flakey paint. Anyway, i figured if i could make a decent job of this then anyone could and it would make for a worthwhile write up.
What you'll need:

So here's what i started off with. A Phase 2 MY99/00 STi inlet manifold.

First thing to do is to remove absolutely everything bolted onto or screwed into the manifold. Stick it all in a bag and put it somewhere safe.
Give it a once over with a wire brush to remvoe all the loose flakes of paint before attacking it with the Nitromors. I used a 1/2" paint brush and the bottom of a mineral water bottle.

When you think you've applied a decent coating leave it a couple of minutes before carrying the manifold outside to give it a thorough going over with the power washer. N.B. make sure there are no cars parked nearby! Once done the manifold should look something like this...

As you can see there were still a few tougher bits to come off so repeat as neccesary until it looks more like this...

Before applying any paint it is important to be sure there is no greasy deposits left anywhere. Now that i have my own dishwasher i thought i'd take full advantage of it.

One freshly cleaned Impreza manfiold. Leave it to cool down and if you can, stick it in a warm room (or airing cupboard) so the moisture can evaporate.
Once cool and dry it's time to start masking up. I was attempting as near a standard finish as possible with this manifold so chose to mask everything that Subaru did. You may have reomved the odd lug here or there so no need to get as jiggy with the tape.


So with the manifold all masked off it's time to get the etch primer on. I sprayed on three coats of this 5 minutes apart.

The instructions said it was overpaintable in 15 minutes so i got to work with the red almost straight away. I was a bit disappointed how crimson the paint looked to begin with but it toned down as it dried.
For the wrinkle effect it's best to spray an initial thick coat followed by several more thin ones 2 minutes apart. The more thin coats the greater the wrinkle effect. In the end i went for four full coats with a sprinkling of paint for a fifth on top - still loads of paint left in the tin.

Top (and pretty obvious) tip here would be to devise a means of supporting the manifold without it touching the floor, allowing you to rotate it. After applying the primer i screwed a pair of M8 bolts into the injector rail holes to let me grab it and then used a couple of lengths of wood which meant i could balanced the manifold upside down on masked areas, preventing damage to the freshly painted bits.
With the paint applied leave the manifold in a warm area for 48hrs until the paint has fully cured.

With a bit of willpower i managed to resist having a look for the full two days. Here's what mine looked like afterwards. It looks a little glittery but that's the camera flash.

When removing the masking tape my advice would be to start in a fairly hidden area until you've gotten the nack of it. I used a Stanley blade to lift the edges of the tape and then peeled away very carefully. As luck would have it i didn't bugger up one piece.

The finished article...


UPDATE 8th February 2009
The red VHT Wrinkle-Plus paint is no longer suitable for this refurbishment process, see here.
-----------------------------------------------------------------------
Not so much of a project but more of a technical guide. I set myself the target of refurbishing one of my STi manifolds to the best of my abilities without cheating, i.e. shot blasting and powder coating were out. I wanted to achieve a decent result in:
A: as short a time span as possible
B: by spending as little money as possible
C: with as little talent as possible
I have never been a confident sprayer. Generally i shy away from the tiniest piece of paintwork scarred by history of running or flakey paint. Anyway, i figured if i could make a decent job of this then anyone could and it would make for a worthwhile write up.
What you'll need:
- Automotive Nitromors
- Etch Primer
- VHT Wrinkle Plus Coating (from Frost)
- Low Impact Masking Tape
So here's what i started off with. A Phase 2 MY99/00 STi inlet manifold.
First thing to do is to remove absolutely everything bolted onto or screwed into the manifold. Stick it all in a bag and put it somewhere safe.
Give it a once over with a wire brush to remvoe all the loose flakes of paint before attacking it with the Nitromors. I used a 1/2" paint brush and the bottom of a mineral water bottle.
When you think you've applied a decent coating leave it a couple of minutes before carrying the manifold outside to give it a thorough going over with the power washer. N.B. make sure there are no cars parked nearby!
Once done the manifold should look something like this...As you can see there were still a few tougher bits to come off so repeat as neccesary until it looks more like this...
Before applying any paint it is important to be sure there is no greasy deposits left anywhere. Now that i have my own dishwasher i thought i'd take full advantage of it.
One freshly cleaned Impreza manfiold.
Leave it to cool down and if you can, stick it in a warm room (or airing cupboard) so the moisture can evaporate.Once cool and dry it's time to start masking up. I was attempting as near a standard finish as possible with this manifold so chose to mask everything that Subaru did. You may have reomved the odd lug here or there so no need to get as jiggy with the tape.
So with the manifold all masked off it's time to get the etch primer on. I sprayed on three coats of this 5 minutes apart.
The instructions said it was overpaintable in 15 minutes so i got to work with the red almost straight away. I was a bit disappointed how crimson the paint looked to begin with but it toned down as it dried.
For the wrinkle effect it's best to spray an initial thick coat followed by several more thin ones 2 minutes apart. The more thin coats the greater the wrinkle effect. In the end i went for four full coats with a sprinkling of paint for a fifth on top - still loads of paint left in the tin.
Top (and pretty obvious) tip here would be to devise a means of supporting the manifold without it touching the floor, allowing you to rotate it. After applying the primer i screwed a pair of M8 bolts into the injector rail holes to let me grab it and then used a couple of lengths of wood which meant i could balanced the manifold upside down on masked areas, preventing damage to the freshly painted bits.
With the paint applied leave the manifold in a warm area for 48hrs until the paint has fully cured.
With a bit of willpower i managed to resist having a look for the full two days.
Here's what mine looked like afterwards. It looks a little glittery but that's the camera flash.When removing the masking tape my advice would be to start in a fairly hidden area until you've gotten the nack of it. I used a Stanley blade to lift the edges of the tape and then peeled away very carefully. As luck would have it i didn't bugger up one piece.
The finished article...
Last edited by Carl Davey; Feb 11, 2009 at 03:36 PM.


 :
:
Thread Starter
Scooby Regular
iTrader: (3)
Joined: Oct 2002
Posts: 2,787
Likes: 0
From: Aberdeenshire
Lol, no it's my office carpet... an offcut laid in the garage. And yes, i used the dishwasher while Emma was sleeping after her nightshift. She was dead pleased i managed to switch it on and empty the dishes that day. 


Scooby Regular
Joined: May 2004
Posts: 11,341
Likes: 1
Ah...I had forgotten what a 'Carl' thread was like.
Great job done, couldn't believe the dishwasher bit.
After you have been wed for a few years and it breaks down, YOU will be the dish washer!
Nice to see you back.
Just need an Sti RA to go with the manifold.
Graham.
Great job done, couldn't believe the dishwasher bit.
After you have been wed for a few years and it breaks down, YOU will be the dish washer!
Nice to see you back.
Just need an Sti RA to go with the manifold.
Graham.
Trending Topics


Thread Starter
Scooby Regular
iTrader: (3)
Joined: Oct 2002
Posts: 2,787
Likes: 0
From: Aberdeenshire
I wasn't going to use the etch primer until the last minute but did some searching on the net which recommended it. I've tried it in the hope it makes a difference to the flaking but have heard plenty of good reports about the VHT wrinkle stuff used on it's own not to be overly vocal about it.
I put it on the normal pots 'n' pans setting Mark but kicked myself afterwards when i realised i could've put it on 'deep clean' setting and really boiled the **** out of it. Fairy tablets used here and plenty of rinse aid.
I put it on the normal pots 'n' pans setting Mark but kicked myself afterwards when i realised i could've put it on 'deep clean' setting and really boiled the **** out of it. Fairy tablets used here and plenty of rinse aid.

Carl,
Just about to do the same with my manifold but have a question or 2.
What is the temp rating of the etching primer? The wrinkle paint is rated to 350c and does not say it needs a primer.
What I'm getting at is this.
Will the etching primer cause the paint to lift? Especially as the wrinkle paint seems not to need it.
Any thoughts?

Scooby Regular
Joined: Nov 2001
Posts: 15,239
Likes: 1
From: Leeds - It was 562.4bhp@28psi on Optimax, How much closer to 600 with race fuel and a bigger turbo?
you normally use an etch primer on bare metal and ally..
Ive yet to see an etch primer lift, due to anything other than poor prep..
I would allways use an etch primer, or self etching primer
Also dont get nitromors on your hands or in your eyes..
David
Ive yet to see an etch primer lift, due to anything other than poor prep..
I would allways use an etch primer, or self etching primer
Also dont get nitromors on your hands or in your eyes..
David
David,
Just to clarify, are you saying that the temps in the inlet manifold, with or without spacers, are low enough not to cause problems?
Also, still laughing mi boy ***** off at
"Also dont get nitromors on your hands or in your eyes.. "
Just to clarify, are you saying that the temps in the inlet manifold, with or without spacers, are low enough not to cause problems?
Also, still laughing mi boy ***** off at
"Also dont get nitromors on your hands or in your eyes.. "

Thread Starter
Scooby Regular
iTrader: (3)
Joined: Oct 2002
Posts: 2,787
Likes: 0
From: Aberdeenshire
Yeah Nitromors isn't pleasant.
Wayne, like i said above, i only used it as it didn't seem right laying the red straight onto the alloy manifold. I did a quick search on the net and it basically came back saying to etch prime bare metals (inc. alloy) for best effect. I had no reason not to try it, especially seeing as the OEM manifold paint jobs aren't known for their longevity.
Wayne, like i said above, i only used it as it didn't seem right laying the red straight onto the alloy manifold. I did a quick search on the net and it basically came back saying to etch prime bare metals (inc. alloy) for best effect. I had no reason not to try it, especially seeing as the OEM manifold paint jobs aren't known for their longevity.

Scooby Regular
Joined: Nov 2001
Posts: 15,239
Likes: 1
From: Leeds - It was 562.4bhp@28psi on Optimax, How much closer to 600 with race fuel and a bigger turbo?
if you see over 100 deg c on your inlet manifiold then you have problems, look at it that way!!.
Im not saying without etch primer wont work, its just I was taught.. (sp) do it right, do it once.
David
Im not saying without etch primer wont work, its just I was taught.. (sp) do it right, do it once.
David
David,
I think you may be right on this one!!
PJ1 coatings that manufacture the wrinkle paint have emailed me back to say that a primer suitable for use on aluminium is recommended.
Thanks for the help.
Wayne.
I think you may be right on this one!!
PJ1 coatings that manufacture the wrinkle paint have emailed me back to say that a primer suitable for use on aluminium is recommended.
Thanks for the help.
Wayne.

Scooby Regular
Joined: Nov 2004
Posts: 1,959
Likes: 0
From: In a 405 BHP/360 ft/lb P1 with SN superstar Sonic dog at my side!
Nice one Carl, great job
I do these for a 'well known subaru specialist' as well as in an ongoing group buy on another forum
i use the same paint, with no etch primer. normally sand blast or acid dip but i have used a industrial paint stripper before with good results (found nitromoors not particularly good and expensive.) and then jet wash. i think i need to get a dishwasher
You get the best results if you can stick the manifold in an oven first and get a bit of heat in it. as you say the more paint the more wrinkle but it gets to the point where it starts to look a bit OTT.
I do one coat (1 manifold takes about 2/3 ds of a can for proper coverage). I have done maybe 25 now, and one has been on my own engine for over a year including many washes with Jizer/gunk etc and its still as good as new.
http://img.photobucket.com/albums/v331/p1mark/man1.jpg
http://img.photobucket.com/albums/v331/p1mark/man2.jpg
http://img.photobucket.com/albums/v331/p1mark/man3.jpg
http://img.photobucket.com/albums/v331/p1mark/man4.jpg
and a year after on my car.
http://img.photobucket.com/albums/v331/p1mark/pow1.jpg

Scooby Regular
Joined: Feb 2003
Posts: 21,611
Likes: 0
From: Zed Ess Won Hay Tee
Originally Posted by Tim W
Try getting it on the underside of your arms...man it burns...
marigold gloves and then putting your hand in the bucket of goop makes them feel "warm" LOL

here is a pic of mine done with white smoothrite, my manifold is insulated so shouldn't get too hot a friend of mine done his with the same stuff (but blue) around 2 years ago and it still looks as good as the day he did it!
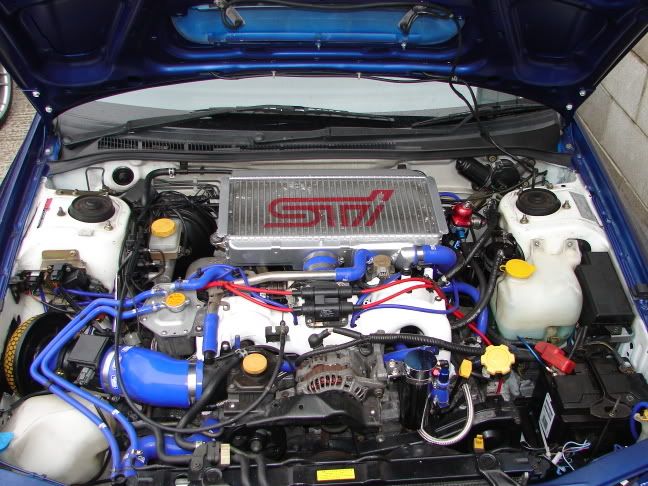
a friend of mine done his with the same stuff (but blue) around 2 years ago and it still looks as good as the day he did it!

Thread Starter
Scooby Regular
iTrader: (3)
Joined: Oct 2002
Posts: 2,787
Likes: 0
From: Aberdeenshire
My normal approach would've been to grit blast but i wanted a guide that anyone could follow that didn't require specialist techniques.
After doing that MY00 manifold i went and bought a MY98 car... d'oh! So i did a couple more manifolds including a Phase 1.5...

Excuse the tatty fuel rail. Will hopefully be fitting it within the next few weeks although i've a long way to go before my engine is as tidy as yours Mark.
After doing that MY00 manifold i went and bought a MY98 car... d'oh! So i did a couple more manifolds including a Phase 1.5...
Excuse the tatty fuel rail.
Will hopefully be fitting it within the next few weeks although i've a long way to go before my engine is as tidy as yours Mark.

That wrinkle finish paint from Frost is great, but it coat most of my garage when I did this!!

And yes I am aware the rest of the engine bay needs 'something', but it's now down to my brother!
And yes I am aware the rest of the engine bay needs 'something', but it's now down to my brother!


 white would of matched my exhaust system...

