PhotoShop addvice please. crop and paste
 28 May 2007, 10:27 AM
#1
Scooby Senior
Thread Starter
if I want to crop/cut out a pic of my car from a photo, whats the best way to cut around the object, which lassoo (sp) setting do i pick?
do you roughly lassoo cut around the object, then re lassoo around that so you can COPY it, then paste it onanother picture, then erase the rough edges of the car to show the new background through?
Is blowing up/enlarging it to a big picture the better way to see what edge you erase out?
SJSkyline did show me, but I've forgot how to do it as he did it so quick lol
Phil
 28 May 2007, 11:38 AM
#3
Scooby Regular

Join Date: Nov 2005
Location: London, UK
Posts: 623
Likes: 0
Received 0 Likes
on
0 Posts
I personally use the pen tool... especially if it is a hardlines object. Zoom in to your hearts content.
I only really use the lassoo for rough cutting and pasting
But thats me
I only really use the lassoo for rough cutting and pasting
But thats me
28 May 2007, 11:43 AM
#4
Scooby Senior
Thread Starter
so you can use the pen to draw around the object then cut it out?
28 May 2007, 11:50 AM
#5
Scooby Regular

I use the pen tool
This is a good tutorial on using the pen tool to cutout objects
How to use Photoshop's Pen Tool - Online Tutorial at Melissa Clifton page 1
This is a good tutorial on using the pen tool to cutout objects
How to use Photoshop's Pen Tool - Online Tutorial at Melissa Clifton page 1
28 May 2007, 10:10 PM
#6
Scooby Senior
Thread Starter
tnx, i've tried that link and came up with this..
quick play on PS... that actualy hours!!
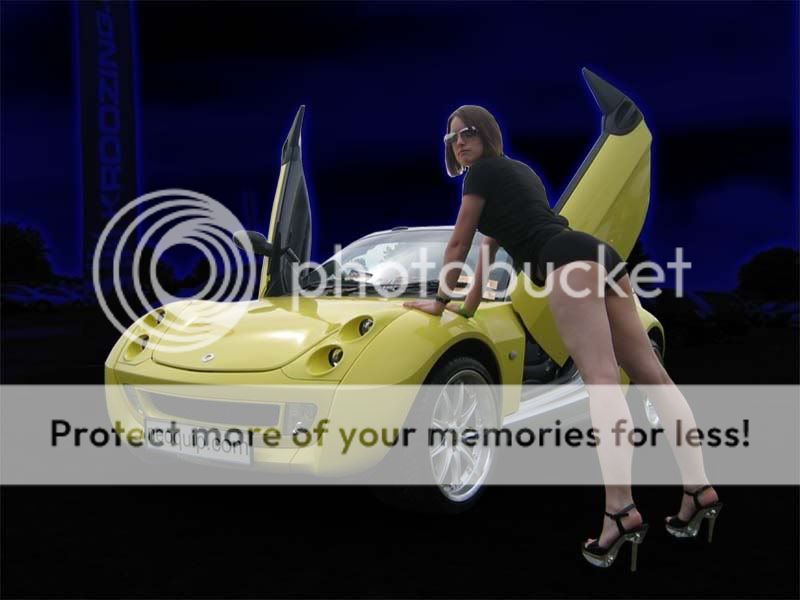
took a while tho, but I'm getting the idea
what you think?
quick play on PS... that actualy hours!!
took a while tho, but I'm getting the idea
what you think?
28 May 2007, 10:32 PM
#7
Scooby Regular
Join Date: Nov 2002
Location: Talk to the hand....
Posts: 13,331
Likes: 0
Received 0 Likes
on
0 Posts
Err, I think that's a bloke in drag?
Seriously though, you need to crop your selection more to get rid of the 'halo'.
There are some really good tutorials on that website. I'm going to try some line drawing, I've always wondered how that's done in Photoshop. Will post the results....
Seriously though, you need to crop your selection more to get rid of the 'halo'.
There are some really good tutorials on that website. I'm going to try some line drawing, I've always wondered how that's done in Photoshop. Will post the results....
Trending Topics
28 May 2007, 11:01 PM
#8
Scooby Regular
Join Date: Nov 2005
Location: London, UK
Posts: 623
Likes: 0
Received 0 Likes
on
0 Posts
Pen is the best for me as you can get in really close and adjust all of the anchor points and lines.
If you just just go around and click the points in the anchors won't be adjustable... if when you put the anchor in you drag the point slightly before releasing the mouse button, two control arms will appear which will mean that the line can be adjusted.
Might not make any sense.. give it and some tutorials a blast
28 May 2007, 11:04 PM
#9
Scooby Regular
Join Date: Nov 2002
Location: Talk to the hand....
Posts: 13,331
Likes: 0
Received 0 Likes
on
0 Posts
 28 May 2007, 11:13 PM
#10
SN Fairy Godmother

Join Date: Nov 2003
Location: Far Far Away
Posts: 35,246
Likes: 0
Received 0 Likes
on
0 Posts
oooh, Glad I've seen this
How do I take a pic and get rid of all but the heads, does that make sense
I don't want to use the heads for anything, just take away everthing else, TIA
How do I take a pic and get rid of all but the heads, does that make sense
I don't want to use the heads for anything, just take away everthing else, TIA
28 May 2007, 11:16 PM
#11
Scooby Regular
Join Date: Nov 2002
Location: Talk to the hand....
Posts: 13,331
Likes: 0
Received 0 Likes
on
0 Posts
I tried the 'turn any photograph into a line drawing' tutorial earlier. Cropped my Greeves engine from a photograph, and followed the proceedure. Worked great, just like a pen and ink render you might see in any manual.

I can make use of this.
I can make use of this.
 28 May 2007, 11:21 PM
#15
Scooby Regular
Join Date: Nov 2005
Location: London, UK
Posts: 623
Likes: 0
Received 0 Likes
on
0 Posts
Well 84.. you can either do some pen work around the heads... make a selection.. then invert the selection then delete... that should leave all but the heads.
or you can mask the heads off and take the eraser to the entire image...
or you can mask the heads off and take the eraser to the entire image...
28 May 2007, 11:22 PM
#16
SN Fairy Godmother
Join Date: Nov 2003
Location: Far Far Away
Posts: 35,246
Likes: 0
Received 0 Likes
on
0 Posts
Could you, err, sort of, do it in stages 1,2,3 please, ta
 28 May 2007, 11:41 PM
#17
Scooby Regular
Join Date: Nov 2002
Location: Talk to the hand....
Posts: 13,331
Likes: 0
Received 0 Likes
on
0 Posts
28 May 2007, 11:49 PM
#18
Scooby Regular
Join Date: Nov 2005
Location: London, UK
Posts: 623
Likes: 0
Received 0 Likes
on
0 Posts
Am afraid I haven't used the program in while :/
The tutorial Avi posted a link to should be a good help. Basically follow that tutorial...
Make a selection as it says in the end... then either right click and highlight invert selection... or go up to the menu and the invert selection should be there somewhere ...
Hit delete then that should just leave you with the heads....
Sorry.. it has been a while since I have used it and very rusty
29 May 2007, 12:48 AM
#21
SN Fairy Godmother
Join Date: Nov 2003
Location: Far Far Away
Posts: 35,246
Likes: 0
Received 0 Likes
on
0 Posts
29 May 2007, 07:12 AM
#22
Scooby Senior
Thread Starter
Err, I think that's a bloke in drag?
Seriously though, you need to crop your selection more to get rid of the 'halo'.
There are some really good tutorials on that website. I'm going to try some line drawing, I've always wondered how that's done in Photoshop. Will post the results....
Seriously though, you need to crop your selection more to get rid of the 'halo'.
There are some really good tutorials on that website. I'm going to try some line drawing, I've always wondered how that's done in Photoshop. Will post the results....
what Halo do you mean, i used the pen and even pulled tighter on the ancor points too with the cursor too. like in that website 'how to'
29 May 2007, 10:19 PM
#23
Scooby Regular
Join Date: Nov 2002
Location: Talk to the hand....
Posts: 13,331
Likes: 0
Received 0 Likes
on
0 Posts
That's what all the 'boys' say... 
There's a kind of white band around her head, upper body, and the rh car door and wing mirror IIRC. It would help to sort that out. Did I notice you added a blue outline around it? That would work better IMO if the above was sorted out.
There's a kind of white band around her head, upper body, and the rh car door and wing mirror IIRC. It would help to sort that out. Did I notice you added a blue outline around it? That would work better IMO if the above was sorted out.
29 May 2007, 10:27 PM
#24
Scooby Senior
Thread Starter
that might be a little of the original pic it cut from, ie: the background/sky around the hair.
i used the FILTER to get the blue/neon effect on the background
I then pasted the car/girl over the layer 1, then did the effect on layer 1, keeping the car/girl as layer 2 separate.
i used the FILTER to get the blue/neon effect on the background
I then pasted the car/girl over the layer 1, then did the effect on layer 1, keeping the car/girl as layer 2 separate.
29 May 2007, 10:29 PM
#25
Scooby Regular
Join Date: Nov 2002
Location: Talk to the hand....
Posts: 13,331
Likes: 0
Received 0 Likes
on
0 Posts
Had a quick play with the Pen Tool earlier and came up with this - based on an image of my former girlfriend..

Quite pleased so far. Will update as I add more detail.
Quite pleased so far. Will update as I add more detail.
29 May 2007, 10:31 PM
#26
Scooby Senior
Thread Starter
how did you do it?
29 May 2007, 10:58 PM
#27
Scooby Regular
Join Date: Nov 2002
Location: Talk to the hand....
Posts: 13,331
Likes: 0
Received 0 Likes
on
0 Posts
 29 May 2007, 11:35 PM
#29
Scooby Regular
Join Date: Nov 2002
Location: Talk to the hand....
Posts: 13,331
Likes: 0
Received 0 Likes
on
0 Posts
 29 May 2007, 11:50 PM
#30
Scooby Regular

Join Date: Oct 2001
Location: ....
Posts: 6,621
Likes: 0
Received 0 Likes
on
0 Posts
Feckin' hell, Phil!
I know I haven't seen you for years but there's NO way I'd recognise you now......you never had legs that manly before, and as for that ****.....
I know I haven't seen you for years but there's NO way I'd recognise you now......you never had legs that manly before, and as for that ****.....