Pic request - Engine bay boost gauge fittting
 16 September 2011, 09:02 AM
#1
Scooby Regular
Thread Starter
iTrader: (8)

Join Date: Sep 2002
Location: Fife - Scotland
Posts: 4,455
Likes: 0
Received 0 Likes
on
0 Posts
Guys soon be fitting a new set off gauges within my 2005 blobeye and although I have all the information etc and feel fine about carrying out the job just wonder if anyone here could help me out by taking a couple off close up pictures off there engine bay and showing exactly where on the blobeye you mounted the sender unit for the boost gauge as well as exactly where the T piece went ??
appreciatte its probably not the pictures most folk take ??!! so again would really appreciatte if anyone here who has fitted a electrical type boost gauge in the blobeye could possibly take a few pictures and share with me- just makes things a bit easier !!
cheers guys.
john
appreciatte its probably not the pictures most folk take ??!! so again would really appreciatte if anyone here who has fitted a electrical type boost gauge in the blobeye could possibly take a few pictures and share with me- just makes things a bit easier !!
cheers guys.
john
 16 September 2011, 09:18 AM
#3
Scooby Regular
Thread Starter
iTrader: (8)
Join Date: Sep 2002
Location: Fife - Scotland
Posts: 4,455
Likes: 0
Received 0 Likes
on
0 Posts
Morning mate and thanks for the quick reply !!
yep electrical Prosport premier, you got a blobeye yep ?? so yes if you could manage that again would be very much appreciatted, might even pick your brains regards where you wired the boost gauge to and how easy it was to get the wires thru ?? going to be running a side pillar pod.
thanks again.
yep electrical Prosport premier, you got a blobeye yep ?? so yes if you could manage that again would be very much appreciatted, might even pick your brains regards where you wired the boost gauge to and how easy it was to get the wires thru ?? going to be running a side pillar pod.
thanks again.


 16 September 2011, 11:21 AM
#7
Scooby Regular
Thread Starter
iTrader: (8)
Join Date: Sep 2002
Location: Fife - Scotland
Posts: 4,455
Likes: 0
Received 0 Likes
on
0 Posts
Okay sorry mate with you now !! just a bit confused as that looks as if its all new tubing there as opposed to just taping into the original pipe that should / will be there on my wrx blobeye ??
Trending Topics
16 September 2011, 11:40 AM
#8
Scooby Regular

Join Date: Sep 2011
Location: Ipswich
Posts: 1,041
Likes: 0
Received 0 Likes
on
0 Posts
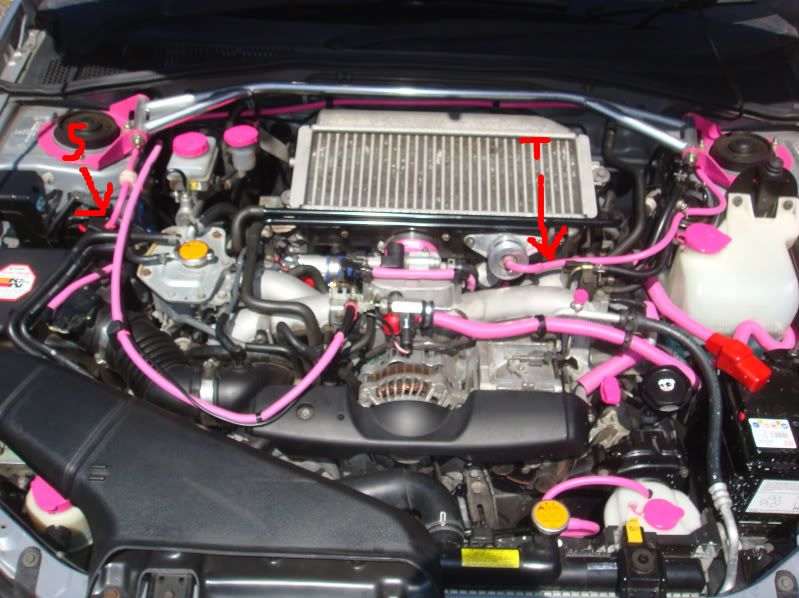
Ok mate. The blue pipes look new and it goes into the headers to. Don't know why. Only wish I could help more. I'm not sure what the pipe work that leads off the the left is going into either.
16 September 2011, 11:56 AM
#9
Scooby Regular
Thread Starter
iTrader: (8)
Join Date: Sep 2002
Location: Fife - Scotland
Posts: 4,455
Likes: 0
Received 0 Likes
on
0 Posts
Not a problem mate, no appreciatte your help anyway thanks again for that.I think that whole area shown is new and its not on my wrx ??
anyone else advise with pictures off where to take the T piece on the blobeye wrx ??
anyone else advise with pictures off where to take the T piece on the blobeye wrx ??
16 September 2011, 12:38 PM
#10
Scooby Regular
iTrader: (10)
Join Date: Nov 2010
Location: Bristol
Posts: 1,391
Likes: 0
Received 0 Likes
on
0 Posts
I have prosport premium boost gauge on my 2005 wrx.
I have T'd into hose coming of dump valve. Ran the hose around the back of the engine along firewall and mounted sender on black bracket on strut near header tank.
Wire goes through grommet by brake servo and comes through above clutch pedel.
I'll see if i got any pics.
I have T'd into hose coming of dump valve. Ran the hose around the back of the engine along firewall and mounted sender on black bracket on strut near header tank.
Wire goes through grommet by brake servo and comes through above clutch pedel.
I'll see if i got any pics.
 16 September 2011, 01:36 PM
#12
Scooby Regular
Thread Starter
iTrader: (8)
Join Date: Sep 2002
Location: Fife - Scotland
Posts: 4,455
Likes: 0
Received 0 Likes
on
0 Posts
Thats excellent mate really do appreciatte that as again makes it so much easier to carry out the job.
taking it you wired your gauges to the rear off the stereo unit, easy enough to get to the back ie. remove stereo and tap into marked wiring ??
lastly how do you find the Prosport premiums- accurate / quiet enough in operation ?? you got them mounted pilar or dash - any pics off them fited ??
thanks again anyway guys appreciatte that.
john
P.s this the type off boost pipe I would require- is it 6mm for the prosport sender gauge ?
http://www.ebay.co.uk/itm/6mm-Blue-S...item4aadc94d8a
Last edited by jono300; 16 September 2011 at 02:03 PM.
16 September 2011, 03:26 PM
#13
Scooby Regular
Join Date: Sep 2011
Location: Ipswich
Posts: 1,041
Likes: 0
Received 0 Likes
on
0 Posts
Centre mounted. Not the best pic.
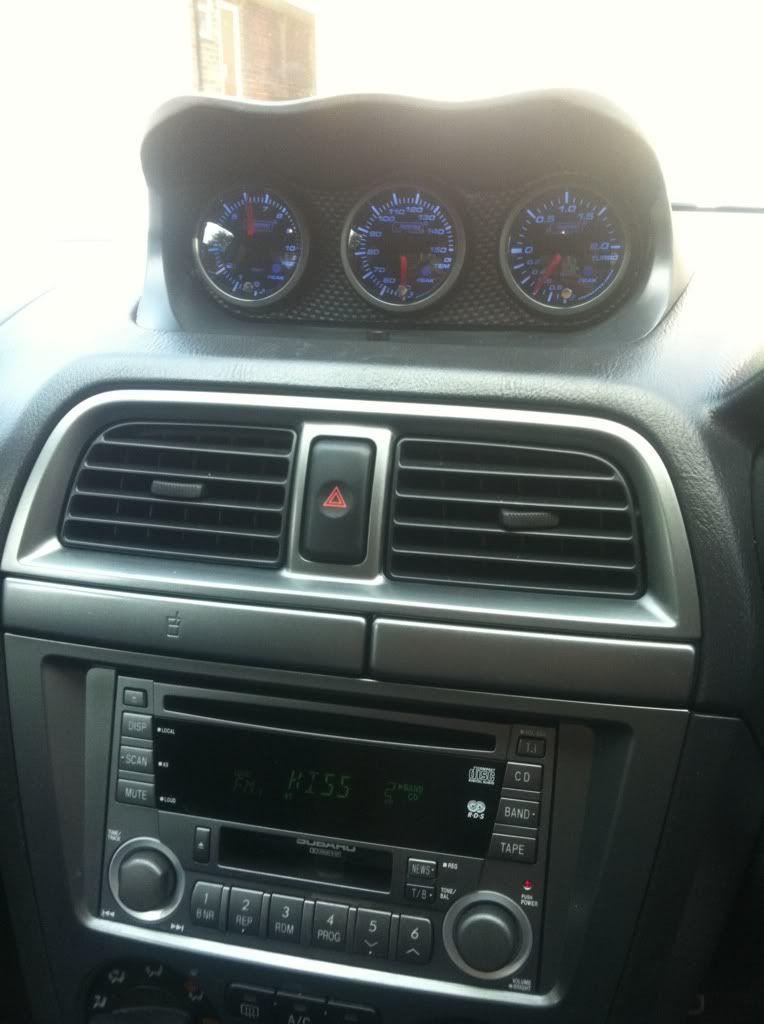
Excellent gauges. I have no problem and can't hear them at all, apart from the start up beep and the warning beeps, such as low oil pressure.
Excellent gauges. I have no problem and can't hear them at all, apart from the start up beep and the warning beeps, such as low oil pressure.
16 September 2011, 04:19 PM
#14
Scooby Regular
Thread Starter
iTrader: (8)
Join Date: Sep 2002
Location: Fife - Scotland
Posts: 4,455
Likes: 0
Received 0 Likes
on
0 Posts
Okay thanks yep like that, was going to go for a centre pod but was very expensive for anything half decent such as the ati pod etc, so decided to go for a quality side mounted pod instead.
just ned to order the 2 x 52mm gauges and get a length off tubing, you any idea if it is 6mm as in the above link for the T piece / sender gauge on the Prosport gauges ??
cheers
just ned to order the 2 x 52mm gauges and get a length off tubing, you any idea if it is 6mm as in the above link for the T piece / sender gauge on the Prosport gauges ??
cheers
16 September 2011, 05:37 PM
#15
Scooby Regular
iTrader: (10)
Join Date: Nov 2010
Location: Bristol
Posts: 1,391
Likes: 0
Received 0 Likes
on
0 Posts
I've just put my on the dash. I've been thinking about a pod but i don't want to lose the clock:

You can turn off the start-up screech, which is good cos its bloody loud with 3 of them. They are very quiet when in use, i can't usually hear them at all.
For the wiring i used fuse taps (add-a-circuit) from the fuse box inside and ran the wires up under the dash.
That hose will be fine. I used 5mm but its the same difference for silcone vacuum hose as its stretchy.
They seem to read well. The in-line filter stops the boost gauge jumping about like i've seen others do.
I'm very happy with them but it has just started reading 2bar on occasion, which is impossible but i haven't found out why yet. Probably not the gauge tho, need to check all my connections.
16 September 2011, 09:09 PM
#18
Scooby Newbie

Join Date: Sep 2011
Location: stoke on trent
Posts: 2
Likes: 0
Received 0 Likes
on
0 Posts
hello people im new on here and need some help! ive got a turbo 2000 running 310 bhp verry soon to be 370! and i need a v6 spoiler can any1 help i joined this fourum the other day but have never been on a fourum in my life and dont know how to post my own thread fing lol also after a front mount cheers sean.
16 September 2011, 09:17 PM
#20
Scooby Regular
iTrader: (10)
Join Date: Nov 2010
Location: Bristol
Posts: 1,391
Likes: 0
Received 0 Likes
on
0 Posts
L&G, with the engine off, hold the button down and turn the key until the gauges light up and sweep. Keep holding it until opening ceremony finishes and the screech is now off.
Only thing is, it comes back if you cut the power to them (eg disconnect the battery).
I beat the stig, Go the wanted section and at the top there is a button saying "New Thread". You have to be a paid member to post in wanted tho. If you need more help post in the help section.
Only thing is, it comes back if you cut the power to them (eg disconnect the battery).
I beat the stig, Go the wanted section and at the top there is a button saying "New Thread". You have to be a paid member to post in wanted tho. If you need more help post in the help section.
16 September 2011, 09:58 PM
#21
Scooby Regular
Thread Starter
iTrader: (8)
Join Date: Sep 2002
Location: Fife - Scotland
Posts: 4,455
Likes: 0
Received 0 Likes
on
0 Posts
I've just put my on the dash. I've been thinking about a pod but i don't want to lose the clock:
You can turn off the start-up screech, which is good cos its bloody loud with 3 of them. They are very quiet when in use, i can't usually hear them at all.
For the wiring i used fuse taps (add-a-circuit) from the fuse box inside and ran the wires up under the dash.
That hose will be fine. I used 5mm but its the same difference for silcone vacuum hose as its stretchy.
They seem to read well. The in-line filter stops the boost gauge jumping about like i've seen others do.
I'm very happy with them but it has just started reading 2bar on occasion, which is impossible but i haven't found out why yet. Probably not the gauge tho, need to check all my connections.
Okay will order that hose or similar then, is there a bset way to fit it to the T piece ie heat it up to expand and when it cools down it will fit tighter or okay just to cut the original pipe fit t piece and jobs done ??!!
anyway again thanks for that guys youv`e all been very helpful appreciatte that.
 17 September 2011, 11:03 AM
#24
Scooby Regular
Join Date: Sep 2011
Location: Ipswich
Posts: 1,041
Likes: 0
Received 0 Likes
on
0 Posts
Cheers, I'm off to give that a try right now
17 September 2011, 05:52 PM
#27
Scooby Regular
Thread Starter
iTrader: (8)
Join Date: Sep 2002
Location: Fife - Scotland
Posts: 4,455
Likes: 0
Received 0 Likes
on
0 Posts
Guys just a quick one as come down with man flu !! if wiring in via the clock on the blobeye did someone say the wires are all marked ??
clock unit easy enough to remove to get to the back ??
DonNedly you say " For the wiring i used fuse taps (add-a-circuit) from the fuse box inside and ran the wires up under the dash "
is this just another way off wiring the gauge up ie you tap into the fuse box rather than via the clock, if so is this easy enough done as well ??
Last edited by jono300; 17 September 2011 at 05:56 PM.
18 September 2011, 11:30 PM
#29
Scooby Regular
iTrader: (10)
Join Date: Nov 2010
Location: Bristol
Posts: 1,391
Likes: 0
Received 0 Likes
on
0 Posts
DonNedly you say " For the wiring i used fuse taps (add-a-circuit) from the fuse box inside and ran the wires up under the dash "
is this just another way off wiring the gauge up ie you tap into the fuse box rather than via the clock, if so is this easy enough done as well ??
The fuses i tapped were:
door locks for constant power
Air con for ignition power
side lights for illum power
and earthed to the chassis
18 September 2011, 11:33 PM
#30
Scooby Regular
iTrader: (10)
Join Date: Nov 2010
Location: Bristol
Posts: 1,391
Likes: 0
Received 0 Likes
on
0 Posts
This guy posted a pretty good guide. Its for a classic but the principal is the same.
https://www.scoobynet.com/interior-1...and-boost.html
https://www.scoobynet.com/interior-1...and-boost.html