
DIY WRX -> STi headlight leveling converter


Thread Starter
Scooby Regular
Joined: Jan 1999
Posts: 113
Likes: 0
From: Rotterdam, NL
As some of you know already, I've been building a converter for getting the STi headlight leveling to work in standard WRX. This involves making an electronic circuit that converts the 3-wire leveling system to the 6-wire one used in STi.
I have now tested my circuit and it seems to be working. I'm still missing the necessary connectors to actually put it into the car but I figured I start the DIY thread at this time because I'm fairly confident that the circuit works fine in the car as well.
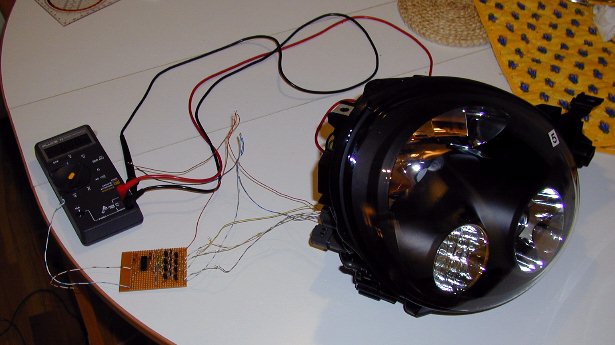
And as a little teaser here is a picture of my testing setup. I said I don't have the necessary connectors yet so all wires are kind of loose...
I have now tested my circuit and it seems to be working. I'm still missing the necessary connectors to actually put it into the car but I figured I start the DIY thread at this time because I'm fairly confident that the circuit works fine in the car as well.
And as a little teaser here is a picture of my testing setup. I said I don't have the necessary connectors yet so all wires are kind of loose...
Thread Starter
Scooby Regular
Joined: Jan 1999
Posts: 113
Likes: 0
From: Rotterdam, NL
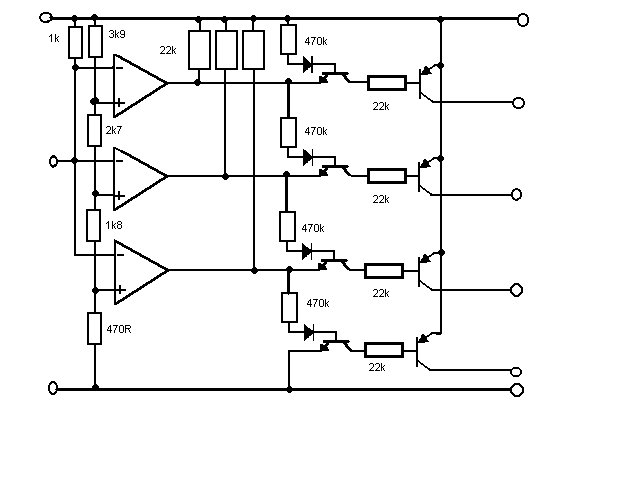
Here's the schematic diagram of the converter circuit. The incoming wires from left are the WRX 3 wires and the outgoing on the right are STi lights 6 wires. Top wire is +12V and bottom is ground.


Thread Starter
Scooby Regular
Joined: Jan 1999
Posts: 113
Likes: 0
From: Rotterdam, NL
No "Radio 1" or any other radio stations either. 
But the comparator IC (the 3 triangles) is very sensitive. Without the 1k pull-up resistor just touching the input wire made the headlight move...
But the comparator IC (the 3 triangles) is very sensitive. Without the 1k pull-up resistor just touching the input wire made the headlight move...
Thread Starter
Scooby Regular
Joined: Jan 1999
Posts: 113
Likes: 0
From: Rotterdam, NL
Parts list:
1 x LM339 (Comparator IC)
4 x BC547 (NPN transistor)
4 x BC557 (PNP transistor)
4 x 1N4001 (Diode)
7 x 22k resistor
4 x 470k resistor
1 x 3k9 resistor
1 x 2k7 resistor
1 x 1k8 resistor
1 x 470R resistor
1 x 1k 1/2W resistor
1 x printed circuit board
1 x suitable box for the whole thing
Connectors and some wire
The total cost for all the parts is about 10-20EUR (Depends a lot where you buy them).
I used a circuit board which has copper stripes and pre-drilled holes on it. This is easier than trying to make a board yourself.

Thread Starter
Scooby Regular
Joined: Jan 1999
Posts: 113
Likes: 0
From: Rotterdam, NL
This is for manual adjustment. Automatic would require a lot more stuff and not just generic electronic components. The load sensors on the suspension would be a bit more difficult to DIY...
This circuit just converts the standard WRX leveling (3 wires) to the one (6 wires) used in STi7 headlights. This means that you can install STi headlights on WRX and use the existing adjuster and wiring loom installed in the car.
This circuit just converts the standard WRX leveling (3 wires) to the one (6 wires) used in STi7 headlights. This means that you can install STi headlights on WRX and use the existing adjuster and wiring loom installed in the car.
Trending Topics

Scooby Regular
Joined: May 2003
Posts: 212
Likes: 0
Jah,
Did you get this levelling system installed in your WRX? Does it work ok as your prototype?
Do you want to make another?
As an aside: Did you find a supplier for an H4 Connector for connecting the High/Low beams to the existing H4 connector on the WRX loom.
I have been unable to do soanywhere and as such have moulded some from ISOPON P38 body filler. It works fine as long as you:
a)Lightly grease the connector you are moulding around (to create a barrier between surfaces)
b)Prefill any holes in the connector that will cause the mould to set in such a way that you cant remove it.
b)Extract the connector from the mould just before it sets solid.
I am going to do the same with the levelling switch.
For the terminations into the STI Light unit connector - Tyco electronics - automotive connectors - Econoseal connectors.
The internals of these connectors fit the STI connector but finding a connector body seems to be impossible.
nick
Thread Starter
Scooby Regular
Joined: Jan 1999
Posts: 113
Likes: 0
From: Rotterdam, NL
Yes I have this installed in my WRX and it works fine.
I used a rather similar method of creating connectors for the bulbs. I used standard 2.8mm flat connectors, wrapped them in electrical shrink wrap for insulation, pushed the individual pins into the connector and fixed them together with 2-component epoxy glue. Does not look pretty but works fine.
For H4 you can use the 6.3mm flat connectors. One possibility is to drill suitable holes into a piece of circuit board and glue them into that. Or just use 3 separate connectors but then you'd have to always remember which one goes where...
I got the 6-pin connectors from a dealer, those would have been difficult to make.
Thread Starter
Scooby Regular
Joined: Jan 1999
Posts: 113
Likes: 0
From: Rotterdam, NL
Nick,
I'm no electrician either... This is relatively easy to make. You need some parts from local electronics store, some soldering skills and spare time. Or a friend with soldering skills and spare time. All the parts are readily available and cheap.
You only need one of these circuits, it can control both headlights.
The most time-consuming thing is making the actual circuit board.
I'd rather not get into building one for someone else mainly because of the trouble associated with payment for the parts and worries what happens if it does not work.

Thread
Thread Starter
Forum
Replies
Last Post
user 46373939
ScoobyNet General
6
Sep 17, 2015 03:51 PM