

Inlet manifold removal


Scooby Regular
Joined: Jun 2006
Posts: 1,568
Likes: 0
From: South West
If you have a samco hose to fit, you can fit it in place without removal - I've done this twice, once with a standard size samco and the last time with a Hybrid, fitting the Hybrid took hours with alot of blood spills and pain.
If you have a new age, you just need to break off a couple of the rigid plastic stubs and pull the old oe pipe out, then refit with the easier and flexi samco job.
If you have a new age, you just need to break off a couple of the rigid plastic stubs and pull the old oe pipe out, then refit with the easier and flexi samco job.
This is what I have to fit
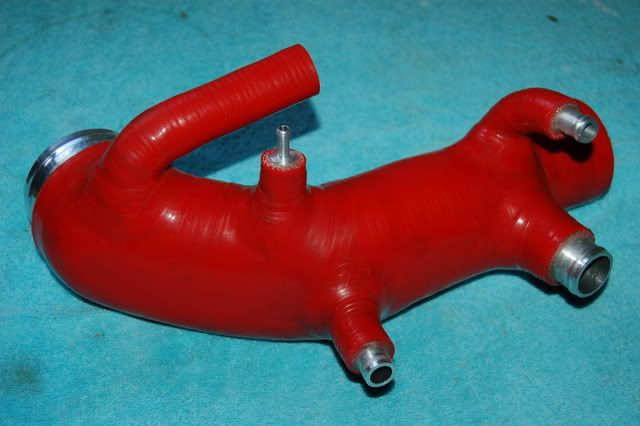
I just cant see how I can fit it without manifold removal, the turbo end looks too big to fit through the gap under the manifold
besides while the manifold is off I can repaint it
I just cant see how I can fit it without manifold removal, the turbo end looks too big to fit through the gap under the manifold
besides while the manifold is off I can repaint it
Last edited by CupraDave; Jul 31, 2007 at 01:09 PM.

Scooby Regular
Joined: Aug 2005
Posts: 3,957
Likes: 1
From: East coast.
LOL Dave, I wrote a thread on it somewhere, you should be able to search for it? It was a warning NOT to try it with the manifold in place. Seriously, just don't bother. I promise you will thank me.
Anyway, here goes:
1. Remove IC, battery, plug leads, coil.
2. Remove airbox top (or induction kit) & MAF with pipe.
3. Disconnect and label just about every single vacuum hose and electrical plug that's hooked up to the IM.
4. Drain and remove header tank.
5. Drain and remove power steering tank. The bolts that hold it down are, bizarrely, INSIDE the tank itself i.e. submerged under the PS fluid, hence why you need to drain it first with a syringe.
5.5 Remove ancillaries like idle valve and throttle body if you want, makes things a little easier at the end.
6. Disconnect all four injectors & fuel hoses on passenger side (carefully). Also the small bore hoses that go to the charcoal canister (behind offside headlight)
7. Disconnect engine breather hoses if you haven't already (top of rocker covers, between turbo and IM)
8. Disconnect and label anything else that looks like it will cause a problem.
9. Undo four bolts each side that hold IM down onto heads and wiggle it off.
10. You may find it not wanting to come off. This will be either it fouling a little on the inlet pipe-turbo joint or on the water pipe under the header tank. Either way wangle it a little and it will come off.
11. Block up your inlet ports on your heads with clean cloths or cover with gaffer tape and that's it.
First time I did it, it took 3 evenings. Last time I did it in one afternoon.
Trending Topics
Scooby Regular
Joined: Jun 2006
Posts: 1,568
Likes: 0
From: South West
Mine was a new age so can only advise on that - I'd do a oe size samco hose fitting again, all I had to do was rotate the hose a little as I pushed it into the gap under the manifold. I'd def not do a hybrid again though, almost killed me doing that one!
Scooby Regular
Joined: Aug 2005
Posts: 3,957
Likes: 1
From: East coast.
No problem, I hope it's useful, there's probably something I've forgotten, and it doesn't necessarily have to be in that exact order. One more time just in case:
DON'T TRY REPLACING YOUR TURBO INLET PIPE WITHOUT REMOVING THE INLET MANIFOLD FIRST!
DON'T TRY REPLACING YOUR TURBO INLET PIPE WITHOUT REMOVING THE INLET MANIFOLD FIRST!


Scooby Regular
Joined: Aug 2005
Posts: 3,957
Likes: 1
From: East coast.
Well it's not actually that bad a job at all. It's just one of those ones that takes a bit of time to do and you definitely have to be methodical. But I'm no mechanic, it's just that I can keep my car in the garage with all my tools to hand, which makes things a lot easier. I wouldn't want to do it outdoors on my drive, even in good weather. You need plenty of room to store bits and pieces as you take them off.
Well it's not actually that bad a job at all. It's just one of those ones that takes a bit of time to do and you definitely have to be methodical. But I'm no mechanic, it's just that I can keep my car in the garage with all my tools to hand, which makes things a lot easier. I wouldn't want to do it outdoors on my drive, even in good weather. You need plenty of room to store bits and pieces as you take them off.
Will get my paints ordered up from Frost, and also the new manifold gaskets (when I find somewhere to get them from) before even thinking about taking the car to bits.

Scooby Regular
Joined: Mar 2007
Posts: 539
Likes: 0
From: The right side of 30psi


Scooby Regular
Joined: Nov 2006
Posts: 579
Likes: 0
From: Fermanagh/Tyrone
Also didnt need to take my PS tank off - classic.
As stated, plenty of time and space necessary. There's a step by step guide in the subaru manual (set on my windscreen ), which is handy for reference.

P.s obviously no need to remove lights/bumper/wings - I did to fit FMIC.
As stated, plenty of time and space necessary. There's a step by step guide in the subaru manual (set on my windscreen
), which is handy for reference.P.s obviously no need to remove lights/bumper/wings - I did to fit FMIC.
Scooby Regular
Joined: Nov 2006
Posts: 579
Likes: 0
From: Fermanagh/Tyrone
Scooby Regular
Joined: Aug 2005
Posts: 3,957
Likes: 1
From: East coast.
No, you don't HAVE to. I just find that for the extra 10 minutes that it takes me, it gives a lot more clearance with the way I work over the engine bay. Plus I'm usually doing other jobs when removing the inlet manifold; realigning breather hoses, adjusting my oil pressure sender etc.
There are lots of things you don't have to do on my list at all. Having now done it 3 times though, I personally have settled on spending a few extra minutes here and there on preparing the surroundings which make jobs to come easier.
There are lots of things you don't have to do on my list at all. Having now done it 3 times though, I personally have settled on spending a few extra minutes here and there on preparing the surroundings which make jobs to come easier.

Thread
Thread Starter
Forum
Replies
Last Post
Mattybr5@MB Developments
Full Cars Breaking For Spares
28
Dec 28, 2015 11:07 PM
Mattybr5@MB Developments
Full Cars Breaking For Spares
12
Nov 18, 2015 07:03 AM