MY06 STI - fitting defi's


 29 December 2006, 08:14 PM
#3
Scooby Regular

Join Date: Aug 2005
Location: Bebind the wheel of my red rice rocket
Posts: 5,585
Likes: 0
Received 0 Likes
on
0 Posts
Originally Posted by ScrappyDoo2
Power from the clock or the radio, and there's a rubber blanking cap near where the accelerator cable comes through the bulkhead towards the turbo
29 December 2006, 08:27 PM
#4
Scooby Regular
iTrader: (2)

Join Date: Oct 2002
Location: oop north in a spec-c.Now sold and starting on a classic ra track/sprint/road car
Posts: 2,536
Likes: 0
Received 7 Likes
on
7 Posts
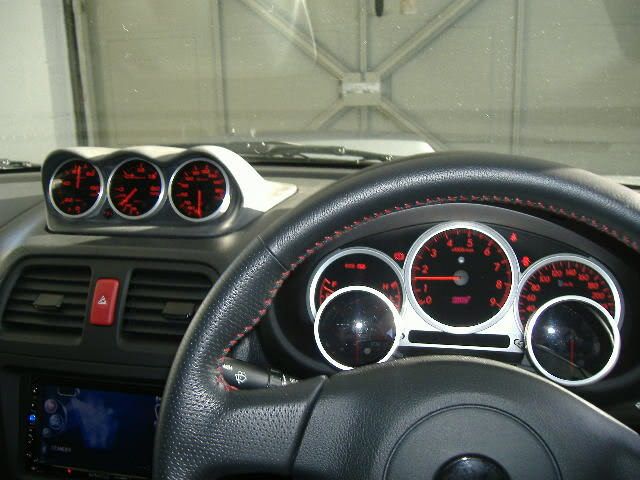
rb5 286,Just fitted some defi amber bf's this week to mine I used the clock for the power etc I fed all my control wires from the sensors thro the rubber gromit on the passenger side where the main cable goes thro the bulkhead and fed them over the tunnel behind the radio and into the defi controller the reason I did it that way is because the area where pippyrips is on about is very close to the Turbo which gets very hot and after problems with my last car in that area this time I decided to take no chances.
29 December 2006, 09:00 PM
#5
Scooby Regular

Join Date: May 2006
Posts: 379
Likes: 0
Received 0 Likes
on
0 Posts
Originally Posted by rb5 286
has anyone done this?
just wondering if there is somewhere on the bulkhead that I can thread the boost guage piping thru to the engine?
also where have u taken the power from to the control unit

just wondering if there is somewhere on the bulkhead that I can thread the boost guage piping thru to the engine?
also where have u taken the power from to the control unit
Just take the power from the Digital clock feed. as you will not be using this.
Steve
29 December 2006, 10:45 PM
#7
Scooby Regular
Join Date: May 2006
Posts: 379
Likes: 0
Received 0 Likes
on
0 Posts
Originally Posted by rb5 286
thanks people
whats the best stuff to remove for access.
where have u mounted the controller?
whats the best stuff to remove for access.
where have u mounted the controller?
Trending Topics
30 December 2006, 12:02 AM
#8
Scooby Regular
Join Date: Aug 2005
Location: Bebind the wheel of my red rice rocket
Posts: 5,585
Likes: 0
Received 0 Likes
on
0 Posts
Originally Posted by gussy
rb5 286,Just fitted some defi amber bf's this week to mine I used the clock for the power etc I fed all my control wires from the sensors thro the rubber gromit on the passenger side where the main cable goes thro the bulkhead and fed them over the tunnel behind the radio and into the defi controller the reason I did it that way is because the area where pippyrips is on about is very close to the Turbo which gets very hot and after problems with my last car in that area this time I decided to take no chances.
 30 December 2006, 11:03 AM
#10

Originally Posted by Tidgy
scoobyclinic have fitted a few mate, give em a bell Scooby Clinic | The UK's Largest Independent Subaru Specialists
Or just fit them yourself and save some serious money,its not a difficult job as long as you have a good read through one of the many fitting guides on here,the only thing i didnt fit myself was the oil pressure adaptor as i didnt really want to remove the altanator as its something i havnt taken on before
The gauges and wiring are a doddle,just time consuming removing panels/feeding wires etc but well worth it in the end
have a crack yourself,and avoid paying a garage silly money for a simply straight forward job
p.s i was charged �40 to have my oil temp/pressure sensors bolted in,as i fitted the gauges/wiring and boost pipe myself,it took a subaru specialist twenty minutes to remove my i/c and altanator, fit the sensors and refit the i/c and altanator,so take this in to consideration if you pay out for fitting
mark
30 December 2006, 12:28 PM
#11
Scooby Regular
Join Date: Aug 2005
Location: Bebind the wheel of my red rice rocket
Posts: 5,585
Likes: 0
Received 0 Likes
on
0 Posts
Originally Posted by ethanrob
Or just fit them yourself and save some serious money,its not a difficult job as long as you have a good read through one of the many fitting guides on here,the only thing i didnt fit myself was the oil pressure adaptor as i didnt really want to remove the altanator as its something i havnt taken on before
The gauges and wiring are a doddle,just time consuming removing panels/feeding wires etc but well worth it in the end
have a crack yourself,and avoid paying a garage silly money for a simply straight forward job
p.s i was charged �40 to have my oil temp/pressure sensors bolted in,as i fitted the gauges/wiring and boost pipe myself,it took a subaru specialist twenty minutes to remove my i/c and altanator, fit the sensors and refit the i/c and altanator,so take this in to consideration if you pay out for fitting
mark
04 January 2007, 03:36 PM
#12
going to fit myself just wanted to know about the wiring thru the bulkhead.
another question guys, when i get the triple hood, its gonna need painting. what colours have u found best match the grey of the dash?
and another question, is it right that the passenger airbag is wired in with the clock wiring and when disconnected the whole system is disconnected?
another question guys, when i get the triple hood, its gonna need painting. what colours have u found best match the grey of the dash?
and another question, is it right that the passenger airbag is wired in with the clock wiring and when disconnected the whole system is disconnected?
07 January 2007, 09:45 PM
#14
Scooby Regular
iTrader: (2)
Join Date: Oct 2002
Location: oop north in a spec-c.Now sold and starting on a classic ra track/sprint/road car
Posts: 2,536
Likes: 0
Received 7 Likes
on
7 Posts
Rb5,
the clock terminates in a 4 female connector which all you do for your controller is fit 4 male thin connectors to the controller wires and plug them into the clock connector I can't see it affecting the air bags and as for colour just a matt black ie black board paint.
if you want I will take a photo off the connection for you and post it up tomorrow
11 January 2007, 10:24 PM
#15
Rb5,
the clock terminates in a 4 female connector which all you do for your controller is fit 4 male thin connectors to the controller wires and plug them into the clock connector I can't see it affecting the air bags and as for colour just a matt black ie black board paint.
if you want I will take a photo off the connection for you and post it up tomorrow
the clock terminates in a 4 female connector which all you do for your controller is fit 4 male thin connectors to the controller wires and plug them into the clock connector I can't see it affecting the air bags and as for colour just a matt black ie black board paint.
if you want I will take a photo off the connection for you and post it up tomorrow
yes please , many thanks

Thread
Thread Starter
Forum
Replies
Last Post
Mattybr5@MB Developments
Car Parts For Sale
1
18 November 2015 07:49 AM
blockhead
Subaru Parts
19
07 November 2015 11:50 PM