GUIDE FOR BREMBO PAD & DISC CHANGE.
 05 March 2010, 12:43 AM
#1
Scooby Regular
Thread Starter
iTrader: (1)
Join Date: Dec 2001
Location: You only live ONCE But if you do it right >>>>> ONCE is enough
Posts: 7,327
Likes: 0
Received 0 Likes
on
0 Posts
At last the weather has let me change my discs. 
I have done a little guide in case anyone wants to have a go.
Disclaimer :- Follow at your own risk!!! It only needs basic tools but as with anything brake related if you are in any doubt as to your mechanical aptitude - Get professional help !!!
1. Turn the wheel to get the best access to the caliper.
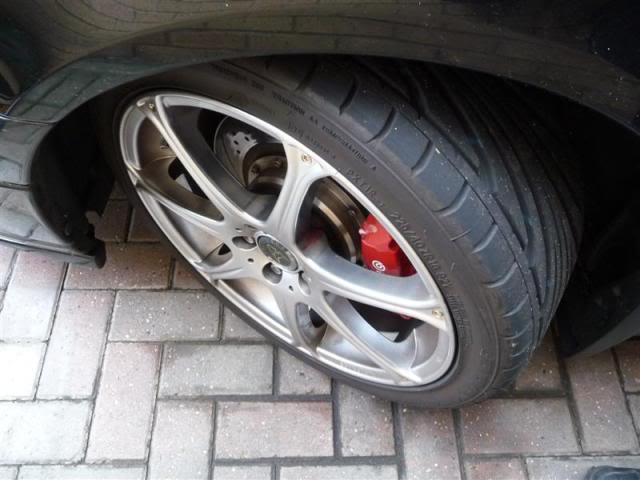
2. Put the hand brake on, chock the opposite sides wheels, jack the car up, remove the wheel & put an axle stand under.
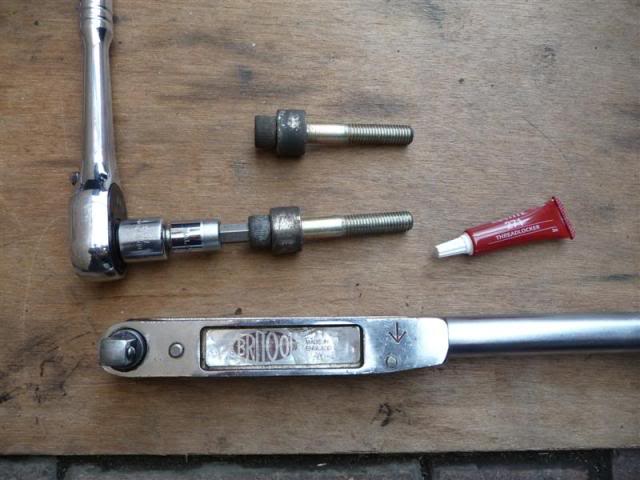
3. Undo the 2 x 10mm Allen head bolts holding the caliper to the suspension leg.
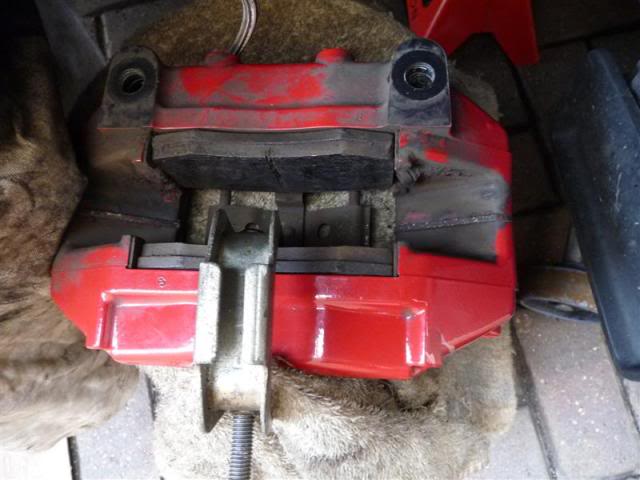
4. Wiggle the caliper away from the disc & rest it on an upturned bucket so there is no strain on the flexible brake hose. There is a spacer on each bolt. Remove the old disc with a block of wood tapped with a hammer. Clean the face of the caliper mounting bracket.
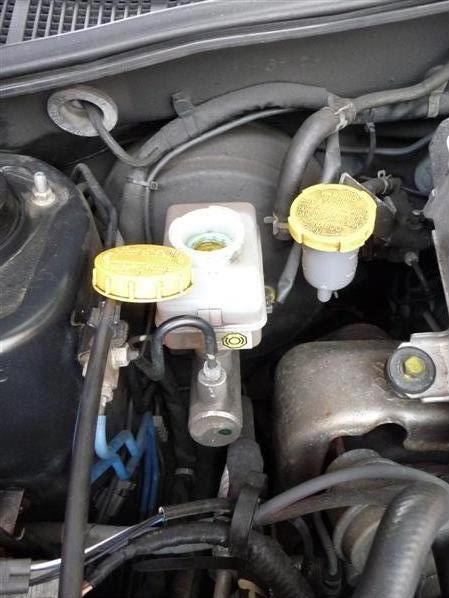
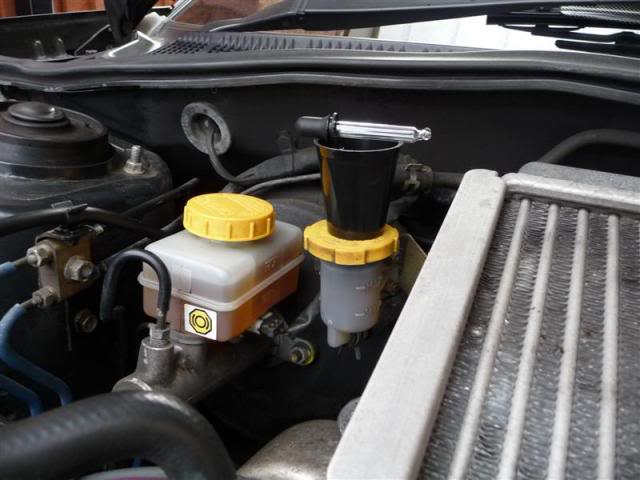
5. Undo the brake fluid filler cap. It can be rested back on the filler opening to stop dirt getting in. Keep an eye on the fluid level during the next bit & if it gets near the top see number 16 below.
6. Use a G clamp to slowly press the pistons back into their bores until they are flush. If you leave the old pads in it does them both at once. If you don't have a clamp use a hammer handle or large screw driver as a lever. You may have to do both sides together so they don't see-saw in & out.
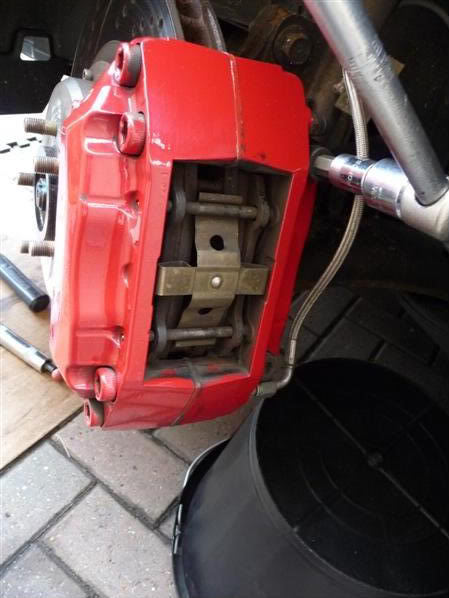
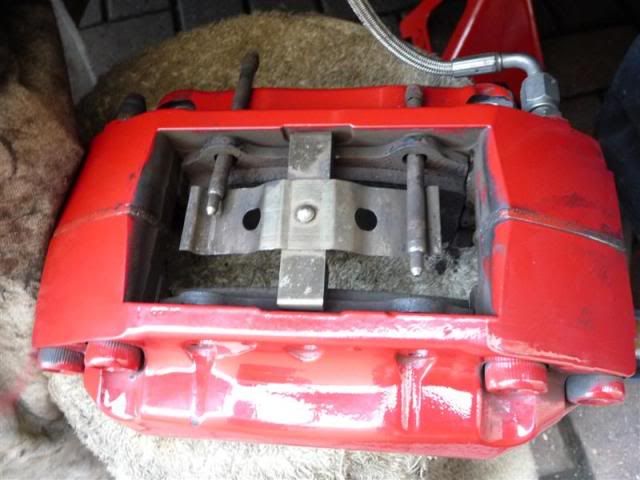
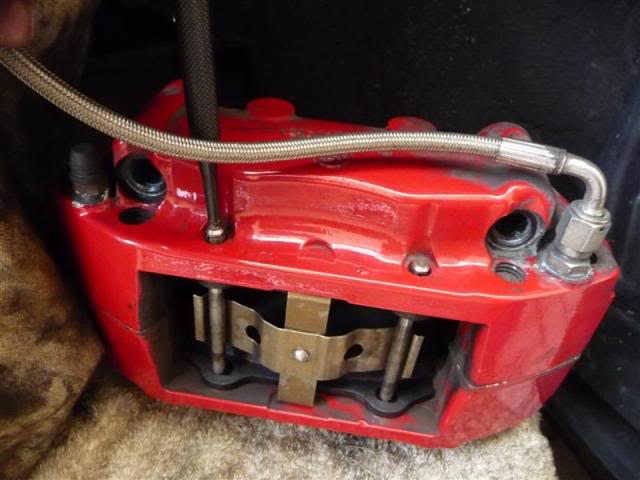
7. Use a thin parallel sided drift to tap out the two brake pad retaining pins.

8. The steel cross piece is tensioned by the pins against the pads.
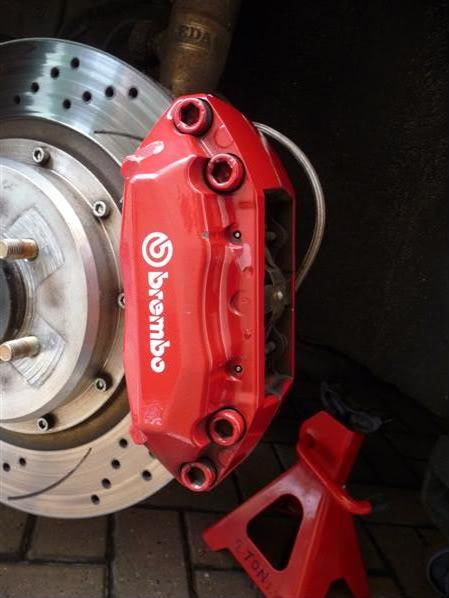
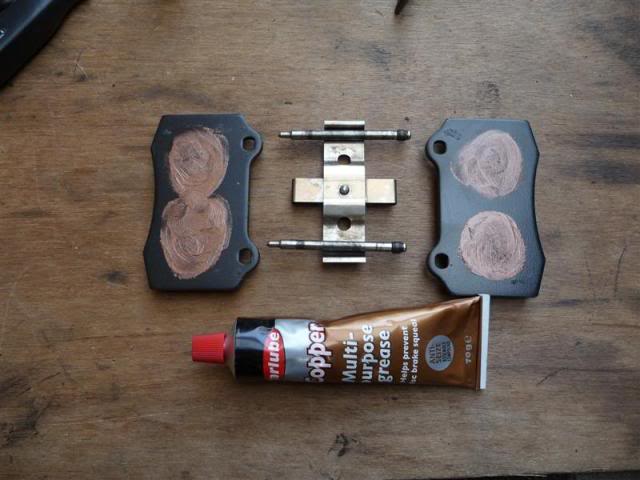
9. Remove the old pads & clean & prep the recess of the caliper. Dab some copper grease on the BACKS of the new pads to help prevent squeal.
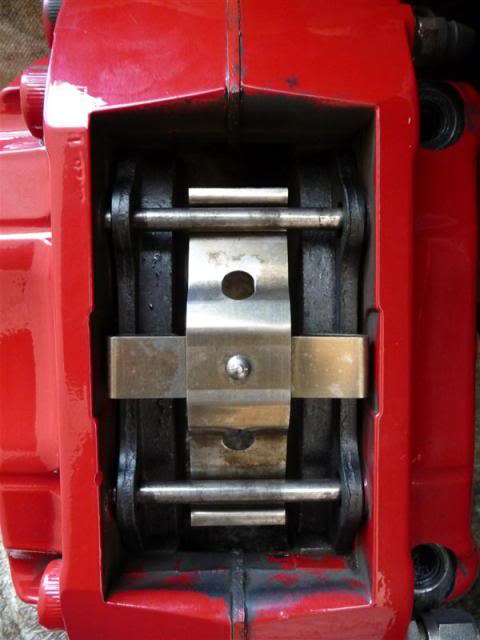
10. With everything clean reassemble with the new pads & tap the pins back into place.
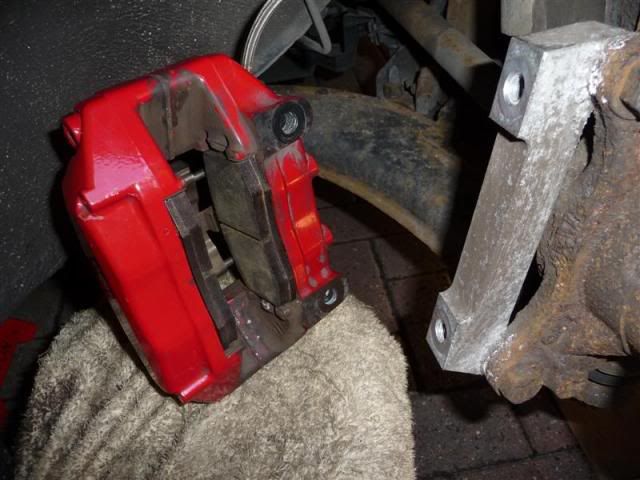
11. The new pads in place.
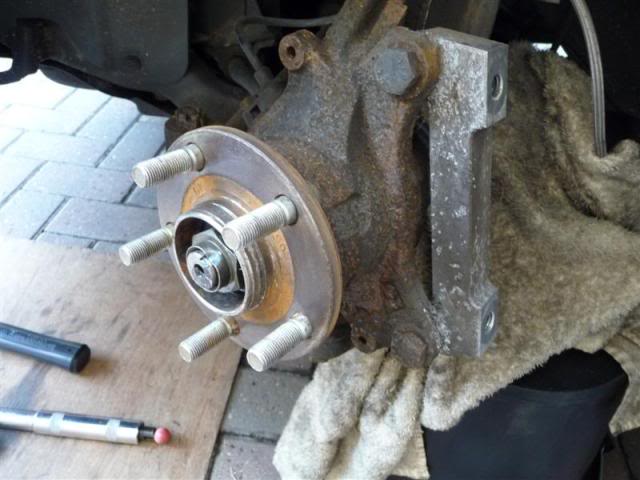
12. Clean the face of the hub ready for the new disc. This ensures it sits square & doesn't run out of line.
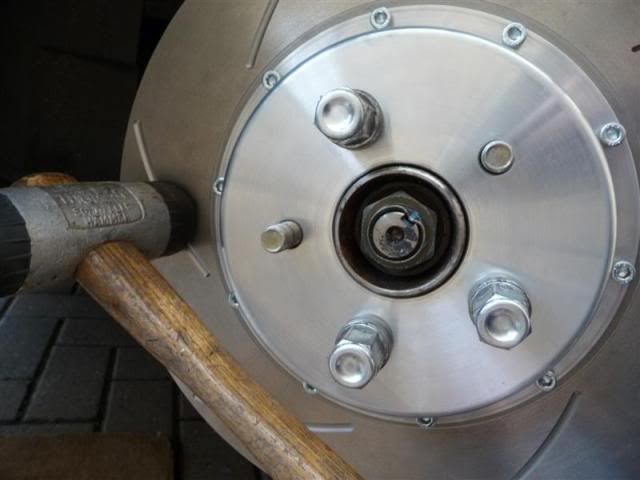
13. Secure the disc finger tight with 3 wheel nuts to hold it in place when fitting the caliper. Tap with a rubber hammer or block of wood to help it seat properly.
14. Ensure the caliper bolt holes, the bolts & the spacers are all clean & free from corrosion so when assembled they will sit flat against each other. Put some thread lock on the bolts & refit the caliper. Torque the bolts to 80 ft-lb.
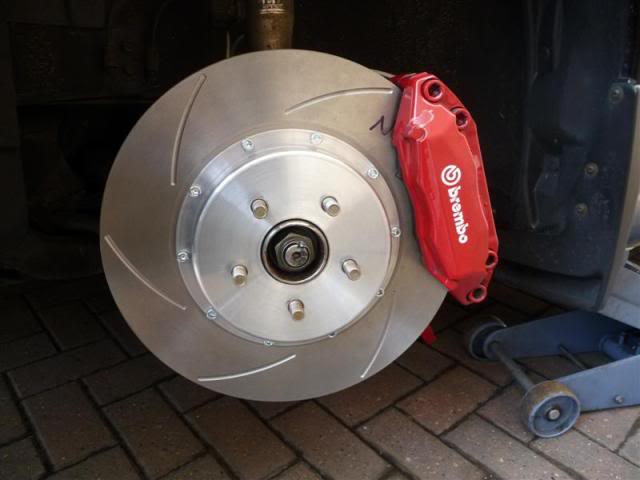
15. Disc & caliper assembled ready for the wheel to go back on & for the car to be lowered back onto the ground.
16. Repeat all the above for the other caliper then when finished & the car is level on the ground press the brake pedal several times until it comes up hard and the pads are settled. Check the fluid level & if it is above the MAX line draw some off with an eye dropper (60p from Boots). Finally screw the top back on firmly & dispose of any brake fluid carefully as it eats paint.
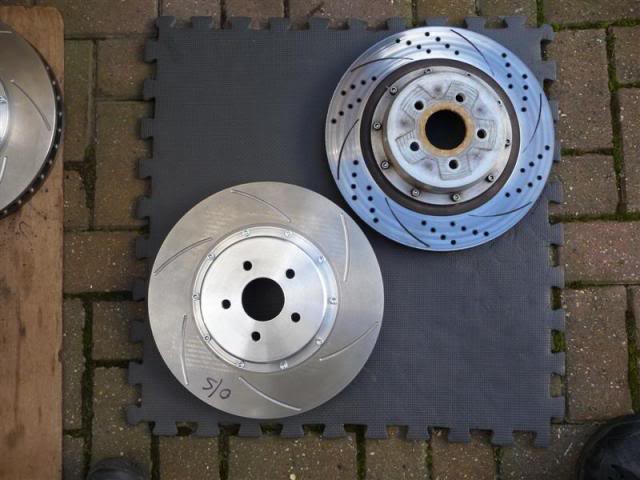
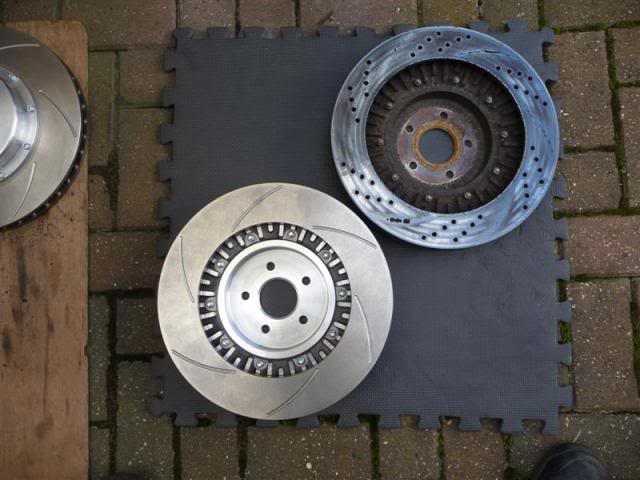
17. Why they had to be changed.
I have done a little guide in case anyone wants to have a go.
Disclaimer :- Follow at your own risk!!! It only needs basic tools but as with anything brake related if you are in any doubt as to your mechanical aptitude - Get professional help !!!
1. Turn the wheel to get the best access to the caliper.
2. Put the hand brake on, chock the opposite sides wheels, jack the car up, remove the wheel & put an axle stand under.
3. Undo the 2 x 10mm Allen head bolts holding the caliper to the suspension leg.
4. Wiggle the caliper away from the disc & rest it on an upturned bucket so there is no strain on the flexible brake hose. There is a spacer on each bolt. Remove the old disc with a block of wood tapped with a hammer. Clean the face of the caliper mounting bracket.
5. Undo the brake fluid filler cap. It can be rested back on the filler opening to stop dirt getting in. Keep an eye on the fluid level during the next bit & if it gets near the top see number 16 below.
6. Use a G clamp to slowly press the pistons back into their bores until they are flush. If you leave the old pads in it does them both at once. If you don't have a clamp use a hammer handle or large screw driver as a lever. You may have to do both sides together so they don't see-saw in & out.
7. Use a thin parallel sided drift to tap out the two brake pad retaining pins.
8. The steel cross piece is tensioned by the pins against the pads.
9. Remove the old pads & clean & prep the recess of the caliper. Dab some copper grease on the BACKS of the new pads to help prevent squeal.
10. With everything clean reassemble with the new pads & tap the pins back into place.
11. The new pads in place.
12. Clean the face of the hub ready for the new disc. This ensures it sits square & doesn't run out of line.
13. Secure the disc finger tight with 3 wheel nuts to hold it in place when fitting the caliper. Tap with a rubber hammer or block of wood to help it seat properly.
14. Ensure the caliper bolt holes, the bolts & the spacers are all clean & free from corrosion so when assembled they will sit flat against each other. Put some thread lock on the bolts & refit the caliper. Torque the bolts to 80 ft-lb.
15. Disc & caliper assembled ready for the wheel to go back on & for the car to be lowered back onto the ground.
16. Repeat all the above for the other caliper then when finished & the car is level on the ground press the brake pedal several times until it comes up hard and the pads are settled. Check the fluid level & if it is above the MAX line draw some off with an eye dropper (60p from Boots). Finally screw the top back on firmly & dispose of any brake fluid carefully as it eats paint.
17. Why they had to be changed.


Trending Topics
05 March 2010, 09:39 PM
#8
Scooby Regular
Thread Starter
iTrader: (1)
Join Date: Dec 2001
Location: You only live ONCE But if you do it right >>>>> ONCE is enough
Posts: 7,327
Likes: 0
Received 0 Likes
on
0 Posts
I guess these fit mine at the lower end & will suit up to a 6 or 8 pot at the higher end so there is plenty of room for an upgrade.

When I got the red Brembo kit originally there were 3 sizes of disc in the Group Buy & I went for the largest grooved & drilled 335mm ones. I don't track it & am not the worlds heaviest braker so drilled wasn't an issue. My choice was mainly down to price & that they filled the arches better & looked more bling. Style over substance I am afraid.
28 April 2010, 09:55 PM
#11
Scooby Regular
Thread Starter
iTrader: (1)
Join Date: Dec 2001
Location: You only live ONCE But if you do it right >>>>> ONCE is enough
Posts: 7,327
Likes: 0
Received 0 Likes
on
0 Posts
Hi Foz just seen this as not about yesterday due to toilet problems.
That's as in plumbing in a new syphon rather than an iffy curry.
They are the non Frayz approved Godspeed rotors on his alloy bells.
They work for me but then I read the road ahead & brake accordingly.
ie like a *****.
That's as in plumbing in a new syphon rather than an iffy curry.
They are the non Frayz approved Godspeed rotors on his alloy bells.
They work for me but then I read the road ahead & brake accordingly.
ie like a *****.

Thread
Thread Starter
Forum
Replies
Last Post
Mattybr5@MB Developments
Full Cars Breaking For Spares
28
28 December 2015 11:07 PM