
Boost Gauge Install - is this the right connection point?


Thread Starter
Scooby Regular
Joined: Jun 2004
Posts: 1,028
Likes: 0
From: house in a street on the earth
Chaps
Can anyone who has done this on a MY02 onwards, given there is no obvious nipple to connect to ike MY00's etc, advise if the connection point in the attached images is correct? The (obvious) blue tube/hose if where I have joined it, and there are 2 pics, from different angles, showing this. If you have one installed, it works and I have used the same connection point and hose/tube, can you let me know please?
Trouble is, I'm still running her in, so cannot get max boost that long before having to back off the revs. Interestingly, I thought this was the hose used on another install, although I see the standard Subaru boost gaue install recommends a different point in front of the intercooler (which I have not used - but could extend the pipe if I needed to).
I thought this should work - but your opinions and knowledge would be great.
Many thanks
Andy
http://community.webshots.com/script...umID=212823043


Thread Starter
Scooby Regular
Joined: Jun 2004
Posts: 1,028
Likes: 0
From: house in a street on the earth
Dammit
Sorry - try this
http://image22.webshots.com/22/2/36/...9fNMQAW_ph.jpg
http://image20.webshots.com/20/2/36/...6VwsIVp_ph.jpg
Thanks, Andy
Sorry - try this
http://image22.webshots.com/22/2/36/...9fNMQAW_ph.jpg
http://image20.webshots.com/20/2/36/...6VwsIVp_ph.jpg
Thanks, Andy

Scooby Regular
Joined: Feb 2004
Posts: 289
Likes: 0
The take off point you've used is the boost controller hose. I'm not sure of the effect of doing this but I wouldn't want it on my car. The normal take off point is the dump valve vacuum hose to the front right of your intercooler. If you look here http://bbs.scoobynet.co.uk/showthrea...07#post3911907 you will find a picture from Bob showing the correct position.
Mark
Mark
Thread Starter
Scooby Regular
Joined: Jun 2004
Posts: 1,028
Likes: 0
From: house in a street on the earth
Great stuff
Thanks fella's. New it one was or the other,and with me MY00 it was so easy back then to tap into the spare port. It was giving me (erratic) boost but no vacuum so thought it was wrong. Much appreciated for all your help,
Andy
Thanks fella's. New it one was or the other,and with me MY00 it was so easy back then to tap into the spare port. It was giving me (erratic) boost but no vacuum so thought it was wrong. Much appreciated for all your help,
Andy

Scooby Regular
Joined: Feb 2004
Posts: 609
Likes: 0
From: East Sussex Scoobies - 555 Wagon Squadron
Puzzling....
Subaru fitted my Boost gauge and T piece into where Mightyyid's photos show !!
Should It be moved? The reason I say that is...
a) I've been getting the odd strange reading on the gauge
b) 95% of the time will not boost higher than 0.5-0.6
c) The boost gauge needle fluctuates a lot
J.
Subaru fitted my Boost gauge and T piece into where Mightyyid's photos show !!
Should It be moved? The reason I say that is...
a) I've been getting the odd strange reading on the gauge
b) 95% of the time will not boost higher than 0.5-0.6
c) The boost gauge needle fluctuates a lot
J.
Trending Topics
Thread Starter
Scooby Regular
Joined: Jun 2004
Posts: 1,028
Likes: 0
From: house in a street on the earth
J
Exactly what happened to mine (but having had an MY00 back in 2000 with a gauge I knew what to look for) - mine was shocking on full throttle, with the guage bouncing around, and giving very dodgy readings. Tell takle sign is if the guage is a vacuum and boost gauge - if it is, then you should be getting -15-20 HG vacuum when idling. If you are not, then it's not working - but if you have the same siting as me, it is wrong. I changed mine yesterdya afternoon and cut into the BOV hose as outlined. This is a bigger hose so I tried to put clamps on the rubber which worked - for about 15 mins, when I suddenly noticed limited boost. Stopped in a old car park and found it had all come apart so spent 45 mins last night under a streetlamp fixing it. Now done - looks a bit crappy but works fine, and reads smoothly, full boost and vacuum and all is well.
Should it be moved - definately. (although I did mine from a few photo's on this site where boost gauge's had been installed, so I thought I was right - it seems I was not...)
Can take photo's if it helps.
Andy
Scooby Regular
Joined: Feb 2004
Posts: 609
Likes: 0
From: East Sussex Scoobies - 555 Wagon Squadron
Andy
The gauge is a Blitz R115 Boost, like this one..... but the 1.5 bar model....

It has a minus reading on it (down to -1.0 bar).... which it has never gone into.
The needle tonight was bouncing between 0.4 and 0.8 on WOT and looked a right mess! I really thought "what�s the point of having this gauge if it's reading like this". Then I saw your response and now feel I've got to move mine too.
So...
a) Any tips (and pics) on how you secured your T piece into the BOV hose would be appreciated.
b) What did you use to fix the pipes onto the T piece.... cable ties?
c) How did you fix the boost controller hose back together? Was it time for a new pipe?
Ta very much. J.
The gauge is a Blitz R115 Boost, like this one..... but the 1.5 bar model....
It has a minus reading on it (down to -1.0 bar).... which it has never gone into.
The needle tonight was bouncing between 0.4 and 0.8 on WOT and looked a right mess! I really thought "what�s the point of having this gauge if it's reading like this". Then I saw your response and now feel I've got to move mine too.
So...
a) Any tips (and pics) on how you secured your T piece into the BOV hose would be appreciated.
b) What did you use to fix the pipes onto the T piece.... cable ties?
c) How did you fix the boost controller hose back together? Was it time for a new pipe?
Ta very much. J.
Last edited by Squadron-Leader; Nov 8, 2004 at 08:47 PM.

Scooby Regular
Joined: Feb 2001
Posts: 3,127
Likes: 1

The BOV tee will have to be a bigger than std gauge tees as the hose diameter is bigger. You'll have a tough time keeping the tee in place.
I put my connection on the line that goes from the inlet manifold to the crankcase vent valve next to the alternator.
Nick
I put my connection on the line that goes from the inlet manifold to the crankcase vent valve next to the alternator.
Nick

Scooby Regular
Joined: Dec 2001
Posts: 1,780
Likes: 0
Go to any decent car spares place and they will sell 'T' pieces in all sizes, on my old MY01 i didnt have to use any clamps at all as the 'T' piece was a tight fit and sealed itself.
2 of you guys have both done as many on here have and fitted the gauge to your Boost solenoid which gives fluctuating pulses hence why your gauges have been all over the place, at least you have learnt something.
2 of you guys have both done as many on here have and fitted the gauge to your Boost solenoid which gives fluctuating pulses hence why your gauges have been all over the place, at least you have learnt something.
here's a piccie
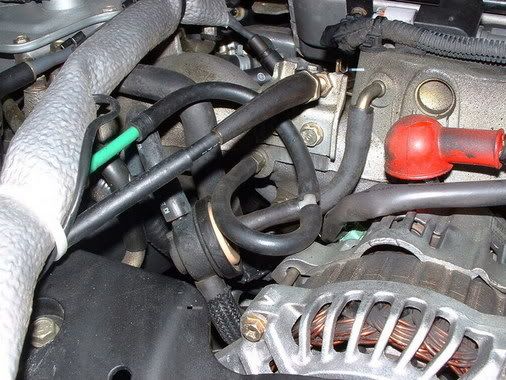
The inlet manifold takeoff is where the pipe that curls 180 degs. This originally connected to the crankcase vent valve which now has a tee to share the boost/vacuum signal.
Nick
The inlet manifold takeoff is where the pipe that curls 180 degs. This originally connected to the crankcase vent valve which now has a tee to share the boost/vacuum signal.
Nick
Thread Starter
Scooby Regular
Joined: Jun 2004
Posts: 1,028
Likes: 0
From: house in a street on the earth
Originally Posted by Squadron-Leader
Andy
The gauge is a Blitz R115 Boost, like this one..... but the 1.5 bar model....
http://www.eastsussexscoobies.co.uk/misc/boost.jpg
It has a minus reading on it (down to -1.0 bar).... which it has never gone into.
The needle tonight was bouncing between 0.4 and 0.8 on WOT and looked a right mess! I really thought "what�s the point of having this gauge if it's reading like this". Then I saw your response and now feel I've got to move mine too.
So...
a) Any tips (and pics) on how you secured your T piece into the BOV hose would be appreciated.
b) What did you use to fix the pipes onto the T piece.... cable ties?
c) How did you fix the boost controller hose back together? Was it time for a new pipe?
Ta very much. J.
Exactly what would be happening now I understand what I did. Yours is definately wrong as many have pointed out. To help you:
1 - I can get images, but in the end as pointed out, the BOV hose is bigger than the standard T piece. Therefore B&Q do a 3mm tubing (used normally for pumping water for garden fountains etc) and a load of different size T-pieces (both 3 and 5 mm). I bought these - the 5mm ones are what you need for the BOV hose. Put in a T piece and although it grips quite well, still put some jubilee clips around it to ensure it held. Then, as my hose that came with the boost gauge was not long enough, lengthened it by attaching the 3mm tubing purchased from B&Q, again using a 2-ended (joining) piece of plastic (again in the packs of assorted sizes) and cable tied that together. Then joined the 3mm hose to the 5mm T piece with some blue rubber flexible hose that also came with the boost gauge (which adapts between sizes). It;s not the prettiest thing I know, but it works and holds it all together and I was in the wet, dark Tesco car park at the time with a 5 month daughter and pissed off missus before an hour drive home so had little choice.
b - answered above - combination of cable ties and jubilee clips
c - If I did it again, the standard hose that came with the guage would not have been long enough, so I would have used the 3mm tubing that I bought in B&Q and just joined it to the stadnard hose after it left the back of the boost gauge (as it needs to be the smaller hose given the size of the fixing on the back of the gauge). As it was, I managed to get the hose down the back/side (by A pillar) of the dash and didn't want the hassle of doing it all again. Likewise, the wiring for the backlight also goes down there and that would then be dislodged.
Hope this helps. You'll be amazed by the difference given you have driven for so lojng with your gauge as it is. Mine now shows down to -15 on idling, often up to -20, zero when stable and up to 15-16psi when on boost. I know your's is BAR but it will still swing around. Bit of fun really...
Scooby Regular
Joined: Feb 2004
Posts: 609
Likes: 0
From: East Sussex Scoobies - 555 Wagon Squadron
Thanks guys.
I'll let you know how I get on. I still cannot believe that Subaru fitted my gauge on the boost controller hose. I've known the mechanic(s) for some years and trust what they do on my car. I would take it back, but it was fitted as a 'freebie' on a recent dealer/owners club day..... and after the advice on this thread I reckon I could do just as good a job anyway.
Honest mistake? or can you fit a boost gauge on pre MY01's in this manner?
J.
Originally Posted by Squadron-Leader
Puzzling....
Subaru fitted my Boost gauge and T piece into where Mightyyid's photos show !!
Should It be moved? The reason I say that is...
a) I've been getting the odd strange reading on the gauge
b) 95% of the time will not boost higher than 0.5-0.6
c) The boost gauge needle fluctuates a lot
J.
Subaru fitted my Boost gauge and T piece into where Mightyyid's photos show !!
Should It be moved? The reason I say that is...
a) I've been getting the odd strange reading on the gauge
b) 95% of the time will not boost higher than 0.5-0.6
c) The boost gauge needle fluctuates a lot
J.
The Boost control circuit will be bleeding away about another 90% from the actusator, and hence giving you about 1BAR on the engine side.
Scooby Regular
Joined: Feb 2004
Posts: 609
Likes: 0
From: East Sussex Scoobies - 555 Wagon Squadron
Thanks Scott, that explains a lot.
Got the T's and pipe I need so I'll be moving things around this weekend.
J.
Got the T's and pipe I need so I'll be moving things around this weekend.
J.
Last edited by Squadron-Leader; Nov 12, 2004 at 08:28 AM.

Originally Posted by Squadron-Leader
Thanks guys.
I'll let you know how I get on. I still cannot believe that Subaru fitted my gauge on the boost controller hose. I've known the mechanic(s) for some years and trust what they do on my car. I would take it back, but it was fitted as a 'freebie' on a recent dealer/owners club day..... and after the advice on this thread I reckon I could do just as good a job anyway.
Honest mistake? or can you fit a boost gauge on pre MY01's in this manner?
J.
I'll let you know how I get on. I still cannot believe that Subaru fitted my gauge on the boost controller hose. I've known the mechanic(s) for some years and trust what they do on my car. I would take it back, but it was fitted as a 'freebie' on a recent dealer/owners club day..... and after the advice on this thread I reckon I could do just as good a job anyway.
Honest mistake? or can you fit a boost gauge on pre MY01's in this manner?
J.
The Subaru Mechanic i spoek to anong wit another subaru expert said to install it were you have yours...... ive left mien were i had it on the DV

Thread
Thread Starter
Forum
Replies
Last Post