
Not a full details, but used some new products today

Thread Starter


Joined: May 2006
Posts: 21,415
Likes: 0
From: Doncaster, S. Yorks.
It's a bit long winded this one so apologies if all you expected was piccies
First of all, I wanted to wash the car today to see what results I had got from Mondays session where I applied new dye to all the arch/door/bumper trimmings that you get on a 205GTI. They were in a sad state as happens over time and trimming dressing's weren't solving the fade problems.
So a little while ago, a mate on another forum suggested this stuff...
Plasticare Trim Dye BLACK, Plastic /Rubber Bumper Paint on eBay, also Touch Up Materials, Car Care, Car Accessories, Cars, Parts Vehicles (end time 10-Sep-08 23:15:06 BST)
Basically a guy I believe who frequents the 205drivers forum wanted something reliable to solve his fading problems a while back. The above product was sourced from the U.S.A. and was deemed a success, so I thought I would try some out. Bought last week for about �12.50 delievered so a good price considering it can do two cars, or multiple coats on one car. I did have a thread on here somewhere asking which colour (black or grey) would be best. I went for black in the end and definitely made the right choice.
So Monday... it wasn't raining for the first time in days, but I didn't have time to wash the car and use the dye (as it would take hours), so I was a bit naughty and just rubbed all the trimmings down with a damp cloth. I decided to mask the red inserts rather than take them off and re-apply, as again it was a time thing and I have no garage - all this took place on my driveway. I prayed for good weather lol. I then decided to mask around the trimmings too so I didn't risk getting dye on the paint work and having to faff about wiping it everywhere
I took a few before pictures to show the sad state of the trimmings, note the car is dirty, but not absolutely filthy.
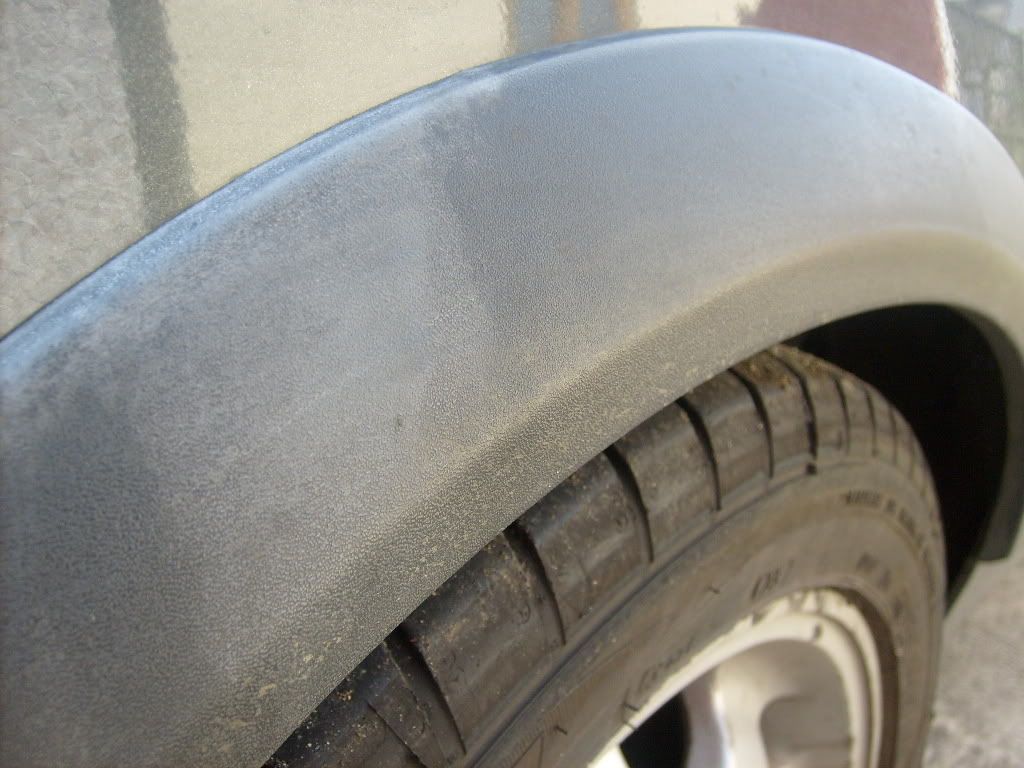
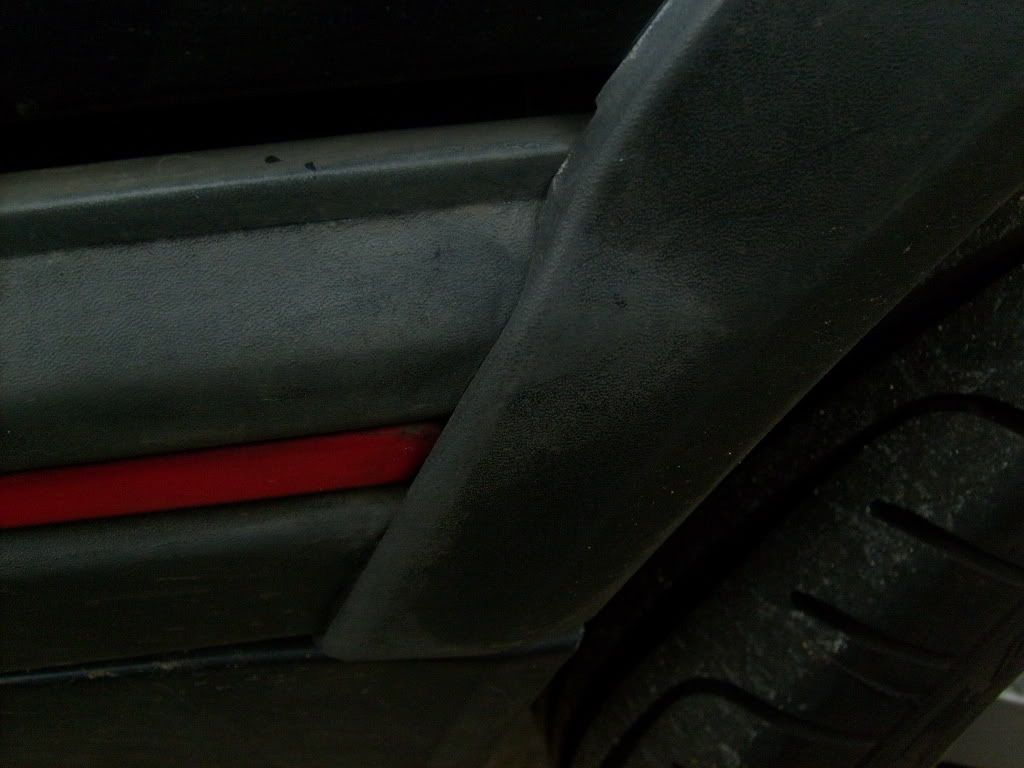
Around the arch trimmings was particularly bad...
Bit dark this one, dunno why
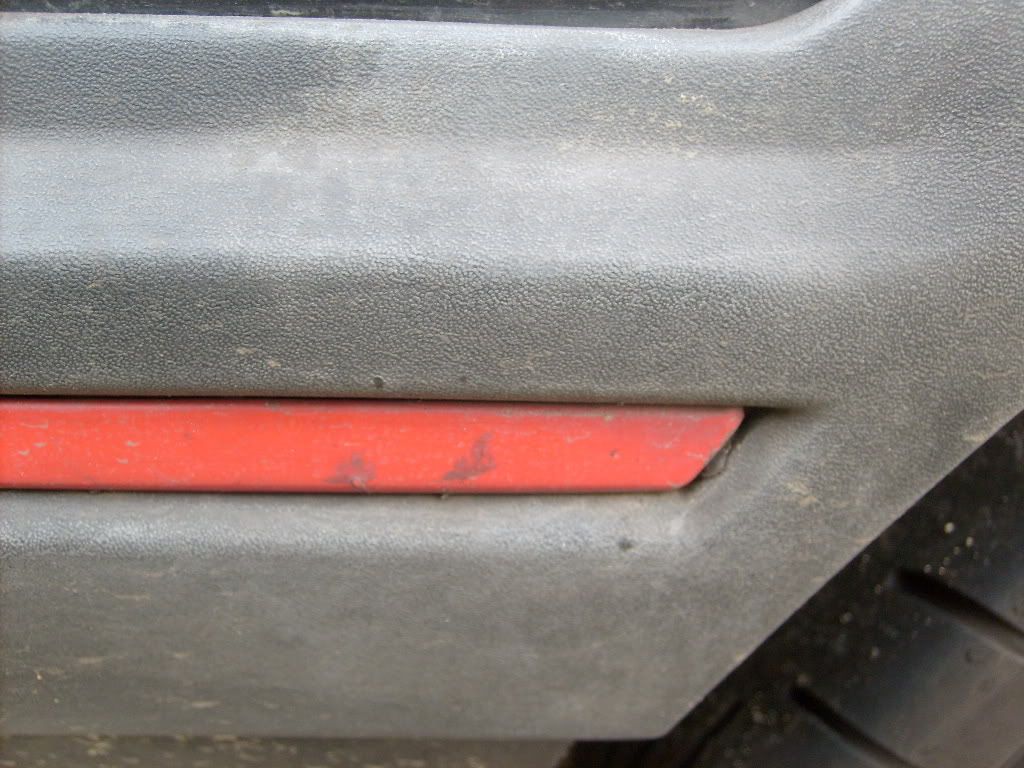
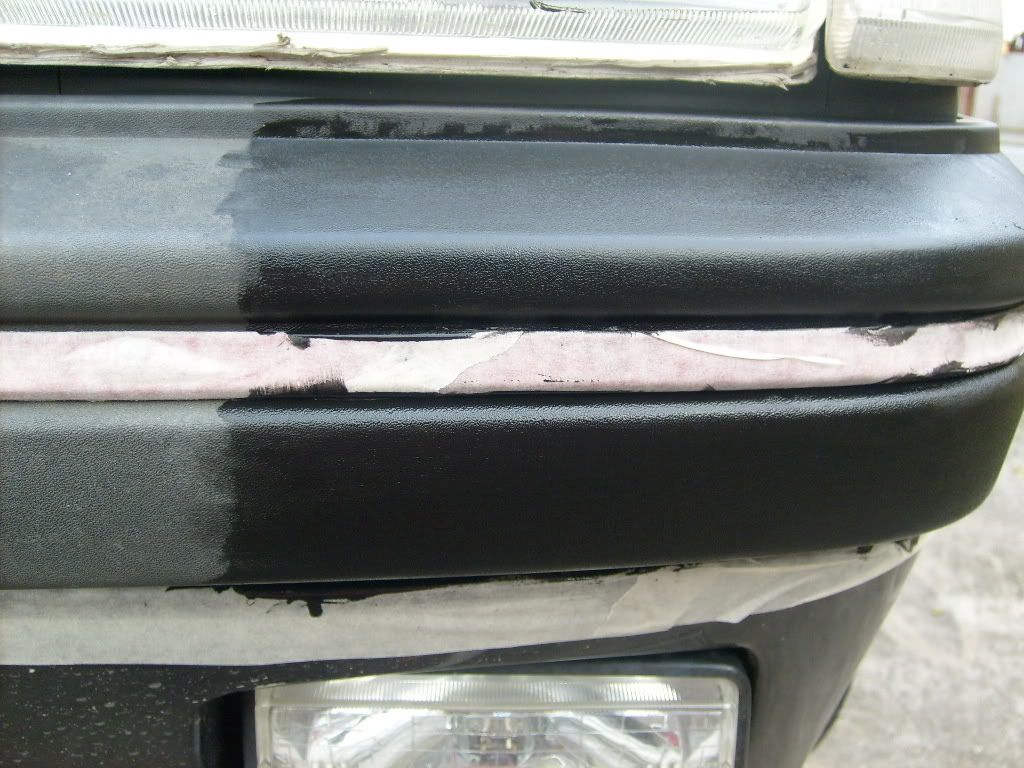
The front bumper one was probably the worst however...

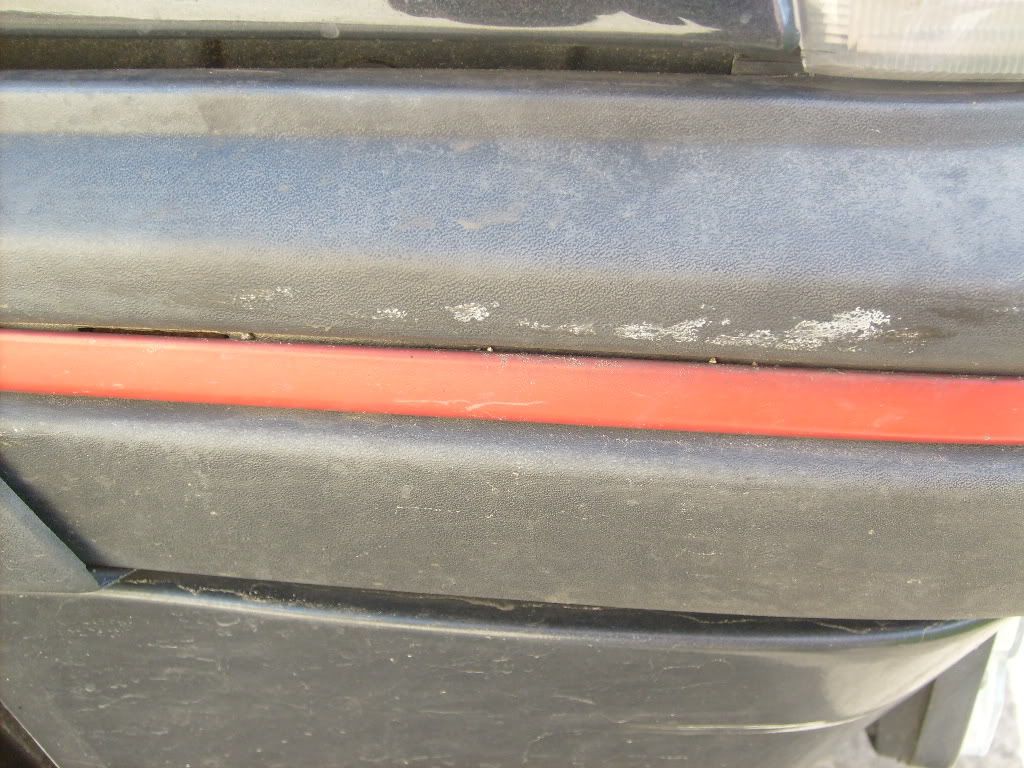
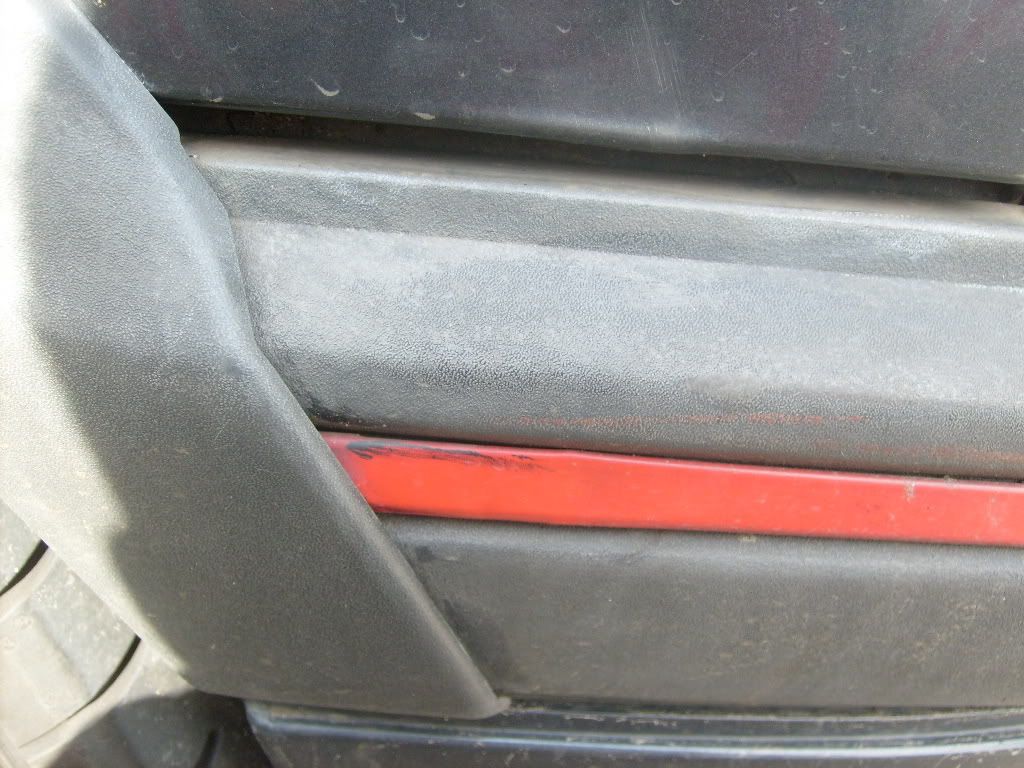
Got a 50/50 shot of the drivers side door/rear quarter to show the difference straight away. Note it's wet so when the dye had soaked in and dried it was slightly closer to dark grey over black.
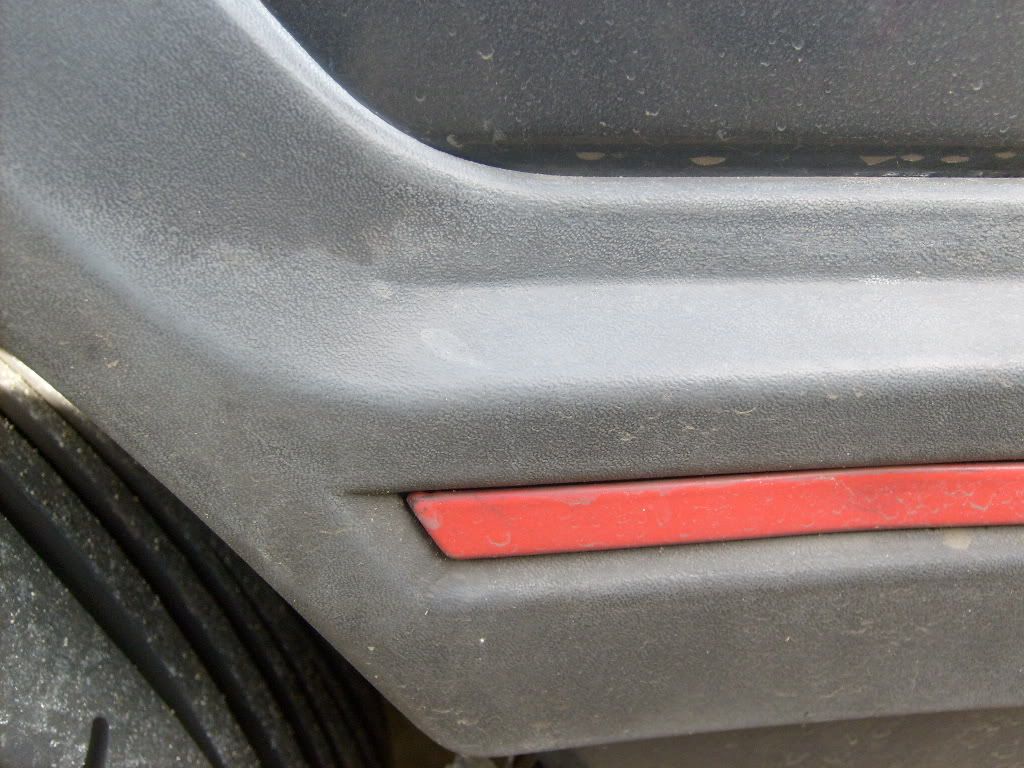
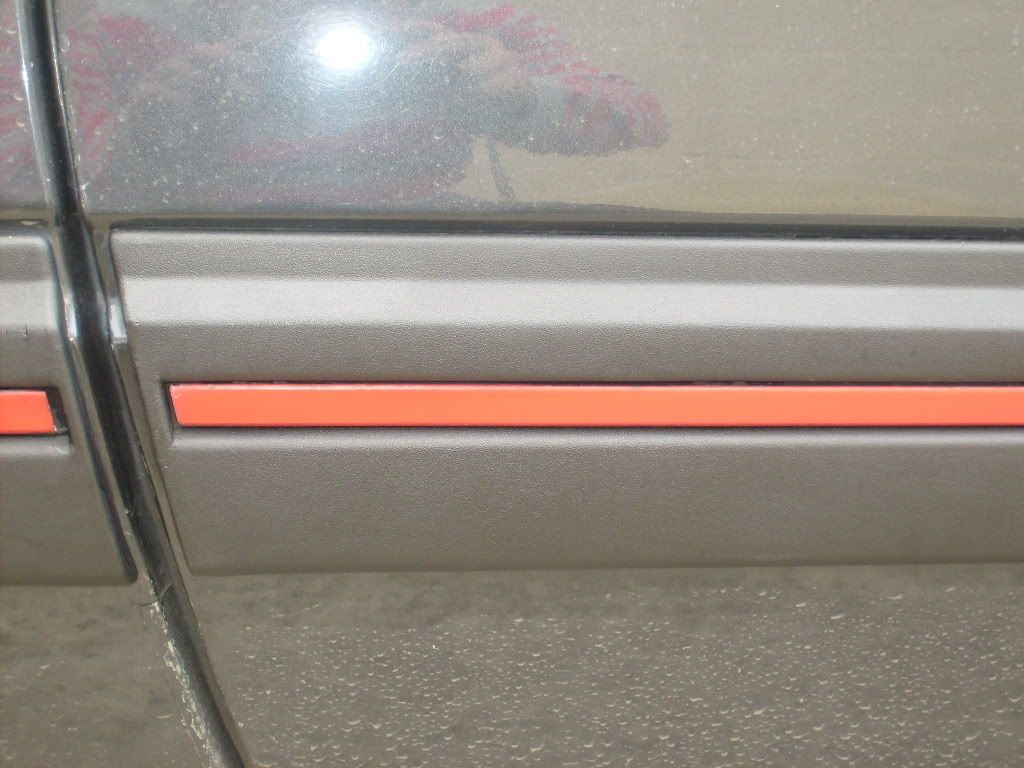
A 50/50 shot of the front bumper, where you can really see the difference!!
After I had done the whole car, and masking tape was taken off etc. I took one shot of the dry results (as the car was dirty and I wanted to get proper shots when cleaned for maximum results).
So that was Monday out the way, and it heaved it down most of yesterday so today (Wednesday) was my first opportunity to wash the car and see how much difference it made to the cars appearence. A bit sad I know, but I was looking forward to washing the car, as I had a new lambswool wash mitt and Poorboys waffle weave towel to try out, along side the new Autoglym High Definition Wax.
I havne't bothered with before or during pics, as it's not really my thing, but I'll write a brief description of what I did and used, as I'm not a pro detailer what so ever - I just take pride in my cars.
Firstly, I hose the wheels with my trusty Karcher pressure washer and applied Autoglym Wheel cleaner. This alongside my trusty Megs wheel scrubber didn't get rid of all the grease, so I kinda used some Autoglym engine de-greaser I had laying around Does the trick, but not advised if your alloys are in mint condition - mine need a refurb anyway unfortunatley.
So, hosed them down after this and then hosed the whole car with the Karcher at full whack - no mineral water used, just good old 'council pop' from the outside tap
Car was washed with two bucket method as per usual using Autoglym shampoo conditioner and my new wash mitt ( I decided to try an ebay item, as I was sick of having to buy wash mitts @ �7.99 from halfords every few weeks as they fall apart , and Polished Bliss were out of stock).
I rinsed the Pug with the pressure washer thoroughly and then dried with my waffle weave. This was brilliant, I really recommend using one instead of naff chamois leathers or microfibre towels. All I did was dab the car all round and it was touch dry. A lot easier than rubbing continuously spreading the damp around. Really good bit of kit.
So car dry, I dressed the wheels with some Mer wax I had spare as I had run out of my usual Autoglym wheel seal spray stuff. Tyres were dressed with Black In A flash (in a bottle ) - again I had run out of the spray stuff which I prefer.
Exhaust tip was polished with Autosol Metal polish and all the windows were given the Turtlewax window cleaner treatment (I'm still to find a window spray apart from the above which doesn't leave smear marks, so have stuck with this for years).
Whole car was clean and dry, so I thought I would give the Autoglym wax a go now as time was pressing and I had the Mrs to pick up from work @ 3.00pm.
In the kit you get the wax itself, 2 foam applicator pads and a tech microfibre towel for buffing. Keeping the applicators moist is easy as they seem a lot easier to use than the Megs ones I have used in the past. Whizzed around the whole car in about 30 mins and then left it for another 10 mins to glaze while me and my next door nieghbour talked about saturdays match.
Back to the point, I then worked round the car with said buffing towel, went to pick the Mrs up, and then went to find a nice spot for a few pics while the sun was still out.
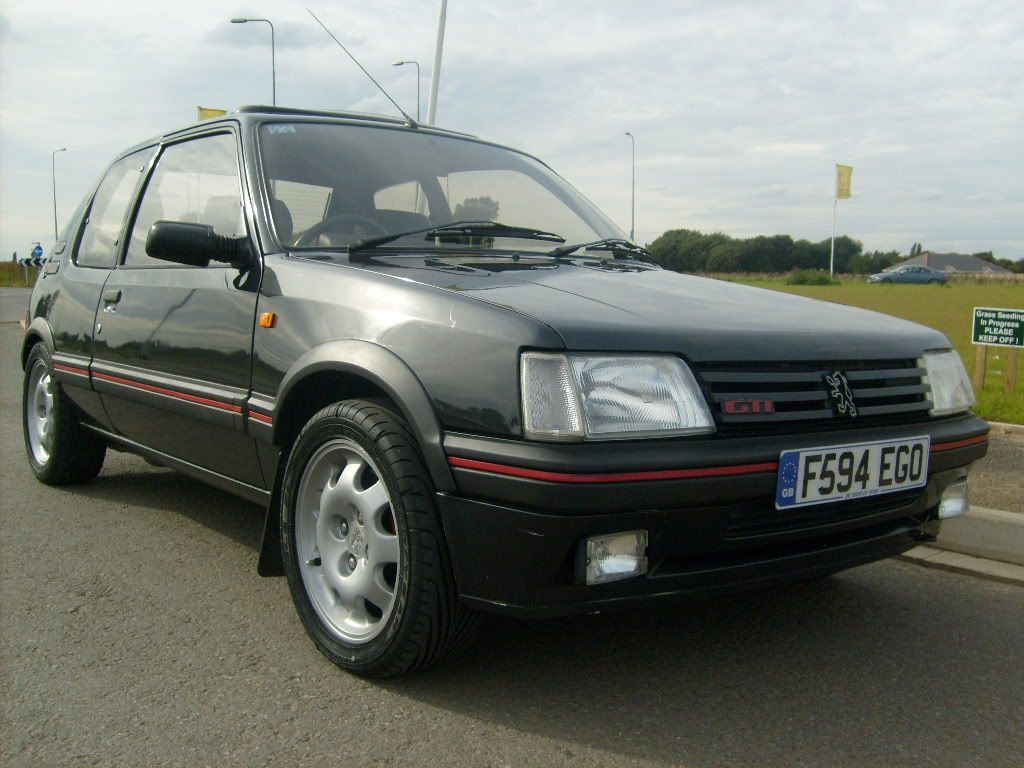
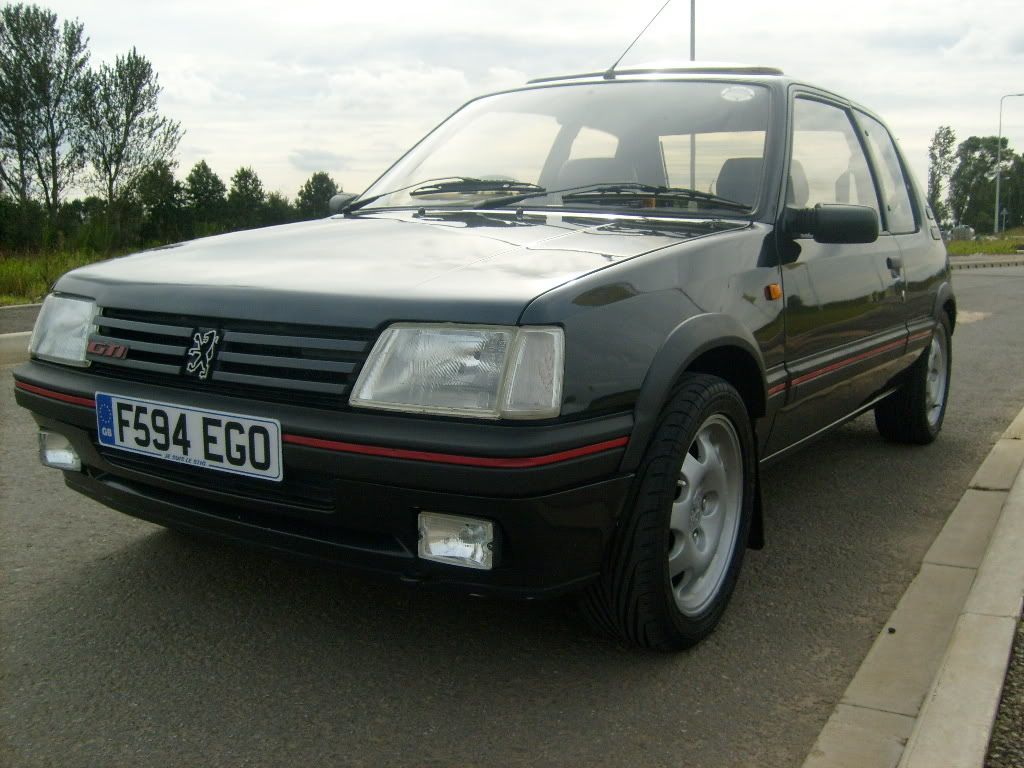
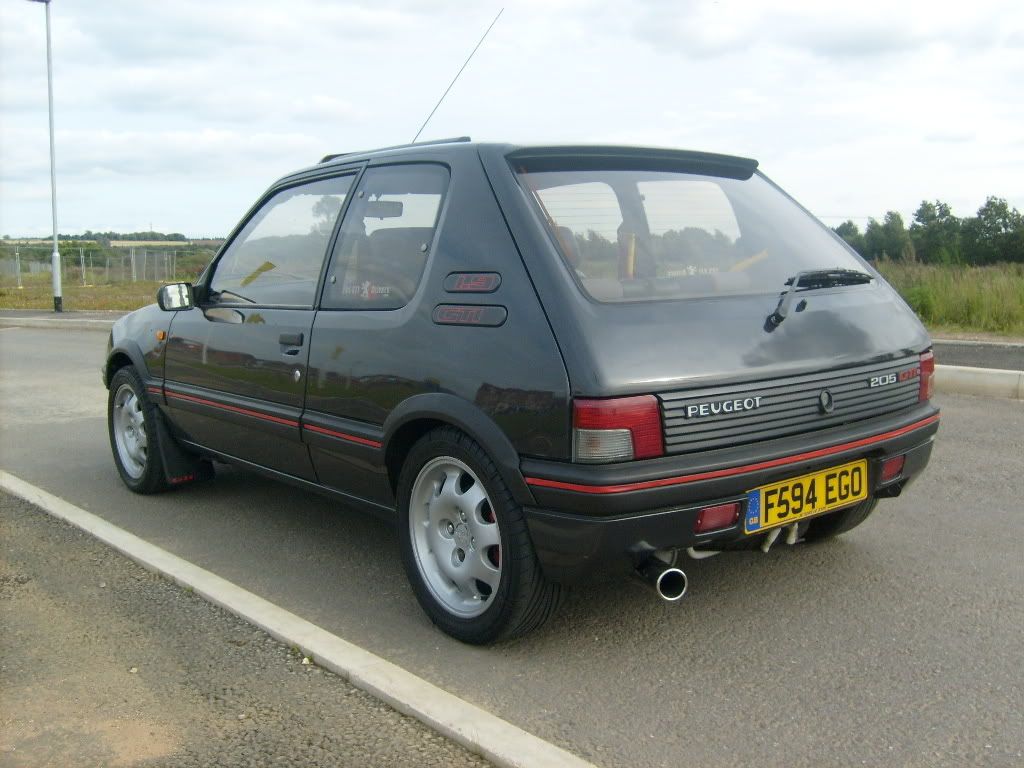
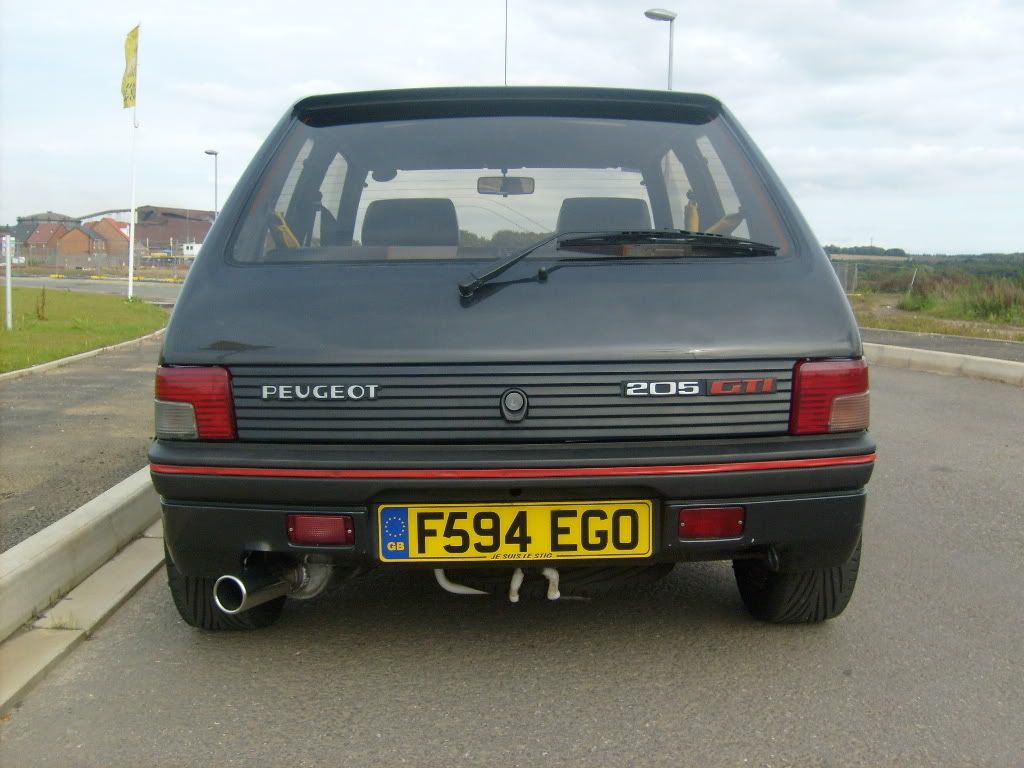
Heres the finished results...

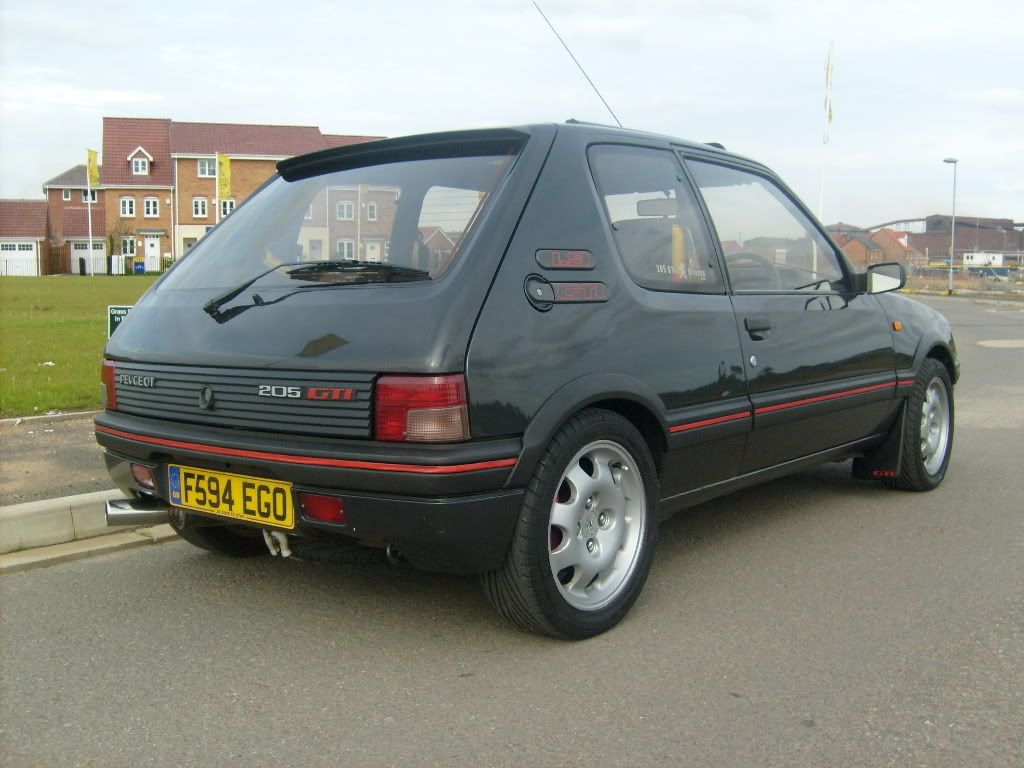
And a couple of close up's to show the shine from the wax, and the huge improvement on th trimmings. I will admit, it probably does need a second coat as it's a little patchy in places, as I used a paint brush to apply it for accutrate results.
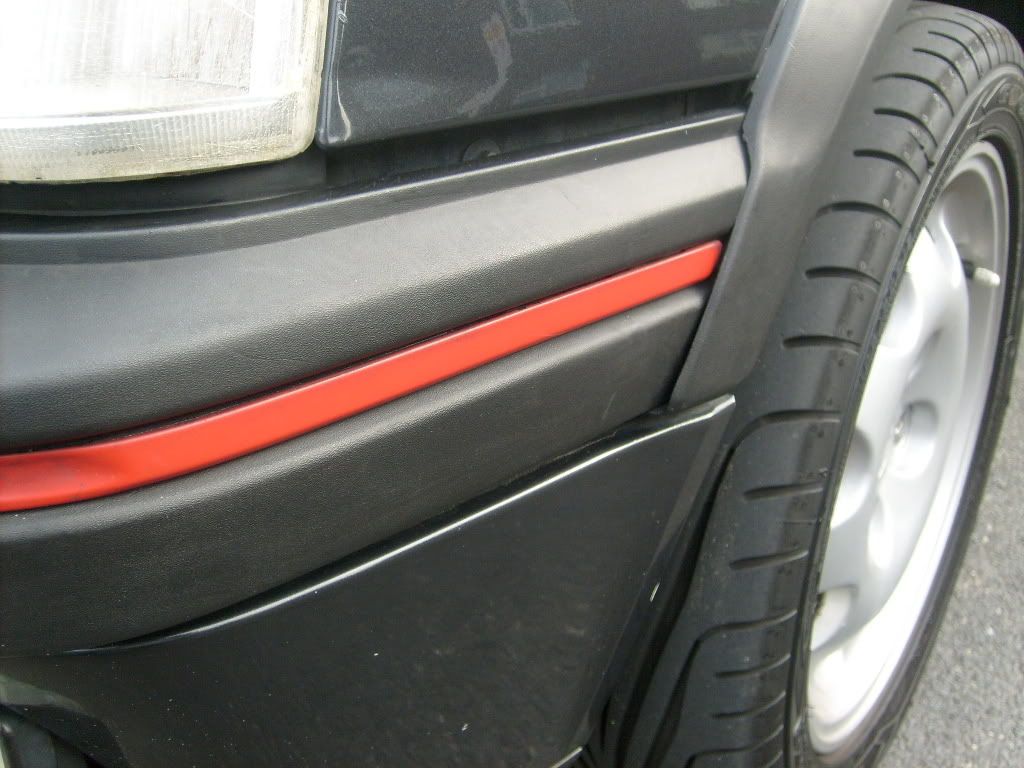
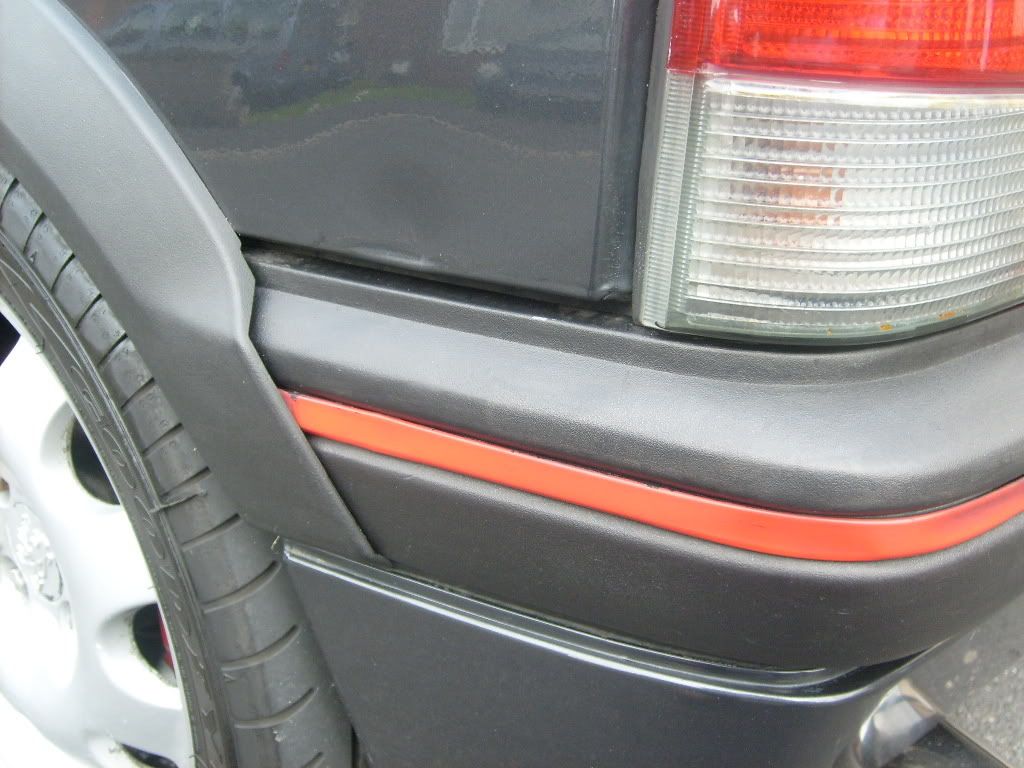
Also note, i didn't apply any trimming dressing either, that's the colour they were after being washed.
Hope you enjoy my terrible write up, as usual comments and constructive crititism are welcome.
Andy
First of all, I wanted to wash the car today to see what results I had got from Mondays session where I applied new dye to all the arch/door/bumper trimmings that you get on a 205GTI. They were in a sad state as happens over time and trimming dressing's weren't solving the fade problems.
So a little while ago, a mate on another forum suggested this stuff...
Plasticare Trim Dye BLACK, Plastic /Rubber Bumper Paint on eBay, also Touch Up Materials, Car Care, Car Accessories, Cars, Parts Vehicles (end time 10-Sep-08 23:15:06 BST)
Basically a guy I believe who frequents the 205drivers forum wanted something reliable to solve his fading problems a while back. The above product was sourced from the U.S.A. and was deemed a success, so I thought I would try some out. Bought last week for about �12.50 delievered so a good price considering it can do two cars, or multiple coats on one car. I did have a thread on here somewhere asking which colour (black or grey) would be best. I went for black in the end and definitely made the right choice.
So Monday... it wasn't raining for the first time in days, but I didn't have time to wash the car and use the dye (as it would take hours), so I was a bit naughty and just rubbed all the trimmings down with a damp cloth. I decided to mask the red inserts rather than take them off and re-apply, as again it was a time thing and I have no garage - all this took place on my driveway. I prayed for good weather lol. I then decided to mask around the trimmings too so I didn't risk getting dye on the paint work and having to faff about wiping it everywhere
I took a few before pictures to show the sad state of the trimmings, note the car is dirty, but not absolutely filthy.
Around the arch trimmings was particularly bad...
Bit dark this one, dunno why
The front bumper one was probably the worst however...
Got a 50/50 shot of the drivers side door/rear quarter to show the difference straight away. Note it's wet so when the dye had soaked in and dried it was slightly closer to dark grey over black.
A 50/50 shot of the front bumper, where you can really see the difference!!
After I had done the whole car, and masking tape was taken off etc. I took one shot of the dry results (as the car was dirty and I wanted to get proper shots when cleaned for maximum results).
So that was Monday out the way, and it heaved it down most of yesterday so today (Wednesday) was my first opportunity to wash the car and see how much difference it made to the cars appearence. A bit sad I know, but I was looking forward to washing the car, as I had a new lambswool wash mitt and Poorboys waffle weave towel to try out, along side the new Autoglym High Definition Wax.
I havne't bothered with before or during pics, as it's not really my thing, but I'll write a brief description of what I did and used, as I'm not a pro detailer what so ever - I just take pride in my cars.
Firstly, I hose the wheels with my trusty Karcher pressure washer and applied Autoglym Wheel cleaner. This alongside my trusty Megs wheel scrubber didn't get rid of all the grease, so I kinda used some Autoglym engine de-greaser I had laying around
Does the trick, but not advised if your alloys are in mint condition - mine need a refurb anyway unfortunatley.So, hosed them down after this and then hosed the whole car with the Karcher at full whack - no mineral water used, just good old 'council pop' from the outside tap
Car was washed with two bucket method as per usual using Autoglym shampoo conditioner and my new wash mitt ( I decided to try an ebay item, as I was sick of having to buy wash mitts @ �7.99 from halfords every few weeks as they fall apart
, and Polished Bliss were out of stock).I rinsed the Pug with the pressure washer thoroughly and then dried with my waffle weave. This was brilliant, I really recommend using one instead of naff chamois leathers or microfibre towels. All I did was dab the car all round and it was touch dry. A lot easier than rubbing continuously spreading the damp around. Really good bit of kit.
So car dry, I dressed the wheels with some Mer wax I had spare as I had run out of my usual Autoglym wheel seal spray stuff. Tyres were dressed with Black In A flash (in a bottle
) - again I had run out of the spray stuff which I prefer.Exhaust tip was polished with Autosol Metal polish and all the windows were given the Turtlewax window cleaner treatment (I'm still to find a window spray apart from the above which doesn't leave smear marks, so have stuck with this for years).
Whole car was clean and dry, so I thought I would give the Autoglym wax a go now as time was pressing and I had the Mrs to pick up from work @ 3.00pm.
In the kit you get the wax itself, 2 foam applicator pads and a tech microfibre towel for buffing. Keeping the applicators moist is easy as they seem a lot easier to use than the Megs ones I have used in the past. Whizzed around the whole car in about 30 mins and then left it for another 10 mins to glaze while me and my next door nieghbour talked about saturdays match.
Back to the point, I then worked round the car with said buffing towel, went to pick the Mrs up, and then went to find a nice spot for a few pics while the sun was still out.
Heres the finished results...
And a couple of close up's to show the shine from the wax, and the huge improvement on th trimmings. I will admit, it probably does need a second coat as it's a little patchy in places, as I used a paint brush to apply it for accutrate results.
Also note, i didn't apply any trimming dressing either, that's the colour they were after being washed.
Hope you enjoy my terrible write up, as usual comments and constructive crititism are welcome.
Andy
Last edited by chocolate_o_brian; Sep 10, 2008 at 04:45 PM.


Scooby Regular
iTrader: (3)
Joined: Jan 2003
Posts: 5,350
Likes: 0
From: South Wales - Stuck on this rollercoaster, get me off!!
Great job, the 205's look soo much better when you get the trim looking like that. I remember when I had mine I used this Gel stuff that fed the trim to stop it from fading, I forget what it was called but had to apply after each wash.
Very nice example mate, one of the true classic's!!
simb
Very nice example mate, one of the true classic's!!
simb
Last edited by simb 2; Sep 12, 2008 at 10:08 PM.


Trending Topics

Thread Starter
Joined: May 2006
Posts: 21,415
Likes: 0
From: Doncaster, S. Yorks.
They're ok actually. Not like they were last September as I've had my Karcher on the car a few times since, but certainly still better than before.
I'm currently refurbing my wheels white to as a cheap budget diy job for some stuff I bought aaages ago, so when these are done and popped back on, I'll have a total new look to the pug
I'm currently refurbing my wheels white to as a cheap budget diy job for some stuff I bought aaages ago, so when these are done and popped back on, I'll have a total new look to the pug
Thread Starter
Joined: May 2006
Posts: 21,415
Likes: 0
From: Doncaster, S. Yorks.
As this is a proper dye, it certainly lasts longer than something you add on as a trim detailer fella. I'd be happy enough applying a fresh coat every 6 months or something, unless ofcourse you have the skirts spray painted or whatnot. But for �12, it's a decent lot.

Thread
Thread Starter
Forum
Replies
Last Post