Notices
ScoobyNet General General Subaru Discussion

Painting Calipers?

Thread Tools
 
Search this Thread
 
Old Mar 1, 2011 | 07:57 PM
  #31  
leecalcars's Avatar
leecalcars
Scooby Regular
iTrader: (37)
 
Joined: Jan 2005
Posts: 7,843
Likes: 1
From: never far away from my impreza
Default

Originally Posted by Markfey
Love the blue ones! Any pics of the rest of the car?

Yours look awesome as well Lee. Did you have the calipers sprayed as well or are they new?
Callipers were old and tatty came up like new when done.

Blue scoob read your project thread great stuff ive got one to in members gallery something for the weekend !

lovely colour by the way !
Reply
Old Mar 2, 2011 | 12:17 AM
  #32  
kj200sx's Avatar
kj200sx
Scooby Regular
iTrader: (7)
 
Joined: Jul 2010
Posts: 769
Likes: 0
Default

don't even think about starting this people unless you have alot of patience I've just started by brembos tonight and been sanding for approx 3 hours and about 1/2 way through one caliper but sure it will be worth it in the end
Reply
Old Mar 2, 2011 | 12:56 AM
  #33  
Pink_Floyd's Avatar
Pink_Floyd
Scooby Regular
 
Joined: Jun 2010
Posts: 1,137
Likes: 1
Default

Originally Posted by kj200sx
don't even think about starting this people unless you have alot of patience I've just started by brembos tonight and been sanding for approx 3 hours and about 1/2 way through one caliper but sure it will be worth it in the end
It is a nightmare mate........

I got a re-manufactured pair through a local specialist and they only came with an electro applied anti-rust treatment. I had to fill and sand, then start with hi-build primer. It has taken hours.

Have you tried a paint remover, or are you sanding to make smooth only? I'd recommend the primer I used as it definitely helps with the more minor blemishes. It's available in Halfrauds and is called U-Pol High-Build

I'm starting the colour coats tomorrow which will no doubt be fun
Reply
Old Mar 2, 2011 | 09:00 AM
  #34  
kj200sx's Avatar
kj200sx
Scooby Regular
iTrader: (7)
 
Joined: Jul 2010
Posts: 769
Likes: 0
Default

thought about paint remover but think it will probably balance itself out once ive had to prime it and then would still need a light sand anyway but may have to if my fingers die first lol will get some pics up when there done
Reply
Old Mar 2, 2011 | 06:16 PM
  #35  
Markfey's Avatar
Markfey
Thread Starter
Scooby Regular
iTrader: (7)
 
Joined: Dec 2009
Posts: 2,008
Likes: 0
From: Surrey
Default

I spent about 15 mins sanding my subaru 4 pots and they came up a treat...
Reply
Old Mar 2, 2011 | 07:11 PM
  #36  
leecalcars's Avatar
leecalcars
Scooby Regular
iTrader: (37)
 
Joined: Jan 2005
Posts: 7,843
Likes: 1
From: never far away from my impreza
Default

Sand blastings them is the best option if there's a local company take them in to get them done should only cost a few quid !
Reply
Old Mar 2, 2011 | 07:28 PM
  #37  
d7nmr's Avatar
d7nmr
Scooby Regular
 
Joined: Sep 2010
Posts: 160
Likes: 0
Default

You can get stickers from ebay, thats what i did. As the "subaru" sign is standing proud on the surface it is easy to apply the stickers. Ive had mine on for 1 year ow and still good ans new
Reply
Old Mar 2, 2011 | 07:30 PM
  #38  
Markfey's Avatar
Markfey
Thread Starter
Scooby Regular
iTrader: (7)
 
Joined: Dec 2009
Posts: 2,008
Likes: 0
From: Surrey
Default

Originally Posted by d7nmr
You can get stickers from ebay, thats what i did. As the "subaru" sign is standing proud on the surface it is easy to apply the stickers. Ive had mine on for 1 year ow and still good ans new
Any pics?
Reply
Old Mar 8, 2011 | 08:04 PM
  #39  
Markfey's Avatar
Markfey
Thread Starter
Scooby Regular
iTrader: (7)
 
Joined: Dec 2009
Posts: 2,008
Likes: 0
From: Surrey
Default

Hello all

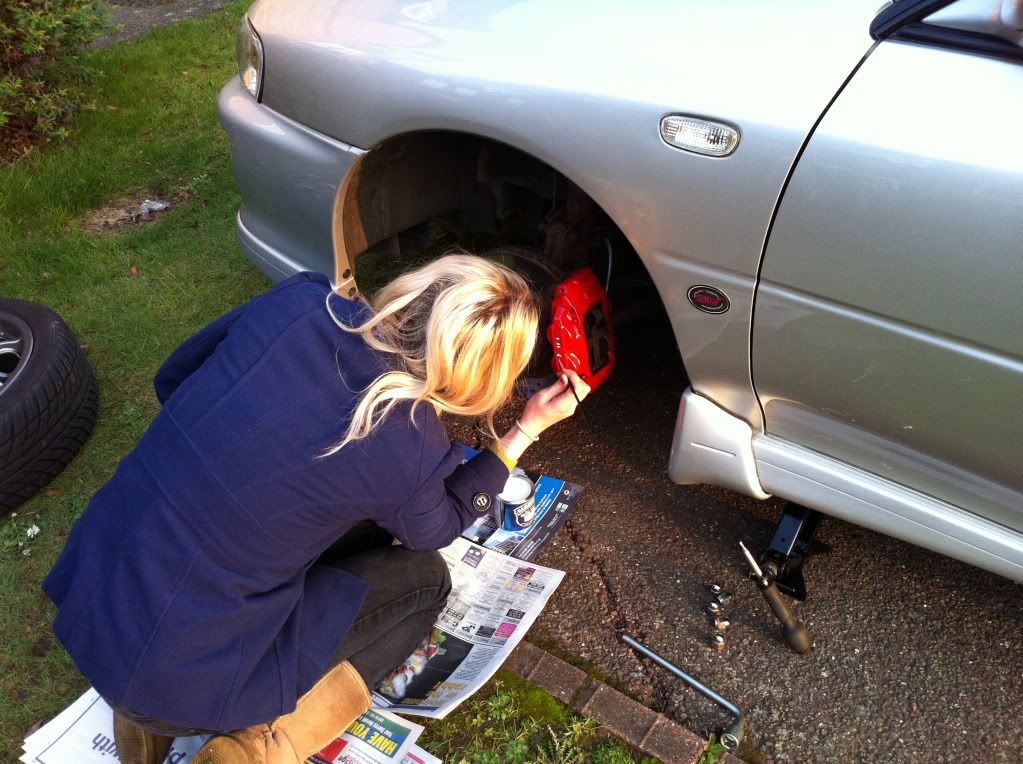
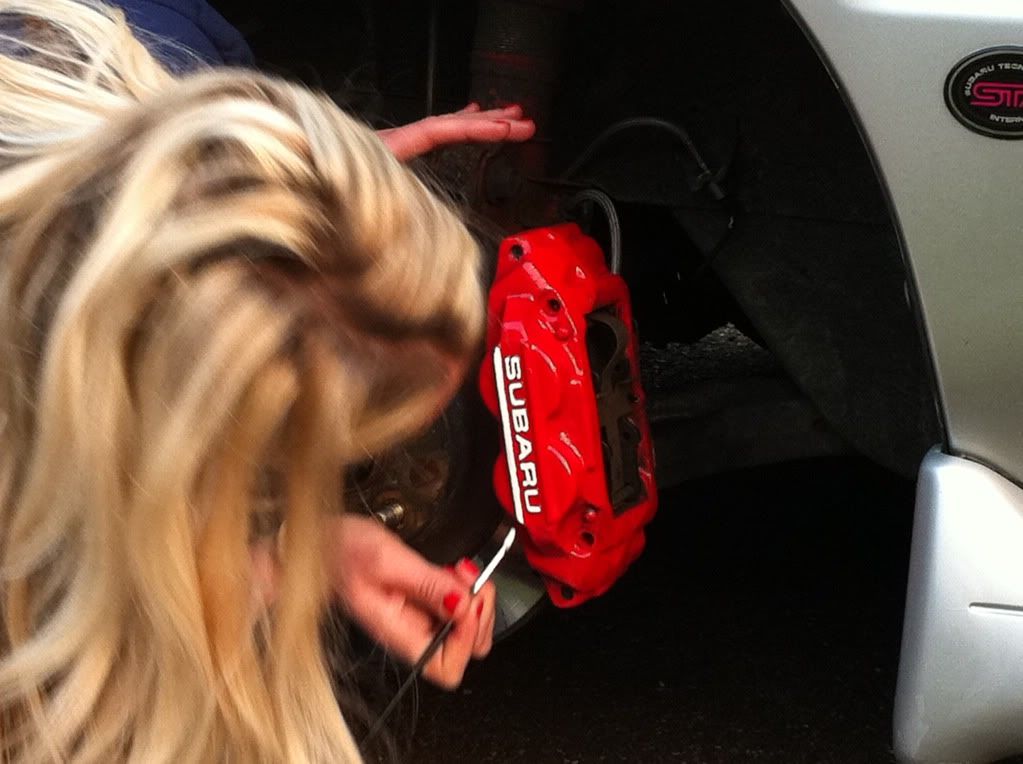
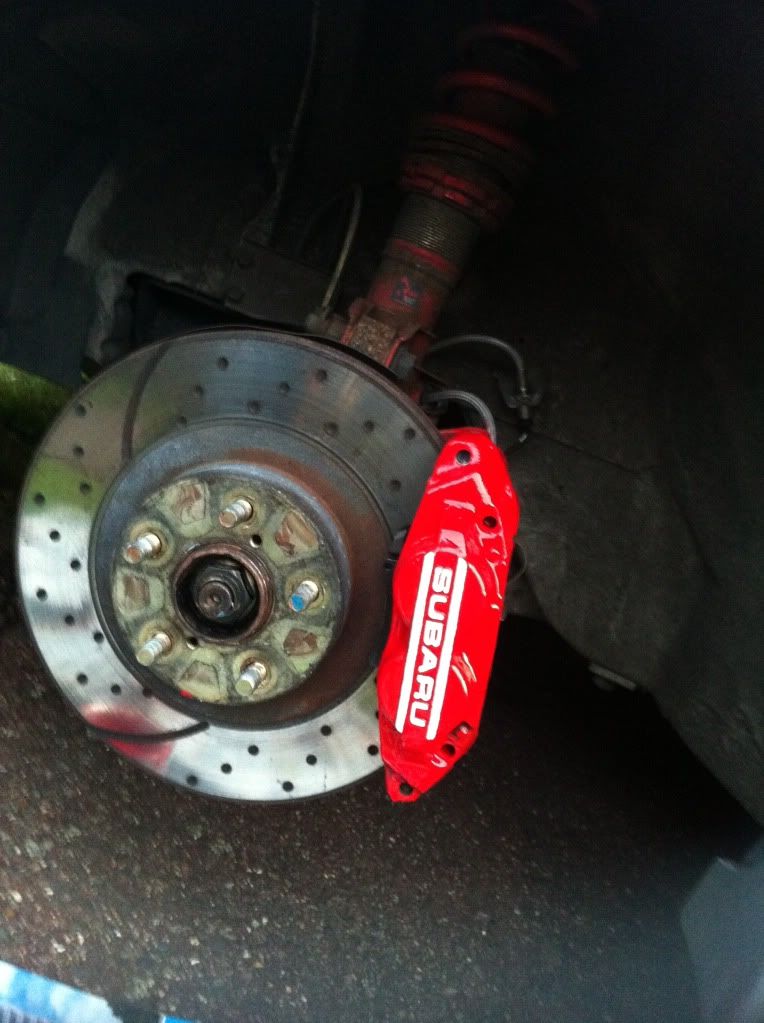
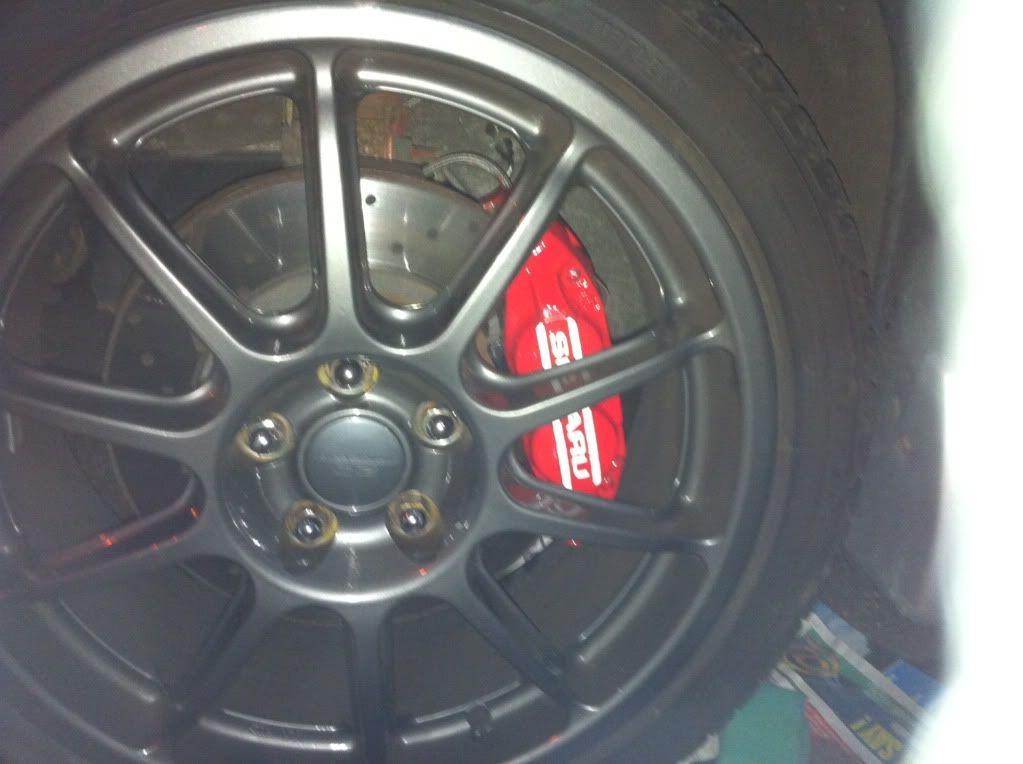
I've finished as i had a day off and it's finally warmed up a little. And the misses helped me out with the fine details.

I'm chuffed to bits with the results.

Now moving on to the next project which is trying to fill the top glove box so i can hide 3 x 60mm gauges inside. The idea is i remove the bracket from the lid, feel with mdf and then velcro the lid back on so i can choose whether to display or not.

If any one has any suggestions i'd be grateful.

Here's some pics of the finished job


Reply
Old Mar 8, 2011 | 08:05 PM
  #40  
chocolate_o_brian's Avatar
chocolate_o_brian
Scooby Regular
20 Year Member
Liked
iTrader: (22)
 
Joined: May 2006
Posts: 21,415
Likes: 0
From: Doncaster, S. Yorks.
Default

Very good
Reply
Old Mar 8, 2011 | 08:31 PM
  #41  
SRSport's Avatar
SRSport
Scooby Regular
 
Joined: Jul 2009
Posts: 3,360
Likes: 0
From: North Yorkshire
Default

That looks spot on. Tell you misses that she has done a very good job, she must have very steady hands as mine was not easy and took quite a few attempts.
Reply
Old Mar 9, 2011 | 11:45 PM
  #42  
Markfey's Avatar
Markfey
Thread Starter
Scooby Regular
iTrader: (7)
 
Joined: Dec 2009
Posts: 2,008
Likes: 0
From: Surrey
Default

Originally Posted by SRSport
That looks spot on. Tell you misses that she has done a very good job, she must have very steady hands as mine was not easy and took quite a few attempts.
Cheers mate, i think she's now half tempted to start offering her serivices

She's determined to paint something else now, just need to decide which part to take off and let her do her magic. Any idea?
Reply
Old Mar 9, 2011 | 11:51 PM
  #43  
JAutos's Avatar
JAutos
ScoobyWorx
iTrader: (5)
 
Joined: Oct 2010
Posts: 768
Likes: 0
From: Barnsley SY
Default

They look top notch
Reply
Old Mar 10, 2011 | 08:01 AM
  #44  
SRSport's Avatar
SRSport
Scooby Regular
 
Joined: Jul 2009
Posts: 3,360
Likes: 0
From: North Yorkshire
Default

Originally Posted by Markfey
Cheers mate, i think she's now half tempted to start offering her serivices

She's determined to paint something else now, just need to decide which part to take off and let her do her magic. Any idea?

Im afraid not. If I think of anything Ill let you know.
Reply
Old Mar 10, 2011 | 08:25 AM
  #45  
ScoobyForLife27's Avatar
ScoobyForLife27
Scooby Regular
iTrader: (14)
 
Joined: Nov 2010
Posts: 1,944
Likes: 0
From: Bedford
Default

Markfey,
What paint did you use ? Hammerite Smooth or something different ? Spray or brush ?
Cheers
Reply
Old Mar 10, 2011 | 08:30 AM
  #46  
ScoobyForLife27's Avatar
ScoobyForLife27
Scooby Regular
iTrader: (14)
 
Joined: Nov 2010
Posts: 1,944
Likes: 0
From: Bedford
Default

I mean paint you used to paint calipers red.
Reply
Old Mar 10, 2011 | 02:23 PM
  #47  
Markfey's Avatar
Markfey
Thread Starter
Scooby Regular
iTrader: (7)
 
Joined: Dec 2009
Posts: 2,008
Likes: 0
From: Surrey
Default

I used hammerite smooth with a brush.

The callipers took four coats in total. Painted, let dry for an hour, 3 times. Then an over night dry and a final coat.

I bought a set of artist brushes off ebay to do the subaru sign, again hammerite smooth.

Most people have been saying that you'll get a better finish with the spray on the callipers but i'm more than happy with my results.
Reply
Old Mar 10, 2011 | 02:34 PM
  #48  
Markfey's Avatar
Markfey
Thread Starter
Scooby Regular
iTrader: (7)
 
Joined: Dec 2009
Posts: 2,008
Likes: 0
From: Surrey
Default

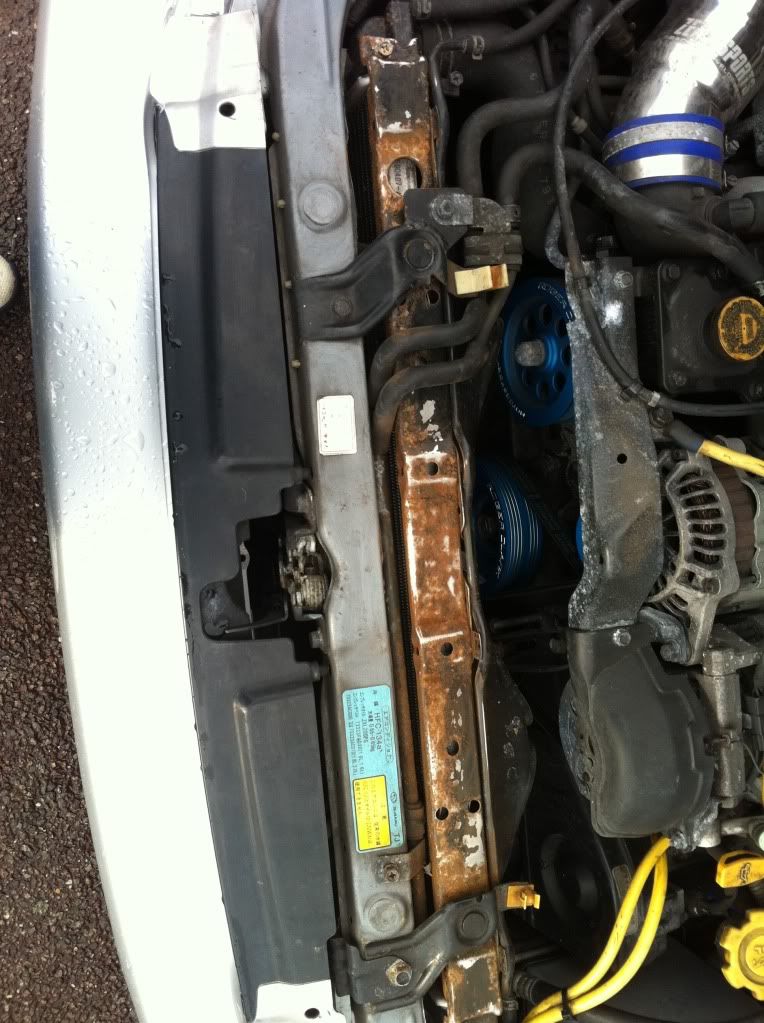
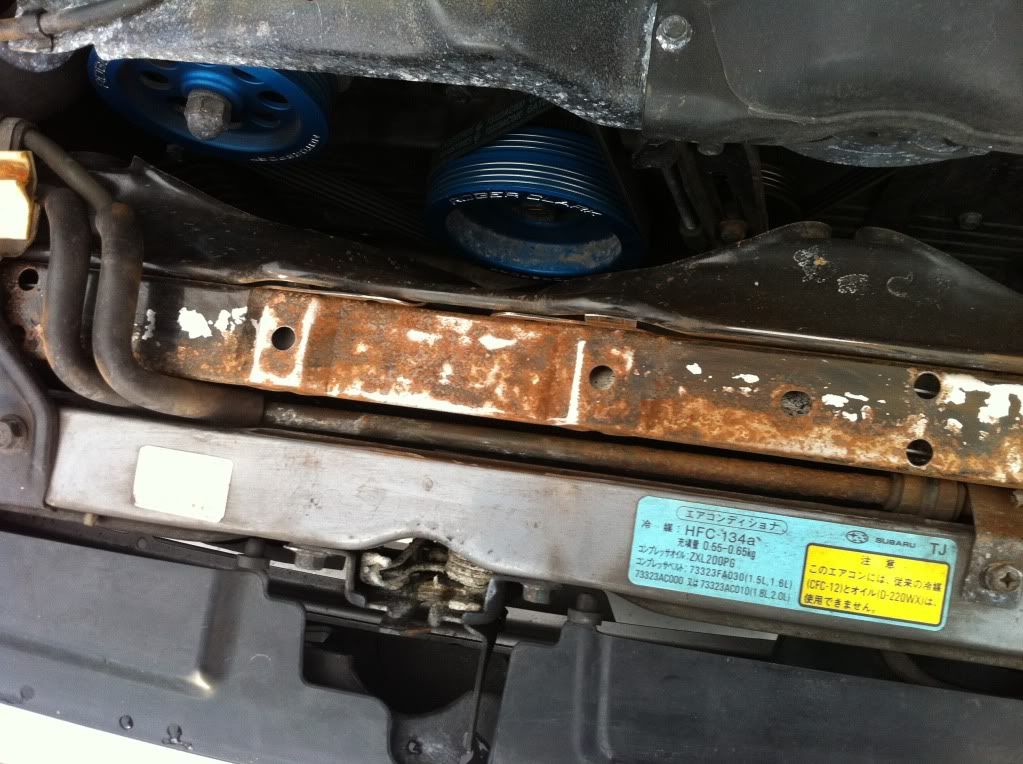
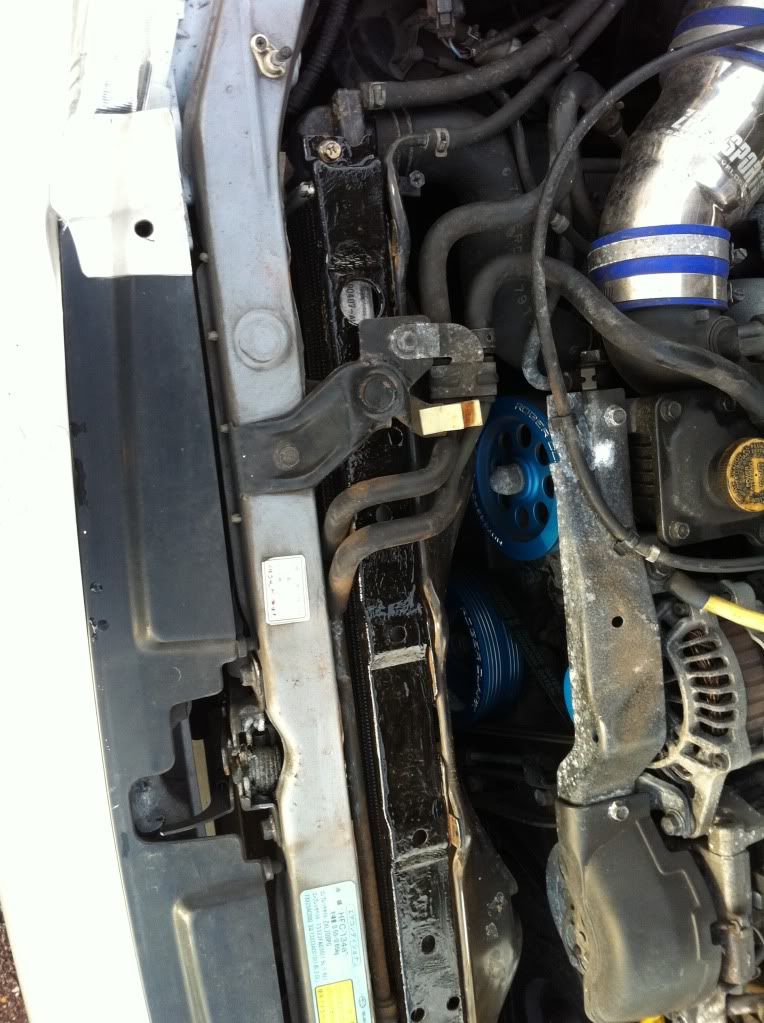
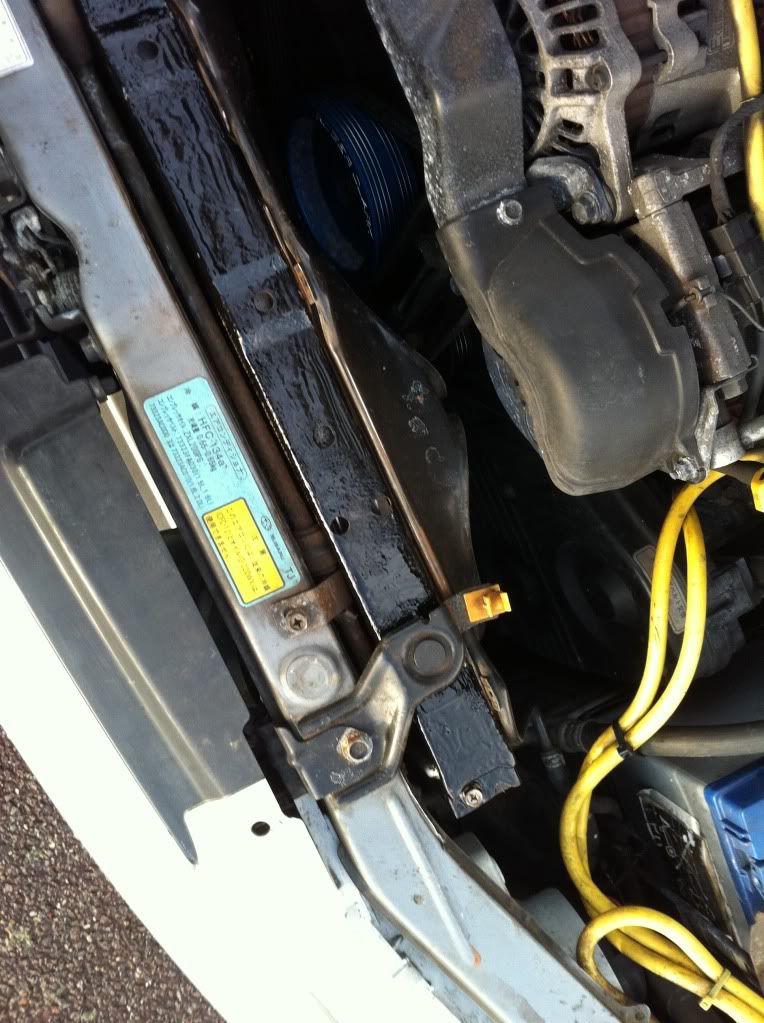
I also sanded down and painted the radiator cover using hammerite smooth. It looks awful, i think i prefered the rusty look Don't know if this will help your decision.


Reply
Old Mar 10, 2011 | 03:21 PM
  #49  
scooby L's Avatar
scooby L
Scooby Regular
 
Joined: Feb 2003
Posts: 3,931
Likes: 0
From: CHIPP'N HAM
Default

I've just painted my Brembo's on my Range Rover

Started by de-greasing and wire brushing them


Then used Halfords Caliper Paint (brushed 2 coats on)


Then applied heat resistant Brembo decals from fleabay


All done Total cost £15 inc brushes, thinners & paint

Reply
Old Mar 10, 2011 | 07:18 PM
  #50  
Aztec Performance Ltd's Avatar
Aztec Performance Ltd
Former Sponsor
iTrader: (234)
 
Joined: Jan 2003
Posts: 14,406
Likes: 0
From: Over 500ft/lbs of torque @ just 1.1bar
Default

Good job mark, the white writing finishes them off nicely
Reply
Old Mar 10, 2011 | 07:21 PM
  #51  
Markfey's Avatar
Markfey
Thread Starter
Scooby Regular
iTrader: (7)
 
Joined: Dec 2009
Posts: 2,008
Likes: 0
From: Surrey
Default

Originally Posted by Aztec Performance Ltd
Good job mark, the white writing finishes them off nicely
Thanks bob, the pads and hoses i got from you are all installed and are doing a great job so far. I've only done 60 miles with them but they feel great.

I'm going to do a few more miles yet till i try and give them a propper test.
Reply
Related Topics
Thread
Thread Starter
Forum
Replies
Last Post
Mattybr5@MB Developments
Full Cars Breaking For Spares
28
Dec 28, 2015 11:07 PM
Mattybr5@MB Developments
Full Cars Breaking For Spares
12
Nov 18, 2015 07:03 AM
just me
ScoobyNet General
25
Oct 29, 2015 10:32 AM
IanG1983
Wheels, Tyres & Brakes
2
Oct 6, 2015 03:08 PM


All times are GMT +1. The time now is 10:59 AM.