
Project Rex Racer


yeach crack on. Got any local scooby clubs to give u a hand?
Its looking good.
Yeah im currently doing track days untill the car is good enough for some sprints. I.e. scooby sprint and time attack.
I would love to compete but i think my budget will only stretch to doing it just for fun. The nippon challenge would be rite good fun. There is a lady on here who participates in it.
You got much track experiance so far?

Thread Starter
Scooby Regular
Joined: Jan 2006
Posts: 931
Likes: 0
From: North Wales
yeach crack on. Got any local scooby clubs to give u a hand?
Its looking good.
Yeah im currently doing track days untill the car is good enough for some sprints. I.e. scooby sprint and time attack.
I would love to compete but i think my budget will only stretch to doing it just for fun. The nippon challenge would be rite good fun. There is a lady on here who participates in it.
You got much track experiance so far?
Its looking good.
Yeah im currently doing track days untill the car is good enough for some sprints. I.e. scooby sprint and time attack.
I would love to compete but i think my budget will only stretch to doing it just for fun. The nippon challenge would be rite good fun. There is a lady on here who participates in it.
You got much track experiance so far?

Quite alots gone wrong in a very short period of time and I cant put it right as Ive run out of time and have to get sorted for uni now so i guess the workshops closed till my winter break! Which is very frustrating an will be eating at me as I hate leaving jobs half done!

I havnt got any track experiance in a car no... but will have enough time to get some practice sessions in before the car is ready by the look of it, hopefully when I get down to Oxford I can go around silverstone or something... we'll see!
Gaz
Thread Starter
Scooby Regular
Joined: Jan 2006
Posts: 931
Likes: 0
From: North Wales
Did some more painting... using a nice basic paint gun


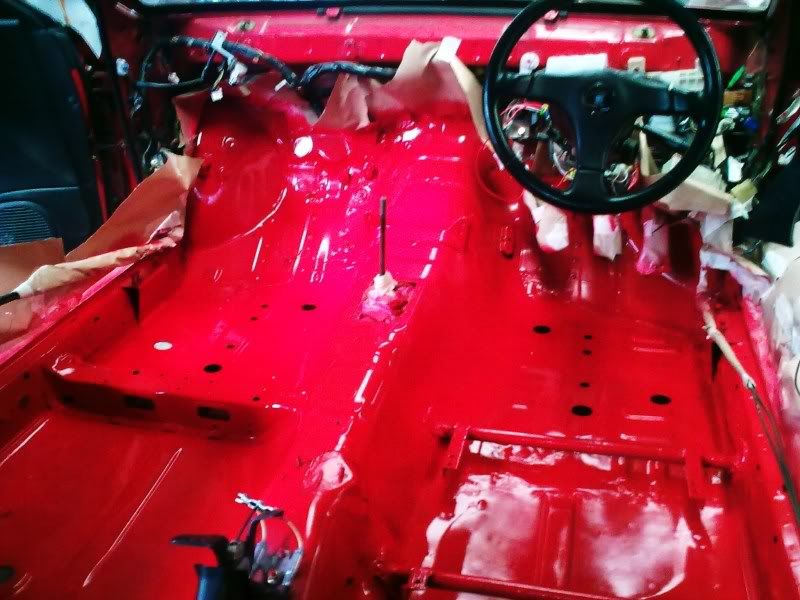
Could use another coat of laquer tho... not going to get time to do that yet, back to oxford on tuesday! So if anyone does any track days around silverstone while im down in Uni can I come and watch?
Also need to find a local place to flock my dash, anyone know of a place?
Gaz
Could use another coat of laquer tho... not going to get time to do that yet, back to oxford on tuesday! So if anyone does any track days around silverstone while im down in Uni can I come and watch?
Also need to find a local place to flock my dash, anyone know of a place?
Gaz
Thread Starter
Scooby Regular
Joined: Jan 2006
Posts: 931
Likes: 0
From: North Wales
Update: Summer 2010
So my second year of Uni finished last month and having achieved better grades than I expected I treated myself to some goodies and got back working on the car.
The Goodies:
HDi front mount intercooler - second hand
Apexi ECU with hand controller and Boost solenoid - second hand
Walbro fuel pump - second hand
Adjustable FPR - second hand
K&N cone - second hand
Various Red samco hoses to replace the blue intercooler ones
fuel hose and various clips
Gauge pods
440 Injectors - second hand
Manifold spacers and gaskets
injector adaptors
FPR adaptor
Aero bonnet catches
The decision:
I decided I wanted more engine reliability and more power which has resulted in the new parts and the plan to achieve a usable 300+BHP. This is obviously more expensive but I think it will be a good choice in the long run.
The work:
Decided to modify the fuel rails so I could rig up a semi-parrallel system and use the FPR I got. This involved cutting the fuel rails, swadging the ends and then rigging up new fuel lines that were measured so all are equal.


The fuel setup should now give better protection to the engine but I just hope the lines are reliable!
The test fitting of the intercooler


Then painted black for a more stealth look!

Then fitting the intercooler pipes and new hoses.


You can see in that last pic that I fitted the FPR where the AC pump was... I did this because without the pump that area looked bare and now I think it looks better. This car needs to be functional but I am trying to keep a specific organised and clean look to it on the whole! I also had to move the catch cans to the other side to make space for the IK so they are now located where the batter would be. The battery will be relocated to the boot as will the washer bottle.
The interior:
The cage has now been fully bolted down and the dash has come back from Ramsport after being flocked. The gauge pods were then fitted and the gauges half wired in at the moment.


coming together nicely and my vision is slowly appearing how I wanted it to look!
The Exterior:
Bonnet catches being fitted but also the bonnet, bumper and drivers wing are in the process of me spraying them as the laquer had gone funny on them. Heres the test fit of the catches.

More to come.... :
A custom pipe has been made to join the induction kit pipe to the turbo which I havent recieved yet.
Air box to be made for the IK
More interior parts
and finally, very soon the fire up to check everythings working!
Cheers!
Gaz
(p.s. pictures are not in the order of when the work was done. Also the 440s have not yet been fitted and wont be untill the ECU is and a mapping session is booked. Sorry for Iphone camera pics!)
So my second year of Uni finished last month and having achieved better grades than I expected I treated myself to some goodies and got back working on the car.
The Goodies:
HDi front mount intercooler - second hand
Apexi ECU with hand controller and Boost solenoid - second hand
Walbro fuel pump - second hand
Adjustable FPR - second hand
K&N cone - second hand
Various Red samco hoses to replace the blue intercooler ones
fuel hose and various clips
Gauge pods
440 Injectors - second hand
Manifold spacers and gaskets
injector adaptors
FPR adaptor
Aero bonnet catches
The decision:
I decided I wanted more engine reliability and more power which has resulted in the new parts and the plan to achieve a usable 300+BHP. This is obviously more expensive but I think it will be a good choice in the long run.
The work:
Decided to modify the fuel rails so I could rig up a semi-parrallel system and use the FPR I got. This involved cutting the fuel rails, swadging the ends and then rigging up new fuel lines that were measured so all are equal.
The fuel setup should now give better protection to the engine but I just hope the lines are reliable!
The test fitting of the intercooler
Then painted black for a more stealth look!
Then fitting the intercooler pipes and new hoses.
You can see in that last pic that I fitted the FPR where the AC pump was... I did this because without the pump that area looked bare and now I think it looks better. This car needs to be functional but I am trying to keep a specific organised and clean look to it on the whole! I also had to move the catch cans to the other side to make space for the IK so they are now located where the batter would be. The battery will be relocated to the boot as will the washer bottle.
The interior:
The cage has now been fully bolted down and the dash has come back from Ramsport after being flocked. The gauge pods were then fitted and the gauges half wired in at the moment.
coming together nicely and my vision is slowly appearing how I wanted it to look!
The Exterior:
Bonnet catches being fitted but also the bonnet, bumper and drivers wing are in the process of me spraying them as the laquer had gone funny on them. Heres the test fit of the catches.
More to come.... :
A custom pipe has been made to join the induction kit pipe to the turbo which I havent recieved yet.
Air box to be made for the IK
More interior parts
and finally, very soon the fire up to check everythings working!
Cheers!
Gaz
(p.s. pictures are not in the order of when the work was done. Also the 440s have not yet been fitted and wont be untill the ECU is and a mapping session is booked. Sorry for Iphone camera pics!)
Last edited by GazJenno; Jul 4, 2010 at 03:20 PM.
Thread Starter
Scooby Regular
Joined: Jan 2006
Posts: 931
Likes: 0
From: North Wales
Update from today.
Custom Pipe:
To join turbo hose to induction kit hose and to keep the idle control valve connection. Made from an aluminium hose joiner for the main pipe and a dump valve adaptor pipe i had lying around for the take off required.


Then the pipe fitted as desired.

The induction track to the turbo now has no other take off for such things as breathers or sump valve return so should be more free flowing.


Most the engine work finished now, I have just finished a very sturdy bracket to secure the IK better than in the above pics. Then a cold air box will be made out of some aluminium around the IK.
Anyone who was following my project from the begining can see that I was avoiding any huge mods and was planning to keep the power and engine standard. This has obviously changed now as my plan for the car changed. I realised I was living in a dream land thinking I could get this car competative on my budget, so now it will just be a track day car.... for now anyway.
Gaz
Custom Pipe:
To join turbo hose to induction kit hose and to keep the idle control valve connection. Made from an aluminium hose joiner for the main pipe and a dump valve adaptor pipe i had lying around for the take off required.
Then the pipe fitted as desired.
The induction track to the turbo now has no other take off for such things as breathers or sump valve return so should be more free flowing.
Most the engine work finished now, I have just finished a very sturdy bracket to secure the IK better than in the above pics. Then a cold air box will be made out of some aluminium around the IK.
Anyone who was following my project from the begining can see that I was avoiding any huge mods and was planning to keep the power and engine standard. This has obviously changed now as my plan for the car changed. I realised I was living in a dream land thinking I could get this car competative on my budget, so now it will just be a track day car.... for now anyway.
Gaz
Last edited by GazJenno; Jul 5, 2010 at 07:29 PM.
Scooby Regular
Joined: Apr 2010
Posts: 104
Likes: 0
From: Cheltenham
my V1 jap import is very similar to yours mate, just had fmic/induction fitted, with remap. Yours is much tidier. Im thinking of stripping mine out and chucking a rollcage in now iv seen yours!
Just a couple of things ---
Im sure your strutbrace is the wrong way round?
I need a cold airbox for my filter. I wanna see how you make yous? If its good i may commission you to make me one!!!
Just a couple of things ---
Im sure your strutbrace is the wrong way round?
I need a cold airbox for my filter. I wanna see how you make yous? If its good i may commission you to make me one!!!

Joined: Apr 2005
Posts: 11,778
Likes: 4
From: Newcastle. 330bhp-289lb/ft @ 1bar boost - 12.4s @ 105mph
Good write up Gaz, although I thought this thread had been deleted. 

I like what you've done on the turbo inlet and your mounting of the FPR. Very well thought out.
I like what you've done on the turbo inlet and your mounting of the FPR. Very well thought out.
Thread Starter
Scooby Regular
Joined: Jan 2006
Posts: 931
Likes: 0
From: North Wales
Thanks for the comment, im trying to keep it as clean as possible but see how long that lasts after it gets some use. If you got yours on the road then I would avoid the roll cage route, I dont know what its gonna do to insurance but I cant see anyone of them liking it. Plus its alot of effort, ok its safer but for fast road use could be more hassle than its worth.
The strut brace was like that when I bought it and I was the first owner in this country. It also had a sticker on it that the writing faced the front in that orientation so would look like its meant to go like that. It doesnt catch or cause any problems. Plus the point of a strut brace is to help stop the struts flexing inwards under load. The bulk head takes some of this flex on the far side but the side closest to the engine has no support high up so I would have thought this is a better position anyway.
Lol, well you'll be able to see how I get on with the air box but need some materials first so may be a while. I have not yet come up with an idea how to start yet either.
Cheers again,
Gaz
Thread Starter
Scooby Regular
Joined: Jan 2006
Posts: 931
Likes: 0
From: North Wales
 Cheers Micky!... and thanks for helping me find my thread

Thread Starter
Scooby Regular
Joined: Jan 2006
Posts: 931
Likes: 0
From: North Wales
Small Update:
No pics im afraid but I got the Walbro fuel pump fitted today and then I thought "what the hell" and started it up :P It sounded insane and I am very happy with the engine and interior at the moment.
Now I have to figure out my options... she needs to be mapped! So I either try getting insurance which will be expensive or figure out a way of getting it to a rolling road which will still cost me :S
Will let you guys know how I get on
Gaz
Scooby Regular
Joined: Apr 2010
Posts: 104
Likes: 0
From: Cheltenham
good idea heat wrapping the cooler pipes infront of turbo. might have to do the same, gets pretty hot. Did u just use metal cable ties to do it?
Also what splitter do you have on the bumper & does it cover the bottom of the fmic? I need one to cover the bottom of mine but dont want a big chavvy one!
Also what splitter do you have on the bumper & does it cover the bottom of the fmic? I need one to cover the bottom of mine but dont want a big chavvy one!
Last edited by bengreen85; Jul 17, 2010 at 07:00 PM.
Thread Starter
Scooby Regular
Joined: Jan 2006
Posts: 931
Likes: 0
From: North Wales
I used some left over heat wrap and the metal cable ties from when I wrapped the headers.
The splitter in the above pics is actually the standard lip on a leggy GT that Im braking at home, its not a great fit and probably wont be going back on. I doubt it would have covered the bottom of the intercooler either cause its tiny. Im in the same boat though need to find a splitter and some vents at some point.
Gaz

Just a small point to assist you. The compressed air leaving the turbo charger can be up to 200 C. on WOT so there is no point wrapping the hard pipe from the turbo to the inner wing as the ambient temperature in that area, even over the top of the turbo, will never be that high. It is however worth wrapping the hard pipe from somewhere after the exit of the intercooler core to the throttle body to protect it from under bonnet engine heat.


Thread Starter
Scooby Regular
Joined: Jan 2006
Posts: 931
Likes: 0
From: North Wales
I had no doubt.... honest
Im just waiting on the race battery and making new power cables. Got a sabelt harness on ebay for �50 last night too so am very excited at the min!
also got the whole front end back together along with my DIY painted bumper which I am very pleased with. My aim is to have this ON THE ROAD by the 1st of Aug and then have it professionally mapped some time in august!
Harvey: Thanks for that, I was concerned that the ali might have got abit hot but now youve said that I may remove the heat wrap from that point. The heat wrap is of course meant for exhaust and keeps heat in so might not be suited to the 'cold' side of the intercooler pipe work. I may move the wrap to under the induction kit which will then prevent heat off the IC pipe warming the IK and also keep the hot side hot to help speed up the gasses?
Gaz
The exhaust wrap doesn't know if something is hot or cold and will keep cold in ie. cold air from the intercooler to the throttle body just as well as it will keep hot air in on an exhaust section. I use DEI heat wrap on the intercooler cold pipes all the time.
Thread Starter
Scooby Regular
Joined: Jan 2006
Posts: 931
Likes: 0
From: North Wales
Fair enough then... I just thought there was specific shiny wrap to help prevent heat soak. I dont have enough wrap at the min to do the whole cold side either. Shame to cover up the shiney bits too really.
Will post pics of my new battery and other progress tmoz.
Gaz
Will post pics of my new battery and other progress tmoz.
Gaz

Thread Starter
Scooby Regular
Joined: Jan 2006
Posts: 931
Likes: 0
From: North Wales
Cheers Geoff,
Pic Update:
All the front end back on, bumper with a DIY re-spray which has come up a treat for my first time at spraying body work. Bonnet still to be done but think I'll find a body shop for that as it will be quicker, simpler and better probs.

New battery... dry cell odyssey 680

Holes in floor plated

fuel lines and battery cables clipped securley

and washer bottle re-located to the boot

oh and I am insured for the 1st of August!!!!!!! Then will need a map sensor and a mapping session. Should I get my 440s sent off to be ultra-sonicly cleaned? is an extra �70 and im out of this year budget unless I can sell some parts but for that peace of mind I think I should.... will need a chat with potential mappers.
Gaz
Pic Update:
All the front end back on, bumper with a DIY re-spray which has come up a treat for my first time at spraying body work. Bonnet still to be done but think I'll find a body shop for that as it will be quicker, simpler and better probs.
New battery... dry cell odyssey 680
Holes in floor plated
fuel lines and battery cables clipped securley
and washer bottle re-located to the boot
oh and I am insured for the 1st of August!!!!!!! Then will need a map sensor and a mapping session. Should I get my 440s sent off to be ultra-sonicly cleaned? is an extra �70 and im out of this year budget unless I can sell some parts but for that peace of mind I think I should.... will need a chat with potential mappers.
Gaz
Thread Starter
Scooby Regular
Joined: Jan 2006
Posts: 931
Likes: 0
From: North Wales
Hi Guys,
Sorry for lack of updates but my laptop has eaten it's harddrive so am without a computer. Need �130ish to fix it up but I am running out of money lol. I have alot of pics to get on here as soon as I get a computer working, cba doing it on my phone.
However, she was insured on the 1st and went for an MoT on the 2nd of Aug and is also taxed! I love it! I have all the parts ready to complete the setup which will be fitted this weekend and I have saved up enough to get Fiestaboy to remap her on Tuesday! Will let you know how it goes!
Gaz
Thread Starter
Scooby Regular
Joined: Jan 2006
Posts: 931
Likes: 0
From: North Wales
update write up:
Right so I left this as shown in the pics below so in my hurry to get this on the road by the 1st of Aug I needed the bonnet painting and a new bonnet vent as mine was knackered. So I got a local guy to paint the bonnet for �90, not the best job but it was cheapish I guess. I bought a bonnet vent off e-bay that was black and then bought some new bolts off here to fit it. Sorted all back together.
So then I take the car very sheepishly to be MOT'd on the 1st of Aug and only had 2 faults on the drive down, First speedo cable wasnt fitted fully but that was solved within seconds. Secondly I had a CEL after a while of driving, turned out a blew the vacuum hose off the map sensor, again solved quickly. So all was good!
Re-mapping horrors:
The day of the remap and I was kind of worried as live in the middle of nowhere and its a long way for Richard (fiestaboy) to come but I was praying there would be no problems. Anyway he got up here at 2pm and we got started. First problem the apexi was struggling to control the idle when the fan came on, sorted that after a few mins so off we went.
Everything was fine until we started putting boost on, only 0.9bar but was getting an awful misfire. So back to my shed and pull out the coil packs on the very hot engine. All were fine except one which disintergrated in my hand, luckily I have a spare scrapping leggy GT so we manage to find a good one on that and whack that in the Impreza.
Go back out again and all is ok at the lower boost levels, but towards 1.2 bar the ecu couldnt control the boost. For some reason the ECU wasnt using the new 3bar map sensor and so was using the stock sensor which cant see past 1.1bar. Eventually Rich figured out that he had to turn the boost control kit off and on every time he altered the boost level. Having never come across this before I was starting to think my car was just being akward.
So we up the boost and get it running 1.2 and 1.3 only to find that there was another miss fire at these levels. By now I was running out of fuel so had to take a huge detour to go get some then back to the shed to whip out the plugs. The plugs were fairly new and I was confident they were ok but the problem was the gaps were over 0.7mm. Adjust them to a tight 0.6mm and off out again. By now its 7pm.
We get back out and all is good at 1.2 bar, get it up to 1.3 and still all good but now I start to here a funny noise when pulling on full boost. A whine/ whistle noise. Everything seemed fine though so carried on and got her finished up. Get back to the shed to find something blowing, suspected downpipe gasket. Then she starts struggling to idle when the fans come on again. Anyway we wraped it up and off Richard went at 9pm to drive 4 hours home. I really did feel guilty because of all the issues, Rich is a top bloke though and wanted to just get it right no matter what it took.
Aftermath:
2 days later I decide to take the car out just to see if the blowing gets worse and to try the apexi hand commander out. All was great, could still hear the blowing so needed to get that sorted. Then CEL comes on, get no volts from the 3bar map sensor. Get the car home on a low boost setting using the oe sensor. Turns out the new MAP sensor had died so had to send it back and got a replacement within a few days. Then I get a new down pipe gasket, just been out to fit it... didnt take to long, start her up and can still here blowing. Turns out it had cracked the up pipe that also means the remap probably isnt correct once I fix the pipe.
Gutted
however, when she was working ok.... it was soo good!
will get some pics up soon and update on how get on with fixing the up-pipe problem!
Gaz
Right so I left this as shown in the pics below so in my hurry to get this on the road by the 1st of Aug I needed the bonnet painting and a new bonnet vent as mine was knackered. So I got a local guy to paint the bonnet for �90, not the best job but it was cheapish I guess. I bought a bonnet vent off e-bay that was black and then bought some new bolts off here to fit it. Sorted all back together.
So then I take the car very sheepishly to be MOT'd on the 1st of Aug and only had 2 faults on the drive down, First speedo cable wasnt fitted fully but that was solved within seconds. Secondly I had a CEL after a while of driving, turned out a blew the vacuum hose off the map sensor, again solved quickly. So all was good!
Re-mapping horrors:
The day of the remap and I was kind of worried as live in the middle of nowhere and its a long way for Richard (fiestaboy) to come but I was praying there would be no problems. Anyway he got up here at 2pm and we got started. First problem the apexi was struggling to control the idle when the fan came on, sorted that after a few mins so off we went.
Everything was fine until we started putting boost on, only 0.9bar but was getting an awful misfire. So back to my shed and pull out the coil packs on the very hot engine. All were fine except one which disintergrated in my hand, luckily I have a spare scrapping leggy GT so we manage to find a good one on that and whack that in the Impreza.
Go back out again and all is ok at the lower boost levels, but towards 1.2 bar the ecu couldnt control the boost. For some reason the ECU wasnt using the new 3bar map sensor and so was using the stock sensor which cant see past 1.1bar. Eventually Rich figured out that he had to turn the boost control kit off and on every time he altered the boost level. Having never come across this before I was starting to think my car was just being akward.
So we up the boost and get it running 1.2 and 1.3 only to find that there was another miss fire at these levels. By now I was running out of fuel so had to take a huge detour to go get some then back to the shed to whip out the plugs. The plugs were fairly new and I was confident they were ok but the problem was the gaps were over 0.7mm. Adjust them to a tight 0.6mm and off out again. By now its 7pm.
We get back out and all is good at 1.2 bar, get it up to 1.3 and still all good but now I start to here a funny noise when pulling on full boost. A whine/ whistle noise. Everything seemed fine though so carried on and got her finished up. Get back to the shed to find something blowing, suspected downpipe gasket. Then she starts struggling to idle when the fans come on again. Anyway we wraped it up and off Richard went at 9pm to drive 4 hours home. I really did feel guilty because of all the issues, Rich is a top bloke though and wanted to just get it right no matter what it took.
Aftermath:
2 days later I decide to take the car out just to see if the blowing gets worse and to try the apexi hand commander out. All was great, could still hear the blowing so needed to get that sorted. Then CEL comes on, get no volts from the 3bar map sensor. Get the car home on a low boost setting using the oe sensor. Turns out the new MAP sensor had died so had to send it back and got a replacement within a few days. Then I get a new down pipe gasket, just been out to fit it... didnt take to long, start her up and can still here blowing. Turns out it had cracked the up pipe
that also means the remap probably isnt correct once I fix the pipe.Gutted
however, when she was working ok.... it was soo good!
will get some pics up soon and update on how get on with fixing the up-pipe problem!
Gaz

Thread Starter
Scooby Regular
Joined: Jan 2006
Posts: 931
Likes: 0
From: North Wales
Im gutted about the issues too... managed to weld the uppipe yesterday and now its not blowing. New MAP sensor has problems again and I thought the whine I had was the uppipe blowing on boost but now think its turbo on its way out.
FMP: no not doing the Subaru Cup now, dont want to take the chance of hitting other cars as I wouldnt be able to afford repairs. Just gonna be some trackdays, hillclimbs, sprints etc
Cheers
Gaz
FMP: no not doing the Subaru Cup now, dont want to take the chance of hitting other cars as I wouldnt be able to afford repairs. Just gonna be some trackdays, hillclimbs, sprints etc
Cheers
Gaz
hey ho,
great thread and it reminds me on my situation (studying also 350 miles away from home and bought an STI v.4 :P), fingers crossed u get the problems sorted!
I also like red scoobies, they're pretty rare and with some white decals on it they're cool ^^
regards
Nico
great thread and it reminds me on my situation (studying also 350 miles away from home and bought an STI v.4 :P), fingers crossed u get the problems sorted!
I also like red scoobies, they're pretty rare and with some white decals on it they're cool ^^
regards
Nico
Thread Starter
Scooby Regular
Joined: Jan 2006
Posts: 931
Likes: 0
From: North Wales
Cheers for the nice comments guys, after all the little problems Ive been having and knowing Im no where near a complete car I was starting to feel abit down about this project. So much money has gone into it and basically my last two summers.
Update:
I think I left this as having a blown up-pipe and the map sensor had given up. So I welded the up-pipe back together (PITA getting it off!) and all seemed good. After the first new map sensor stopped working I was given a replacement which had a fault under high vacuum where it would just go straight to zero volts so finally got another replacement and all is good again!!! (thanks to chris @ efi parts!)
Took the car out yesterday and she really is a rocket, noticably lighter and stiffer (even on OE suspension) and I had no problems, well I say that....
... my aftermarket oil temp sensor has gone so now the gauge sits at 150degreesC or if I unplug the sensor wire it sits at zero. I also get a little bit of knock every now and again. I think my knock warning is set to 45 and I have seen 45-47 on a few occasions???
I think now Ive fixed the blown up-pipe and got the map sensor sorted I could do with a tweak to the map, problem is I live too far from anywhere decent. Fiestaboy did say if I get it to oxford he'd tweak it for free or a small amount but thats a long way to drive it really.
Anyway, heres some pictures that are long overdue!

split in up-pipe!

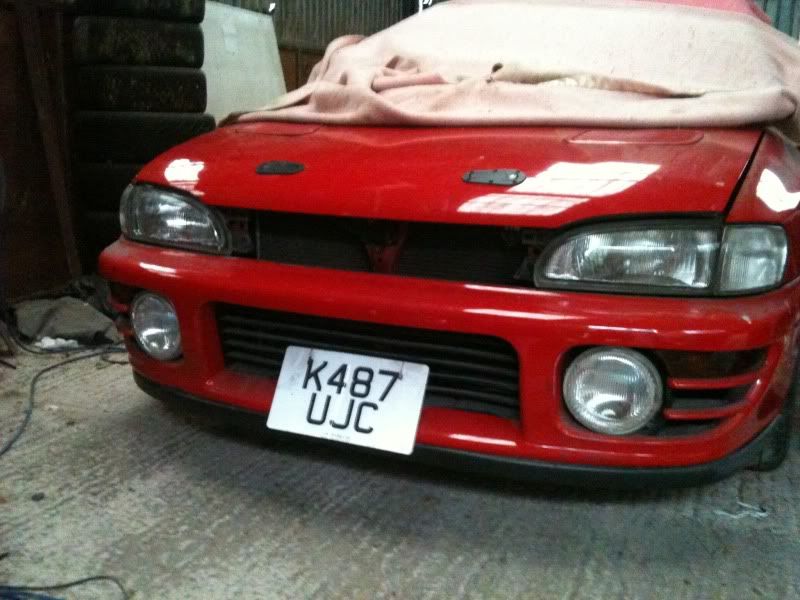
when she first came out of the shed.

bonnet was in paint shop


Impreza and Leggy together


so Next...
Replace oil temp sensor
some how get a tweak to the map
tighten all hose clamps
.... enjoy it before I have to go back to Uni! 15days left
Cheers!
Gaz
Update:
I think I left this as having a blown up-pipe and the map sensor had given up. So I welded the up-pipe back together (PITA getting it off!) and all seemed good. After the first new map sensor stopped working I was given a replacement which had a fault under high vacuum where it would just go straight to zero volts so finally got another replacement and all is good again!!! (thanks to chris @ efi parts!)
Took the car out yesterday and she really is a rocket, noticably lighter and stiffer (even on OE suspension) and I had no problems, well I say that....
... my aftermarket oil temp sensor has gone so now the gauge sits at 150degreesC or if I unplug the sensor wire it sits at zero. I also get a little bit of knock every now and again. I think my knock warning is set to 45 and I have seen 45-47 on a few occasions???
I think now Ive fixed the blown up-pipe and got the map sensor sorted I could do with a tweak to the map, problem is I live too far from anywhere decent. Fiestaboy did say if I get it to oxford he'd tweak it for free or a small amount but thats a long way to drive it really.
Anyway, heres some pictures that are long overdue!
split in up-pipe!
when she first came out of the shed.
bonnet was in paint shop
Impreza and Leggy together
so Next...
Replace oil temp sensor
some how get a tweak to the map
tighten all hose clamps
.... enjoy it before I have to go back to Uni! 15days left
Cheers!
Gaz