
08/09 Hatches, Stand up and show yourselves!!!


I currently have smd's in the rear license plate holders and they've been in 3 years without issue. lost a front led the other day but it's working again, so will leave them alone. MOT soon on mine


I've already got the front sides done, can you do me a pair of rear no. plate SMDs then Phil please?
Actually, �8 for all 4 inc postage is a bargain, I'll take a set - PM your paypal please!

V

Scooby Senior


Joined: Feb 2000
Posts: 15,078
Likes: 46
From: Nottm
PIC request.. show us your mud flaps...
I've teh std sealer fit ones.. and think I'm ready for a new set.
Like the look of the rally style ones...
options are these
http://www.evobits.co.uk/index.php?r...product_id=185
They are just like the Rally Armor Version 1's size/shape. Like the look but not sure how they look on a car.
or these...http://www.performancecreations.co.u...logo-144-p.asp
So who has what fitted and what do they look like on your car.
Last edited by salsa-king; Feb 4, 2013 at 08:57 PM.

Scooby Regular
Joined: Jun 2012
Posts: 236
Likes: 0
From: Scotland
PIC request.. show us your mud flaps...
I've teh std sealer fit ones.. and think I'm ready for a new set.
Like the look of the rally style ones...
options are these
http://www.evobits.co.uk/index.php?r...product_id=185
They are just like the Rally Armor Version 1's size/shape. Like the look but not sure how they look on a car.
or these...http://www.performancecreations.co.u...logo-144-p.asp
So who has what fitted and what do they look like on your car.
I've teh std sealer fit ones.. and think I'm ready for a new set.
Like the look of the rally style ones...
options are these
http://www.evobits.co.uk/index.php?r...product_id=185
They are just like the Rally Armor Version 1's size/shape. Like the look but not sure how they look on a car.
or these...http://www.performancecreations.co.u...logo-144-p.asp
So who has what fitted and what do they look like on your car.

Scooby Senior
Joined: Feb 2000
Posts: 15,078
Likes: 46
From: Nottm

1/ Push the trip **** to select �REV� on the combination meter
2/ When the trip **** is pushed for more than 2 seconds the thousands place flashes.
3/ Release your finger from the trip **** once, then push and hold the trip **** again. The number will change sequentially from 2 to 7. Release your finger at the desired alarm level engine speed.
4/ When the trip **** is pushed, the hundreds place flashes.
5/ Release your finger from the trip **** once, then push and hold the trip **** again. The number will change sequentially from 1 to 9. Release your finger at the desired alarm level engine speed.
6/ When the trip **** is pushed, the buzzer sounds and the REV alarm system will automatically enter its new setting mode (step 7 below), in which you can activate or deactivate the buzzer.
7/ Every time the trip **** is pushed and held, the buzzer changes to activate or deactivate.
b � On: Activated
b � oFF: Deactivated
When the mode is changed to �activate�, the buzzer sounds.
8/ Push the trip **** to complete the setting procedure.
This all has to be done with the ignition On and the car stationary.
All this information can be found in the Owners Manual, Chapter 3-13 in my manual for 09 hatch sti may be different in other manuals.
Scooby Regular
iTrader: (2)
Joined: Jun 2012
Posts: 295
Likes: 0
From: South Essex - Grey Hatch 330S
Made a totally newb error while ordering parts from Japan and ordered 3 pairs of the black front arch STi badges from the R205 by accident. Will teach me to check the cart quantity next time 
I have 2 pairs to sell �60 posted each delivered via RM Signed For can be collected in person from South Essex or paid for via PayPal.
I have 2 pairs to sell �60 posted each delivered via RM Signed For can be collected in person from South Essex or paid for via PayPal.
Made a totally newb error while ordering parts from Japan and ordered 3 pairs of the black front arch STi badges from the R205 by accident. Will teach me to check the cart quantity next time
I have 2 pairs to sell �60 posted each delivered via RM Signed For can be collected in person from South Essex or paid for via PayPal.
I have 2 pairs to sell �60 posted each delivered via RM Signed For can be collected in person from South Essex or paid for via PayPal.
Scooby Regular
Joined: Sep 2003
Posts: 8,677
Likes: 0
From: At the diesel pump...
Can someone do me a quick favour please?
I need the measurement from an 09 sun visor. From the outside edge of the L shaped bracket to the outside edge of the clip seat.
My drivers side has broken and I and I need the size to make sure some spares will fit. I know an 08 legacy ones will, but these are from an 07 impreza. If they dont fit, I'll be pulling them apart to repair mine.
Ps: I can't cos mines in the garage under assesment, to determine just how sick it is.
In the clear lense at the front there are two small notches, just a gently pry in there will release the lense to gain access to the bulbs

Scooby Regular
Joined: Oct 2012
Posts: 248
Likes: 0
From: wales
Can someone do me a quick favour please?
I need the measurement from an 09 sun visor. From the outside edge of the L shaped bracket to the outside edge of the clip seat.
My drivers side has broken and I and I need the size to make sure some spares will fit. I know an 08 legacy ones will, but these are from an 07 impreza. If they dont fit, I'll be pulling them apart to repair mine.
Ps: I can't cos mines in the garage under assesment, to determine just how sick it is.
I need the measurement from an 09 sun visor. From the outside edge of the L shaped bracket to the outside edge of the clip seat.
My drivers side has broken and I and I need the size to make sure some spares will fit. I know an 08 legacy ones will, but these are from an 07 impreza. If they dont fit, I'll be pulling them apart to repair mine.
Ps: I can't cos mines in the garage under assesment, to determine just how sick it is.
Scooby Senior
Joined: Feb 2000
Posts: 15,078
Likes: 46
From: Nottm
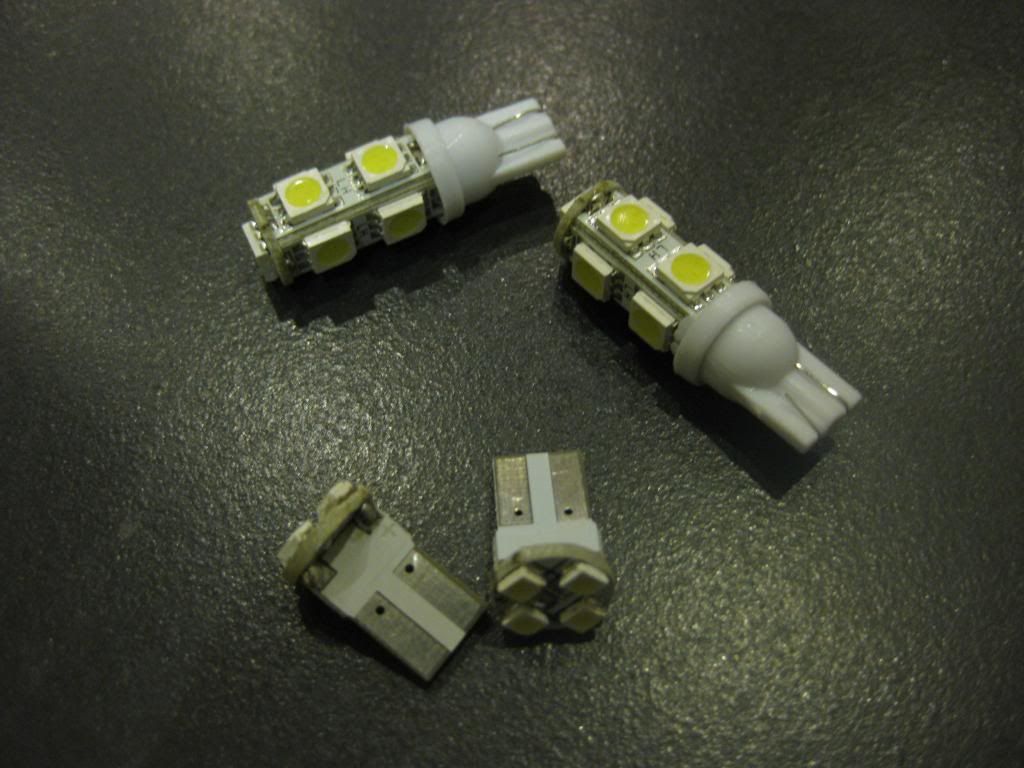
GUYS.. all you who ordered #plate +side light bulbs, they have been tested and packed this evening, will be posted tomorrow.
To remove the #plate bulb holders.
get your fingers in there and ease them firmly to one side (if that side doesn't work, try the other side) and at the same time slightly pulling downwards. They may be a bit tight if they've not come out before.
to get to the side light bulbs
put you front wheels on full lock so you can gain access to the front wheel arch. remove the bottom plastic bung clip, then the others going up the outer side of the wheel arch/bumper.
Once those are removed, pull out the wheel arch from the lip of the front wing/bumper. The wheel arch won't break!! Squeeze your arm in the gap and fiddle for the head light cover. Unclip and feel for the side light bulb holder. 1/4 turn will remove it. pull out the std bulb and carefully replace with new SMD Bulb. If the bulb doesn't work, take it out and re fit the other way round (- & + might be wrong way round).
Then work backwards and put everything back.
Cheers for sorting this out phil

Scooby Regular
Joined: Feb 2007
Posts: 1,991
Likes: 1
From: Belfast
Setting the alarm level engine speed
1/ Push the trip **** to select �REV� on the combination meter
2/ When the trip **** is pushed for more than 2 seconds the thousands place flashes.
3/ Release your finger from the trip **** once, then push and hold the trip **** again. The number will change sequentially from 2 to 7. Release your finger at the desired alarm level engine speed.
4/ When the trip **** is pushed, the hundreds place flashes.
5/ Release your finger from the trip **** once, then push and hold the trip **** again. The number will change sequentially from 1 to 9. Release your finger at the desired alarm level engine speed.
6/ When the trip **** is pushed, the buzzer sounds and the REV alarm system will automatically enter its new setting mode (step 7 below), in which you can activate or deactivate the buzzer.
7/ Every time the trip **** is pushed and held, the buzzer changes to activate or deactivate.
b � On: Activated
b � oFF: Deactivated
When the mode is changed to �activate�, the buzzer sounds.
8/ Push the trip **** to complete the setting procedure.
This all has to be done with the ignition On and the car stationary.
All this information can be found in the Owners Manual, Chapter 3-13 in my manual for 09 hatch sti may be different in other manuals.
thanks mate
Scooby Regular
Joined: Feb 2007
Posts: 1,991
Likes: 1
From: Belfast
GUYS.. all you who ordered #plate +side light bulbs, they have been tested and packed this evening, will be posted tomorrow.
To remove the #plate bulb holders.
get your fingers in there and ease them firmly to one side (if that side doesn't work, try the other side) and at the same time slightly pulling downwards. They may be a bit tight if they've not come out before.
to get to the side light bulbs
put you front wheels on full lock so you can gain access to the front wheel arch. remove the bottom plastic bung clip, then the others going up the outer side of the wheel arch/bumper.
Once those are removed, pull out the wheel arch from the lip of the front wing/bumper. The wheel arch won't break!! Squeeze your arm in the gap and fiddle for the head light cover. Unclip and feel for the side light bulb holder. 1/4 turn will remove it. pull out the std bulb and carefully replace with new SMD Bulb. If the bulb doesn't work, take it out and re fit the other way round (- & + might be wrong way round).
Then work backwards and put everything back.
To remove the #plate bulb holders.
get your fingers in there and ease them firmly to one side (if that side doesn't work, try the other side) and at the same time slightly pulling downwards. They may be a bit tight if they've not come out before.
to get to the side light bulbs
put you front wheels on full lock so you can gain access to the front wheel arch. remove the bottom plastic bung clip, then the others going up the outer side of the wheel arch/bumper.
Once those are removed, pull out the wheel arch from the lip of the front wing/bumper. The wheel arch won't break!! Squeeze your arm in the gap and fiddle for the head light cover. Unclip and feel for the side light bulb holder. 1/4 turn will remove it. pull out the std bulb and carefully replace with new SMD Bulb. If the bulb doesn't work, take it out and re fit the other way round (- & + might be wrong way round).
Then work backwards and put everything back.
Scooby Regular
iTrader: (2)
Joined: Jun 2012
Posts: 295
Likes: 0
From: South Essex - Grey Hatch 330S
Made a totally newb error while ordering parts from Japan and ordered 3 pairs of the black front arch STi badges from the R205 by accident. Will teach me to check the cart quantity next time
I have 2 pairs to sell �60 posted each delivered via RM Signed For can be collected in person from South Essex or paid for via PayPal.
I have 2 pairs to sell �60 posted each delivered via RM Signed For can be collected in person from South Essex or paid for via PayPal.
Here's the pic 1 set left!

Scooby Regular
Joined: Feb 2007
Posts: 1,991
Likes: 1
From: Belfast

 it makes all the difference