
My Ibiza Cupra


Scooby Regular
Joined: Aug 2008
Posts: 1,854
Likes: 0
From: in a place where there lots of rocks to chuck at feejits
320-330ish...
But Got a Devil Owns Stage 2 Methonal kit in the shed to be fitted this weekend...So aiming around 350-360bhp running a 50/50 Meth Mix...
Defo,Im up for that Been good to meet a few people...Was tempted to fit my brothers td05-18G...
But I don't want it laggy...Im on full Boost at 3100rpm Proven via vagcom & Lemmiwinks...Running 1.5 bar gotta get a EGT Fitted to keep an eye on the temps as IHI Dnt like Higt Temps lol...
To discribe how it drives............................................ .................................................. ...............Bit of a handful

Thread Starter
Scooby Regular
Joined: Apr 2009
Posts: 175
Likes: 0
From: Manchester,Walkden
I really need to log it before i can go out Playin with the SPS3 ect...But its defo fells a Handfull on boost...soooo ****in quick....
Was quicker than my Gt2x ever was i mean full boost at around 3.2-3.3krpm and its off....
Im over the moon with it...Just i haven't got the ***** to boot it as its that quick....Scares me :ban:
Now its all up and running & fueling is Perfect i thought id get a little video of the exhaust...Prober love it...
YouTube - MOV00392


Thread Starter
Scooby Regular
Joined: Apr 2009
Posts: 175
Likes: 0
From: Manchester,Walkden
Thanks mate...Defo is a awesome Feeling...
Ive Been tweaking the map with my mates via lemmiwinks and ive made it even quicker with advance'd Timing 2.75Degrees+ before i even seen any litte cfs.(DET)
Gonna Use the Revo select plus ive got to tweak it that bit more....
Speaking of encounters...Had a Evo 9 & Black R32 was very Easy Pickings awesome Feeling though.. Peaking & Substained 1.55bar boost...
Thread Starter
Scooby Regular
Joined: Apr 2009
Posts: 175
Likes: 0
From: Manchester,Walkden
No idea mate sorry.....
40-100 ish Scary tbh as its already got traction and torques steers like a ****..
0-60 wont be that great maybe 6sec relastic depending on Weather..I wouldn't mine a High 12s 1/4..
40-100 ish Scary tbh as its already got traction and torques steers like a ****..
0-60 wont be that great maybe 6sec relastic depending on Weather..I wouldn't mine a High 12s 1/4..

Scooby Regular
Joined: Dec 2006
Posts: 11,470
Likes: 0
From: Mars
That is a hell of a conversion - really good to see it done so well.
And no daft claims of being able scalp a GT2 or similar (although it must be very quick now).
Modding is not my cup of tea but that's very nicely executed!
And no daft claims of being able scalp a GT2 or similar (although it must be very quick now).
Modding is not my cup of tea but that's very nicely executed!
Thread Starter
Scooby Regular
Joined: Apr 2009
Posts: 175
Likes: 0
From: Manchester,Walkden
Thanks lads Comment appreacited..
Its took me long enough but its defo worth it kinda been tweaking the timing and Boost to see what i can slightly gain AFR is also Been spot on too which is a added bonus...
As for Bhp its roughly around 320ish as my mates Celica is 343 and i rape it...Once its roller its just awesome..
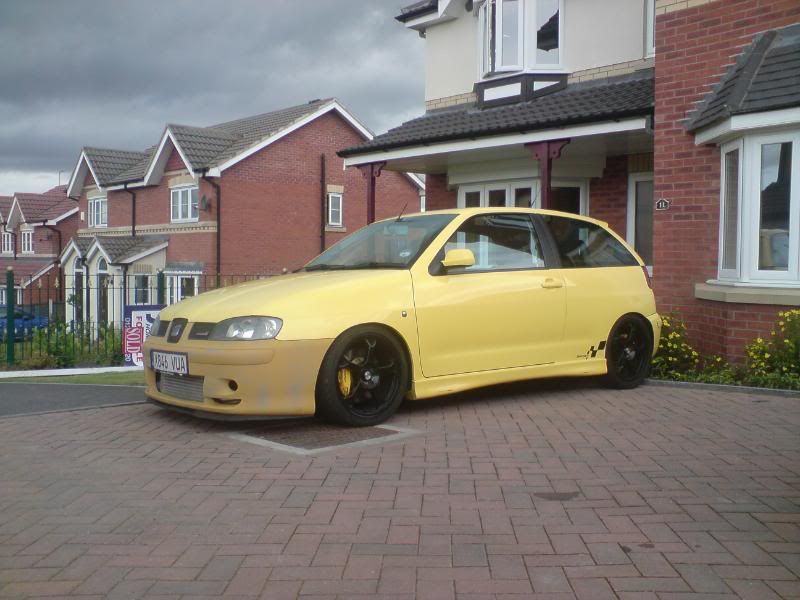
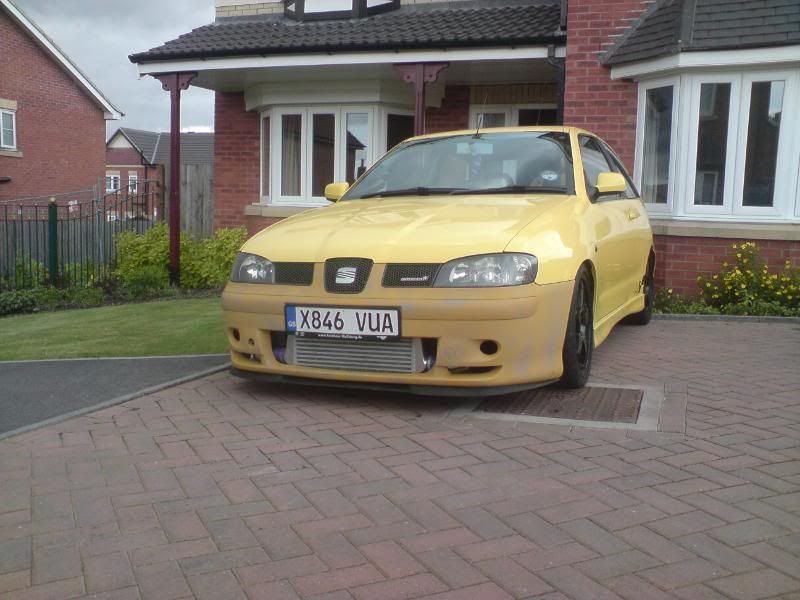
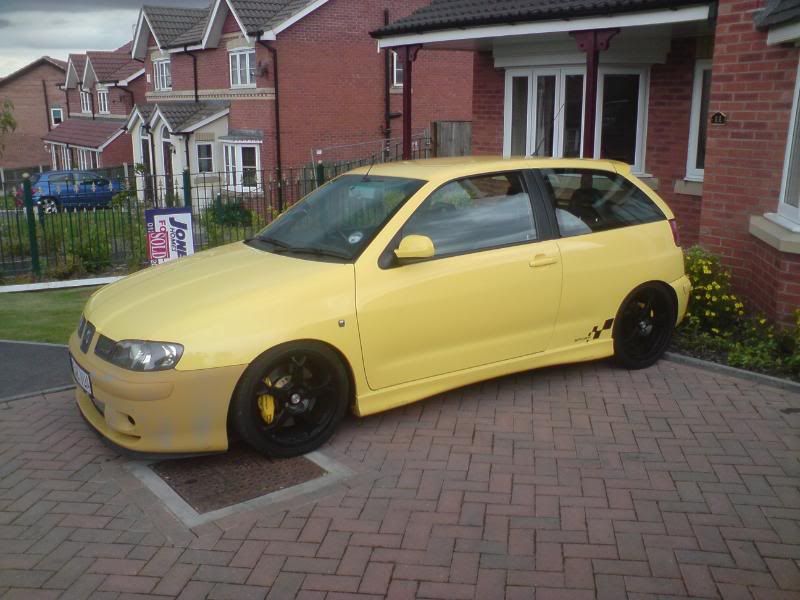
Gonna start Fitting my methanol kit this weekend..but im having the bodywork sorted few little Bits then a full respray in yellow to brighten it up...
How the outside stands:
Last edited by Danny_lad; Aug 20, 2009 at 08:14 PM.
 christ!!! how do you explain that one to your insurance company?
Thread Starter
Scooby Regular
Joined: Apr 2009
Posts: 175
Likes: 0
From: Manchester,Walkden
Thread Starter
Scooby Regular
Joined: Apr 2009
Posts: 175
Likes: 0
From: Manchester,Walkden
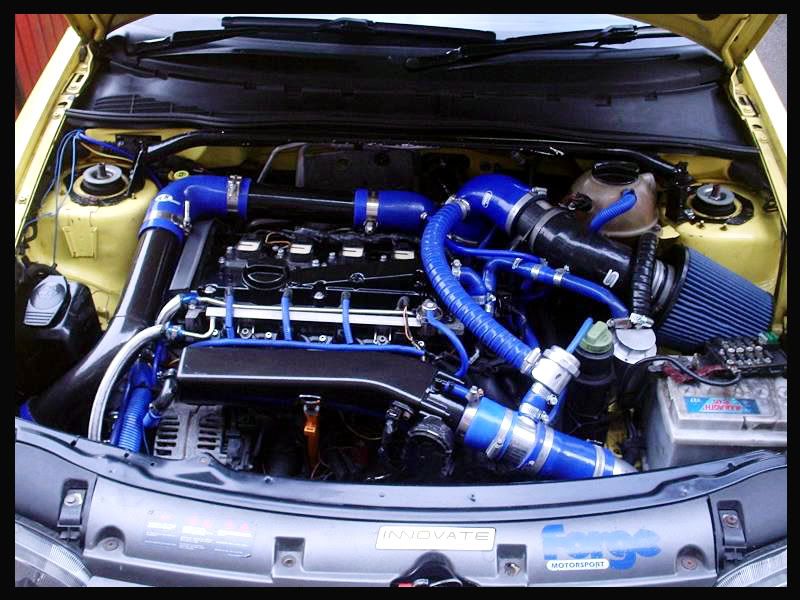
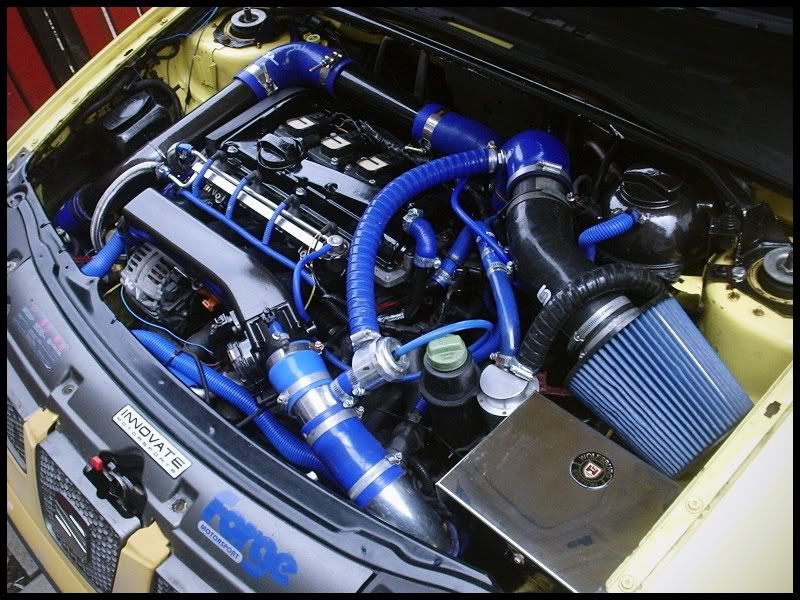
Now that My Big turbo conversion was all Done and running and producing good power for me...I was Next moving on to the bodywork But sadly a few days ago my water Pump Gave way...
So ive had to Put the Money else were in to the engine...I desided to Do a Full rebuild well as near as dam it..
What ever i could replace with the engine in situ from gasket to bearings ect..
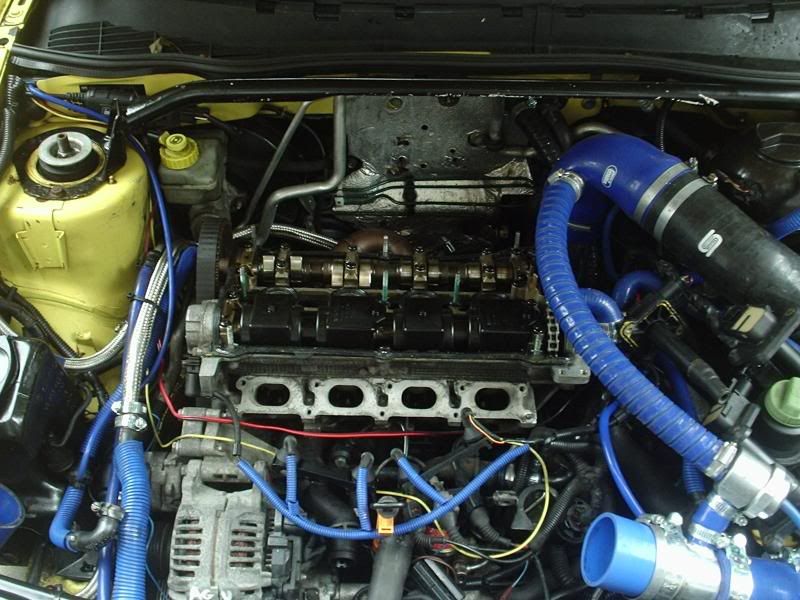
So it sat for a few day while i pondered on what todo so i desided along with a few mates to pull it all apart and get it done..As it wouldn't get done by its self...
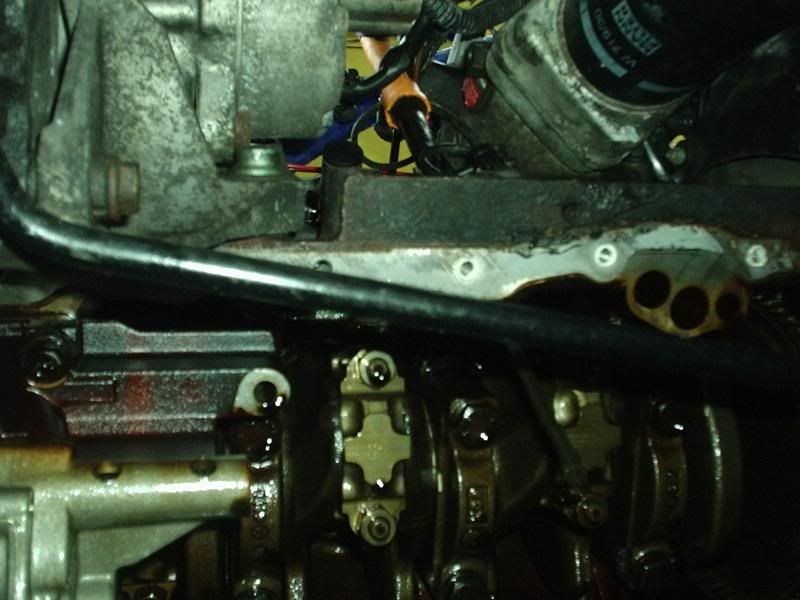
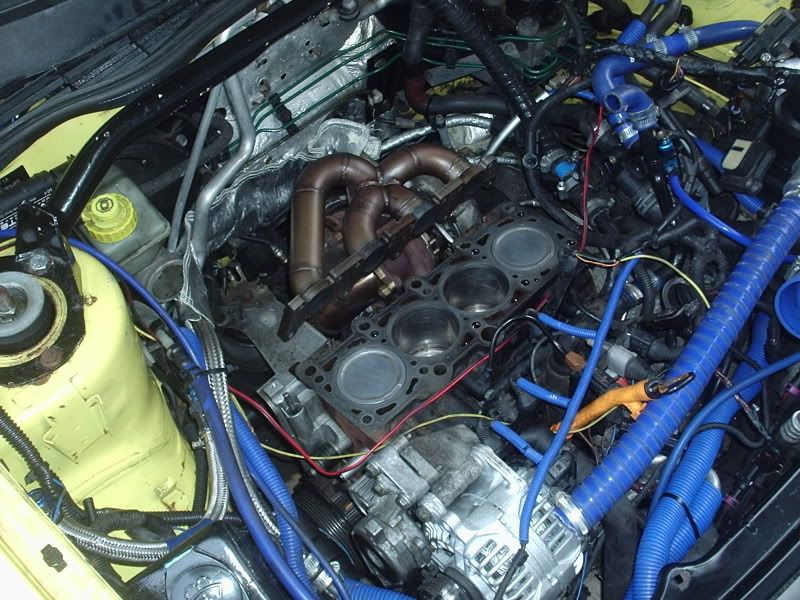
So i started by removing the Inlet manifold And Rocker cover then Drained all the coolant out which i had in it...
Then i got cracking on with the manifold on the IHI amazinly i don't have to take the turbo off or even downpipe so that makes faffing about alot less...
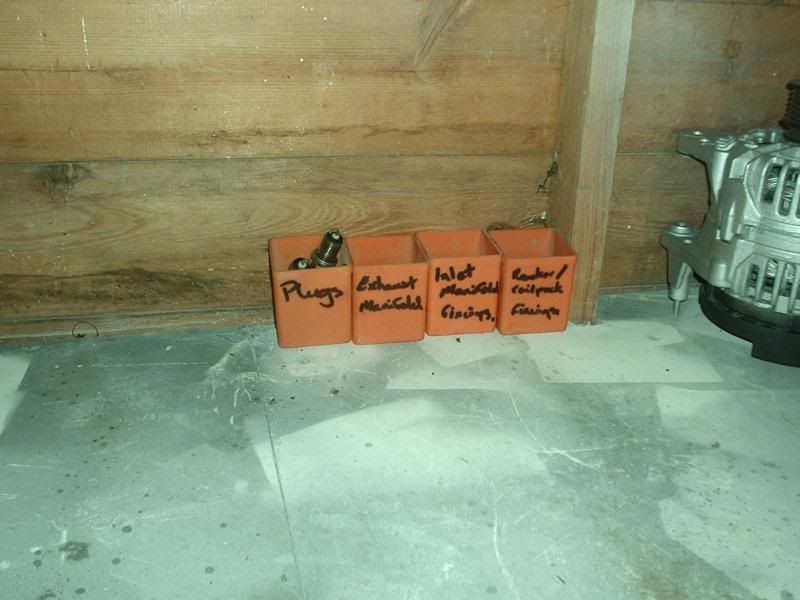
I know this might sound sad to people but as me doing this with mates i desided to box and lable everthing that i had taken off...Bit of organizing tbh:
Pics:
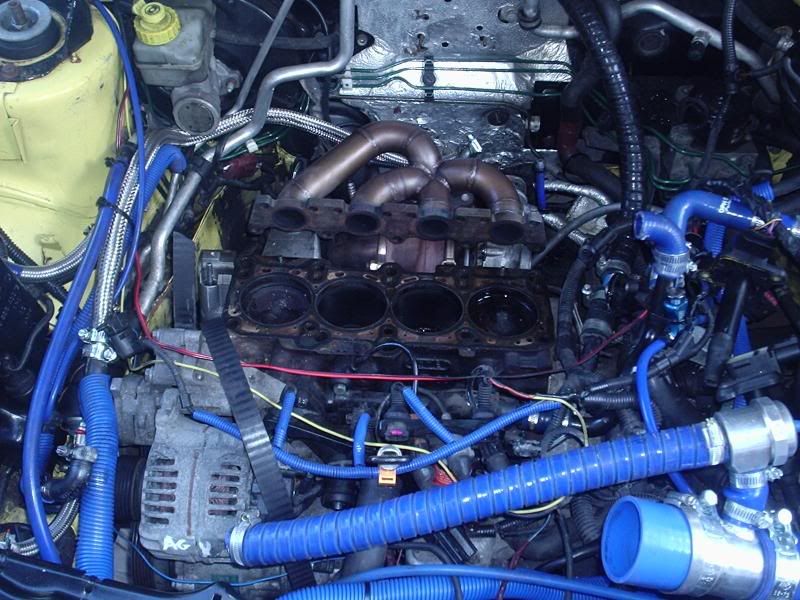
How it looked after the BT conversion that i had done:
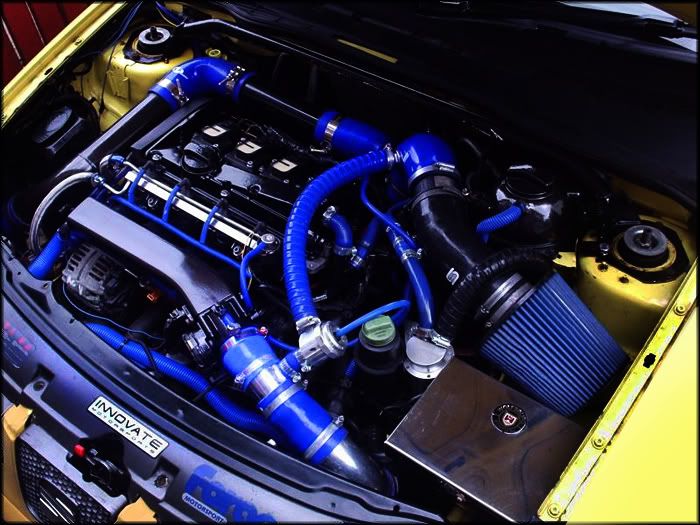
Then:

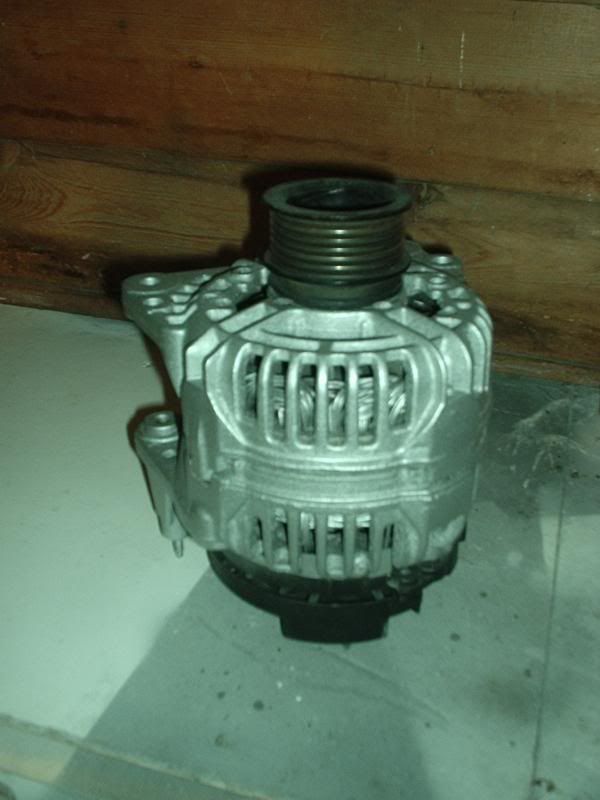
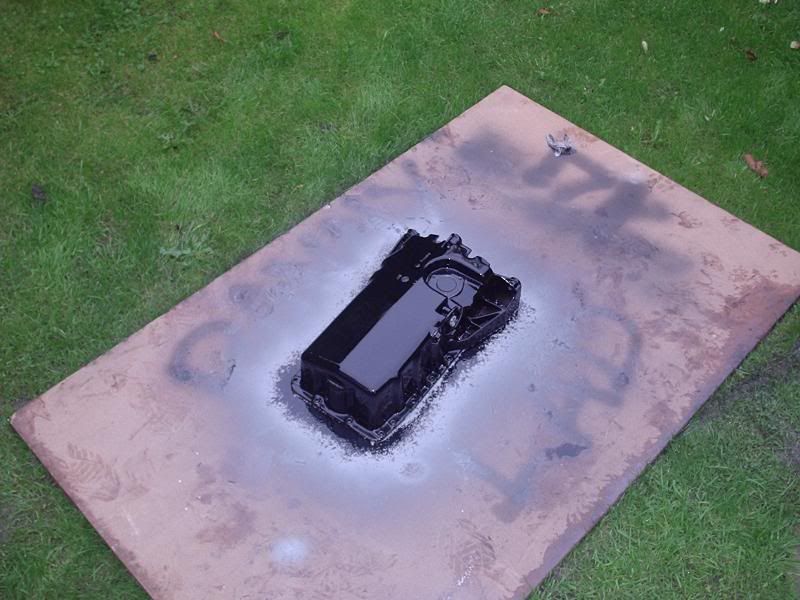
I then Desided while it was in bits this would be my only and easiest chance to Smarten and Paint a few things..So i started with the Alternator to freshen up..Also painted brackets and Alt Tensioner to clean them up atleast:
my pots of which i have many off:
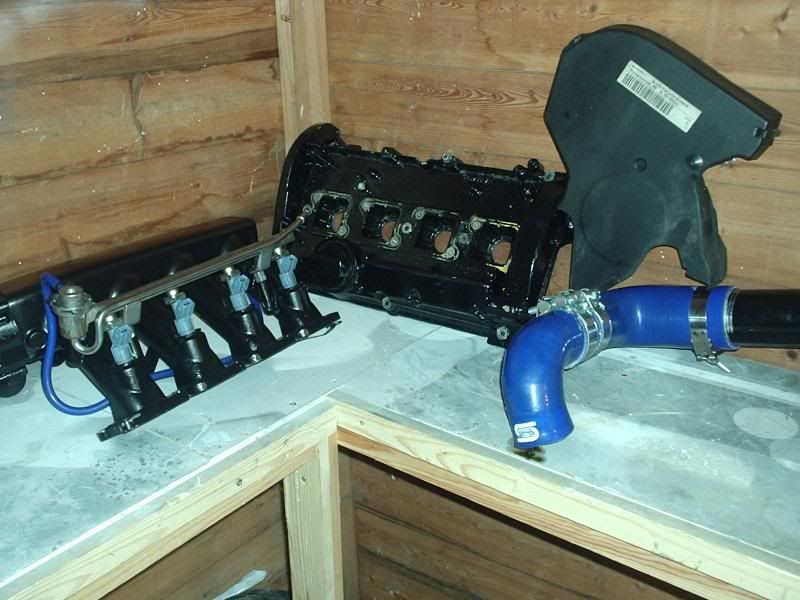
And current parts in order of which i took them off:
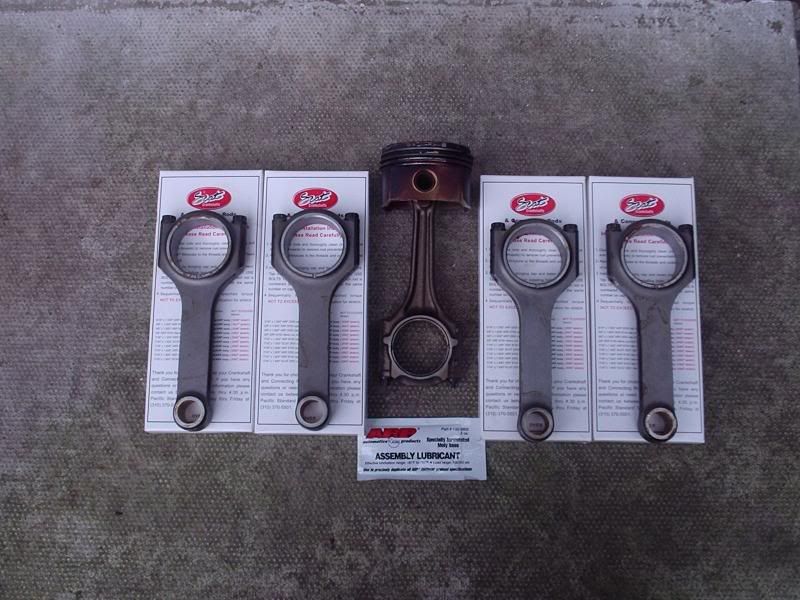
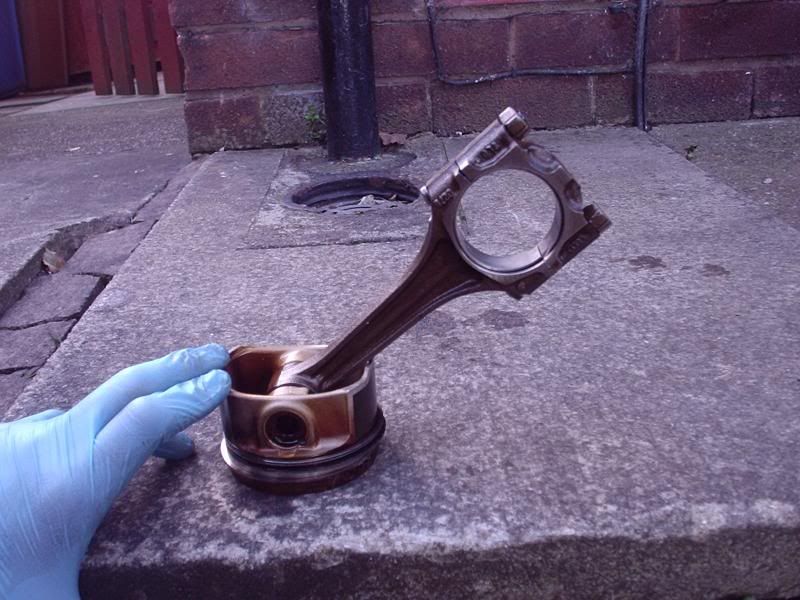
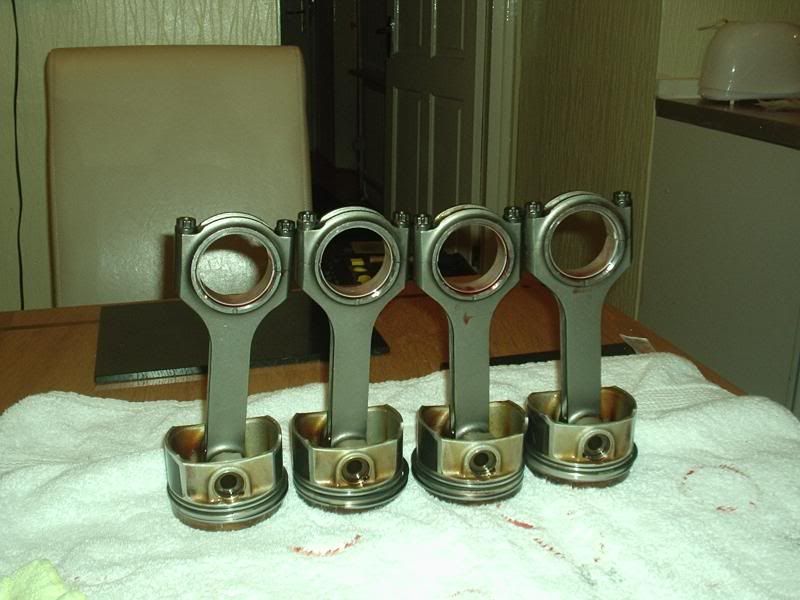
So while its in bits i desided to uprate my rods as running 1.5bar at the limiter is in rod bending terrioty.As you can see a massive difference between the OEM rod and my Scat ones:
I didn't get much done today due to it raining but tomorrow i want to get the :
* Oil Drained
* Remove Oil Sump
* Remove water Pump
* Remove Timing belt & Tensioner
Then once my Head Bolt Remover has arrived i can remove the 20v Cyclinder head and get it sent off to be full Rebuilt...Due to funds & time im gonna keep the OEM Valves but with New Springs and Guides ect...
While the pistons and Rods are Out im going to De-glaze the Bores with a 180 Grit hone then replace with new rings.Headgaskets,New Shims & gaskets...
Alot more pictures to follow...:
So ive had to Put the Money else were in to the engine...I desided to Do a Full rebuild well as near as dam it..
What ever i could replace with the engine in situ from gasket to bearings ect..
So it sat for a few day while i pondered on what todo so i desided along with a few mates to pull it all apart and get it done..As it wouldn't get done by its self...
So i started by removing the Inlet manifold And Rocker cover then Drained all the coolant out which i had in it...
Then i got cracking on with the manifold on the IHI amazinly i don't have to take the turbo off or even downpipe so that makes faffing about alot less...
I know this might sound sad to people but as me doing this with mates i desided to box and lable everthing that i had taken off...Bit of organizing tbh:
Pics:
How it looked after the BT conversion that i had done:
Then:
I then Desided while it was in bits this would be my only and easiest chance to Smarten and Paint a few things..So i started with the Alternator to freshen up..Also painted brackets and Alt Tensioner to clean them up atleast:
my pots of which i have many off:
And current parts in order of which i took them off:
So while its in bits i desided to uprate my rods as running 1.5bar at the limiter is in rod bending terrioty.As you can see a massive difference between the OEM rod and my Scat ones:
I didn't get much done today due to it raining but tomorrow i want to get the :
* Oil Drained
* Remove Oil Sump
* Remove water Pump
* Remove Timing belt & Tensioner
Then once my Head Bolt Remover has arrived i can remove the 20v Cyclinder head and get it sent off to be full Rebuilt...Due to funds & time im gonna keep the OEM Valves but with New Springs and Guides ect...
While the pistons and Rods are Out im going to De-glaze the Bores with a 180 Grit hone then replace with new rings.Headgaskets,New Shims & gaskets...
Alot more pictures to follow...:
Thread Starter
Scooby Regular
Joined: Apr 2009
Posts: 175
Likes: 0
From: Manchester,Walkden
I spent another hour on it tonight after work...So i ended up getting the sump off which was really easy looking at it....
Then by my suprise i got the manifold of ''Without'' removing the Turbo,lines & downpipe and i done it with easy to...
So next for me is to remove the following:
* Remove Alternator Belt
* Remove crank shaft pully & Bi plate
* Remove Timing belt and Tension
Then Remove then Water Pump
Just gotta meet up with john to borrow his Head Bolt Kit then i can get this 20v cyclinder head off and get on with the rebuild...
I got a few pictures as usal...
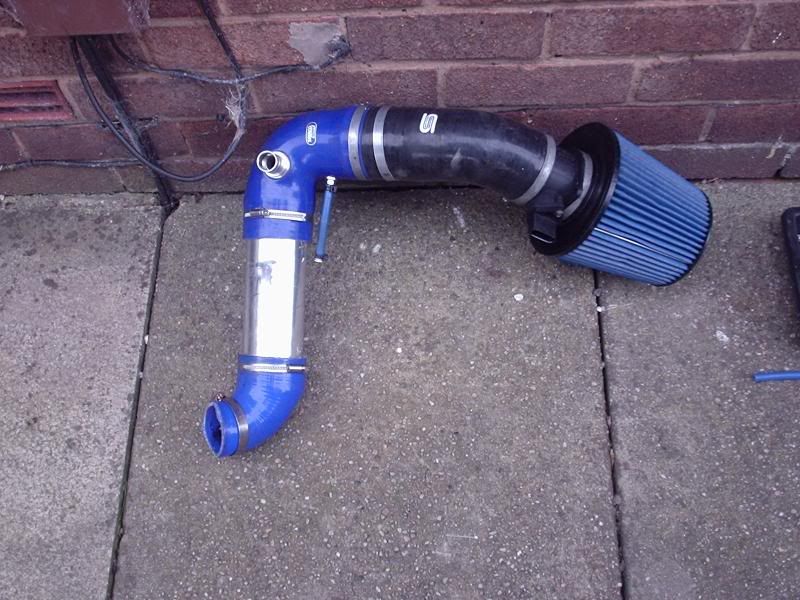
My Custom 3'' T.i.p which sounds immense:
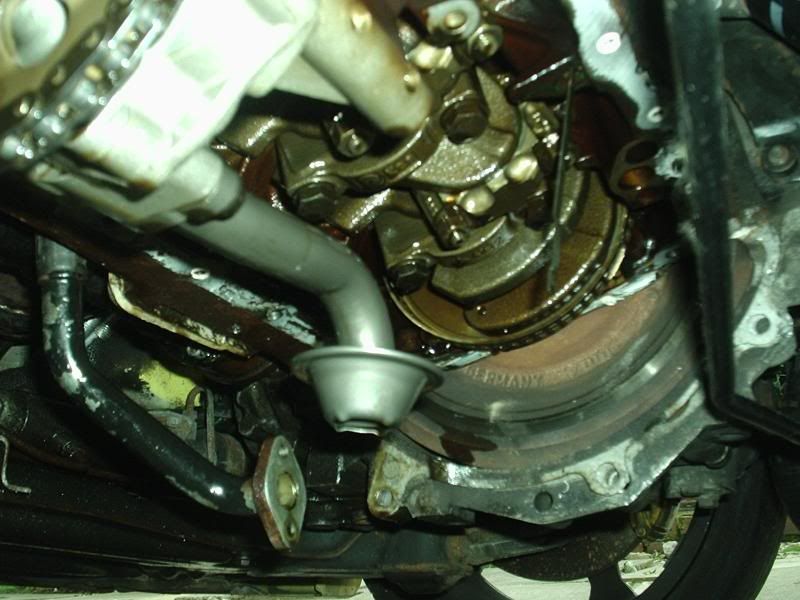
Under Neath with the crank and rods showing(Covered up with a dust sheet)
Then gave the Bottom Sump a quick Lick of paint but i feel i need to treat my self to a baffle jobbie
Big Thanks to John & Alex for Helping me so far:happy:
Then by my suprise i got the manifold of ''Without'' removing the Turbo,lines & downpipe and i done it with easy to...
So next for me is to remove the following:
* Remove Alternator Belt
* Remove crank shaft pully & Bi plate
* Remove Timing belt and Tension
Then Remove then Water Pump
Just gotta meet up with john to borrow his Head Bolt Kit then i can get this 20v cyclinder head off and get on with the rebuild...
I got a few pictures as usal...
My Custom 3'' T.i.p which sounds immense:
Under Neath with the crank and rods showing(Covered up with a dust sheet)
Then gave the Bottom Sump a quick Lick of paint but i feel i need to treat my self to a baffle jobbie
Big Thanks to John & Alex for Helping me so far
:happy:
Thread Starter
Scooby Regular
Joined: Apr 2009
Posts: 175
Likes: 0
From: Manchester,Walkden
Started doing abit more tongith due to the fact i got my head Remover tool in the post...
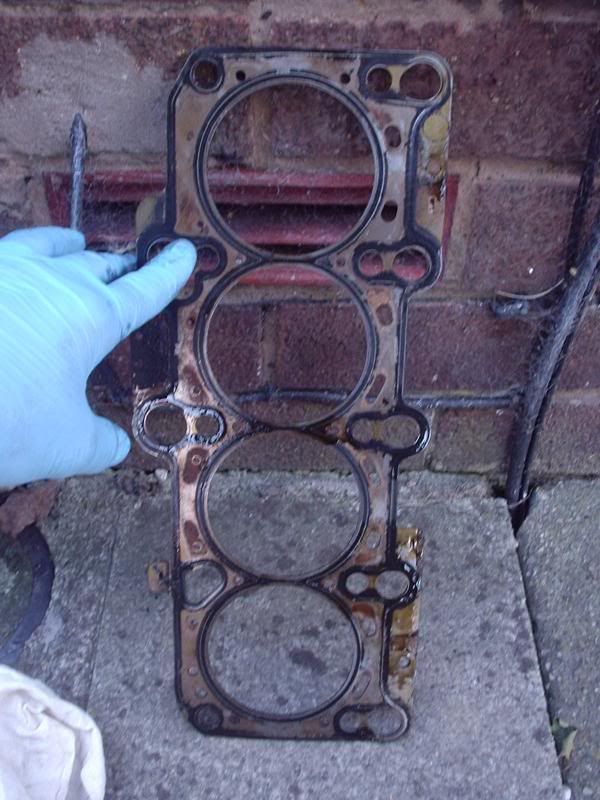
So the head came off with easy which was all good for me and to my utter suprise the Headgasket Looked & Seemed fine...Even though looks can be deseving.
So thats the Headgasket now Binned Ready for a nice new One
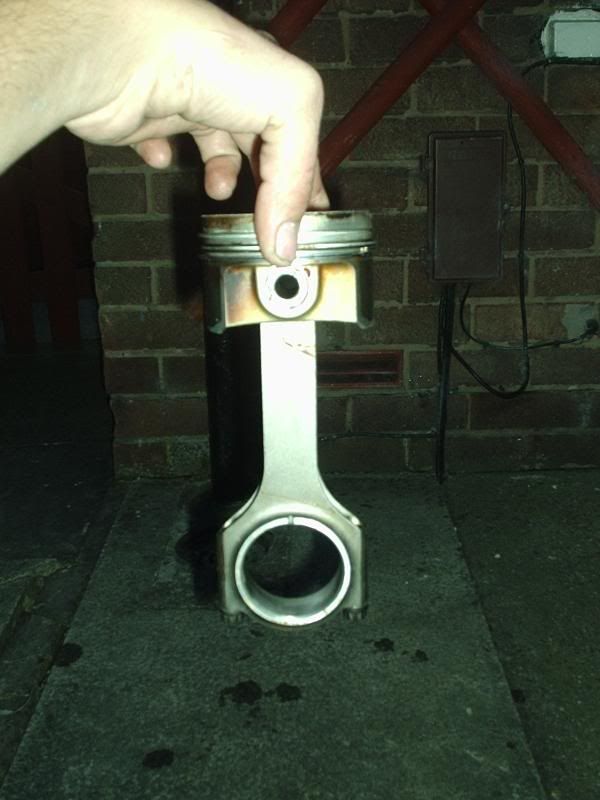
Once that was done i removed Cylinder 1 piston which needed some Fettling due to the engine being at TDC.
So i had to Tap Number 4 down to allow me more room to get the rod out as it was catching on the shoulder of the inner wall...
And got that out and swaped the rods over....Measured up which was the intake side of the rod and which was front & Back...
The Next Step for me was to inner inspected the Inner Bore wall for Depth marks and Genral Wear But to my suprise & my Mates(Mechanic) It was Uber Smooth and Clean...As were the other 3 Cylinders..
Next for me is to hone the cylinders and Fit my New Rings then Fit and torque up the rods..
I got one rod done tonight due to me needing feeding...
Big Thanks Once again to John & Alex
Anyway Pics...
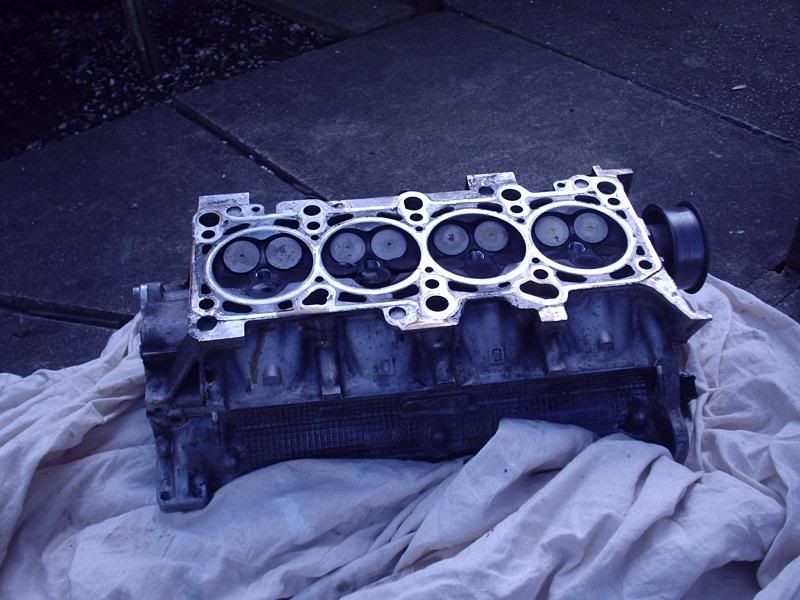
Im not 100% sure on the Head yet but its defo having a Full rebuild and a Port & Polish( Inlet & Exhaust Sides)
So the head came off with easy which was all good for me and to my utter suprise the Headgasket Looked & Seemed fine...Even though looks can be deseving.
So thats the Headgasket now Binned Ready for a nice new One
Once that was done i removed Cylinder 1 piston which needed some Fettling due to the engine being at TDC.
So i had to Tap Number 4 down to allow me more room to get the rod out as it was catching on the shoulder of the inner wall...
And got that out and swaped the rods over....Measured up which was the intake side of the rod and which was front & Back...
The Next Step for me was to inner inspected the Inner Bore wall for Depth marks and Genral Wear But to my suprise & my Mates(Mechanic) It was Uber Smooth and Clean...As were the other 3 Cylinders..
Next for me is to hone the cylinders and Fit my New Rings then Fit and torque up the rods..
I got one rod done tonight due to me needing feeding...
Big Thanks Once again to John & Alex
Anyway Pics...
Im not 100% sure on the Head yet but its defo having a Full rebuild and a Port & Polish( Inlet & Exhaust Sides)
Thread Starter
Scooby Regular
Joined: Apr 2009
Posts: 175
Likes: 0
From: Manchester,Walkden
Righto...
Its finally time to start sticking it all back together..I finally Received most of my rebuild kit so a big thanks to alex at Backdraft motorsport for doing me a truely outstanding price on Genuine VW/Audi Parts...
Best place and price even in the states..
So im gonna start on saturday morning to get the bottom end all made up and ready so then i can finally get my head sent off to be fully rebuilt...
All im waiting on now is my head Gasket set & headbolts along with my Genesis 550cc injectors then i can turn the key..
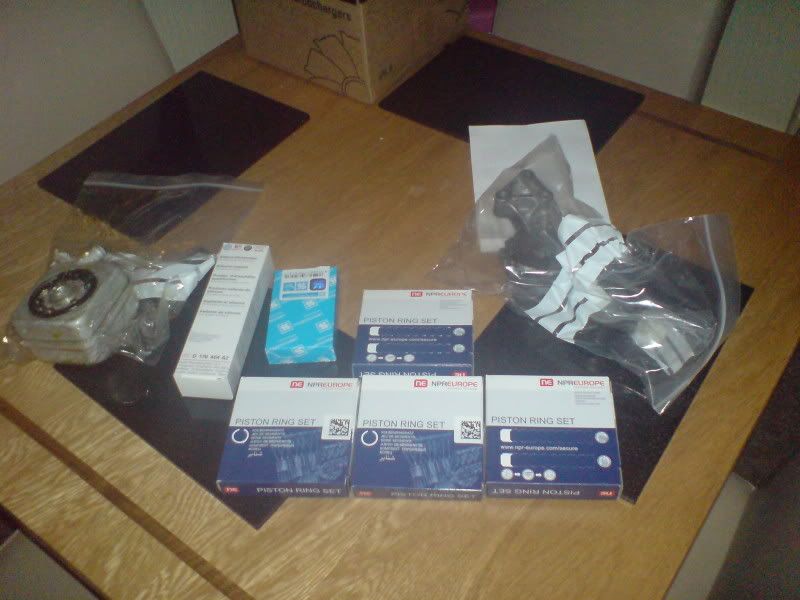
O and i also forget to mention ive got a Methanol kit on order and im waiting for andy forrest to ring me about a TD05-18G but it seems i can make my IHI Vf23/P20 in too a beefy hybrid...
so waiting on price from mark at cr-turbos...but its nearly there.. finally..
Its finally time to start sticking it all back together..I finally Received most of my rebuild kit so a big thanks to alex at Backdraft motorsport for doing me a truely outstanding price on Genuine VW/Audi Parts...
Best place and price even in the states..
So im gonna start on saturday morning to get the bottom end all made up and ready so then i can finally get my head sent off to be fully rebuilt...
All im waiting on now is my head Gasket set & headbolts along with my Genesis 550cc injectors then i can turn the key
..O and i also forget to mention ive got a Methanol kit on order and im waiting for andy forrest to ring me about a TD05-18G but it seems i can make my IHI Vf23/P20 in too a beefy hybrid...
so waiting on price from mark at cr-turbos...but its nearly there.. finally..
Thread Starter
Scooby Regular
Joined: Apr 2009
Posts: 175
Likes: 0
From: Manchester,Walkden
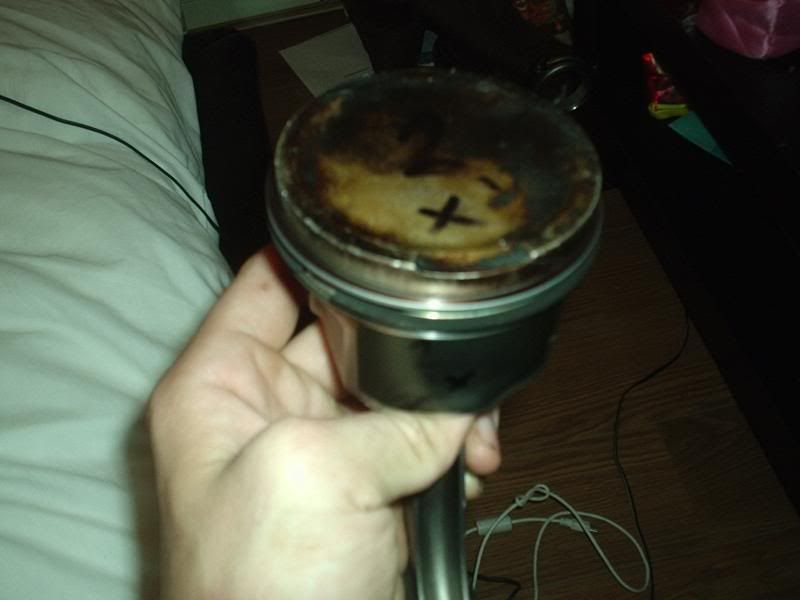
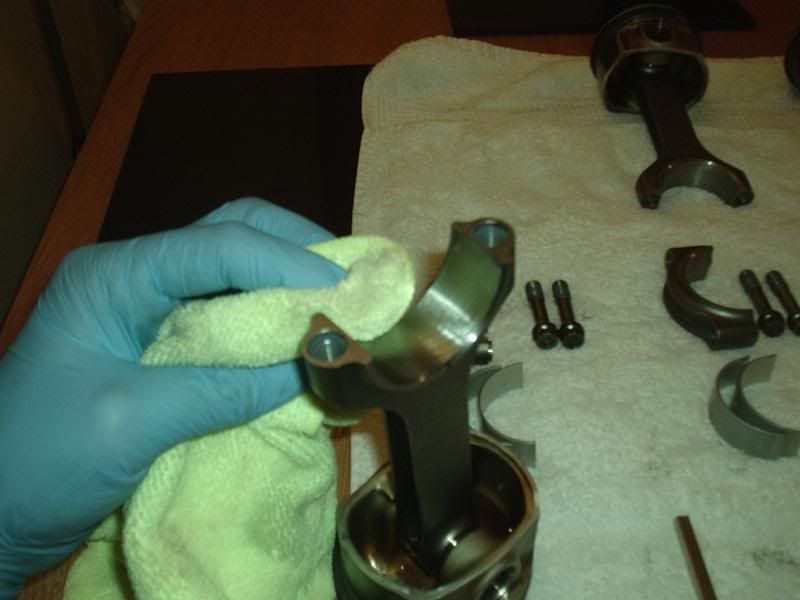
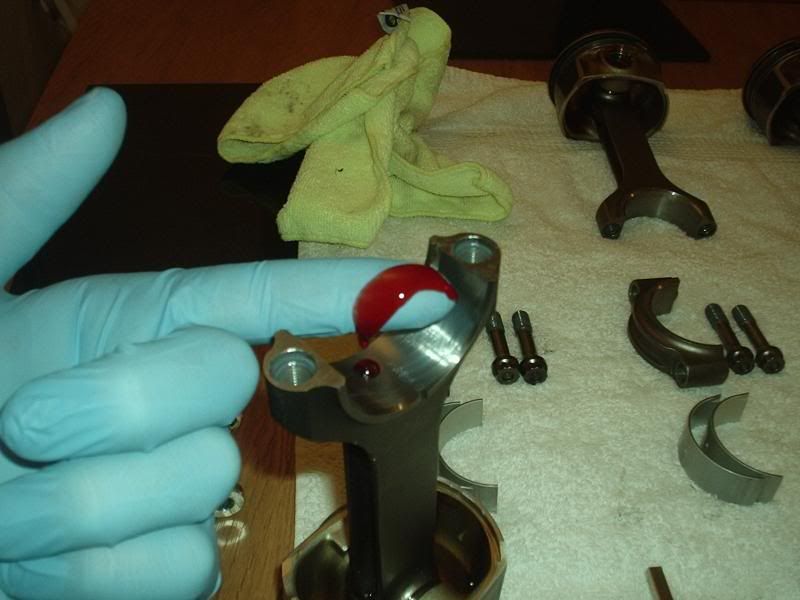
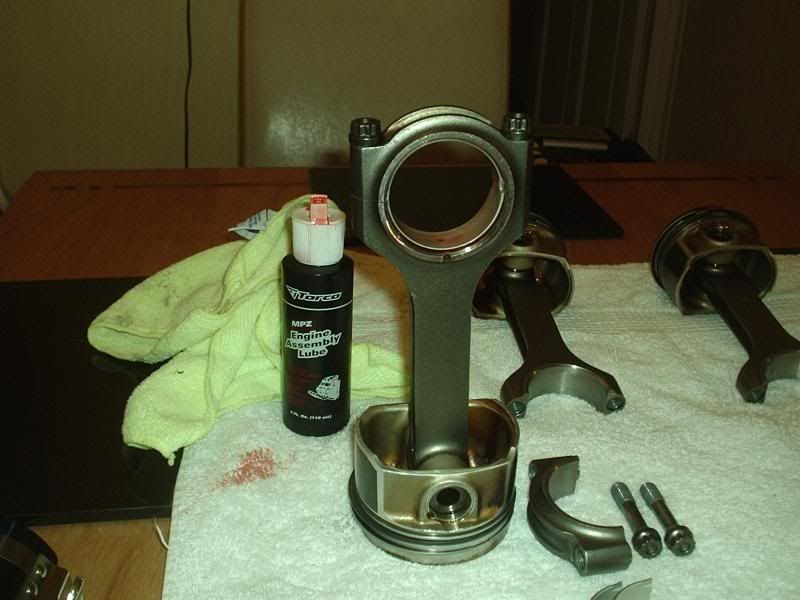
While I knew i had lots todo tomorrow and not enough time todo it i thought id start dressing up the new Pistons & Rods With Rings plus new Rod Bearings...
To say the least i was really ****ting my self as i didnt want to snap a ring due to how bloody expensive they actually really are...Anyway I took the old Rings of one piston and by following Vwvortex & Jepistons plus reading and watching them several times i learned out how todo them which was really straight forward...
Once they were on a quick phone call to alex to confirm they were done correclty i started on with the rest of them which to my suprise went really smoothly(For a change).
The for me was to get the bearings fitted and all lube up with torco lube which is like a kinda ky-3 jelly for cars...
Took me Roughly 1 hour todo the rings and Bearings as it was a huge learning cirve for me so i didn't want to miss or rush anything...
I made sure Everything was real clean abit like a OCD Charge but i supose it actually helps...So Now there all dressed up and ready togo i can get cracking on with them tomorrow morning and can have the full bottom end all built up nicely..
Just a shame i could'nt get the pistons up like new but i supose that dosnt matter...
So tommorrow jobs are as the following:
* Set Clearances For the Rings Via Je piston website.
* Clean Both Sump Services ready for Sealant..
* Generiously Lube Inner Cylinder walls With torco..
*Fit New pistons and Align up with crack...
* Clean and Lube Crank then Fit Bottom rod Cap
* Fit ARP bolts with ARP lube and torque in seqence 3 times 50ft-lb
* Double Check everything
* Turn the crank By hand to see if anything catching..
* Fit Sump Drainer With gaurd
* Then Refit sump with sealant...
Also gotta fit a new Oil cooler and Alternator tensioner....
Anyway lots of pictures as usal..:whistle:
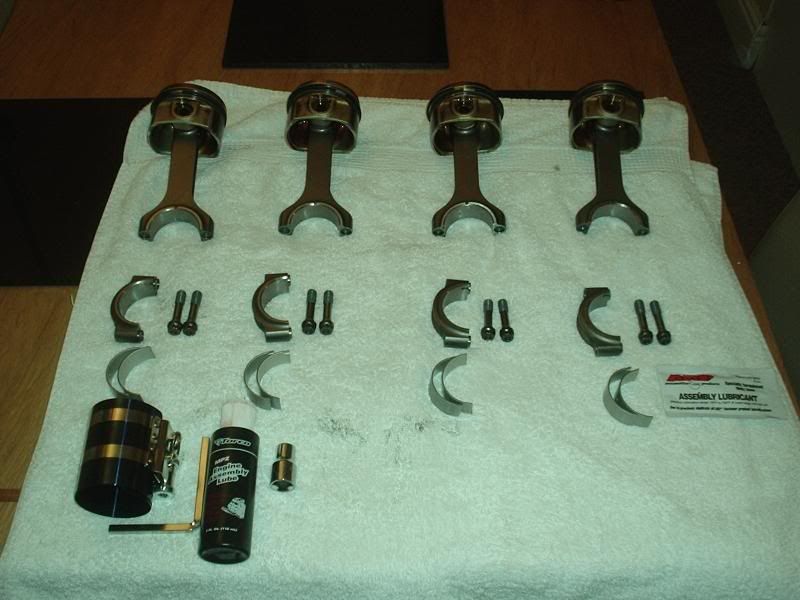

More to follow..
To say the least i was really ****ting my self as i didnt want to snap a ring due to how bloody expensive they actually really are...Anyway I took the old Rings of one piston and by following Vwvortex & Jepistons plus reading and watching them several times i learned out how todo them which was really straight forward...
Once they were on a quick phone call to alex to confirm they were done correclty i started on with the rest of them which to my suprise went really smoothly(For a change).
The for me was to get the bearings fitted and all lube up with torco lube which is like a kinda ky-3 jelly for cars
...Took me Roughly 1 hour todo the rings and Bearings as it was a huge learning cirve for me so i didn't want to miss or rush anything...
I made sure Everything was real clean abit like a OCD Charge but i supose it actually helps...So Now there all dressed up and ready togo i can get cracking on with them tomorrow morning and can have the full bottom end all built up nicely..
Just a shame i could'nt get the pistons up like new but i supose that dosnt matter...
So tommorrow jobs are as the following:
* Set Clearances For the Rings Via Je piston website.
* Clean Both Sump Services ready for Sealant..
* Generiously Lube Inner Cylinder walls With torco..
*Fit New pistons and Align up with crack...
* Clean and Lube Crank then Fit Bottom rod Cap
* Fit ARP bolts with ARP lube and torque in seqence 3 times 50ft-lb
* Double Check everything
* Turn the crank By hand to see if anything catching..
* Fit Sump Drainer With gaurd
* Then Refit sump with sealant...
Also gotta fit a new Oil cooler and Alternator tensioner....
Anyway lots of pictures as usal..:whistle:
More to follow..

BANNED
Joined: Jul 2009
Posts: 14
Likes: 0


nice car and read m8
got a m8 who runs rer development running 500bhp b4 the nos was fitted in his ibiza , was in last months redline , (the red 1)
just picked myself up a leon cupra r rear end write off so the lump will be going into something but unsure what yet will keep my eyes on the thread
http://www.facebook.com/video/video....ubj=1760908569
Last edited by Bealescooby; Nov 3, 2009 at 01:43 AM. Reason: added link
Scooby Regular
Joined: May 2009
Posts: 191
Likes: 0

