Notices
Member's Gallery Pictures of your pride and joy

Blob Eye Black headlight mod Images

Old Jan 15, 2009 | 03:19 PM
  #61  
Harryr34's Avatar
Harryr34
Scooby Regular
iTrader: (9)
 
Joined: Sep 2006
Posts: 1,724
Likes: 30
From: London
Default

Have a look at mine in my profile, it's had he mod done and looks very good especially with a 4300k hid kit
Reply
Old Jan 15, 2009 | 04:40 PM
  #62  
STiFreak's Avatar
STiFreak
Scooby Regular
iTrader: (4)
 
Joined: Jan 2006
Posts: 905
Likes: 0
Default

Originally Posted by Midnight Runner
lol I would be to scared to do it on somebody elses in case I broke something or scratched the paint

STiFreak I wasn't sure about the black on WR Blue so I went for leaving it silver, that way if I change my mind then I can spray 'em black, don't think I will though.

Loving being without those nasty ginger triangles
Yeah, I am definitely doing the de-tango (got the replacement bulbs already), just trying to decide whether to do the black mod at the same time.

Harry, thanks, but the pics in your profile are from a distance and not from the front, so it is still difficult to tell for sure.
Reply
Old Jan 15, 2009 | 05:12 PM
  #63  
morpheus1870's Avatar
morpheus1870
Thread Starter
Scooby Regular
20 Year Member
 
Joined: Oct 2004
Posts: 978
Likes: 2
From: The Main Frame
Default

Originally Posted by IainMilford
come on sunshine put your back into it !!!!!!!!!
I have

Removed all the bolts, top two holding the light in place and the one holding the light against the slam panel which is accessed through moving the grill. I have removed the fog cover and can't locate any clips bar 1. I have pulled on the light with plenty of grunt but its fixed solid. I know its "easy" to do but it aint working for me people.... feel like a retard

p.s.

no offence to retards
Reply
Old Jan 15, 2009 | 07:12 PM
  #64  
Meallbhan's Avatar
Meallbhan
Scooby Regular
iTrader: (3)
 
Joined: Feb 2007
Posts: 743
Likes: 0
From: Inverness
Default

Originally Posted by STiFreak
Yeah, I am definitely doing the de-tango (got the replacement bulbs already), just trying to decide whether to do the black mod at the same time.
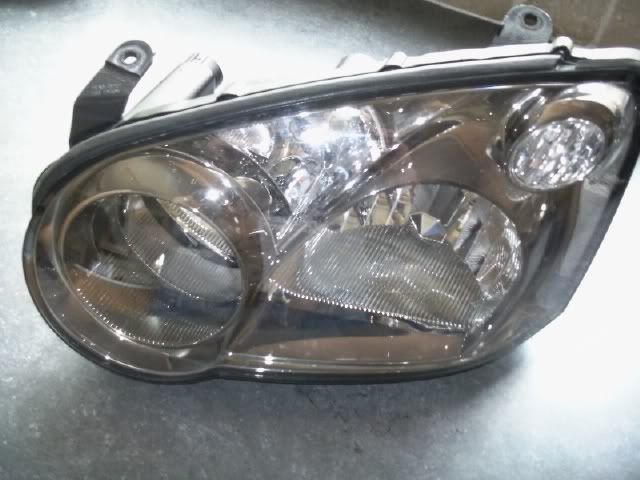
Do it, do it, do it! You won't be disappointed. I did mine in two stages. First I got rid of the mingin ginger bits and put the lights back together, for a few weeks I liked the new look but then started to think there was far too much silver/chrome there. I took the lights apart again (pain in the ***) and did them black, have never looked back since. It makes the front end look that bit more aggressive.
Reply
Old Jan 15, 2009 | 08:46 PM
  #65  
jpmilling's Avatar
jpmilling
Scooby Regular
 
Joined: Mar 2008
Posts: 149
Likes: 5
From: warwickshire
Default

Originally Posted by scooby-tc
his is a thread about black headlights not black cars
lol, copied wrong pic off photo bucket. you must have clocked it before i had chance to edit.
Reply
Old Jan 17, 2009 | 11:09 PM
  #66  
mikey30's Avatar
mikey30
Scooby Regular
 
Joined: Oct 2008
Posts: 729
Likes: 0
From: co.louth,eire
Default

Name:  DSC_0452.jpg
Views: 0
Size:  82.9 KB
Reply
Old Jan 18, 2009 | 12:19 AM
  #67  
D.O.M's Avatar
D.O.M
Scooby Regular
iTrader: (4)
 
Joined: Dec 2006
Posts: 1,465
Likes: 0
From: London
Default

Any instructions for doing this to a hawkeye?
Reply
Old May 5, 2009 | 12:20 PM
  #68  
STiFreak's Avatar
STiFreak
Scooby Regular
iTrader: (4)
 
Joined: Jan 2006
Posts: 905
Likes: 0
Default

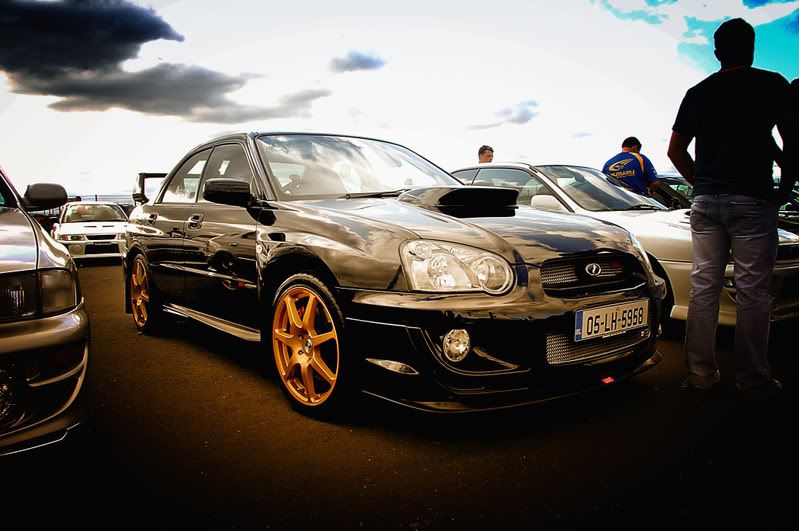
I finally got around to De-Tango'ing the front and rear lights and doing the Black Light Mod on the fronts.

It was a bit of a ******* to get the front lamps out and in the end quite a lot of force was required. The 05's dont seem to have the two clips described in the instructions either, so this confused me for a while. Lamps in a 80 dec C fan assist oven for about 8 mins. Also there are 9 screws holding the headlight unit together (one under a piece of foam tape).

The fronts look much more agressive and the rears much smarter.

Sorry for the crappy pics, just couldn't get rid of the reflections.
Attached Thumbnails Click image for larger version

Name:	BlackLightMod_2.JPG
Views:	0
Size:	77.3 KB
ID:	2494   Click image for larger version

Name:	BlackLightMod_Closeup1.JPG
Views:	0
Size:	96.1 KB
ID:	2495   Click image for larger version

Name:	BlackLightMod_1.jpg
Views:	0
Size:	312.8 KB
ID:	2496   Click image for larger version

Name:	DeTango_Rear.JPG
Views:	0
Size:	95.1 KB
ID:	2497  
Reply
Old May 5, 2009 | 12:59 PM
  #69  
IainMilford's Avatar
IainMilford
Scooby Regular
15 Year Member
Liked
Loved
Community Favorite
iTrader: (15)
 
Joined: Jun 2008
Posts: 3,927
Likes: 91
From: In the garage
Default

Originally Posted by mikey30
that is one very shiny car
Reply
Old May 7, 2009 | 06:26 PM
  #70  
brockalightus's Avatar
brockalightus
Scooby Regular
iTrader: (2)
 
Joined: Mar 2009
Posts: 483
Likes: 0
From: underground
Default

Reply
Old May 7, 2009 | 08:38 PM
  #71  
wrx9181's Avatar
wrx9181
Scooby Regular
iTrader: (2)
 
Joined: Nov 2005
Posts: 4,160
Likes: 3
From: South Yorkshire
Default

Name:  HOW06.jpg
Views: 0
Size:  54.3 KB
Reply
Old May 7, 2009 | 08:39 PM
  #72  
wrx9181's Avatar
wrx9181
Scooby Regular
iTrader: (2)
 
Joined: Nov 2005
Posts: 4,160
Likes: 3
From: South Yorkshire
Default

Reply
Old May 7, 2009 | 08:41 PM
  #73  
wrx9181's Avatar
wrx9181
Scooby Regular
iTrader: (2)
 
Joined: Nov 2005
Posts: 4,160
Likes: 3
From: South Yorkshire
Default

Name:  HOW01.jpg
Views: 0
Size:  47.7 KB
Reply
Old May 10, 2009 | 03:32 PM
  #74  
wrx9181's Avatar
wrx9181
Scooby Regular
iTrader: (2)
 
Joined: Nov 2005
Posts: 4,160
Likes: 3
From: South Yorkshire
Default

have you done it yet buddy
boobiman search iwsti.com they have great how to s on there
Reply
Old Jul 15, 2009 | 10:06 PM
  #75  
AbbasSTI's Avatar
AbbasSTI
Scooby Regular
iTrader: (37)
 
Joined: Apr 2009
Posts: 1,012
Likes: 0
From: Stalybridge
Default

I removed the 2 bolts on the black plastic air ducting going to the air box but could not get it out. Do i need to be more rough and pull it?

the two phillips head screws, are they screwed into a white piece? I can see the head of one screw but cannot find the other one???????

Help please
Reply
Old Jul 15, 2009 | 10:09 PM
  #76  
brockalightus's Avatar
brockalightus
Scooby Regular
iTrader: (2)
 
Joined: Mar 2009
Posts: 483
Likes: 0
From: underground
Default

Originally Posted by brownface
I removed the 2 bolts on the black plastic air ducting going to the air box but could not get it out. Do i need to be more rough and pull it?

the two phillips head screws, are they screwed into a white piece? I can see the head of one screw but cannot find the other one???????

Help please
there is a 10mm bolt behind the grill that needs to be removed for each headlight...two bolts on the top...then pull to release
Reply
Old Jul 15, 2009 | 10:28 PM
  #77  
bioforger's Avatar
bioforger
Scooby Regular
iTrader: (1)
 
Joined: Jan 2002
Posts: 16,995
Likes: 5
From: Pig Hill, Wiltsh1te
Default

I wonder if a dealer would consider doing this, I haven't got the bollocks to try n would probably **** it up if I did.
Reply
Old Jul 15, 2009 | 10:30 PM
  #78  
brockalightus's Avatar
brockalightus
Scooby Regular
iTrader: (2)
 
Joined: Mar 2009
Posts: 483
Likes: 0
From: underground
Default

Originally Posted by bioforger
I wonder if a dealer would consider doing this, I haven't got the bollocks to try n would probably **** it up if I did.
not a chance.........£100 m8 and i`ll do them for ya
Reply
Old Jul 15, 2009 | 10:32 PM
  #79  
bioforger's Avatar
bioforger
Scooby Regular
iTrader: (1)
 
Joined: Jan 2002
Posts: 16,995
Likes: 5
From: Pig Hill, Wiltsh1te
Default

You're in Ireland though
Reply
Old Jul 15, 2009 | 10:32 PM
  #80  
GTW's Avatar
GTW
Scooby Regular
iTrader: (1)
 
Joined: Jun 2009
Posts: 107
Likes: 0
Default

i'm going to do mine soon on the blobeye. But im not doing them black

It will be matched to the badgeless grill im in the middle of doing, need to find a decentpaint, im thinking pewter grey as i did the interior stereo surrounds in that andlooks pretty nice
Reply
Old Jul 15, 2009 | 10:34 PM
  #81  
brockalightus's Avatar
brockalightus
Scooby Regular
iTrader: (2)
 
Joined: Mar 2009
Posts: 483
Likes: 0
From: underground
Default

Originally Posted by bioforger
You're in Ireland though
indeed i am...cost £15 postage and you would have them back in 2days...
Reply
Old Jul 15, 2009 | 10:37 PM
  #82  
bioforger's Avatar
bioforger
Scooby Regular
iTrader: (1)
 
Joined: Jan 2002
Posts: 16,995
Likes: 5
From: Pig Hill, Wiltsh1te
Default

Originally Posted by brockalightus
indeed i am...cost £15 postage and you would have them back in 2days...
Thx for the offer mate, but it's a daily driver so would need be completed at weekend or in an evening.
Reply
Old Jul 15, 2009 | 10:39 PM
  #83  
brockalightus's Avatar
brockalightus
Scooby Regular
iTrader: (2)
 
Joined: Mar 2009
Posts: 483
Likes: 0
From: underground
Default

Originally Posted by bioforger
Thx for the offer mate, but it's a daily driver so would need be completed at weekend or in an evening.
not a problem...good luck with the mod
Reply
Old Jul 15, 2009 | 11:04 PM
  #84  
Flaps's Avatar
Flaps
Scooby Regular
iTrader: (1)
 
Joined: Nov 2006
Posts: 2,966
Likes: 0
From: Yorkshire
Default

Originally Posted by bioforger
I wonder if a dealer would consider doing this, I haven't got the bollocks to try n would probably **** it up if I did.
A specialist probably would. Scoobybits did mine for £40 a couple of years ago when they were still in Sheffield.
Reply
Old Jul 16, 2009 | 06:25 PM
  #85  
Meallbhan's Avatar
Meallbhan
Scooby Regular
iTrader: (3)
 
Joined: Feb 2007
Posts: 743
Likes: 0
From: Inverness
Default

Originally Posted by bioforger
I wonder if a dealer would consider doing this, I haven't got the bollocks to try n would probably **** it up if I did.

I was a bit nervous when I did it the first time. Done it twice now, you just need to be methodical, take your time and don't rush the job and it'll turn out sweet.

Or the other option is to do it on the computer, you're pretty good with photoshop!
Reply
Old Jul 16, 2009 | 06:53 PM
  #86  
bioforger's Avatar
bioforger
Scooby Regular
iTrader: (1)
 
Joined: Jan 2002
Posts: 16,995
Likes: 5
From: Pig Hill, Wiltsh1te
Default

firstly I'm crap at painting in real life or with a spray can, I always seem to **** it up And second I don't know what I would be doing getting the lights out.

Last edited by bioforger; Jul 16, 2009 at 06:55 PM.
Reply
Old Jul 16, 2009 | 09:29 PM
  #87  
AbbasSTI's Avatar
AbbasSTI
Scooby Regular
iTrader: (37)
 
Joined: Apr 2009
Posts: 1,012
Likes: 0
From: Stalybridge
Default

I have finished the passenger side, just waiting for it to stop raining so i can put it back in, first time spraying anything for me but that really was the easy part. I hope putting it back isn't too difficult
Reply
Old Jul 18, 2009 | 10:12 AM
  #88  
IainMilford's Avatar
IainMilford
Scooby Regular
15 Year Member
Liked
Loved
Community Favorite
iTrader: (15)
 
Joined: Jun 2008
Posts: 3,927
Likes: 91
From: In the garage
Default

Originally Posted by bioforger
firstly I'm crap at painting in real life or with a spray can, I always seem to **** it up And second I don't know what I would be doing getting the lights out.
How to clear MY04 headlights - photo instructions - NASIOC
Reply
Old Jul 18, 2009 | 02:11 PM
  #89  
-shane-'s Avatar
-shane-
Scooby Regular
iTrader: (40)
 
Joined: Aug 2008
Posts: 2,163
Likes: 0
From: Suffolk
Default

Originally Posted by brockalightus
there is a 10mm bolt behind the grill that needs to be removed for each headlight...two bolts on the top...then pull to release
Is that all as i managed to remove top 2 bolts and one near grill, Then realised top clip in wing im told there is 2, is it then a case of pulkling it out?
Reply
Old Jul 18, 2009 | 02:56 PM
  #90  
AbbasSTI's Avatar
AbbasSTI
Scooby Regular
iTrader: (37)
 
Joined: Apr 2009
Posts: 1,012
Likes: 0
From: Stalybridge
Default

Originally Posted by -shane-
Is that all as i managed to remove top 2 bolts and one near grill, Then realised top clip in wing im told there is 2, is it then a case of pulkling it out?
There are a couple of clips at the bottom of the headlight one of which you can see when you remove the fog light cover, but dont worry about them. Once all the cables around the back are disconnected give the headlight a pull towards you and it should come out.
Reply

Thread Tools
Search this Thread

All times are GMT +1. The time now is 04:02 AM.