
Blob Eye Black headlight mod Images


Thread Starter
Scooby Regular

Joined: Oct 2004
Posts: 978
Likes: 2
From: The Main Frame
Help!!
I attempted to de-tango today but couldn't get the bloody headlight out!!
I thought i t would be an easy job, had everything prepared too, silicon to seal up the unit afterwards properly, new bulbs, primer and black spray paint too but didn't even get that far.
I removed all the bolts, the grill and the blot holding the light to the slam pannel, also removed the fog light cover and released the push clip from there. I couldn't find the second clip however, where is it located??
I gave the light a right pull and push to release it but it wouldn't budge more than a couple of cms, I tried for about 2hours to no avail.
Help would be much appreciated!
Gonna have another shot tomorrow morning!
Last edited by morpheus1870; Jan 3, 2009 at 06:35 PM.

Scooby Regular
Joined: Mar 2008
Posts: 152
Likes: 0
hi all,
did mine today with the flu,
thought it would take an hour or so !!.............
pulled lights out no probs, painted & de-tango'd them no probs, put them back in no probs.....then came trouble !!
sidelights = on
main beam = on
dipped beam = no?
hmmm i thought so i checked the wiring then the main beam came on dim....panic stations set in, i thought id melted my loom..
phew turned out to be blown bulbs & a blown fuse....
but when turning my ignition on the fan kept coming in which i knew wasnt right........it turned out to be my aircon fan.....lol
i have got flu though so feel free to take the p*ss
job well done in the end though
post pics shortly
Thread Starter
Scooby Regular
Joined: Oct 2004
Posts: 978
Likes: 2
From: The Main Frame
hi all,
did mine today with the flu,
thought it would take an hour or so !!.............
pulled lights out no probs, painted & de-tango'd them no probs, put them back in no probs.....then came trouble !!
sidelights = on
main beam = on
dipped beam = no?
hmmm i thought so i checked the wiring then the main beam came on dim....panic stations set in, i thought id melted my loom..
phew turned out to be blown bulbs & a blown fuse....
but when turning my ignition on the fan kept coming in which i knew wasnt right........it turned out to be my aircon fan.....lol
i have got flu though so feel free to take the p*ss
job well done in the end though
post pics shortly
did mine today with the flu,
thought it would take an hour or so !!.............
pulled lights out no probs, painted & de-tango'd them no probs, put them back in no probs.....then came trouble !!
sidelights = on
main beam = on
dipped beam = no?
hmmm i thought so i checked the wiring then the main beam came on dim....panic stations set in, i thought id melted my loom..
phew turned out to be blown bulbs & a blown fuse....
but when turning my ignition on the fan kept coming in which i knew wasnt right........it turned out to be my aircon fan.....lol
i have got flu though so feel free to take the p*ss
job well done in the end though
post pics shortly
there is 2 bolts on the top of the headlight and one behind the bumper which is accessible with grille removed and the 2 plastic clips securing the front bumper to the iron (on top of bumper) they are 12mm bolts iirc then just pull the light unit and wiggle it a bit
Scooby Regular
Joined: Dec 2007
Posts: 795
Likes: 0
From: North Wales/Chester
There are clips at the bottom of the light. One Holds the white bracket behind the grill, the other at the bottom towards the outermost side of the unit. Once the three bolts are removed, push the unit from the inside at the bottom outermost side should release it from this clip (you can't see it but it is there). Both clips are quite robust so you will probably have to be brave (I also covered the edge of the wing with electrical tape as it is easy to scratch them)
One last thing, you have undone all the electrical connectors first as if you haven't then the light won't come out!! (There are four)
Good luck
One last thing, you have undone all the electrical connectors first as if you haven't then the light won't come out!! (There are four)
Good luck
Thread Starter
Scooby Regular
Joined: Oct 2004
Posts: 978
Likes: 2
From: The Main Frame
Bollocks!! Had another go today and couldn't get the light out! removed all the bolts and everything, was pulling and pushing on the light to no luck at all. I'm generally good at this sort of stuff but feel like a right tit not being able to get the headlight out at all!
Anyone close to Hebden Bridge where I work who might fancy giving me a hand that would be awesome!
Otherwise I live in good old Bradford!
Anyone close to Hebden Bridge where I work who might fancy giving me a hand that would be awesome!
Otherwise I live in good old Bradford!
Thread Starter
Scooby Regular
Joined: Oct 2004
Posts: 978
Likes: 2
From: The Main Frame
-------------------------------------------------------------------------
This is a relatively easy modification and costs Zero. Just time and patience and you can do it too.
Here�s how it�s done....
Headlight Removal
First both headlights must obviously be removed.
The driver�s side requires the black plastic air ducting going to the air box be removed to allow easier access to headlight.
This is secured by 2 x 10mm bolts onto the slam panel. (shown green).
To remove the headlights, these are also secured by 2 x 10mm bolts. (shown red)
Same bolts need removed on passenger side headlight. (shown red)
On the back of each headlight, nearest the grille side, there are 2 small phillips screws holding the headlight against a bracket, which is bolted onto the slam panel behind the grille.
These screws must be removed, and can be quite fiddly and hard to get to. A magnetic screwdriver is most handy at this point!
On the driver�s side, you may require to move the power steering reservoir to get access to the screws. The bottle simply clips onto the bracket and clips on and off fairly easily. (indicated by green arrow)
Lastly, the headlights are secured inside the wing by 2 push-clips on each unit.
Once the 10mm bolts and phillips screws are removed its just a case of carefully manouvering the light around to unclip it. (if you have an STI, remove the fog cover and you can get your hand up behind it and un-do the lower clip from there)
Make sure you don�t catch the wing on the way out as it could dent it or chip your paintwork.
Once loose, reach in and unclip the 4 multiplugs. (sidelight, indicator, headlight and adjuster motor)
The headlight should pull free now, and repeat on the other side.
Headlight dissection
Once off, look at the back of the unit and you will see approx 8(?) screws round the edge. (one screw is hidden behind padding tape) Remove all of these with a Phillips screwdriver so that the only thing holding the unit together is the mastic stuff.
Now the unit requires to be heated to soften the mastic.
Some people have actually put their headlights in the oven for a short time at low settings.
Do you think these units will be cheap to replace if you make an @rse of it? I don�t!
I simply placed the headlight directly in front of a fan heater for about 10-15 minutes with the back of the headlight facing the heater. Time may vary depending on power of heater etc. It should be no closer than about 12 inches.
Move the unit around so that the heat gets to the entire area at the back of the light.
Once warm, the mastic should be supple, so gently, place a flat edged screwdriver in the join, and slowly prise them apart. If they start to move, get your fingers in and slowly pull them apart. If it doesn�t want to come, you are too early, so put it back in front of the heater.
Once the unit starts to separate, you need to unclip the 3 clips on bottom of headlight, and pull both halves apart.
IMPORTANT
As the headlight is a sealed unit, it is imperative that no marks, scratches or mastic gets onto the inside of the lens so be very careful when working inside the headlight.
De-Tango!!!
When you pull both halves apart, you will see the orange triangle clipped into the facing at 3 places.
With a flat edged screwdriver, gently unclip these, and the orange triangle should fall inside the lens. Take it out and throw it in the de-tango bin!
Once out, put both halves of the unit back together while the mastic is still warm and supple as this will aid putting them back together.
Press the halves together hard, ensuring the mastic takes a good bite, then replace the 8(?) screws that hold the unit together.
Once the mastic sets again, the unit should be watertight and hopefully no condensation will appear. (if it does in the future, you�ll have to take �em back out and re-seal the units so do it right this time!)
Repeat this on other side and voila�. You have a nice set of de-tango�d headlights.
Re-fit them to the car (reverse process of removal).
You now require an orange/silvertec bulb so that it flashes orange but looks silver inside the unit.
sorry but i can't post the step by step pic's
Last edited by 5doorbullet; Jan 5, 2009 at 07:40 PM.

Thread Starter
Scooby Regular
Joined: Oct 2004
Posts: 978
Likes: 2
From: The Main Frame
Hi pal, i have used this guide (even printed it out and had by me) but still had no luck.
Gonna have another go this weekend and had a very kind offer from cos-ram who sad he would give us a hand...so hopefully will have it done this weekend fingers crossed.
I don't understand what your're having a problem with. If you follow the guide above then you should be able to do it. It's not hard, you just need to get stuck in, its a learning curve and will find out what you're doing as you're doing it.
Wish I was closer id come and show you what to do, oncy youve seen or done it youll realise you are being too dammed gentle
once unbolted give them a real goog pull they will come out
once unbolted give them a real goog pull they will come out

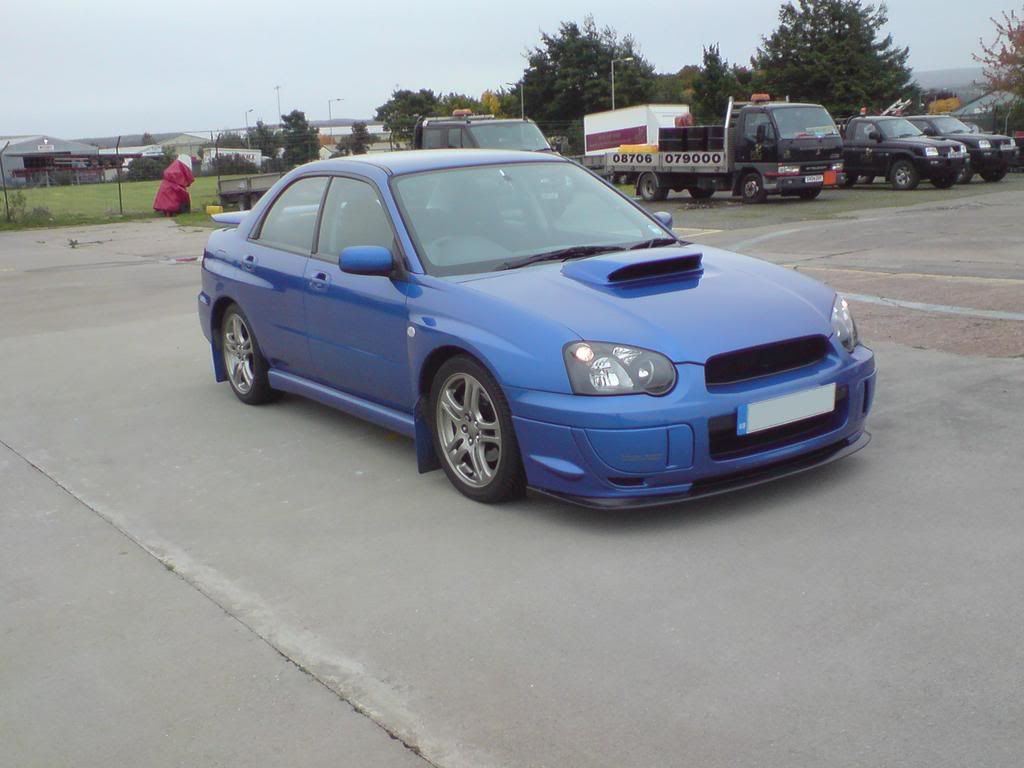
Seriously considering this. It looks brilliant against the silver and black cars, but still undecided with the WR Blue. All the blue car pics on this thread are at strange angles or with reflections which make it hard to tell how it will look.
Could one of you with this mod done on a WR blue car please post up some pics for me as follows?
Looking for one closeup of the headlight unit from directly in front (at headlight level).
One of the whole front of the car from directly in front (at headlight level).
Could one of you with this mod done on a WR blue car please post up some pics for me as follows?
Looking for one closeup of the headlight unit from directly in front (at headlight level).
One of the whole front of the car from directly in front (at headlight level).
Scooby Regular
Joined: Apr 2007
Posts: 744
Likes: 0
From: Middlesex
https://www.scoobynet.com/projects-4...eadlights.html
Check this out guys, its the same as the instructions previously posted but has pics and arrows pointing to exactly what you need to do.
Hope it helps.
Check this out guys, its the same as the instructions previously posted but has pics and arrows pointing to exactly what you need to do.
Hope it helps.


Scooby Regular
Joined: Dec 2007
Posts: 795
Likes: 0
From: North Wales/Chester
lol I would be to scared to do it on somebody elses in case I broke something or scratched the paint 
STiFreak I wasn't sure about the black on WR Blue so I went for leaving it silver, that way if I change my mind then I can spray 'em black, don't think I will though.
Loving being without those nasty ginger triangles
STiFreak I wasn't sure about the black on WR Blue so I went for leaving it silver, that way if I change my mind then I can spray 'em black, don't think I will though.
Loving being without those nasty ginger triangles