
Photoshop squish my WRX please :)

 fair enough mate, here u are,

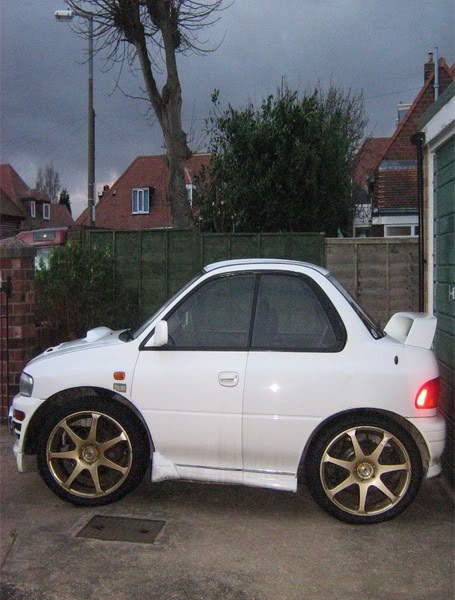
 Here's yours, some gfx had to be sacrificed
 Scooby Regular
Joined: Dec 2006
Posts: 743
Likes: 0
From: sunny north east
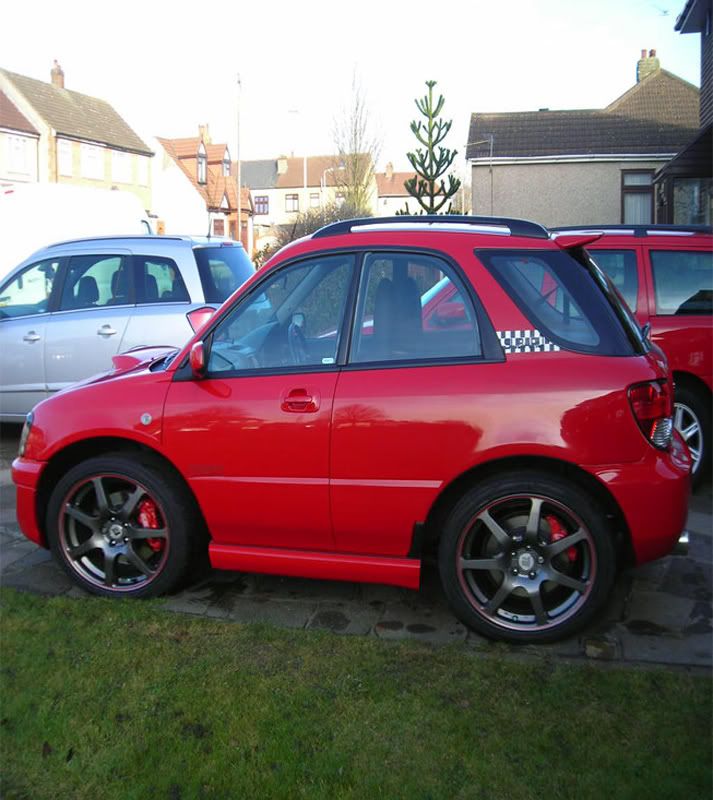
my first attempt (crappy photo but it was handy) -the walkthru works fine, thanks! (once I'd learnt how to make multiple selections)
oddly, the original photo now looks stretched!!!
oddly, the original photo now looks stretched!!!
Last edited by scoobian; Jan 16, 2009 at 05:47 PM. Reason: photo improved


 [/IMG]


Scooby Regular


Joined: Oct 2005
Posts: 606
Likes: 2
From: united kingdom
Fella thanks very much for doing my car it looks great.
Can i be a pain and ask for a little novice help , i have obtained CS3 , and went thru your advice on page 1.
Select each wheel with the Polygon lasso tool.
Take a small part of the arch n surrounding area around the wheels to.
Copy n paste the selections to new layers.
Duplicate the main picture to a new layer.
Transform the copy (CTRL+T) n resize to roughly half the width.
i can get up to this point fine , but i cant get the wheels back on ?
i end up with 4 layers , the origional , front wheel , back , wheel and the copy all squashed down but i can get the wheels to drag over the copy?
can you give me a little more advice ,
Select your wheel layers n move them over the above resized pic.
Tidy up overlapping areas with eraser/selection tool.
Hide the original pic in layers. Flatten the image n delete the hidden layer.
Crop your result to tidy it up.
Resize to 640 X whatever so its nice n smooth on snet
thanks again .
Chris.
Last edited by sti-chris; Mar 30, 2009 at 08:50 PM.
Fella thanks very much for doing my car it looks great.
Can i be a pain and ask for a little novice help , i have obtained CS3 , and went thru your advice on page 1.
i can get up to this point fine , but i cant get the wheels back on ?
i end up with 4 layers , the origional , front wheel , back , wheel and the copy all squashed down but i can get the wheels to drag over the copy?
can you give me a little more advice ,
thanks again .
Chris.
Oh and I lowered yours as well as it looked sweet

Last edited by bioforger; Mar 30, 2009 at 09:19 PM.
For the areas that don't match up, overlap etc, use the eraser as much as you can then flatten the image n use the clone/smudge tools to touch up whats left over.
Clone tool can also be used to blend out the door handle after u've copied a selection over the top of it. Smudge tool is also good for blending colours together.
Clone tool can also be used to blend out the door handle after u've copied a selection over the top of it. Smudge tool is also good for blending colours together.