
Project RA - MY95 STI

Thread Starter
Scooby Regular
iTrader: (2)
Joined: May 2000
Posts: 8,626
Likes: 1
From: Class record holder at Pembrey Llandow Goodwood MIRA Hethel Blyton Curborough Lydden and Snetterton
It was the rear diff, unlucky since there are cars running a lot more power than me on a 3.9:1 rear diff
Thought I'd sourced a replacement and had a local garage at the ready to do the swap, but what was supposed to be a diff from a MY96 STI RA (same spec as mine with LSD) turned out to be a 4.44:1 diff
So I then found a 3.9:1 open diff and the gearbox specialist would swap the LSD from mine into the good CWP diff. Unfortunatly his premesis burnt down last month so he is working from a different workshop with no ramps. So I decided to take the diff off myself.
Armed with a pair of axle stands and a trolley jack I managed it without touching the hubs Its a bitch of a job when those bolts haven't been touched for 75k miles, a 2 foot breaker bar helps TweenieRob was on the other end of a phone offering advice, the trick to do it without splitting the hubs is once the diff is free, lower it as much as you can until its almost hanging by the driveshafts, then rotate it around the axis of the propshaft as much as you can, then there is enough room to pop one of the driveshafts out. However, the splines on one of the driveshafts locate further into the diff than the other, so is harder to get out. Guess which one I did first? yep the longer one. So for anyone else attempting this, pop the nsr driveshaft 1st
  Its much easier this way.
Nice to know I was given the correct diagnosis, 2 teeth were attached to the magnetic drain plug
Today Im dropping the 2 diffs off to be rebuilt, hopefully the car will be up and running this weekend
I will charge the camera up for the weekend refit.
Thought I'd sourced a replacement and had a local garage at the ready to do the swap, but what was supposed to be a diff from a MY96 STI RA (same spec as mine with LSD) turned out to be a 4.44:1 diff
So I then found a 3.9:1 open diff and the gearbox specialist would swap the LSD from mine into the good CWP diff. Unfortunatly his premesis burnt down last month so he is working from a different workshop with no ramps. So I decided to take the diff off myself.
Armed with a pair of axle stands and a trolley jack I managed it without touching the hubs
Its a bitch of a job when those bolts haven't been touched for 75k miles, a 2 foot breaker bar helps TweenieRob was on the other end of a phone offering advice, the trick to do it without splitting the hubs is once the diff is free, lower it as much as you can until its almost hanging by the driveshafts, then rotate it around the axis of the propshaft as much as you can, then there is enough room to pop one of the driveshafts out. However, the splines on one of the driveshafts locate further into the diff than the other, so is harder to get out. Guess which one I did first? yep the longer one. So for anyone else attempting this, pop the nsr driveshaft 1st Its much easier this way.Nice to know I was given the correct diagnosis, 2 teeth were attached to the magnetic drain plug
Today Im dropping the 2 diffs off to be rebuilt, hopefully the car will be up and running this weekend
I will charge the camera up for the weekend refit.
Last edited by Jay m A; Jul 17, 2006 at 10:13 AM.

Scooby Regular
Joined: May 2004
Posts: 11,341
Likes: 1
I'm sure it is quicker in the end to remove both lower 'through bolts' from the hubs and pop the shafts out/back in?
Done 3 diff changes and it is almost a mini version of doing the gearbox...
Good going!
Graham
Done 3 diff changes and it is almost a mini version of doing the gearbox...
Good going!
Graham
Thread Starter
Scooby Regular
iTrader: (2)
Joined: May 2000
Posts: 8,626
Likes: 1
From: Class record holder at Pembrey Llandow Goodwood MIRA Hethel Blyton Curborough Lydden and Snetterton
Its all done! Finished just in time before the thunderstorms too.
Graham, I prefer unbolting the exhaust and dropping the box down as far as it will go, if you pop the near side driveshaft 1st its easier.
The longer driveshaft popped in very easily, but the 2nd one was a pain until I worked out the best way is with a block of 1x0.5 and a hammer on the end of the CV, taking care not to rip the rubber boot.
I also used 2 jacks, a trolley jack to take the wieght whilst doing the driveshafts, then once in used that and the OE scissor jack on the prop end to manouvure it into position.
Pics:
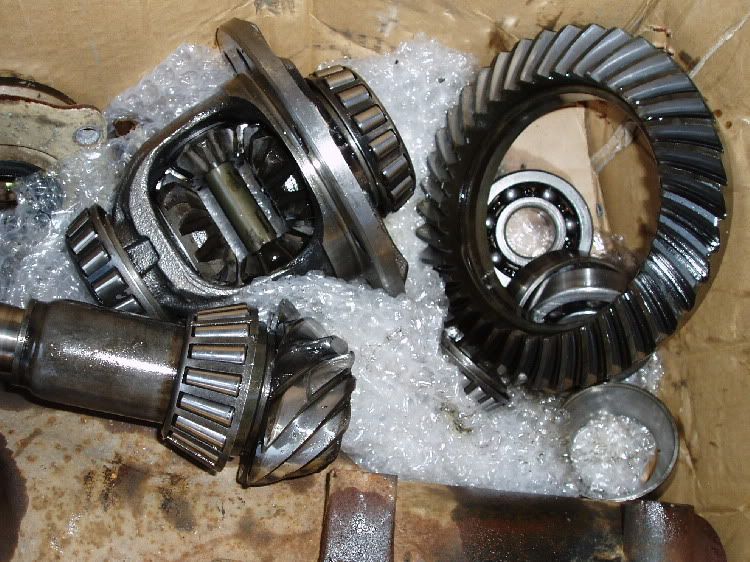
The chipped pinion teeth

Not the best working conditions - I hate gravel! This is my parents driveway, my new home doesn't have any level ground but that will all change now I have funds for my new garage

Driveshafts and prop, note the o/s one longer (hence don't remove it 1st)

The rebuilt diff waiting to go in

The leftovers from the rebuild - you can see where the 2 teeth came from
I put 0.8 litres of BOA90 in, I hope that is correct..
cheers
Graham, I prefer unbolting the exhaust and dropping the box down as far as it will go, if you pop the near side driveshaft 1st its easier.
The longer driveshaft popped in very easily, but the 2nd one was a pain until I worked out the best way is with a block of 1x0.5 and a hammer on the end of the CV, taking care not to rip the rubber boot.
I also used 2 jacks, a trolley jack to take the wieght whilst doing the driveshafts, then once in used that and the OE scissor jack on the prop end to manouvure it into position.
Pics:
The chipped pinion teeth
Not the best working conditions - I hate gravel! This is my parents driveway, my new home doesn't have any level ground but that will all change now I have funds for my new garage
Driveshafts and prop, note the o/s one longer (hence don't remove it 1st)
The rebuilt diff waiting to go in
The leftovers from the rebuild - you can see where the 2 teeth came from
I put 0.8 litres of BOA90 in, I hope that is correct..
cheers
Scooby Regular
Joined: May 2004
Posts: 11,341
Likes: 1
Ouch, that must have hurt!
My handbrake cables always get in the way but if you can get the 2 studs out of the diff then things are better if the studs get past the fuel tank...
Or is it only my car that is a sod?
Graham

My handbrake cables always get in the way but if you can get the 2 studs out of the diff then things are better if the studs get past the fuel tank...
Or is it only my car that is a sod?
Graham
Thread Starter
Scooby Regular
iTrader: (2)
Joined: May 2000
Posts: 8,626
Likes: 1
From: Class record holder at Pembrey Llandow Goodwood MIRA Hethel Blyton Curborough Lydden and Snetterton
Bit of an update...
Car has been running fine in its current spec, since my last post the car ran a trouble free 900 mile long-weekend trip that took in the Nurburgring and the full F1 circuit at Spa, other than that just the daily grind to work and the odd blast.
Early this week I found a split hose (dumpvalve to inlet return) under the bonnet, unrepairable hence justifying a slight upgrade and tinker
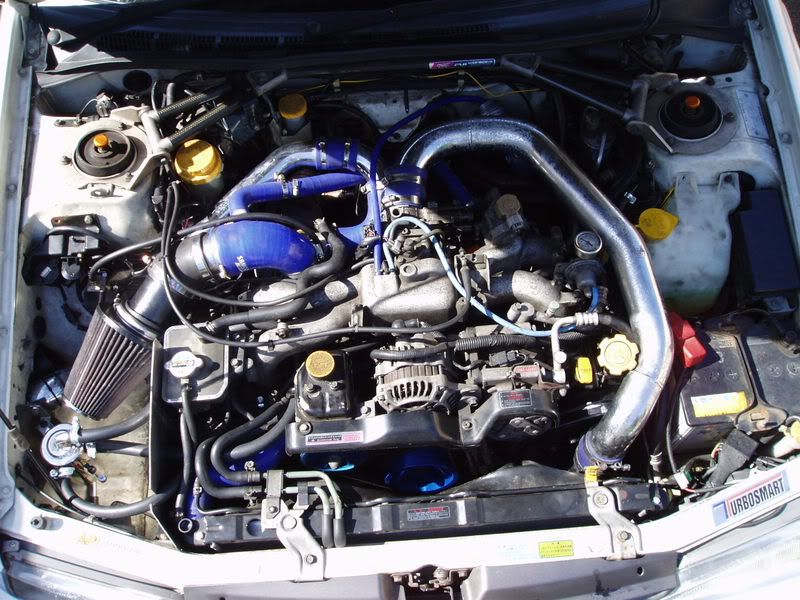
Running a MAF, FMIC and a recirculating DV has seen problems with jerkiness when backing off the throttle mid-boost. Its seems a common problem experienced with other similar cars on here, the best solution I've found being fitting a weaker spring as poss to the Forge DV I'm using.
However, although the problem seems to lie with pre dumped pressure pushing back past the MAF, I was also thinking the pipework taking the recirc back to the intake also contributes, since it fires some of the air towards the MAF also.
So since I was going to replace the inlet pipework I thought I'd try an idea to force the dumped pressure towards the turbo and away from the MAF, also relocate the feed to the idle control valve.
Things needed:
Samco 76mm to 60mm reducing elbow
Samco 25mm elbow
Samco 25mm pipe
3" x 3" long ali tubing
Nylon 25mm T piece
Nylon 25mm elbow
New working conditions! At last I don't need my parents gravel driveway, since I now have a flat garage base. No garage as yet and yes, I am waiting until its warmer before I lay the grass seed!

The split pipe

I cut the nylon elbow down and rounded off the sharp edges, since this will be in the inlet airflow, so I wanted it as smooth as possible. Cut elbow next to T piece.

I then cut a hole in the side of the reducing elbow, making a good interference fit for the cut elbow.

View from MAF side.

View from turbo side.
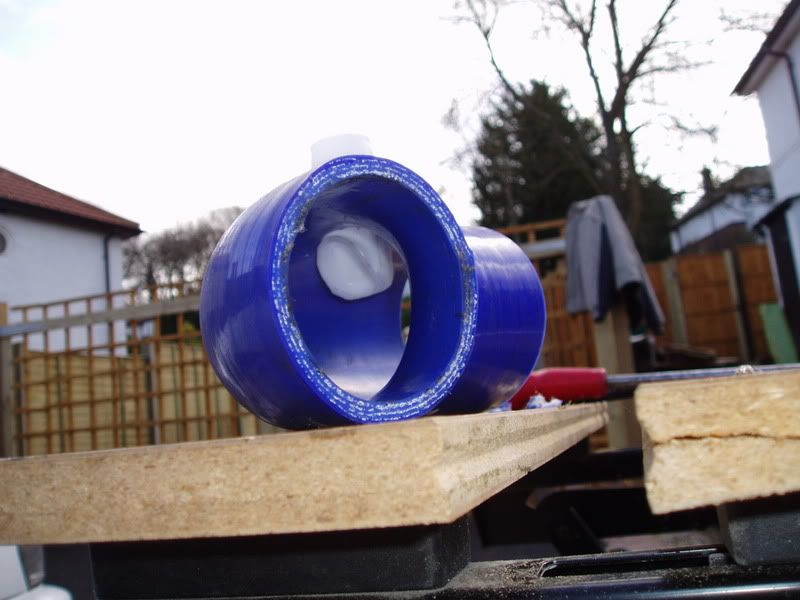
I calculated the difference in area from 76mm to 60mm is greater than the area from the elbow, so it shouldn't restrict flow - but I'm not sure how it will affect turbulence of airflow, considering it has to go round 2 right angles afterwards anyway?
All fitted - T piece used to plumb in ICV pipework
I fired her up and all runs and idles OK, once I've given it a good run I'll update later to see if this has any positive / negative affects on lift off judder.
Car has been running fine in its current spec, since my last post the car ran a trouble free 900 mile long-weekend trip that took in the Nurburgring and the full F1 circuit at Spa, other than that just the daily grind to work and the odd blast.
Early this week I found a split hose (dumpvalve to inlet return) under the bonnet, unrepairable hence justifying a slight upgrade and tinker
Running a MAF, FMIC and a recirculating DV has seen problems with jerkiness when backing off the throttle mid-boost. Its seems a common problem experienced with other similar cars on here, the best solution I've found being fitting a weaker spring as poss to the Forge DV I'm using.
However, although the problem seems to lie with pre dumped pressure pushing back past the MAF, I was also thinking the pipework taking the recirc back to the intake also contributes, since it fires some of the air towards the MAF also.
So since I was going to replace the inlet pipework I thought I'd try an idea to force the dumped pressure towards the turbo and away from the MAF, also relocate the feed to the idle control valve.
Things needed:
Samco 76mm to 60mm reducing elbow
Samco 25mm elbow
Samco 25mm pipe
3" x 3" long ali tubing
Nylon 25mm T piece
Nylon 25mm elbow
New working conditions! At last I don't need my parents gravel driveway, since I now have a flat garage base. No garage as yet and yes, I am waiting until its warmer before I lay the grass seed!
The split pipe
I cut the nylon elbow down and rounded off the sharp edges, since this will be in the inlet airflow, so I wanted it as smooth as possible. Cut elbow next to T piece.
I then cut a hole in the side of the reducing elbow, making a good interference fit for the cut elbow.
View from MAF side.
View from turbo side.
I calculated the difference in area from 76mm to 60mm is greater than the area from the elbow, so it shouldn't restrict flow - but I'm not sure how it will affect turbulence of airflow, considering it has to go round 2 right angles afterwards anyway?
All fitted - T piece used to plumb in ICV pipework
I fired her up and all runs and idles OK, once I've given it a good run I'll update later to see if this has any positive / negative affects on lift off judder.
Thread Starter
Scooby Regular
iTrader: (2)
Joined: May 2000
Posts: 8,626
Likes: 1
From: Class record holder at Pembrey Llandow Goodwood MIRA Hethel Blyton Curborough Lydden and Snetterton
First impressions are good - a 10 mile run up and down the dual carriageway trying to induce judder resulted in a very smooth drive Induction noise has changed significantly too which is surprising,
Induction noise has changed significantly too which is surprising,
Thread Starter
Scooby Regular
iTrader: (2)
Joined: May 2000
Posts: 8,626
Likes: 1
From: Class record holder at Pembrey Llandow Goodwood MIRA Hethel Blyton Curborough Lydden and Snetterton
Another update
I've always held back from uprating the turbo (still on the TD05 16g) due to the limitations of the gearbox - the car needs to be a reliable daily driver and it has been (apart from the rear diff, which is rare for this output).
But I came across a very rare opportunity to buy a USDM MY05 6 speed, which has the UK ratios and the DCCD (the only 6 speed I'd consider apart fron a forester STI) at a very good price, but it didn't come with the prop or rear diff. Rear diff wasn't a problem since my car already has a 3.9 CWP, and I sourced an auto prop from the For Sale section.
But Because the gearbox is an 05 I also had to source some front stub shafts from an earlier 6 speed (the later ones dont have these like the earlier 6 speeds - the driveshaft now 'plugs in' to the diff rather than attaching to a splined shaft). They are pretty expensive from a dealer but they are exactly the same as stub shafts from a 5 speed auto - plenty of them lying around at �40 a pair. I also needed new seals for these - again the ones for an early 6 speed are needed, beware they are handed.
A massive thanks to SleeperSy for selling his gearbox and giving me all the relevant info on parts needed for the conversion
I took it to Zen and they swapped it over without issue, I was quite relieved having sourced all parts from 4 different sources but everything went together. Zen have a great setup, many thanks to Paul, Liz, Tim and the team.
The ratios are great - pretty manic just like 1-5 of the old box it replaced, but joy of joys a 6th gear for the motorway Can't wait for Nurburg in a fortnight...
Especially since I now have a flocked dash fitted
Its been in my cellar for months but at last I managed to find someone mad enough to help me fit it Actually I'm glad Dyney came round because before today I didn't know where the screws were that held in the centre console, let alone do the dash
It took 6 hours start to finish, a lot of swearing, cuts bruises etc but Dyney's OK
Pics (camera phone sorry!)
Dash out

Woeful faded dash and its replacement

Installed


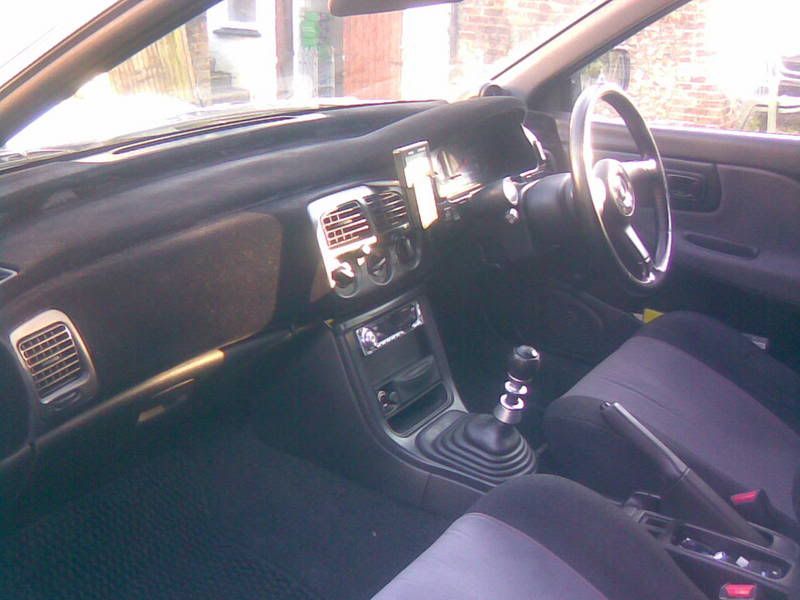
The car is soo close to being finished now
I've always held back from uprating the turbo (still on the TD05 16g) due to the limitations of the gearbox - the car needs to be a reliable daily driver and it has been (apart from the rear diff, which is rare for this output).
But I came across a very rare opportunity to buy a USDM MY05 6 speed, which has the UK ratios and the DCCD (the only 6 speed I'd consider apart fron a forester STI) at a very good price, but it didn't come with the prop or rear diff. Rear diff wasn't a problem since my car already has a 3.9 CWP, and I sourced an auto prop from the For Sale section.
But Because the gearbox is an 05 I also had to source some front stub shafts from an earlier 6 speed (the later ones dont have these like the earlier 6 speeds - the driveshaft now 'plugs in' to the diff rather than attaching to a splined shaft). They are pretty expensive from a dealer but they are exactly the same as stub shafts from a 5 speed auto - plenty of them lying around at �40 a pair
. I also needed new seals for these - again the ones for an early 6 speed are needed, beware they are handed.A massive thanks to SleeperSy for selling his gearbox and giving me all the relevant info on parts needed for the conversion
I took it to Zen and they swapped it over without issue, I was quite relieved having sourced all parts from 4 different sources but everything went together. Zen have a great setup, many thanks to Paul, Liz, Tim and the team.
The ratios are great - pretty manic just like 1-5 of the old box it replaced, but joy of joys a 6th gear for the motorway
Can't wait for Nurburg in a fortnight...Especially since I now have a flocked dash fitted
Its been in my cellar for months but at last I managed to find someone mad enough to help me fit it
Actually I'm glad Dyney came round because before today I didn't know where the screws were that held in the centre console, let alone do the dash It took 6 hours start to finish, a lot of swearing, cuts bruises etc but Dyney's OK
Pics (camera phone sorry!)
Dash out
Woeful faded dash and its replacement
Installed
The car is soo close to being finished now
Last edited by Jay m A; Aug 26, 2007 at 12:10 AM.


Scooby Regular
Joined: Feb 2006
Posts: 267
Likes: 0
From: Oxford
Likng teh dash mate, got a lot of time for the rally schlag effect.
Couple of questions, What sort of ring times have you been doing and what power are you getting having the 90 deg on the turbo?
Couple of questions, What sort of ring times have you been doing and what power are you getting having the 90 deg on the turbo?

Thread Starter
Scooby Regular
iTrader: (2)
Joined: May 2000
Posts: 8,626
Likes: 1
From: Class record holder at Pembrey Llandow Goodwood MIRA Hethel Blyton Curborough Lydden and Snetterton
Power wise I'm maxxing the OE MAF and seeing 95% IDCs on 550s (3.1 bar fuel pressure) so would estimate about 330 of each, however the car doesn't see target boost in gears 1-4 (not enough load) so its down on power there.
Funnily enough I was out accelerated by a TVR chimera 4.5 the other day from 80 onwards - I killed him from the lights (equal start) but he'd caught and passed me as I changed into 4th. Of course I flicked through the back pages of Evo to get the stats - 280+ HP/ton for him but TVR power is usually optomistic, so who knows what I have.
But the 16g really runs out of puff at 5k5 - the 2.5 is crying for a more suitable turbo tbh
Last edited by Jay m A; Aug 27, 2007 at 10:47 PM.
Scooby Regular
Joined: Feb 2006
Posts: 267
Likes: 0
From: Oxford
Thanks alot for the reply mate. Not too sure what to do with mine, I'll prob go garrett and custom pipework. What are you going to do about manifold spacing? If you dump the 90 bend?
That's a shame on the ring trip, the only time I've been there it was glorious sunshine. Hope you've been hitting GT4 hard lol
That's a shame on the ring trip, the only time I've been there it was glorious sunshine. Hope you've been hitting GT4 hard lol
Thread Starter
Scooby Regular
iTrader: (2)
Joined: May 2000
Posts: 8,626
Likes: 1
From: Class record holder at Pembrey Llandow Goodwood MIRA Hethel Blyton Curborough Lydden and Snetterton
I'm going to keep the 90 degree bend and probably get the 16g converted to 20g.
The 20g is obviously front entry but there is enough room to fit a samco 90deg bend on keep the same pipework route
Ring prep last time was 0, didn't even get a chance to watch johnfelsteds DVD I have lying around! Will be similar this time too
The 20g is obviously front entry but there is enough room to fit a samco 90deg bend on keep the same pipework route
Ring prep last time was 0, didn't even get a chance to watch johnfelsteds DVD I have lying around! Will be similar this time too


Thread Starter
Scooby Regular
iTrader: (2)
Joined: May 2000
Posts: 8,626
Likes: 1
From: Class record holder at Pembrey Llandow Goodwood MIRA Hethel Blyton Curborough Lydden and Snetterton
I'd best pop it over, I'm away all next week as of Saturday.
And nope, have only got tomorrow lunchtime free to solve it!
And nope, have only got tomorrow lunchtime free to solve it!
Thread Starter
Scooby Regular
iTrader: (2)
Joined: May 2000
Posts: 8,626
Likes: 1
From: Class record holder at Pembrey Llandow Goodwood MIRA Hethel Blyton Curborough Lydden and Snetterton
Best update this a bit..
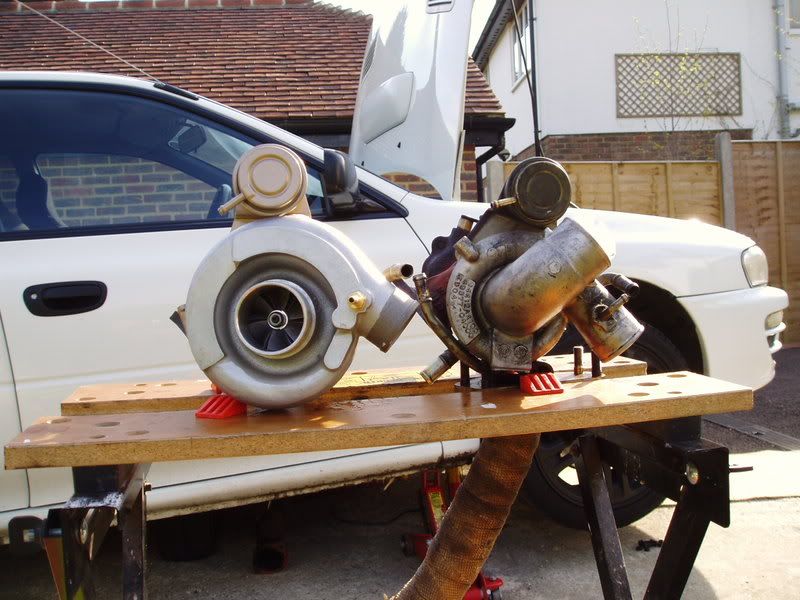
Sent the TD05 16g off to Andy.F and got it converted to a 20g, at present it is waiting to go on along with 740 injectors and a Q45 MAF. I haven't found a spare weekend to swap these over and tidy up a few things so its running an old smokey TD04 I had lying around.
However I did find time to fit some Autometer stealth gauges (fuel pressure, oil pressure and oil temp) and an AVCR - set to off ATM since the cars not mapped to the TD04!
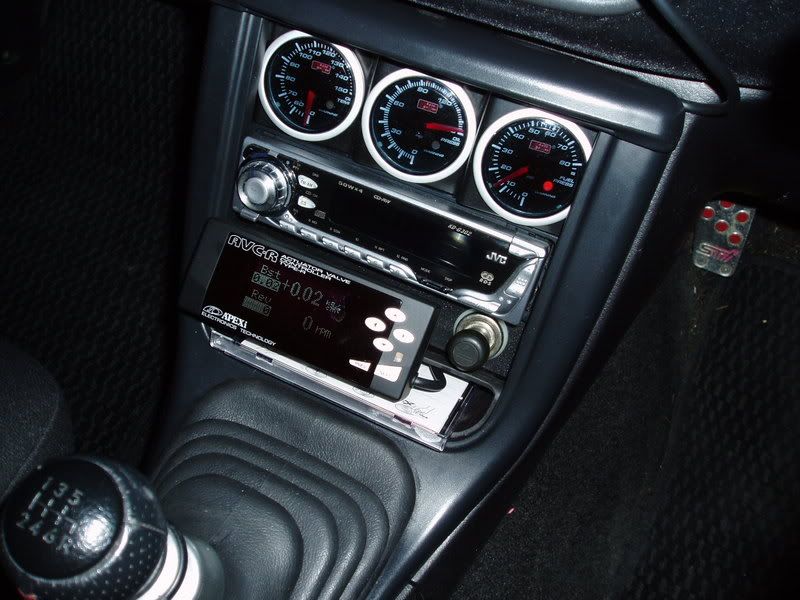
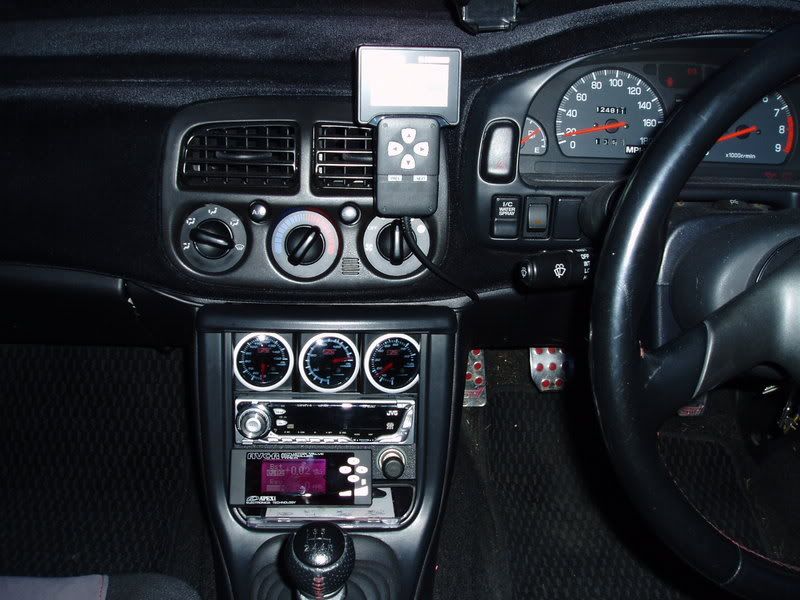
I'm really chuffed how these went in, it took a lot of work to squeeze 3x52mm gauges in there - especially when the "single DIN" holder is actually 10mm larger in height, hence the gauges and stereo wouldn't fit into the double DIN space.
I also bought a new catch can to replace my Heath Robinson tupperware special which looked like this:

But the inlets and filter outlet were only 1/2" tube - which resulted in a pipe ID of 10mm due to the effect of the swage tool used, which I felt is too small. So I modified it with 15mm tube for the crankase inlet and can outlet - I also had a tube made to replace the drain bolt at the bottom for ease of draining:

Hopefully my collection of mods will be fitted v.soon
Sent the TD05 16g off to Andy.F and got it converted to a 20g, at present it is waiting to go on along with 740 injectors and a Q45 MAF. I haven't found a spare weekend to swap these over and tidy up a few things so its running an old smokey TD04 I had lying around.
However I did find time to fit some Autometer stealth gauges (fuel pressure, oil pressure and oil temp) and an AVCR - set to off ATM since the cars not mapped to the TD04!
I'm really chuffed how these went in, it took a lot of work to squeeze 3x52mm gauges in there - especially when the "single DIN" holder is actually 10mm larger in height, hence the gauges and stereo wouldn't fit into the double DIN space.
I also bought a new catch can to replace my Heath Robinson tupperware special which looked like this:
But the inlets and filter outlet were only 1/2" tube - which resulted in a pipe ID of 10mm due to the effect of the swage tool used, which I felt is too small. So I modified it with 15mm tube for the crankase inlet and can outlet - I also had a tube made to replace the drain bolt at the bottom for ease of draining:
Hopefully my collection of mods will be fitted v.soon
Thread Starter
Scooby Regular
iTrader: (2)
Joined: May 2000
Posts: 8,626
Likes: 1
From: Class record holder at Pembrey Llandow Goodwood MIRA Hethel Blyton Curborough Lydden and Snetterton
Managed to get it all fitted last weekend, on the Friday evening before dusk I got the car on the axle stands, took off the FMIC / inlet pipework, then once bad light stopped play I started cleaning the filter and dump valve:

Next day, glorious sunshine and the TD04 off - next to its replacement:
Manifold off, leaving a rats nest of wires / tubing!

Manifold ready for new injectors and to redo the fuel lines, I also removed the ISCV pipework

Trial fitting of turbo - hits fuel line return, also fitted catch can and routed breather inlet pipework - crankcase has its own seperate 15mm ID feed, heads are paired up to the other inlet with a 12mm ID feed.

Simply tightening the fuel line return a bit more moved it 1/4 of a turn and out of the way of the turbo. Once located it is a very tight squeeze to get the Samco 60mm 90 degree inlet pipe fitted, I had to do a lot of cutting and shaping of the pipe to get it to fit. It rests hard against the straight exit turbo nipple so I am now on the lookout for a right angled one...
Also the bolts supplied with the inlet manifold spacers were for a ph1.5 manifold, I didn't realise these are different lengths to that of my ph1 manifold. So when I ordered the spacers I should have stated my manifold type rather than heads type (which are STI3 hence ph1.5). I've sent a pm to Carl Davey so hopefully I'll have the correct bolts soon. So I had to reuse the OE bolts as a very temporary measure to get the car back on the road, its not ideal since the manifold is literally hanging on by a thread (or 2).
All back on and she fired 1st time Fuel pressure was backed off to 2.3bar without vacuum to compensate for the 740 injectors on a 550 map. The cold air shield is still to go back on since it needs trimming for the breather pipework. Rerouting the ISCV to just after the DV outlet meant I could remove a lot of pipework from under the inlet manifold. Catch can now behind OSF headlight.


Nearly there
Next day, glorious sunshine and the TD04 off - next to its replacement:
Manifold off, leaving a rats nest of wires / tubing!
Manifold ready for new injectors and to redo the fuel lines, I also removed the ISCV pipework
Trial fitting of turbo - hits fuel line return, also fitted catch can and routed breather inlet pipework - crankcase has its own seperate 15mm ID feed, heads are paired up to the other inlet with a 12mm ID feed.
Simply tightening the fuel line return a bit more moved it 1/4 of a turn and out of the way of the turbo. Once located it is a very tight squeeze to get the Samco 60mm 90 degree inlet pipe fitted, I had to do a lot of cutting and shaping of the pipe to get it to fit. It rests hard against the straight exit turbo nipple so I am now on the lookout for a right angled one...
Also the bolts supplied with the inlet manifold spacers were for a ph1.5 manifold, I didn't realise these are different lengths to that of my ph1 manifold. So when I ordered the spacers I should have stated my manifold type rather than heads type (which are STI3 hence ph1.5). I've sent a pm to Carl Davey so hopefully I'll have the correct bolts soon. So I had to reuse the OE bolts as a very temporary measure to get the car back on the road, its not ideal since the manifold is literally hanging on by a thread (or 2).
All back on and she fired 1st time
Fuel pressure was backed off to 2.3bar without vacuum to compensate for the 740 injectors on a 550 map. The cold air shield is still to go back on since it needs trimming for the breather pipework. Rerouting the ISCV to just after the DV outlet meant I could remove a lot of pipework from under the inlet manifold. Catch can now behind OSF headlight.Nearly there
Thread Starter
Scooby Regular
iTrader: (2)
Joined: May 2000
Posts: 8,626
Likes: 1
From: Class record holder at Pembrey Llandow Goodwood MIRA Hethel Blyton Curborough Lydden and Snetterton
Its all done
Last minute I ordered some lightweight pulleys in the CDF groupbuy, they turned up just in time for the trip to Zen Performance for the mapping session.
Since I had changed the turbo and injectors for bigger items that wasn't mapped for, I decided against putting the bigger MAF on for the 100 mile trip to Zen just incase it ran lean, but before I went I did a dummy fit so that I could refabricate the cold air shield. Good job I did because I found that I couldn't use the Q45 as is, since my K+N filter and adaptor flange was for a 80mm MAF so it wouldn't have been an ideal fit. Luckily the STIv4 MAF I bought as a spare came with a K+N filter, reason being was that the flange on this MAF had been cut off and the filter clamped directly to the 90mm pipe. So I used that at the 11th hour!
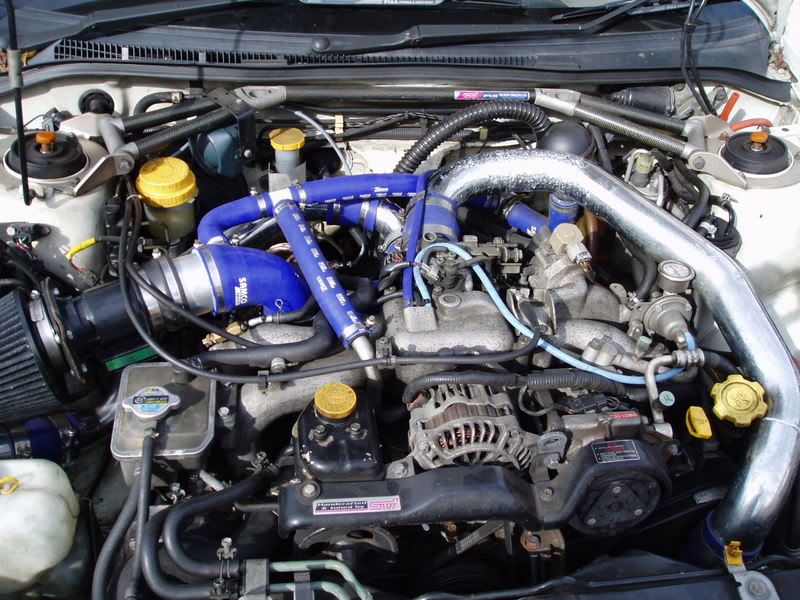
Up at Zen I fitted and wired the MAF, also the pulleys were fitted - engine bay complete at last:
Mapping went really well, firstly Paul recalibrated the PFC for the MAF, set fuel pressures etc, then it was off for a drive. Car was mapped for 1.4 bar mid range, tailing to 1.25 at the top, the car held 1.25 all the way to near redline.
The car is a different beast now, I didn't really comment to Paul, in fact he had to ask me how how it felt etc - I was too zoned on the road ahead, rev counter, knocklink etc to even contemplate voicing a comparison! But on the drive back its apparent where the power is, all at the top - relative to a 16g on a 257 that is. Where the 16g runs out of puff at 5500 the 20g is really going strong - probably now making real use of the STI3 heads where the 16g just couldn't push the air. Its definately the old cliche where 4th is now 3rd etc, plus the bonus that theres no need to shift at 6k now, its strong to 7k and the power curve feels really wide.
The AVCR really does its stuff too, I haven't really had a chance to work it all out yet, but I'm not going to change any of Pauls settings, lol.
I was a bit concerned about whether the clutch or pistons would survive the mapping session, but its all held together to date.
I remember avidly following John Banks' thread a few years ago, in particular him championing the combination of a 20g and a 257, personally for a road car I believe this is ideal. I've always thought that 300 BHP / ton is as much as you need for a road car, I think the 20g on a classic 257 delivers this brilliantly. I've logged 1bar at 2850, that was in 5th without a hot turbo, so I could probably reduce that a bit if I do a run in 6th with everything at optimum temp. I'm sure a 321H may be even better, but budgets are budgets and I've spend more than I can care to remember to get it to how I want, and I'm really happy with what I've achieved
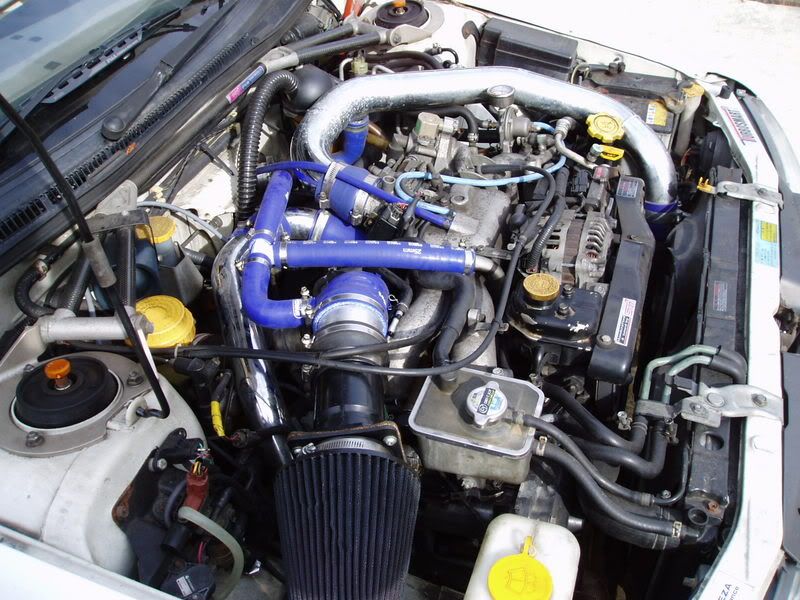
Phone pic of car as it will be for the forseeable:
All that left to do is tidy the paintwork, also see how the brakes cope with the the extra power. I want to keep 16" wheels so choices are limited.
Last minute I ordered some lightweight pulleys in the CDF groupbuy, they turned up just in time for the trip to Zen Performance for the mapping session.
Since I had changed the turbo and injectors for bigger items that wasn't mapped for, I decided against putting the bigger MAF on for the 100 mile trip to Zen just incase it ran lean, but before I went I did a dummy fit so that I could refabricate the cold air shield. Good job I did because I found that I couldn't use the Q45 as is, since my K+N filter and adaptor flange was for a 80mm MAF so it wouldn't have been an ideal fit. Luckily the STIv4 MAF I bought as a spare came with a K+N filter, reason being was that the flange on this MAF had been cut off and the filter clamped directly to the 90mm pipe. So I used that at the 11th hour!
Up at Zen I fitted and wired the MAF, also the pulleys were fitted - engine bay complete at last:
Mapping went really well, firstly Paul recalibrated the PFC for the MAF, set fuel pressures etc, then it was off for a drive. Car was mapped for 1.4 bar mid range, tailing to 1.25 at the top, the car held 1.25 all the way to near redline.
The car is a different beast now, I didn't really comment to Paul, in fact he had to ask me how how it felt etc - I was too zoned on the road ahead, rev counter, knocklink etc to even contemplate voicing a comparison! But on the drive back its apparent where the power is, all at the top - relative to a 16g on a 257 that is. Where the 16g runs out of puff at 5500 the 20g is really going strong - probably now making real use of the STI3 heads where the 16g just couldn't push the air. Its definately the old cliche where 4th is now 3rd etc, plus the bonus that theres no need to shift at 6k now, its strong to 7k and the power curve feels really wide.
The AVCR really does its stuff too, I haven't really had a chance to work it all out yet, but I'm not going to change any of Pauls settings, lol.
I was a bit concerned about whether the clutch or pistons would survive the mapping session, but its all held together to date.
I remember avidly following John Banks' thread a few years ago, in particular him championing the combination of a 20g and a 257, personally for a road car I believe this is ideal. I've always thought that 300 BHP / ton is as much as you need for a road car, I think the 20g on a classic 257 delivers this brilliantly. I've logged 1bar at 2850, that was in 5th without a hot turbo, so I could probably reduce that a bit if I do a run in 6th with everything at optimum temp. I'm sure a 321H may be even better, but budgets are budgets and I've spend more than I can care to remember to get it to how I want, and I'm really happy with what I've achieved
Phone pic of car as it will be for the forseeable:
All that left to do is tidy the paintwork, also see how the brakes cope with the the extra power. I want to keep 16" wheels so choices are limited.
