Floyd’s ‘economy’ Stage III
 18 April 2005, 07:23 AM
#151

Floyd must be ashamed of his fingers I think, but doing a parallel fuel mod turns you like this....
After I'd done all my mods I felt I would have been quicker taking the engine out and doing it all on a stand.
I spent a lot of time re checking time and again dreading leaks close to the turbo!
All in all, I think I spent about 150 hours on mine over an 8 week period, roughly 20 hours a week. Lucky for me my wife likes cars too!
Graham.
 18 April 2005, 07:48 AM
#152

I had office fingers before this round of mods ") They were all soft and clean but now they are cut and ingrained with dirt with skin peeling off - eewww!
They were all soft and clean but now they are cut and ingrained with dirt with skin peeling off - eewww!
I rekon in all that I've spent around 100 hours on the car since I got it. At garage rates that's Ł5000!!!
I do feel most guilty about my wife and kids as I've really had to shut myself in the garage and finish the car My misses had to introduce me to them yesterday as the 'man who lives in the garage'
More pictures tonight hopefully.
F
They were all soft and clean but now they are cut and ingrained with dirt with skin peeling off - eewww!I rekon in all that I've spent around 100 hours on the car since I got it. At garage rates that's Ł5000!!!
I do feel most guilty about my wife and kids as I've really had to shut myself in the garage and finish the car
My misses had to introduce me to them yesterday as the 'man who lives in the garage' More pictures tonight hopefully.
F
18 April 2005, 07:29 PM
#153
This should be called Floyd's method to losing a wife and family while breaking your back and mashing your hands
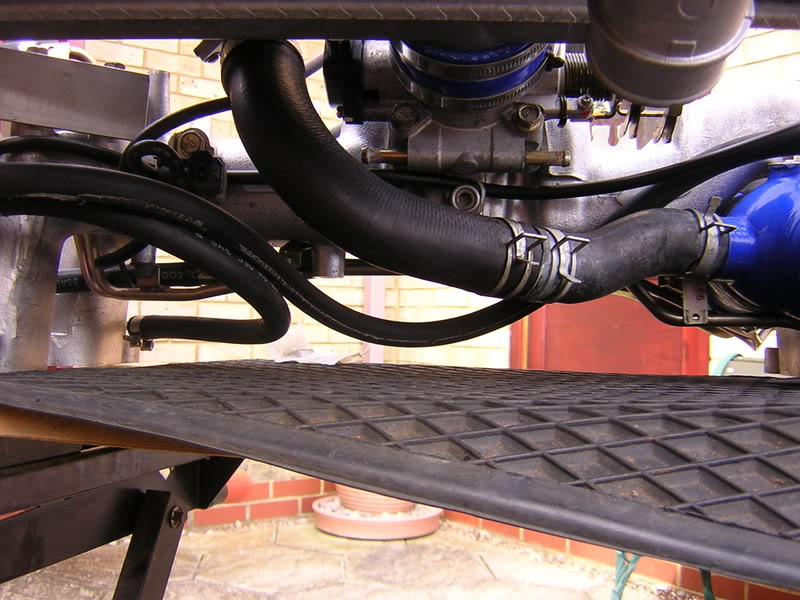
Anyway, The finished pipework feeds 3+4 and returns on 1+2 (I think!):
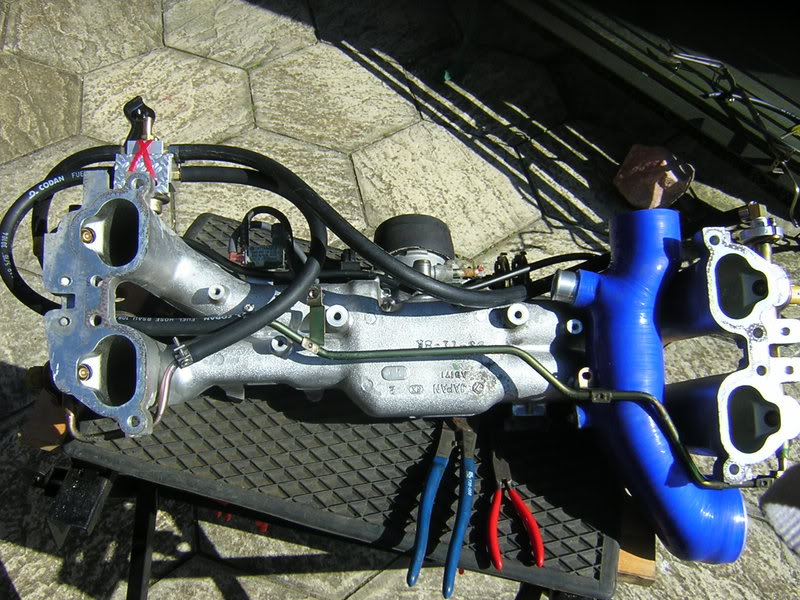
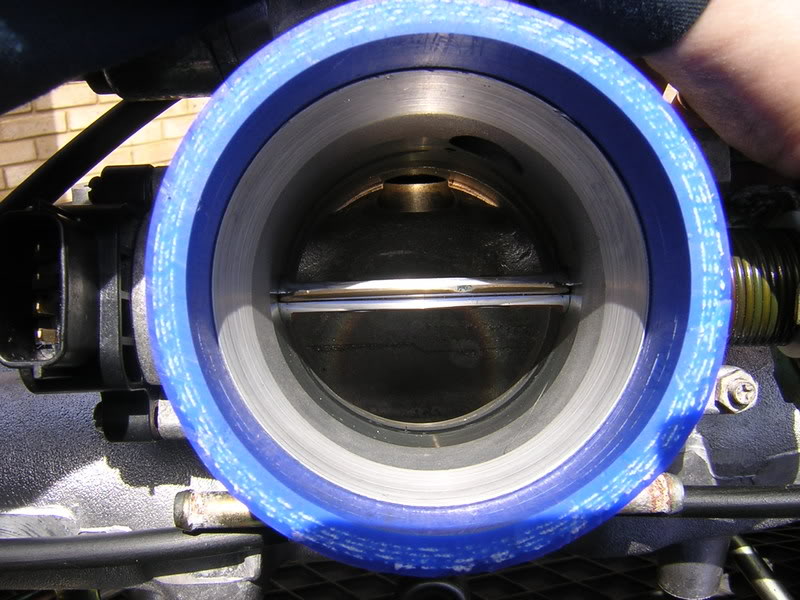
No cutting is necessary and pipe lengths are roughly similar. While the manifold was off I stuck the throttle body on with the new Samco connector -Smooooth :
:
This also gave me a chance to really sort the DV return. I'm really glad I did this off the car as it would have been a real effort to sort in the engine bay and took several attempts to get right. Here's the method using original parts -result
Cut the old hard pipe off the cam breather hard pipe and chop about 2 inches of the end:
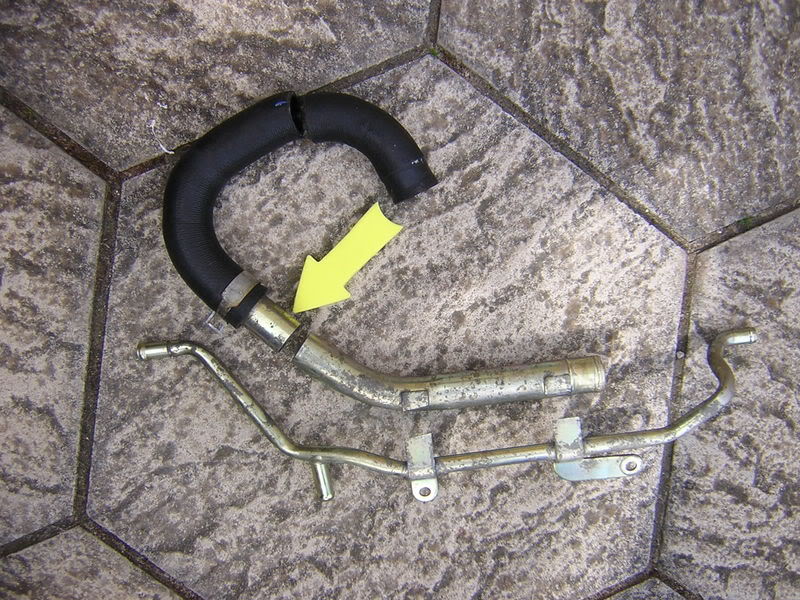
Stick the old rubber DV hose on the end and chop just before the bend:
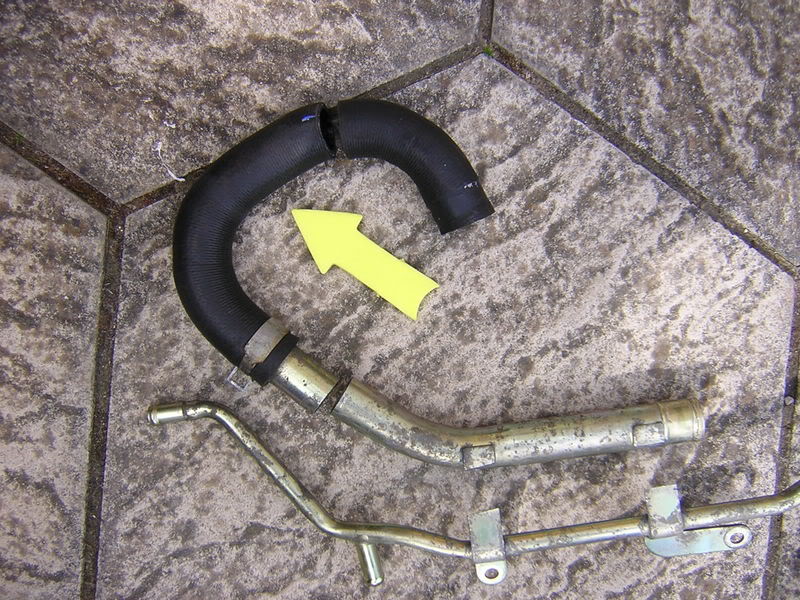
The last bit is a b1tch. Enlarge the hose to about half the depth internally of the hose wall and file if you can to make smooth. This is to make a chamfer to be able to slip it over the DV exit pipe, which is bigger than the classic one You will also need to file the lip off the DV exit pipe and chamfer this down as much as you can. Now WD40 the hose and swear a lot as you push it on. It will go but make sure you jubilee it afterwards. The DV is left connected to the return pipe and will be connected once the TMIC is put back on:
F
Anyway, The finished pipework feeds 3+4 and returns on 1+2 (I think!):
No cutting is necessary and pipe lengths are roughly similar. While the manifold was off I stuck the throttle body on with the new Samco connector -Smooooth
:This also gave me a chance to really sort the DV return. I'm really glad I did this off the car as it would have been a real effort to sort in the engine bay and took several attempts to get right. Here's the method using original parts -result
Cut the old hard pipe off the cam breather hard pipe and chop about 2 inches of the end:
Stick the old rubber DV hose on the end and chop just before the bend:
The last bit is a b1tch. Enlarge the hose to about half the depth internally of the hose wall and file if you can to make smooth. This is to make a chamfer to be able to slip it over the DV exit pipe, which is bigger than the classic one
You will also need to file the lip off the DV exit pipe and chamfer this down as much as you can. Now WD40 the hose and swear a lot as you push it on. It will go but make sure you jubilee it afterwards. The DV is left connected to the return pipe and will be connected once the TMIC is put back on:F
Last edited by Floyd; 18 April 2005 at 07:32 PM.
19 April 2005, 12:48 PM
#154

Originally Posted by Floyd
I had office fingers before this round of mods They were all soft and clean but now they are cut and ingrained with dirt with skin peeling off - eewww!
F
They were all soft and clean but now they are cut and ingrained with dirt with skin peeling off - eewww!F

Originally Posted by Floyd
I rekon in all that I've spent around 100 hours on the car since I got it.
 He did it comfortably in a day. I took longer than that fitting the i/c and induction
Originally Posted by Floyd
( My misses had to introduce me to them yesterday as the 'man who lives in the garage'
F
F
PMSL
19 April 2005, 06:37 PM
#155
Remember to get the Brownie points back up to the right level.
Flowers, meals out, wash the cars and do the gardens.
Don't go to the pub, only bring home the mates she actually like (if you have any)
Graham.
Flowers, meals out, wash the cars and do the gardens.
Don't go to the pub, only bring home the mates she actually like (if you have any)
Graham.
19 April 2005, 11:27 PM
#156
Mates, mates, what are they? I lost them long ago when I got introduced to Subaru tuning
I finished putting the turbo on tonight and fitted the down pipe. I had a bit of a job getting the water feed hose back on as well as the oil feed. The turbo heat shield was another problem all together
I also refitted the water header tank and made some plastic insulator brackets to detatch it from the inlet manifold. What's the best way to refill the rad?
Next on the list is to make a new shield for the STi8 clutch reservoir and then finally, the TMIC - yeah! Oh and the fuel pump for the second time...
F
20 April 2005, 12:16 AM
#157

Floyd, still trying to find the lambda sensor for you, didn't seem to be down in Kent, so I'm going to have to have a more thorough look up here...
Anyway for the rad you need to fill it through the header tank pumping the hoses like you would on a mini then once your happy that there's a fair bit of water in the system start the car up, with the header tank cap removed and keep topping it up with the engine running until the level doesn't drop anymore. The biggest drop will occur when the thermostat opens...
Anyway for the rad you need to fill it through the header tank pumping the hoses like you would on a mini
then once your happy that there's a fair bit of water in the system start the car up, with the header tank cap removed and keep topping it up with the engine running until the level doesn't drop anymore. The biggest drop will occur when the thermostat opens...
20 April 2005, 07:41 AM
#158
Agree with Tim on the rad fill.
I filled mine by the same way but took a l o n g time over doing it while doing other jobs in the engine bay. Spent an hour doing it. I also set the heater on full heat and with the fan on. A cold heater is a sure sign the air is trapped.
When convinced all is full, fit the cap and keep running for another 3 mins and check the level in the small tube by the battery. Top-up to suit (hard to see the levels).
Graham.
20 April 2005, 07:57 AM
#159
Tim, I bought a new Lambda from Subaru just in case so don't worry too much and thanks for looking. Anyone know if I can re-thread the old Lambda? I haven't fitted it yet as I only remembered this morning in the shower that I hadn't done it yet. If it was completed last night I would have started it with it removed and then I would have realised
I drained 2 ltrs of coolant to do the turbo swap and I lost a cup full as well. I re filled with the 2 ltrs by topping up the header and pumping as Tim says. I put the rest in the top up tube - why did they make this so hard to see where the level is, darh?
Does anyone else climb on the engine to do stuff? My knees hurt now
And another thing, I can't find via search, how to connect the 3 port Do I need the restrictor still? Which wire goes where? Help? Is there a connector adapter?
F
that I hadn't done it yet. If it was completed last night I would have started it with it removed and then I would have realised I drained 2 ltrs of coolant to do the turbo swap and I lost a cup full as well. I re filled with the 2 ltrs by topping up the header and pumping as Tim says. I put the rest in the top up tube - why did they make this so hard to see where the level is, darh?
Does anyone else climb on the engine to do stuff? My knees hurt now
And another thing, I can't find via search, how to connect the 3 port
Do I need the restrictor still? Which wire goes where? Help? Is there a connector adapter?F
Last edited by Floyd; 20 April 2005 at 08:23 AM.
20 April 2005, 08:35 AM
#160
Scooby Regular

Join Date: Feb 2003
Location: Zed Ess Won Hay Tee
Posts: 21,611
Likes: 0
Received 0 Likes
on
0 Posts
lol @ climbing on the engine
yea i have done that as well, i had an old jumper zip tied to my knee
im to tall and the car is to low to do engine jobs without killing my back
yea i have done that as well, i had an old jumper zip tied to my knee
im to tall and the car is to low to do engine jobs without killing my back
20 April 2005, 12:25 PM
#161
Right then, I've researched the 3 port and this time I spelt solenoid correctly
The one bit I can't find though is which wire to connect?
What I found out as well was that some believe that the 3 port is unecessary up to certain boost levels. IMO Prodrive would not have bothered with it on the WR1 and PPP upgrades if that was the only reason. I think the ability to completely open or close the wastegate will give better control with my mods and hopefully provide the sort of power delivery that I'm after.
What say you lot?
F
20 April 2005, 01:04 PM
#162
I went through this.
1
Connection: all detailed on Carl's thread with his usual great pics too.
2
I used a 3 port as AndyF said it was better for boost control over 1.3 bar. Got a new one from MarkA, direct swop if you follow the above (as I did).
They come up for sale every now and then. Just clean it before it goes on as it may be full of oil...
If i were you i would fit and forget.
Graham.
20 April 2005, 01:30 PM
#163
Is a straightforward swap. Didnt actually end up fitting mine in the end but I believe it is detailed in Carls' thread as Graham says.
I would say that the boost control will be all over the place with a 3-port before mapping so I would leave it dis-connected and fit a dawes until Andy starts mapping it. Or you can leave it as the last thing 'to do' on the day of mapping.
Bob
I would say that the boost control will be all over the place with a 3-port before mapping so I would leave it dis-connected and fit a dawes until Andy starts mapping it. Or you can leave it as the last thing 'to do' on the day of mapping.
Bob
21 April 2005, 12:56 PM
#165
I should have mentioned that the red cable ties on my parallel fuel rail mod do look a little naff but what you may not see is an aluminium plate underneath that supports and locates them. The ties were a quick solution as I am/was running out of time to get it completed. I did contemplate drilling holes but I couldn't thread them easily and I didn't know if I had long enough screws to suit either I will be tidying a lot of things that I had planned to do but did not have time to.
I felt it was a good solution to place the blocks where I did because it gives future flexibility to re-route the flow and to add a different regulator at a later date.
As for progress, well I've re routed some breathers (again), done some tidying and finally fitted the TMIC. I managed to insert a thermocouple in the TB as well. Pictures later.
Today I have worked on the scoop undertray and it looks very 'bling' so lets hope it does the job! Tonight will be the Walbro (again ) and start the car. Yeah!
F
I will be tidying a lot of things that I had planned to do but did not have time to.I felt it was a good solution to place the blocks where I did because it gives future flexibility to re-route the flow and to add a different regulator at a later date.
As for progress, well I've re routed some breathers (again), done some tidying and finally fitted the TMIC. I managed to insert a thermocouple in the TB as well. Pictures later.
Today I have worked on the scoop undertray and it looks very 'bling' so lets hope it does the job! Tonight will be the Walbro (again
) and start the car. Yeah!F
21 April 2005, 10:42 PM
#171
It didn't The battery was flat even after a few hours charge. I turned the engine over a few times to get some oil moving but then it gave up before I could connect the crank sensor.
The batt is 5 yrs old and has been left for weks without charge. I guess I've killed it
Is Halfords the cheapest and most convenient? Or will Subaru suprise me? Any ideas?
F
The battery was flat even after a few hours charge. I turned the engine over a few times to get some oil moving but then it gave up before I could connect the crank sensor.The batt is 5 yrs old and has been left for weks without charge. I guess I've killed it
Is Halfords the cheapest and most convenient? Or will Subaru suprise me? Any ideas?
F
21 April 2005, 10:45 PM
#172
I also changed the walbro tonight, which was quite straight forward. I primed the system and discovered a leak. Arrgh! The fuel rail adapter didn't have enough ptfe on it and was weeping onto the turbo bracket...
I managed to remove it and re do. Seems dry. I did have a moment when I thought the pressure had subsided but when I removed the hose Fuel all over the bonnet. Luckily it didn't catch me in the face. Any tips on reducing the pressure?
F
I managed to remove it and re do. Seems dry. I did have a moment when I thought the pressure had subsided but when I removed the hose
Fuel all over the bonnet. Luckily it didn't catch me in the face. Any tips on reducing the pressure?F
21 April 2005, 10:55 PM
#173
Floyd, the standard Subaru Battery is something like 80 quid from the main dealer and from Halfrauds, in the end I bought a smaller battery that had a slightly lower AH rating but the same cranking current, terminal size and position (I think it was for an Escort ) for about 40 quid left me with a bit more space in the bay and worked fine for a year or so before I took the car of the road again...
Looked like this I think you can read the specs off the pic
) for about 40 quid left me with a bit more space in the bay and worked fine for a year or so before I took the car of the road again...Looked like this I think you can read the specs off the pic
21 April 2005, 11:36 PM
#174
Scooby Regular

Join Date: Dec 2003
Location: Lancashire
Posts: 358
Likes: 0
Received 0 Likes
on
0 Posts
"I had office fingers before this round of mods They were all soft and clean but now they are cut and ingrained with dirt with skin peeling off - eewww!"
Blaady Sathern softeee!
I like those pointing arrows, are they actual cardboard cut-outs sprayed yellow or photo-shopped? Very professional anyway!
Regarding the leaking fuel rail adaptor, I would normally have used loctite and tightened the fitting very tightly on it's tapered thread but as I didn't know which way yours needed to point I had to leave it loose for you to fine-tune! Hope the ptfe tape has done the job, should be OK.
I got a battery for mine from a mates Motor Factors shop, it's a Varta, D27W 560-068-039, 60AH, 390A (EN) cost about Ł30ish, has been fine, correct terminals etc.
Martin
22 April 2005, 01:06 AM
#175
\m/ ^_^ \m/

Originally Posted by flat4
i have every faith it will start first time

got my battery off a new corsa from my local scrapper for a tenner
half the size and weight
22 April 2005, 07:11 AM
#176
3 years ago bought a battery off a Ford Artic I think by the size of it. Fills the battery tray for sure....Ł80 (sums up my approach to cars)
Batteries die surprisingly quickly left to stand cols for a month or two.
Graham.
Batteries die surprisingly quickly left to stand cols for a month or two.
Graham.
22 April 2005, 07:55 AM
#177
Thanks chaps, I'll try to get a Varta then. There's a local motor factor where I work so I'll try there at lunchtime. I did consider using my 'battlebus' battery, which happens to be a Ford Escort, so it would probably have fitted!
Martin, I hope it's OK now, not your fault at all but me being a sarvern softee and not doing it up enough. I tried a couple of times to get the right amount of PTFE on the thread - just enough for the thread to bite and seal the bloody thing. It's a pain but not impossible to get at
Once the batt is fitted the only other concern will be the TPS sensor. It's roughly in the same place as when I removed it (a degree or so) but I'm not sure how sensitive it will be to positioning?
No one got any ideas on lowering fuel presure prior to fuel pipe removal then?
F
22 April 2005, 08:00 AM
#178
Scooby Regular
Join Date: Dec 2003
Location: Lancashire
Posts: 358
Likes: 0
Received 0 Likes
on
0 Posts
Floyd,
I usually find that the actual fuel pressure is not all that excessive anyway after several hours since priming, just get a cloth underneath the connector you intend removing and gently presuade the pipe off, at the same time get the cloth around the pipe to absorb the spray and excess of fuel.
Martin
22 April 2005, 11:37 PM
#179
It's ALIVE I'm off to see 'uncle Bob' as they say in the Terminator so fingers crossed that all will hold together. I took it around the block and there were no knocking or strange noises and no spanners fell out of the engine bay When I stopped though I had plumes of smoke from the WD40 on all the stuborn nuts
One disaster that I did have was my STi7 scoop was being prepared for fitment when a gust of wind took it and threw it on the patio - ****! and double ****! I'll have to ask DRM if they can fix it.
My scoop undertray looks the dogs, even if I say so myself Update with pics later.
F
I'm off to see 'uncle Bob' as they say in the Terminator so fingers crossed that all will hold together. I took it around the block and there were no knocking or strange noises and no spanners fell out of the engine bay When I stopped though I had plumes of smoke from the WD40 on all the stuborn nuts One disaster that I did have was my STi7 scoop was being prepared for fitment when a gust of wind took it and threw it on the patio - ****! and double ****!
I'll have to ask DRM if they can fix it.My scoop undertray looks the dogs, even if I say so myself
Update with pics later.F