When you click on links to various merchants on this site and make a purchase, this can result in this site earning a commission. Affiliate programs and affiliations include, but are not limited to, the eBay Partner Network.
Not that thick really. I've not even used half the 5l tub and I've done 4x 16 inch alloys and the manifold. The wheels aren't totally perfect but another application would probably get most of the paint off however there's a fair bit of corrosion on them that needs blasted off anyway so it'll all get dealt with then. You should start to see it working within a few seconds (yes, really) of being applied. I'll need to try and remember to setup a video recording when I do whatever I'm doing next to see how impressive this stuff really is.
Couple of goodies arrived yesterday. STI wheel from a Blobeye and a Harvey Smith Trick Uppipe from AS Performance.
Wheel has some marking to it but it�s mostly still in pretty good condition. Mostly I got it because I love the way this wheel looks but it�s also slightly smaller in diameter than the original wheel. Up pipe is a lovely looking piece. It�ll be getting wrapped but I asked for it to be sent unwrapped because I�d probably end up ruining it with all the fitting and refitting of parts that�s going to be happening.
I’m sticking with the stock headers I ported earlier in the thread. They’ll be getting wrapped too. I’m not going for big power so I don’t see the need for fancy headers.
I�m sticking with the stock headers I ported earlier in the thread. They�ll be getting wrapped too. I�m not going for big power so I don�t see the need for fancy headers.
Forgot about them. You should see some good spool.
So I've taken advantage of Hel's black friday discount and ordered up a load of brake lines for the whole car and a bias adjuster.
Somehow this:
Was turned into this:
Which was turned into an order with Hel. Fingers crossed it all joins up where it's supposed to. Plan is to put the bias adjuster below the centre console so the **** can poke through near the handbrake.
And double checking the master cylinder brace actually lines up as I realised I hadn't bothered to check after fully welding it up and getting all of the fittings:
Also made use of a little heater in the shed to primer up the wings, Morette covers and bonnet scoop with some high build:
Decided I just wasn't happy with how the Morette's turned out using the spray cans so I'm redoing them from scratch. I'll sand back the primer on the wings and do another coat of high build before they get some colour.
Nice box of goodies from Hel arrived this afternoon:
Except they've put the wrong kind of grommets on every single hose Just waiting to hear back from them about that. It's nice to see them using yellow tags again though.
Got the wings all painted up and just in time too as it�s meant to get a lot colder here I think. The heater was only just keeping the insulated shed warm enough as it was so I don�t think it�d be kept warm enough with the outside temperature dropping.
They�re a little orange peel-y but a bit of polish should sort that out when they�ve had time to fully dry.
I used a polyester base coat with a 2k clear on top. Light coats with about 15-20 minutes between each coat. Temperature was around 15 degrees inside the shed so a tad cold but not bad.
Cheers johnoggy. Pleased not to get any runs but a little disappointed how much orange peel there is. I'm wondering if I perhaps was using too light a coat each time which wasn't allowing the clear to self level. Ah well, it's all part of the learning experience of this whole project.
Cheers johnoggy. Pleased not to get any runs but a little disappointed how much orange peel there is. I'm wondering if I perhaps was using too light a coat each time which wasn't allowing the clear to self level. Ah well, it's all part of the learning experience of this whole project.
Think you could be right here. When you start with the clear do a mist coat, which could be quite satin as it�ll be quite thin, but once it�s tacky (not long at all) hit it again fairly strongly. The first coat stops the thicker coat from running, and it�s the thicker coat that gets you the even glossy finish. Took me a bit of nerve (and a few runs) to get it right. It might also be easier if your parts are presented at 45deg angle, as more likely to run when vertical.
Great project so far, keep up the good work
Morning, I've just discovered this thread, thanks to an email from scoobynet rounding up the year, some epic work going on here!! That rear subframe looks amazing. I may have missed it but is this going to be a track/hillclimb car? I've a hawk WRX wagon sitting rotting outside at the moment that could do with this same treatment, but wouldn't have the skills/time to go as far as you've done so far.
It’s primarily a road car but I want it to be capable on the track and I’m looking to get into a little bit of sprinting in the future. I’ve wanted a Bugeye since I was a kid (I was 5 when it came out) and I don’t plan to ever get rid of it so all the time I’m putting into it is worth it to me. It is a lot of time to do something like this and I still have a long way to go. I hadn’t originally planned to go this far but you know how it is, once you start something you just keep going and going and going.
I was a fairly competent push bike mechanic before all this so I knew how to turn a spanner but before my N/A Hawk 3 and bit years ago I hadn’t really done anything on cars other than the odd brake/suspension job on my parents cars. A lot of this project has been a learning curve for me but that’s part of the fun. Just have to be prepared for things to go wrong sometimes.
Yep the whole car will be done eventually. All the doors and boot will come off which will just leave the roof, pillars, rear arches and engine bay to paint up outside under a cover.
Happy new year to everyone! I really hadn't planned for this project to still be going nearly a year later but having this to do during all the lockdowns has been much better than losing my mind stuck doing nothing. I wasn't planning to go nearly this far with this build which is why it's taking so long but plans never get stuck to around here.
So a few small updates. Before Christmas I bought a second engine with "a bent valve". Well yes, there is a bent valve. And 13 others. And 2 snapped valves. And a shrapneled combustion chamber. And a dead piston.
Ah well, risk you take buying one of these engines and I'm still up as it came with pretty much every ancillary except the alternator. It's getting stored away for a rainy day to eventually be properly built up to replace the original 130000 mile engine.
I did a little tinkering on Christmas day:
Too busy cooking venison with trimmings for our family lunch to do much else. First time in years I've been around here as I'm normally with other family so I decided to do some cooking.
Last few days I've been locked away loosing my mind over the wiring loom. I've removed all the SRS wiring from the main loom so I can run it as a separate loom. No plans just now to remove the airbags but I'll be so grateful in the future if I ever do and it's a separate loom that can be easily removed. Also been removing more unneeded cabling from the loom for various bits that aren't going back in the car. I don't want to leave any wiring in that doesn't need to be there.
It's much more red in person. There are a few slightly brighter spots but hardly noticeable at a glance which, lets face it, is all you ever do at a speedo. The LCD's are also the same colour. Far too much work for a colour change really but with the rubbish weather I've liked the excuse to be inside. Whole speedo needed dismantled to remove the green coating behind the dial faces then added some lighting filters meant for stage lighting.
You may be asking why I didn't just fit some coloured LED's. Well I did try that initially and they were crap. They were no where near bright enough and it did horrible things to the yellow needles which I happen to like. Unfortunately I fitted them to me Hawkeye just to test them out and the needles aren't moving freely. I'm going to do a little fiddling to see if I can sort them but I do have a spare set of clocks I can take the dials from without removing the needles if I have indeed borked them.
I've also had another delivery of some scaffolding. This time to go inside the car:
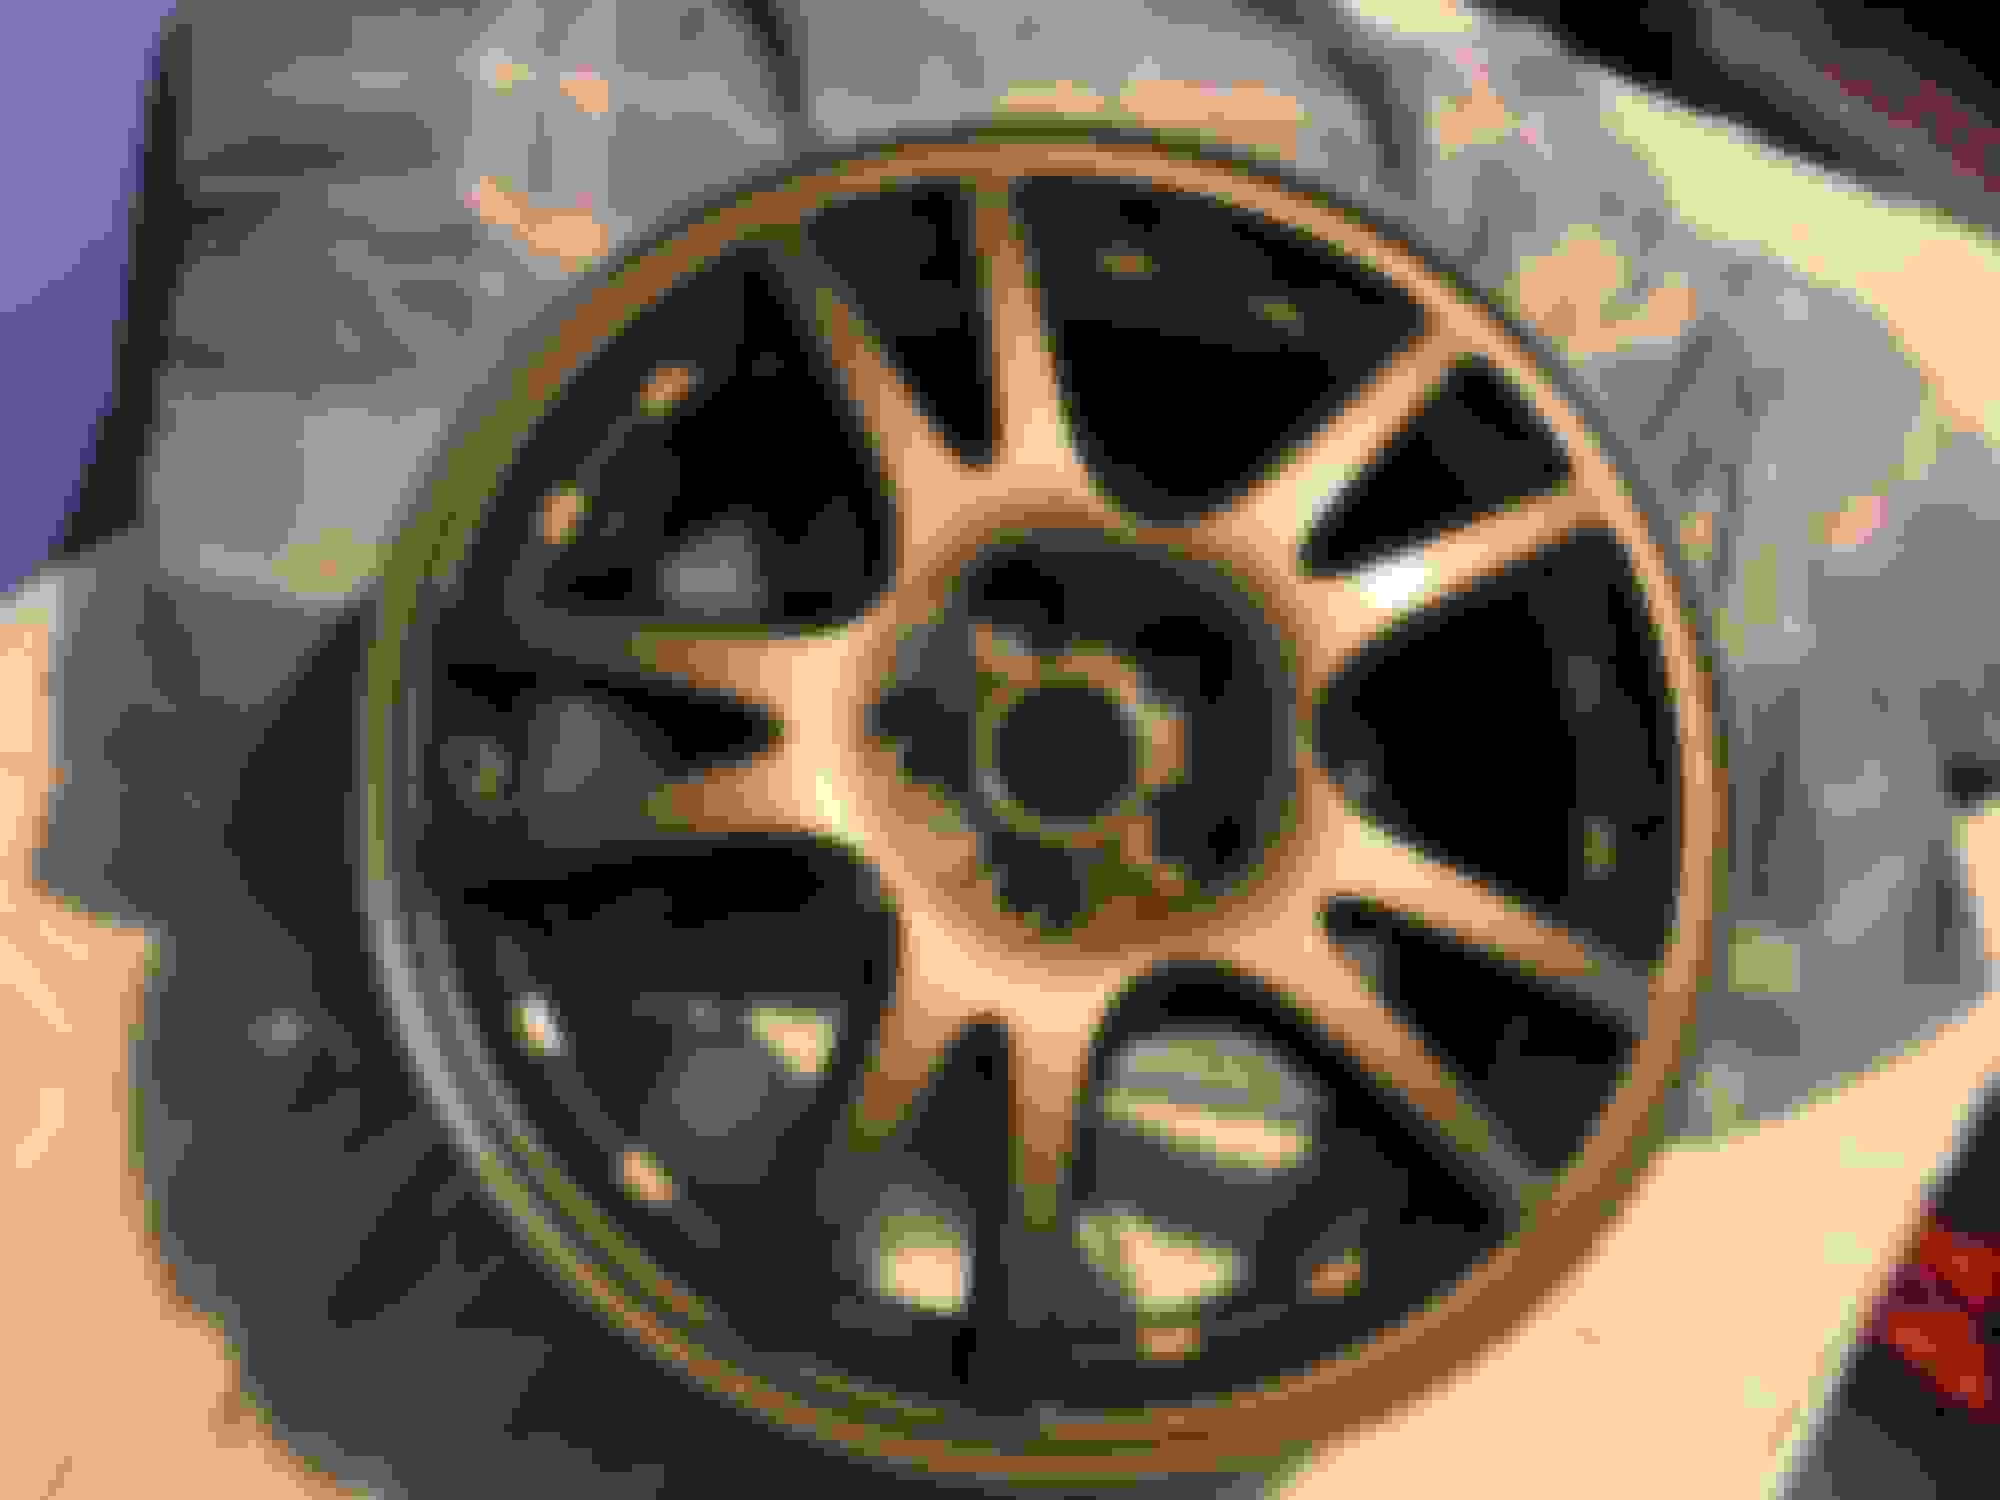
Got myself a new heater that heats the shed up like a sauna so I've finally got around to finishing the wheels off. It was only 2 and a half months ago I etch primed them .
They're a little glossier than I was aiming for considering I used a satin clear coat but I'm still pretty happy with them.


 Just waiting to hear back from them about that. It's nice to see them using yellow tags again though.


") .
.