
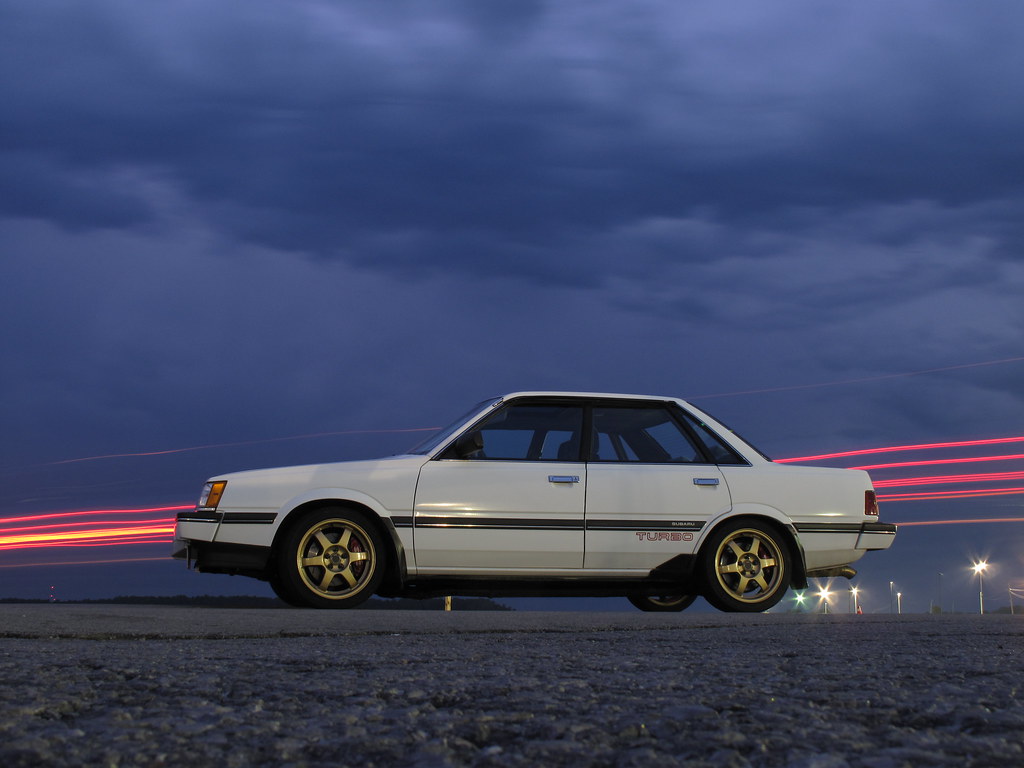
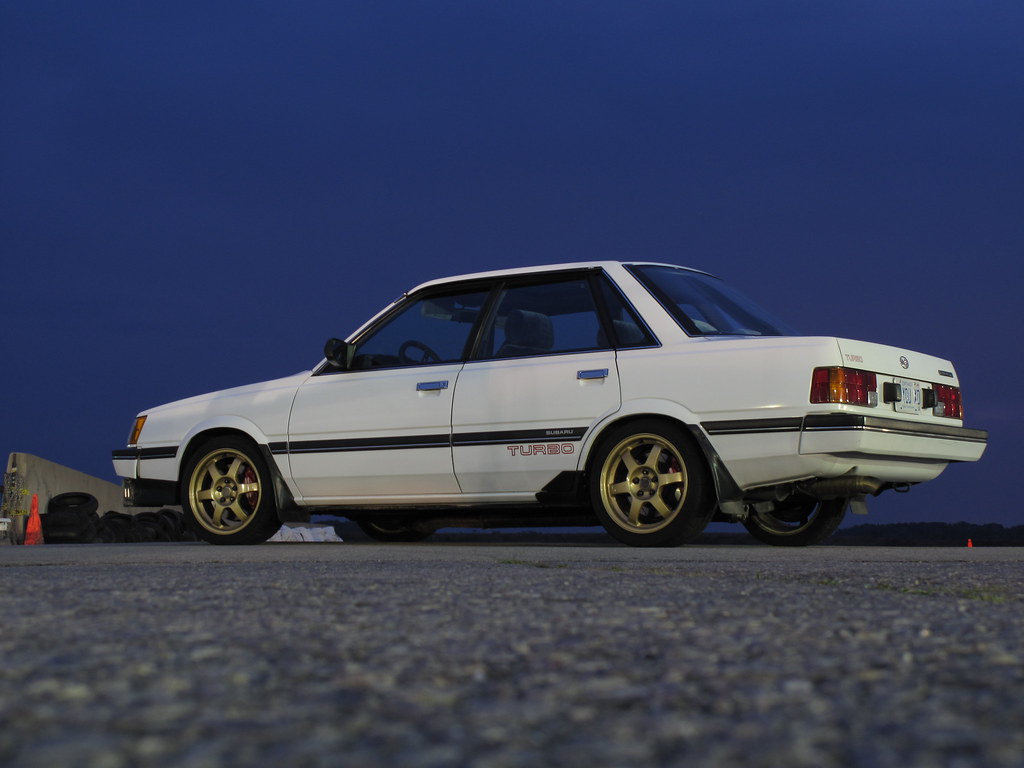
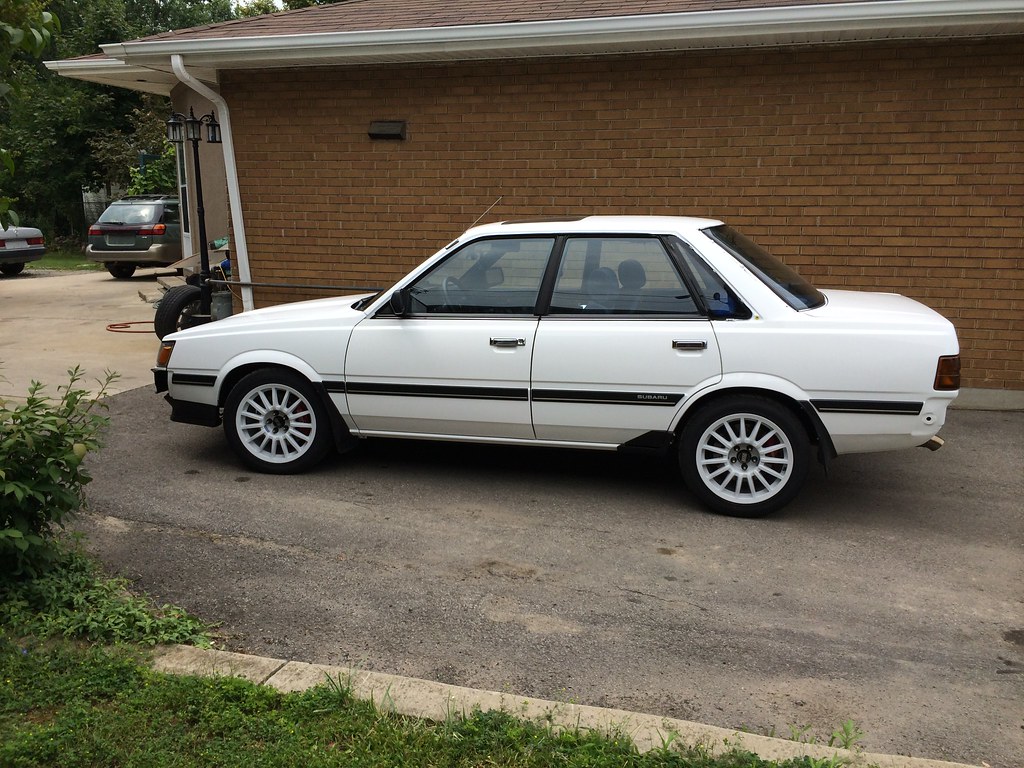
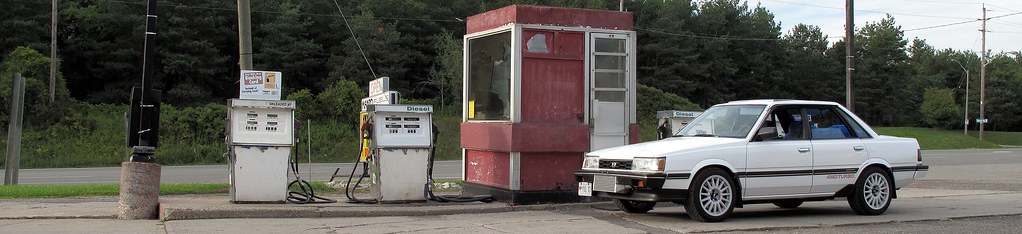
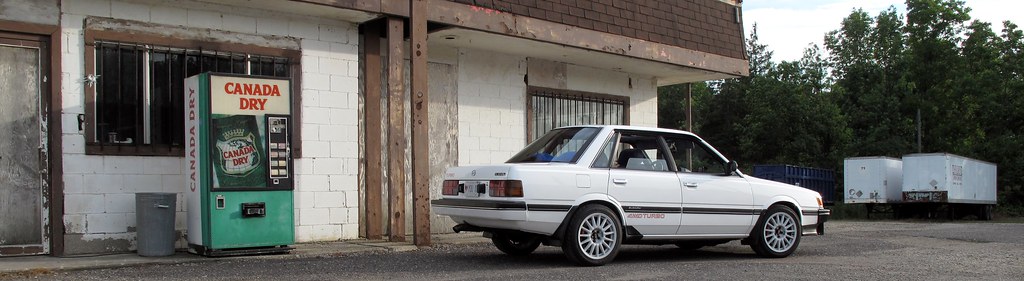
86 Subaru Leone RX TURBO STi


Thread Starter
Scooby Regular
Joined: Jun 2015
Posts: 99
Likes: 1
From: Canada
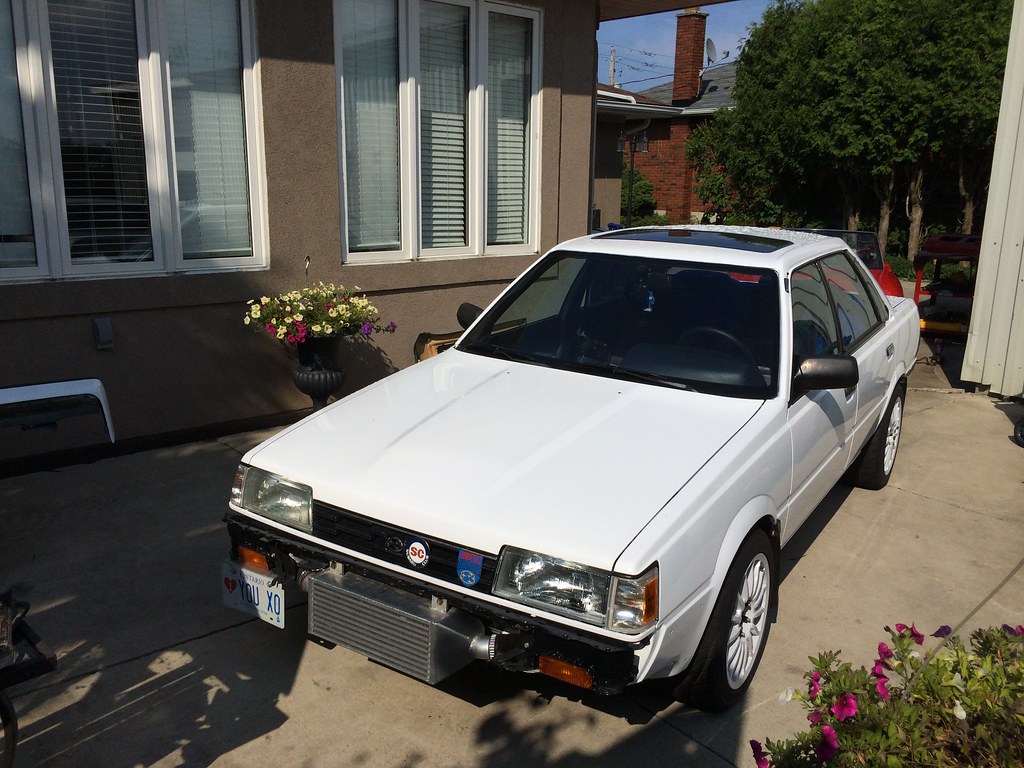
front bumper is painted and on, waiting from subaru for one more top rubber trim to finish it off.
intercooler pipes are going to be made next week ! very excited its all most done.
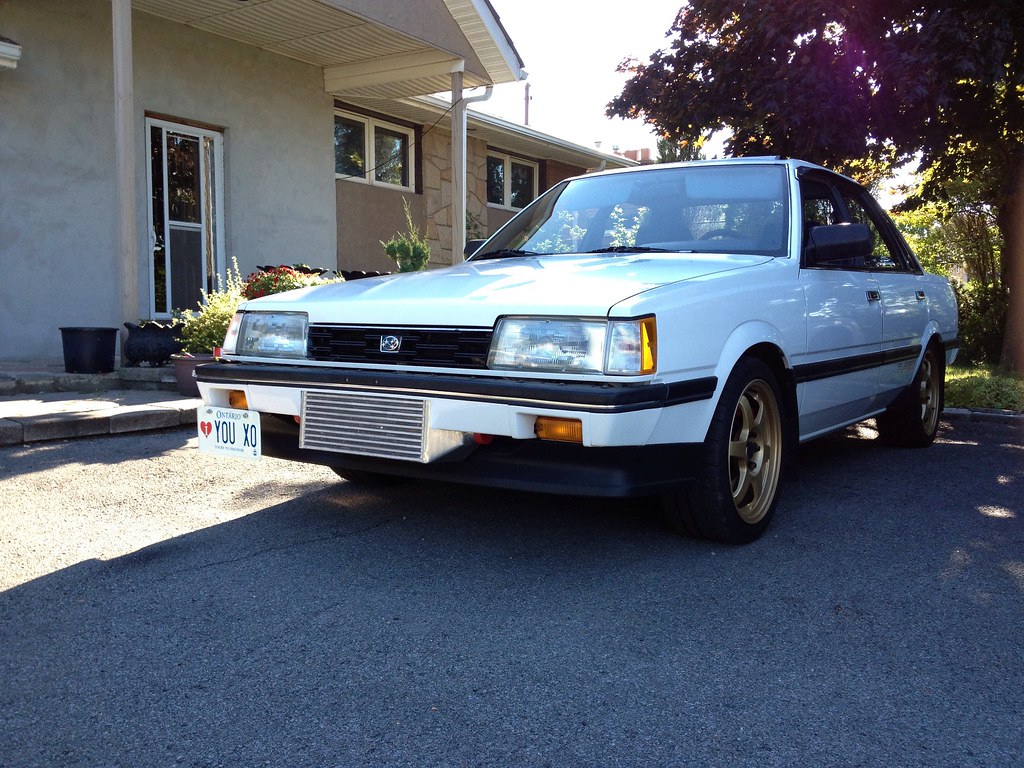
sits a little funny needs a readjusting better.
intercooler pipes are going to be made next week ! very excited its all most done.
sits a little funny needs a readjusting better.
Thread Starter
Scooby Regular
Joined: Jun 2015
Posts: 99
Likes: 1
From: Canada
I would like to thank Franz and his familia for all the hospitality while I was down in the USA !... I had a blast down there and all most didn't want to come home.
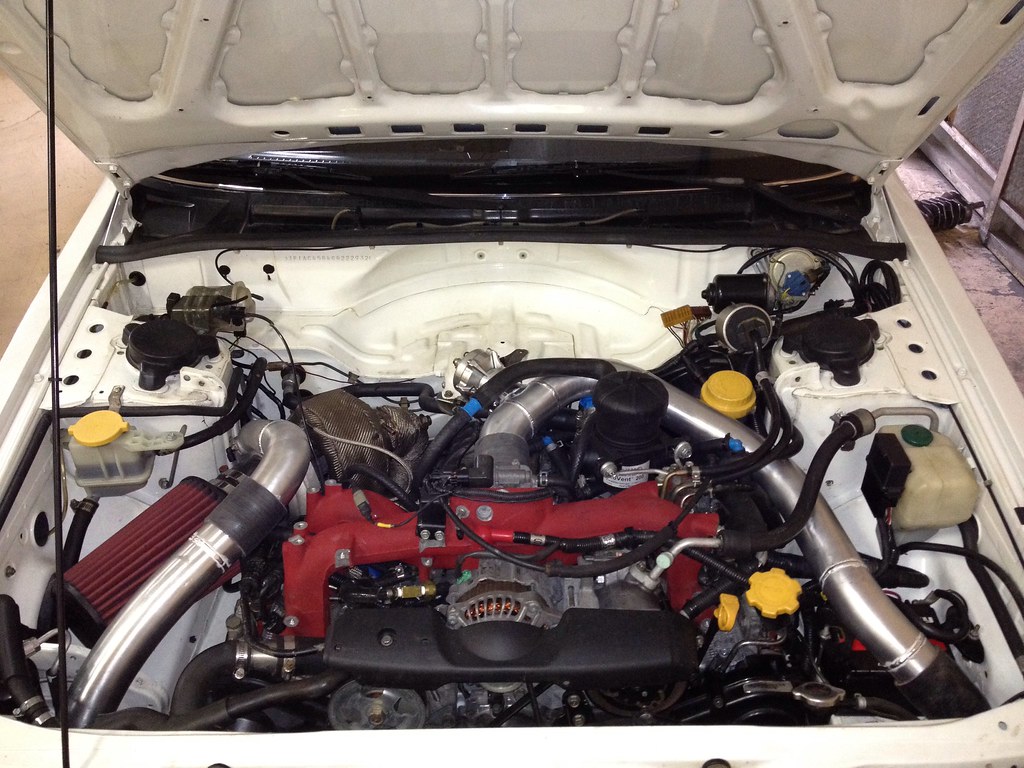
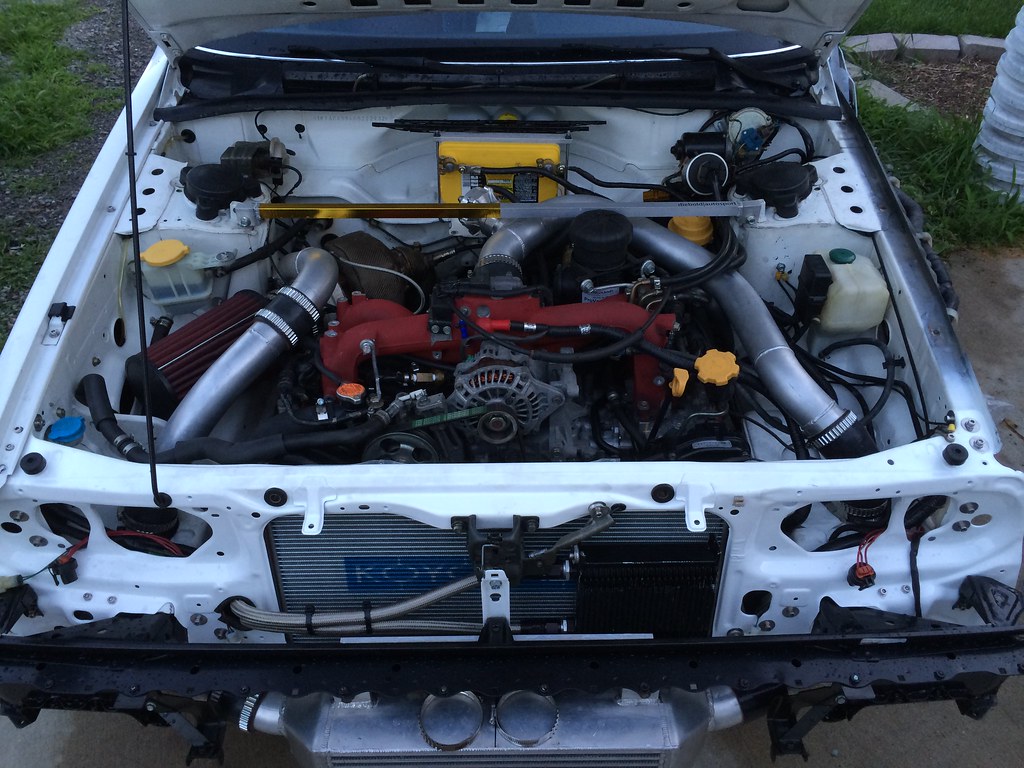
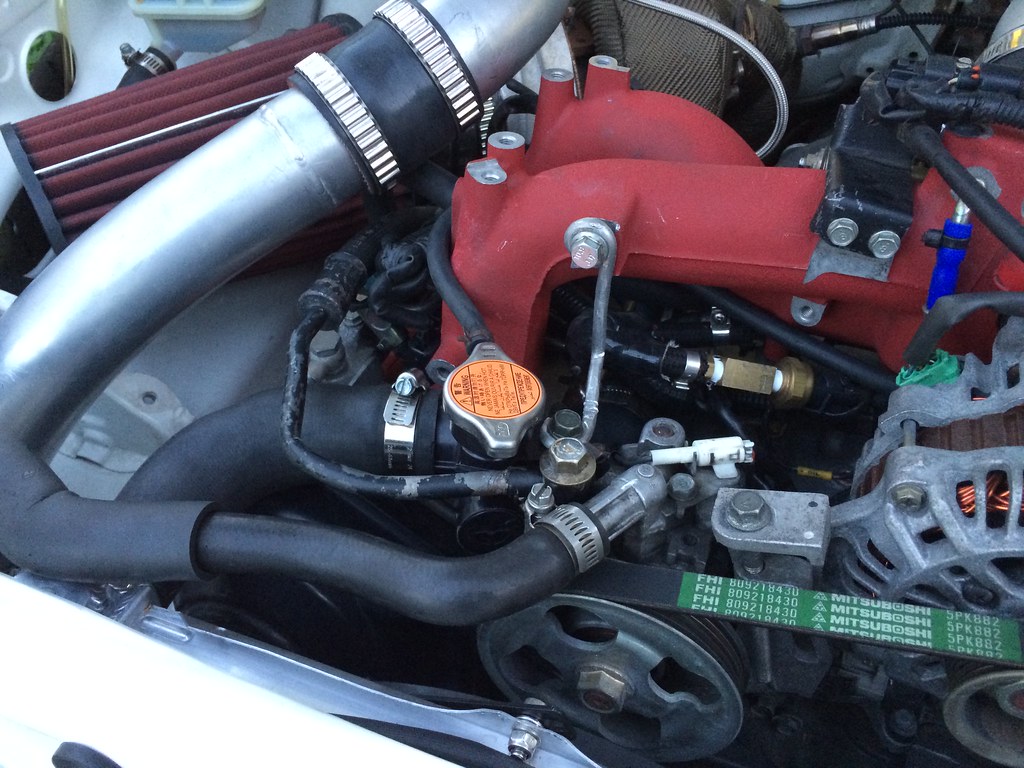
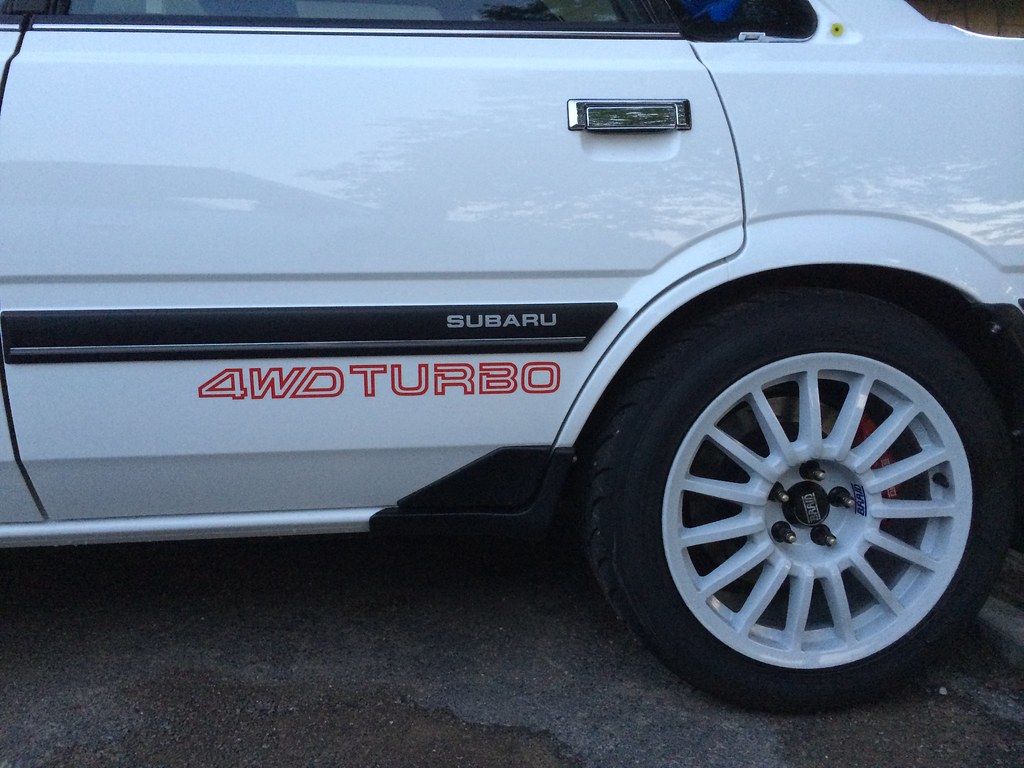
here we have Franz's amazing hand crafted one of a kind Leone intercooler piping that fits perfect and does a fantastic job keep the temps down and power up !
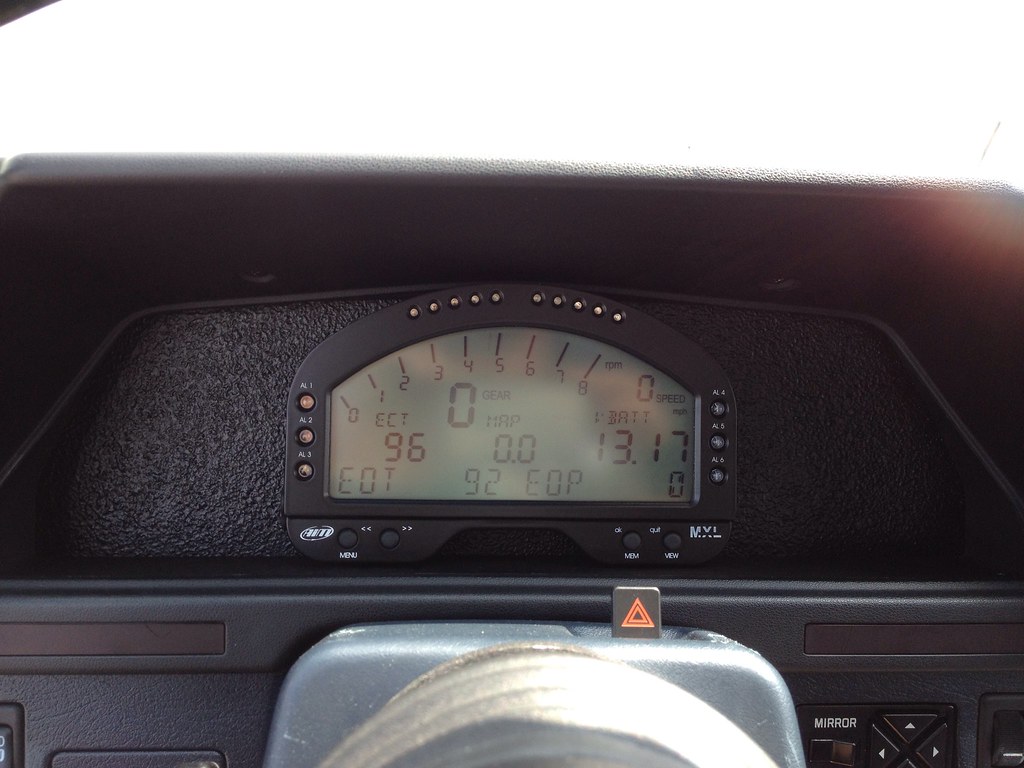
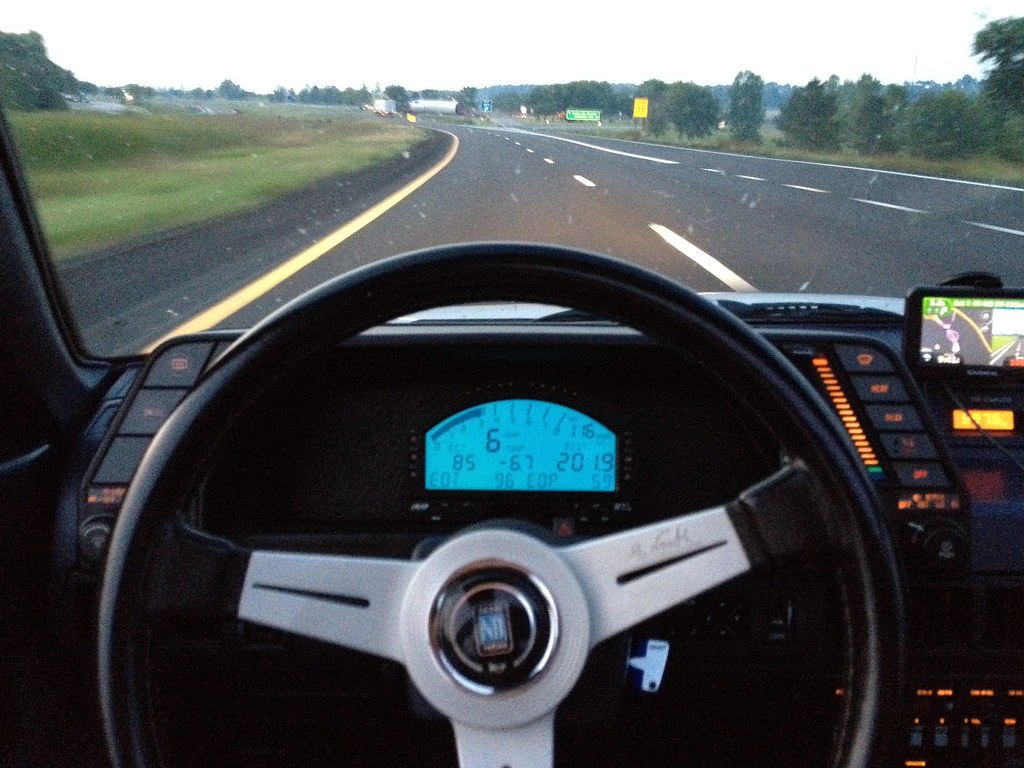
my new dash wired up by Franz, this time I can see and keep a eye on everything just in case something is not right.
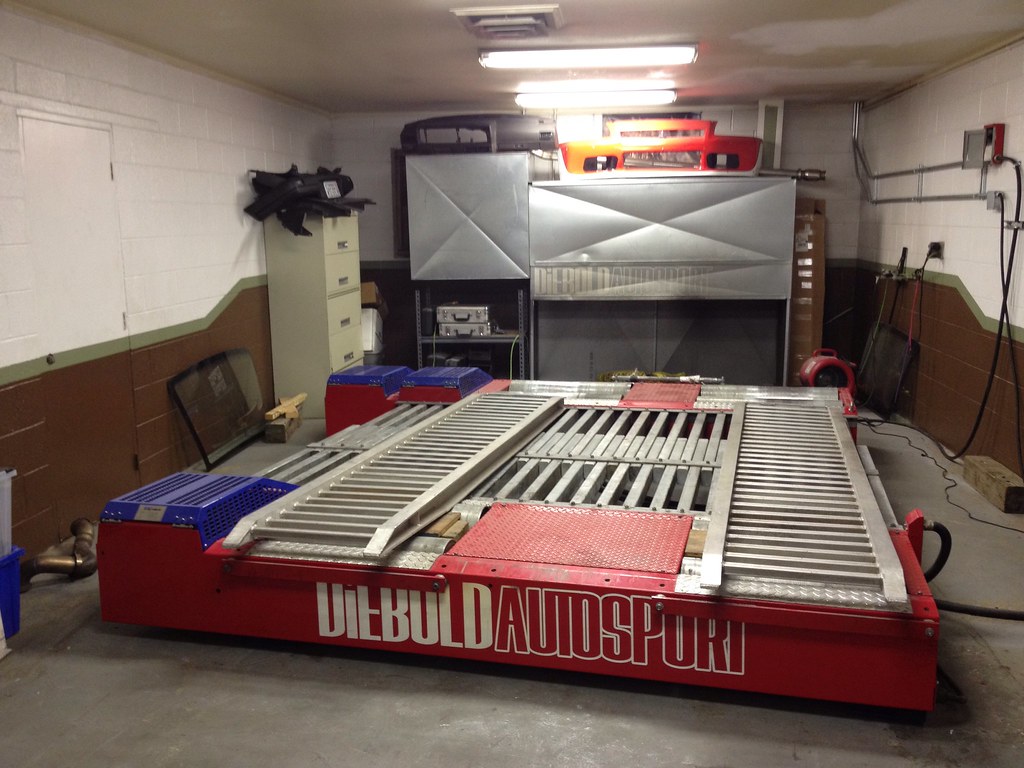
Franz's Dyno Dynamics tuning tool.... that fan in the back with the red EVO rally bumper on it !!! that thing will suck you in and spit you out the other side if you get to close !..
all sensors hooked up ready to rock and roll the proper way !....

so much eye candy OVER LOAD !
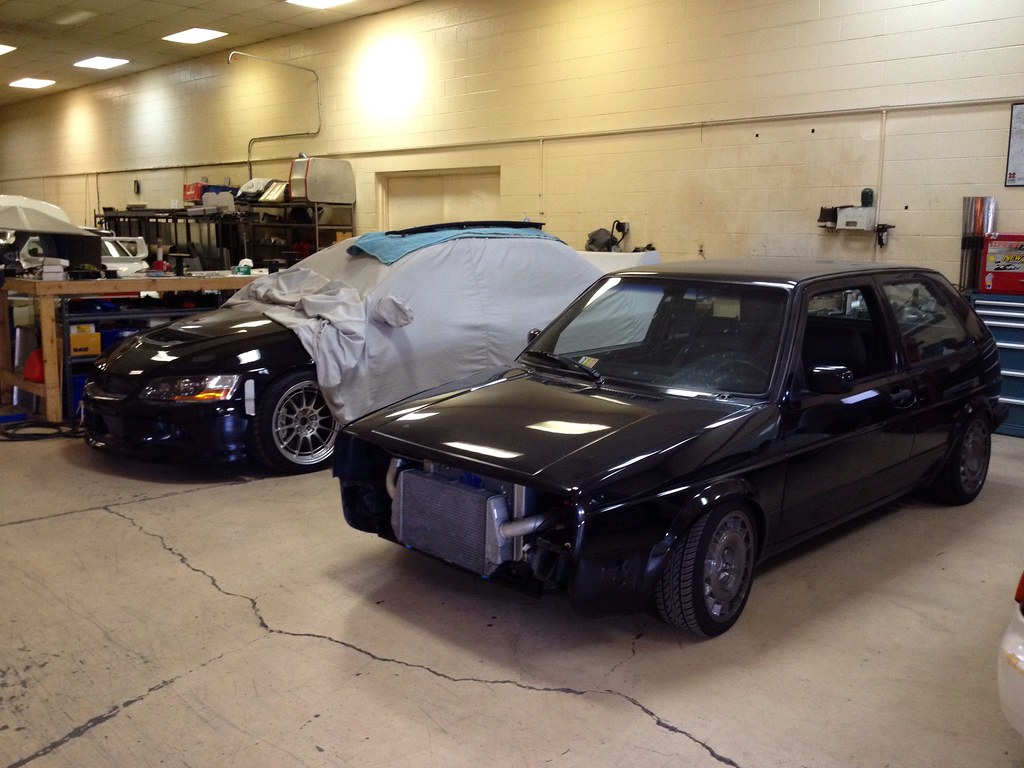
Franz's babys sided by side.... the EVO is just crazy !... its like a full blown race car and has EVERYTHING ! no joke !.. me I like the 86 Golf because I'm from the old school lol.
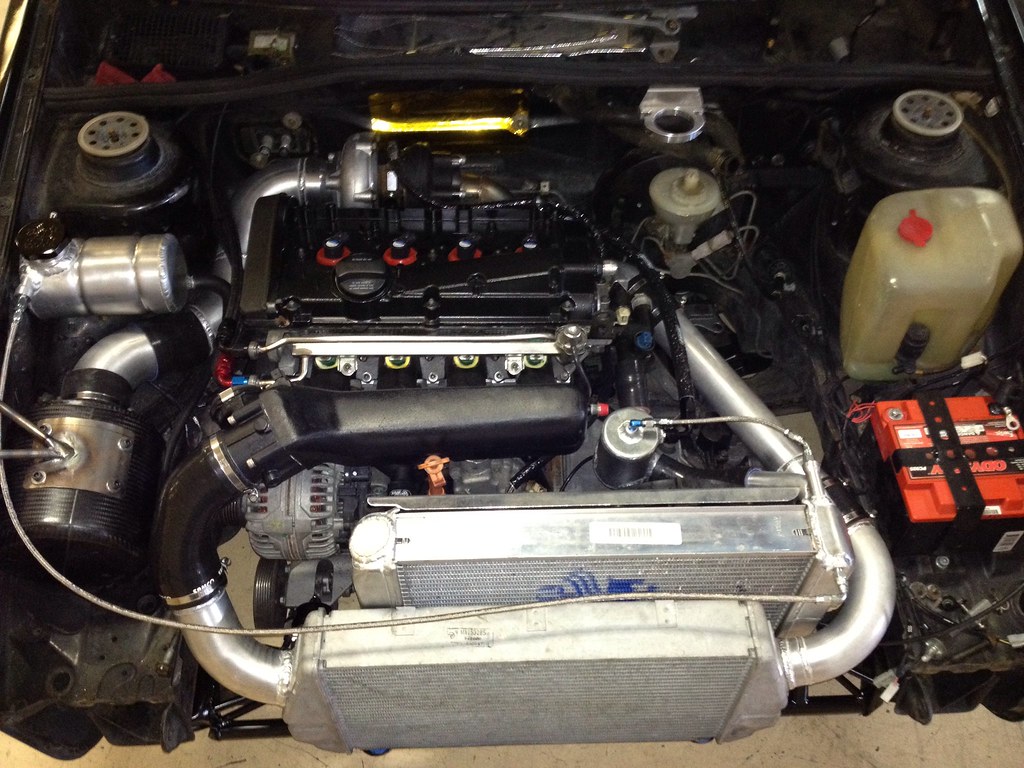
looks amazing under this Golf's hood !
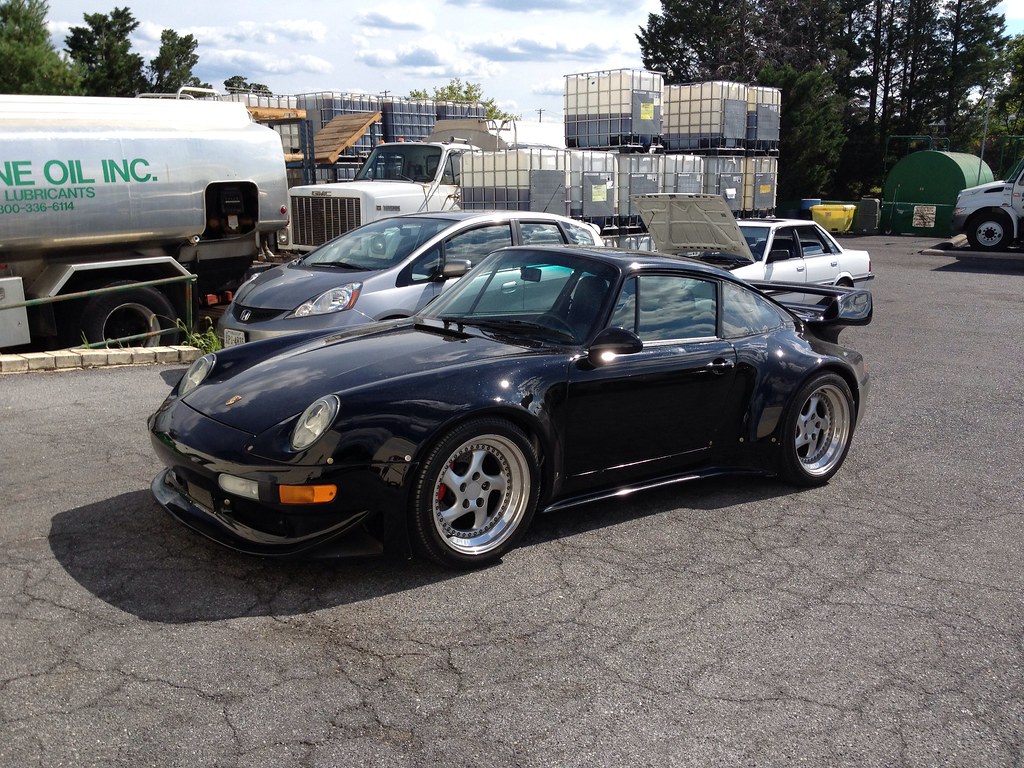
this car was on the dyno getting all dialed in by Franz... this Porsche has a full blown carbon fiber wide body kit twin turbos and is packing 500hp and 2000lbs.... its freaking fast
and some other car's he's working on around the shop...

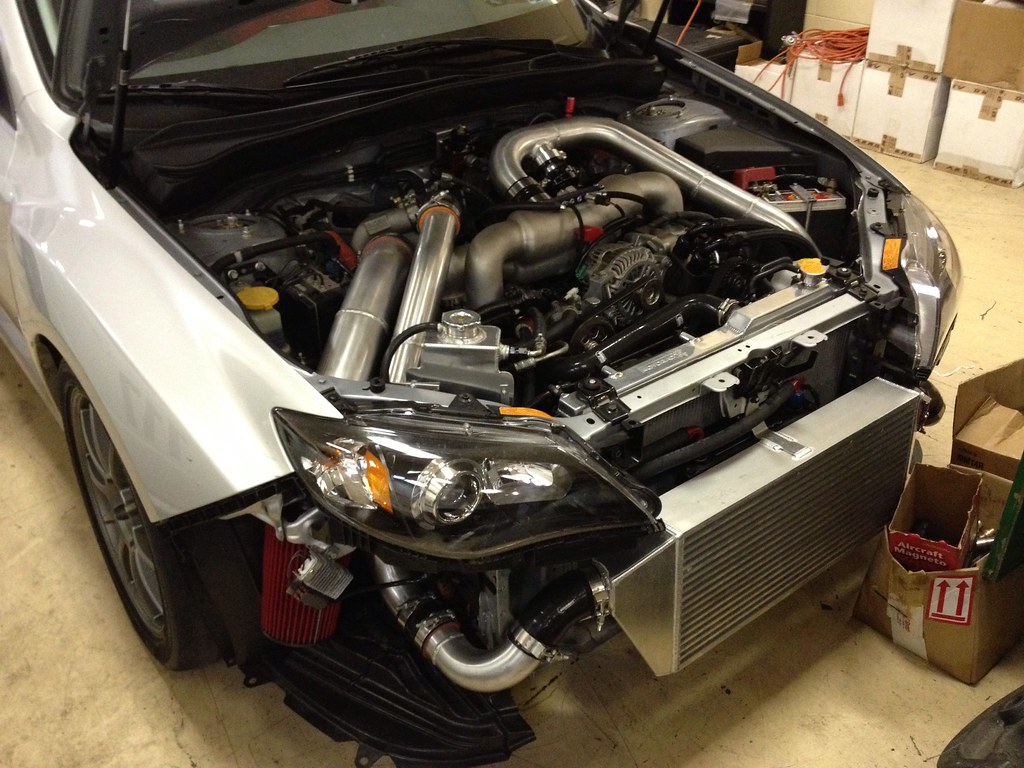
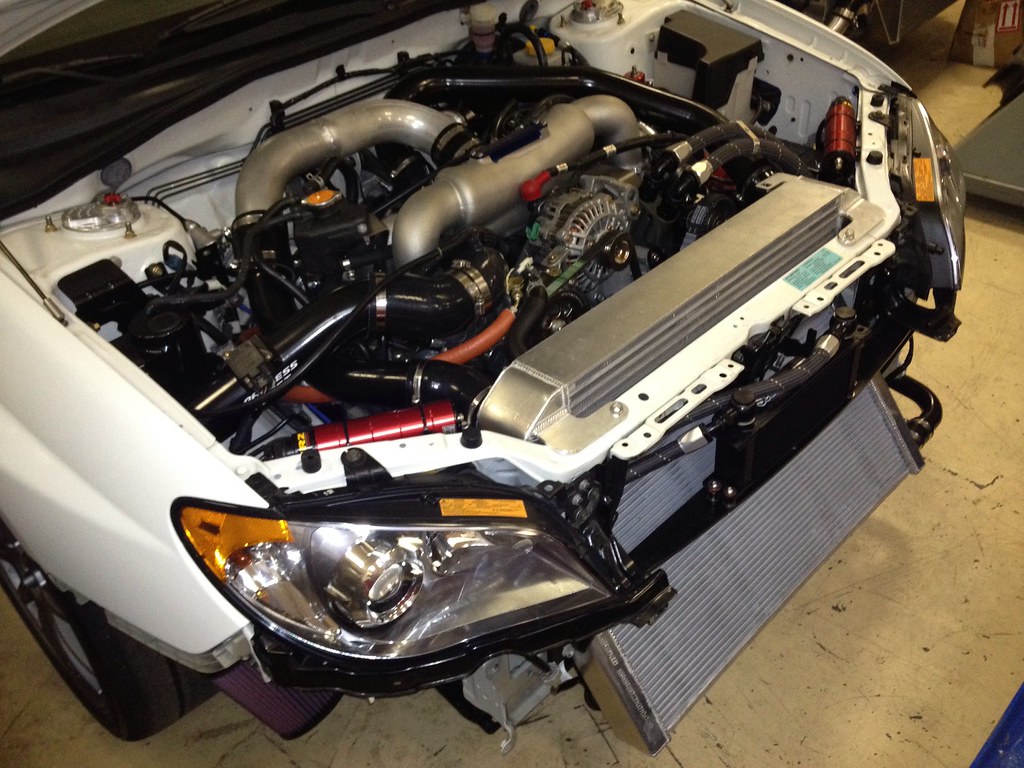
here we have Franz's amazing hand crafted one of a kind Leone intercooler piping that fits perfect and does a fantastic job keep the temps down and power up !
my new dash wired up by Franz, this time I can see and keep a eye on everything just in case something is not right.
Franz's Dyno Dynamics tuning tool.... that fan in the back with the red EVO rally bumper on it !!! that thing will suck you in and spit you out the other side if you get to close !..
all sensors hooked up ready to rock and roll the proper way !....
so much eye candy OVER LOAD !
Franz's babys sided by side.... the EVO is just crazy !... its like a full blown race car and has EVERYTHING ! no joke !.. me I like the 86 Golf because I'm from the old school lol.
looks amazing under this Golf's hood !
this car was on the dyno getting all dialed in by Franz... this Porsche has a full blown carbon fiber wide body kit twin turbos and is packing 500hp and 2000lbs.... its freaking fast
and some other car's he's working on around the shop...
Thread Starter
Scooby Regular
Joined: Jun 2015
Posts: 99
Likes: 1
From: Canada
this is what the dash looks like with night vision on
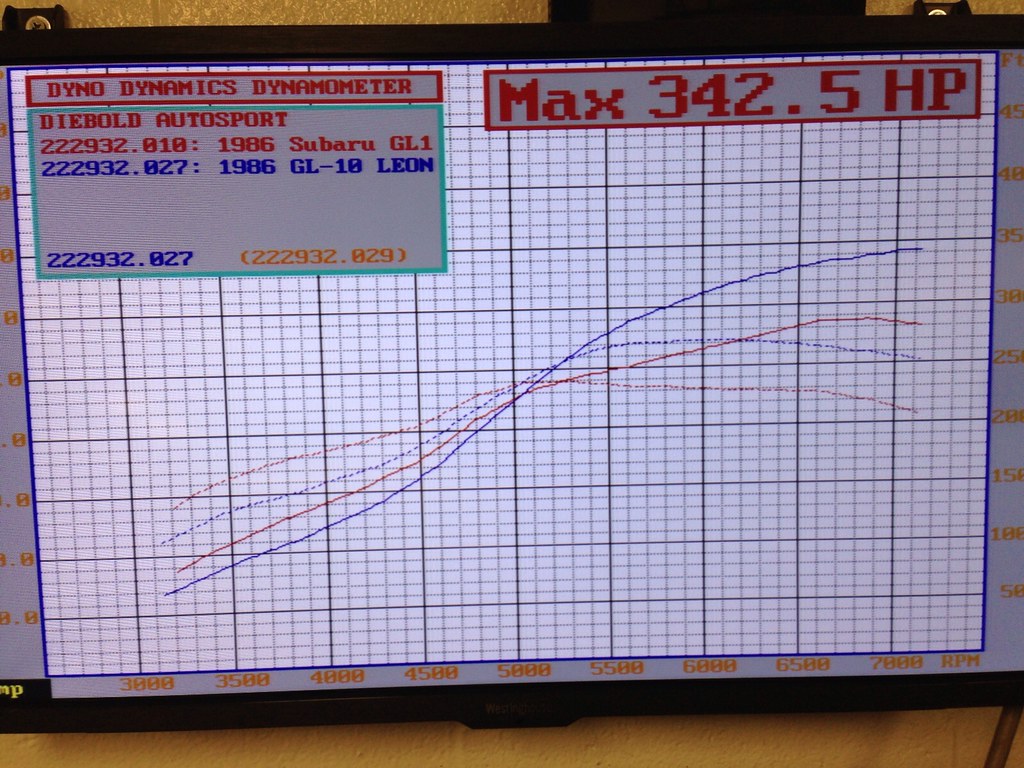
so this is my new power level with working oil pump and front mount intercooler set up and the big s300sx FMW turbo on. so 21psi is safe for me, franz could have pumped more boost out but i need to get home to canada again just in case.
old plot with new plot dyno dynamics both on american 93 gas ( Canadian 94 gas will gain a bit more) next will try race gas which will bring the power way up and over the top because I have lots of room to play with... as of now its just insane to keep it all under control while I am on it, so baby steps on my part while driving and my a/c blows nice and cold to keep me calm lol.
so things I need to do are:
maybe bigger rad (brz koyo)
oil cooler
lots of braces, one for the diff and a H brace up front with strut brace.
Thread Starter
Scooby Regular
Joined: Jun 2015
Posts: 99
Likes: 1
From: Canada
I went to the track to try my luck and see if it all holds together this past week, after doing one pass on the q-mile and getting kicked off for no helmet ! I managed to pull a 12.6 out.
I know I know my times suck out the box ! I dont want to snap my axles or leave my Diff on the floor ! so I took off bogging in first and not revving out 2nd or 3rd gear becuase the car likes to lay rubber in the rear tires.
I am on the left Porsche 977 twin turbo on right... high boost button used
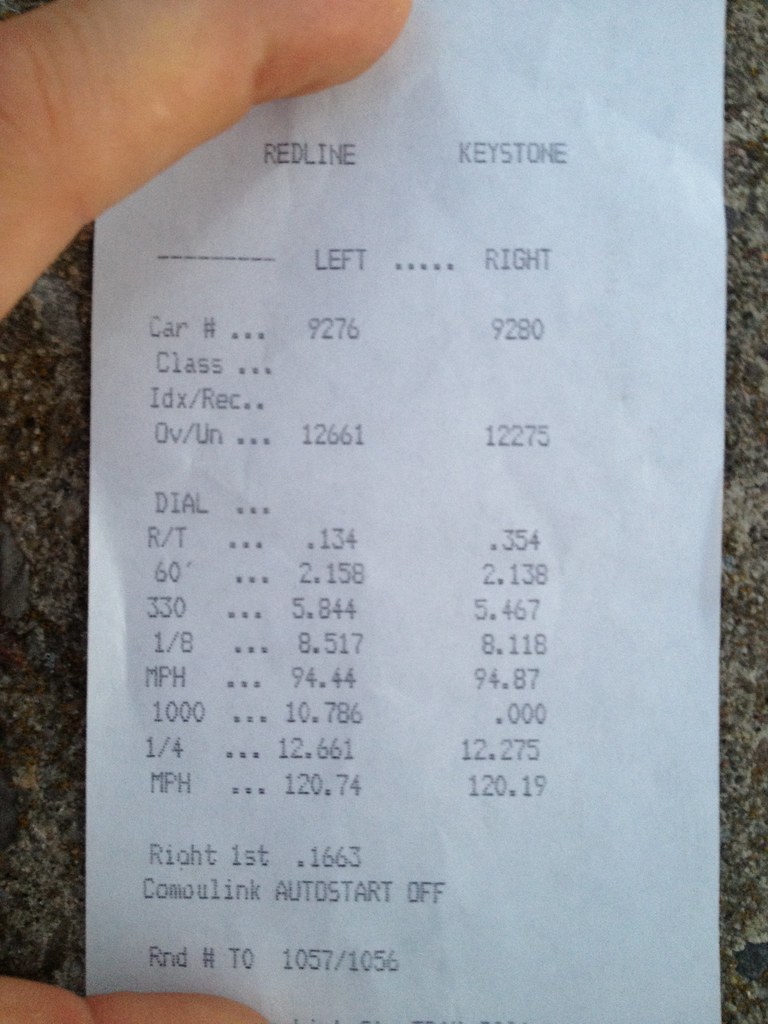
so after getting kicked off i went lapping to see how well the car handles ! scary move lol.... my brakes are to small or weak so maybe better pads, and the car feels like it needs some wider tires and bracing to help keep it more stable.
Low Boost On was used for lapping its to scary with high lol
as of now its fun to play with till i fix things out
Instagram
I know I know my times suck out the box ! I dont want to snap my axles or leave my Diff on the floor ! so I took off bogging in first and not revving out 2nd or 3rd gear becuase the car likes to lay rubber in the rear tires.
I am on the left Porsche 977 twin turbo on right... high boost button used
so after getting kicked off i went lapping to see how well the car handles ! scary move lol.... my brakes are to small or weak so maybe better pads, and the car feels like it needs some wider tires and bracing to help keep it more stable.
Low Boost On was used for lapping its to scary with high lol
as of now its fun to play with till i fix things out
Thread Starter
Scooby Regular
Joined: Jun 2015
Posts: 99
Likes: 1
From: Canada
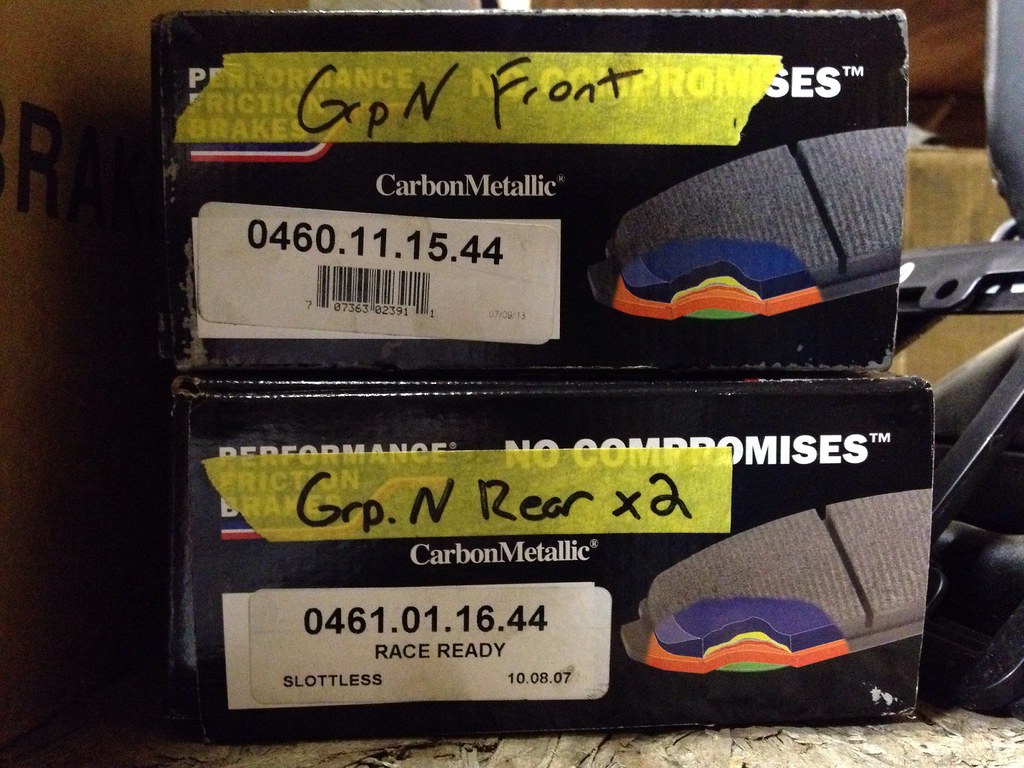
well the season is done for me and I got out on the track a couple times more for fun to test out my new brake pad's, the pad's helped out a bit more but still need more work.
PFC 01 compound group N pad's work well very well, lots of dust but rather stop then not.
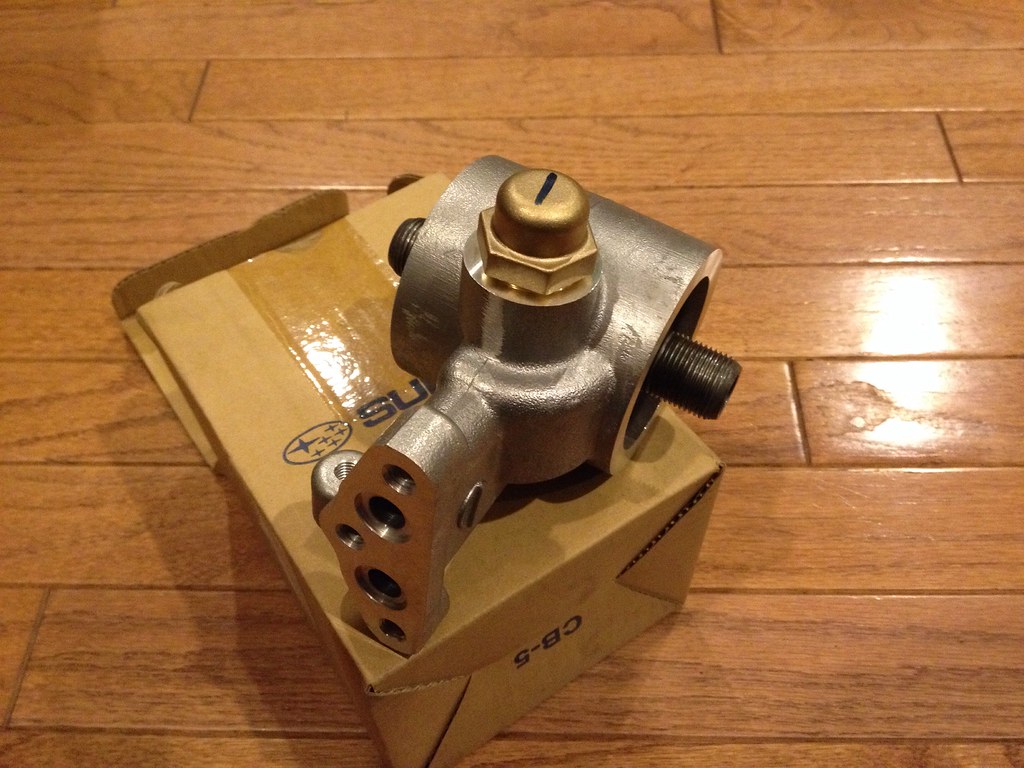
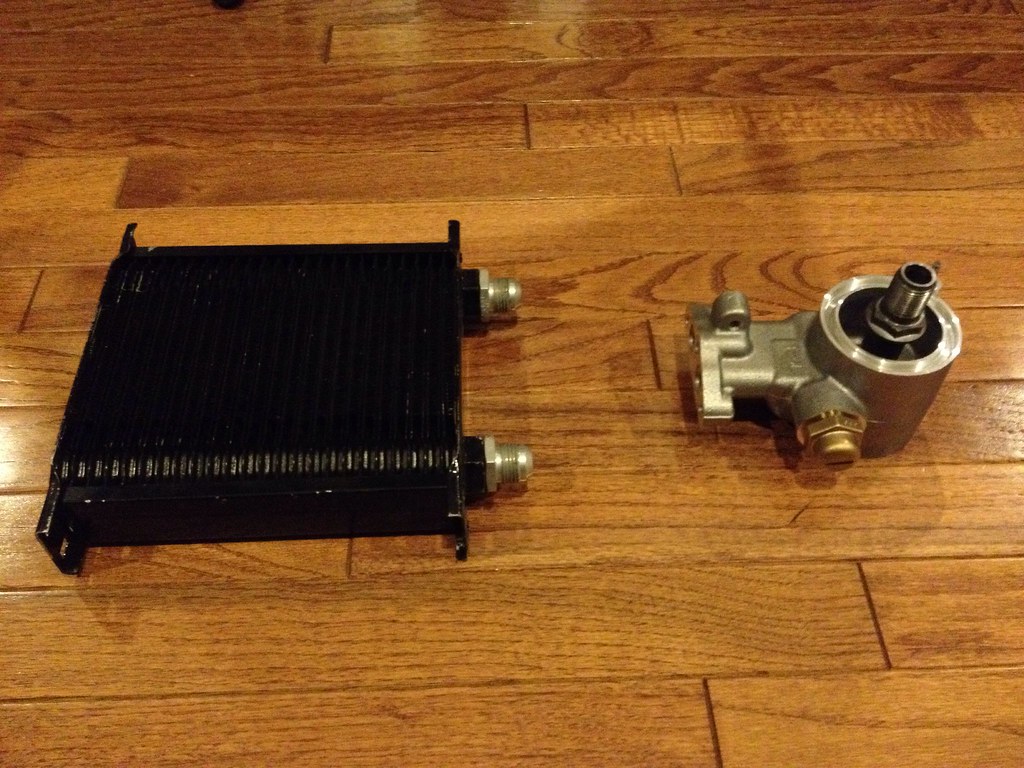
S203 S204 Spec-c Ra R oil cooler adapter factory from subaru oem has come in. built in thermostat opens at 100 C and OEM Made In Japan By STi no other adapter is better !
my spare earls cooler should do the job, got rid of A/C for this set up lol
lol
I put the 86 Subaru Leone away for the season but next year to do lit will be fun.
wider sticky tires + smaller wheels 15"
Race gas tune 500hp DD it
better suspension stiffer springs
STi oil cooler
BRZ koyo rad install
bigger CV axles
i also was going to swap out my STi Spec-c 6mt 3.900 to my S204 STi 6mt 3.545, but its now in my winter beater (99 Nico). i think my winter beater will be more in need of longer gearing next spring when i do the motor swap.
99 Nico - NASIOC
PFC 01 compound group N pad's work well very well, lots of dust but rather stop then not.
S203 S204 Spec-c Ra R oil cooler adapter factory from subaru oem has come in. built in thermostat opens at 100 C and OEM Made In Japan By STi no other adapter is better !
my spare earls cooler should do the job, got rid of A/C for this set up
lolI put the 86 Subaru Leone away for the season but next year to do lit will be fun.
wider sticky tires + smaller wheels 15"
Race gas tune 500hp DD it
better suspension stiffer springs
STi oil cooler
BRZ koyo rad install
bigger CV axles
i also was going to swap out my STi Spec-c 6mt 3.900 to my S204 STi 6mt 3.545, but its now in my winter beater (99 Nico). i think my winter beater will be more in need of longer gearing next spring when i do the motor swap.
99 Nico - NASIOC
Thread Starter
Scooby Regular
Joined: Jun 2015
Posts: 99
Likes: 1
From: Canada
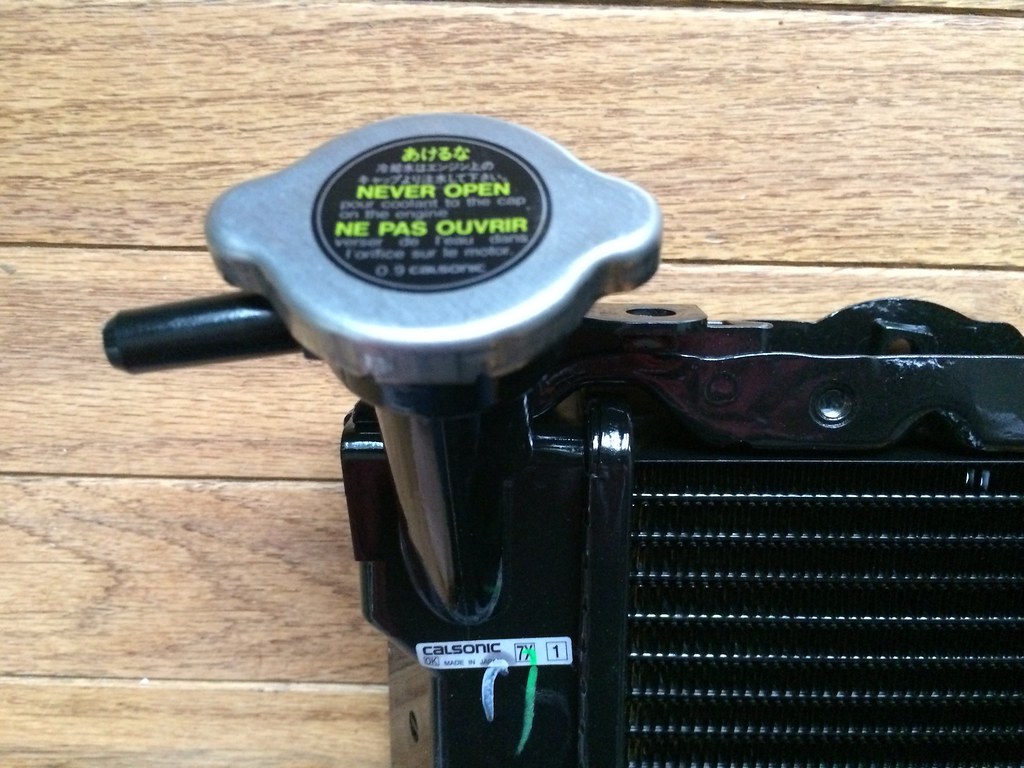
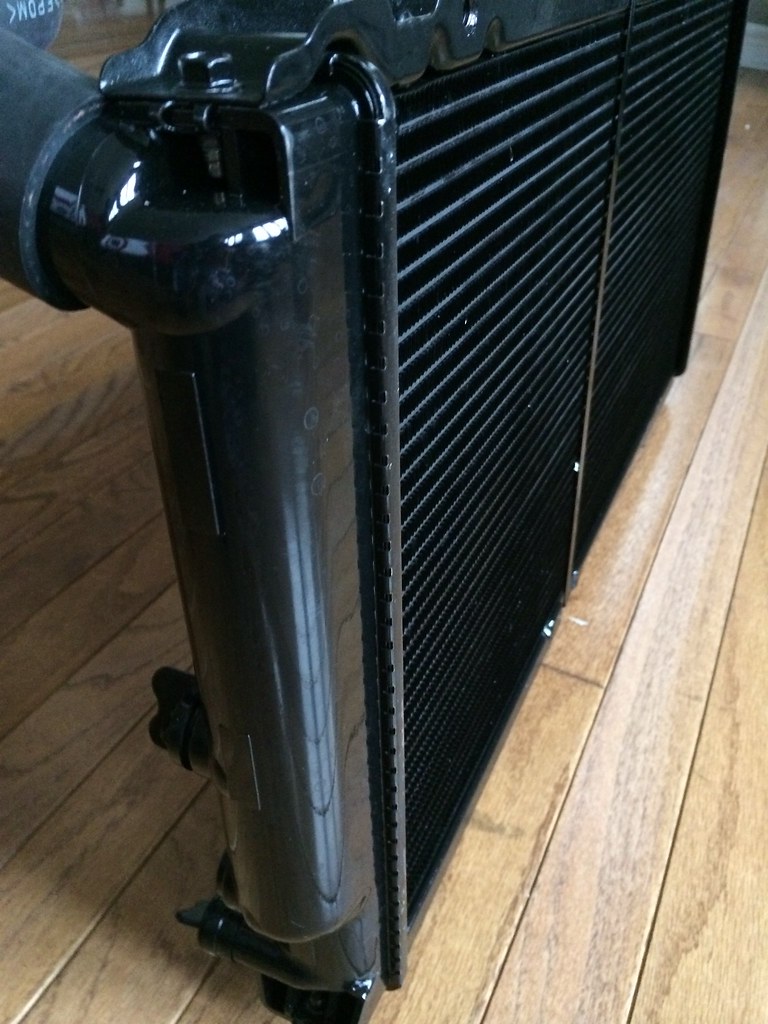
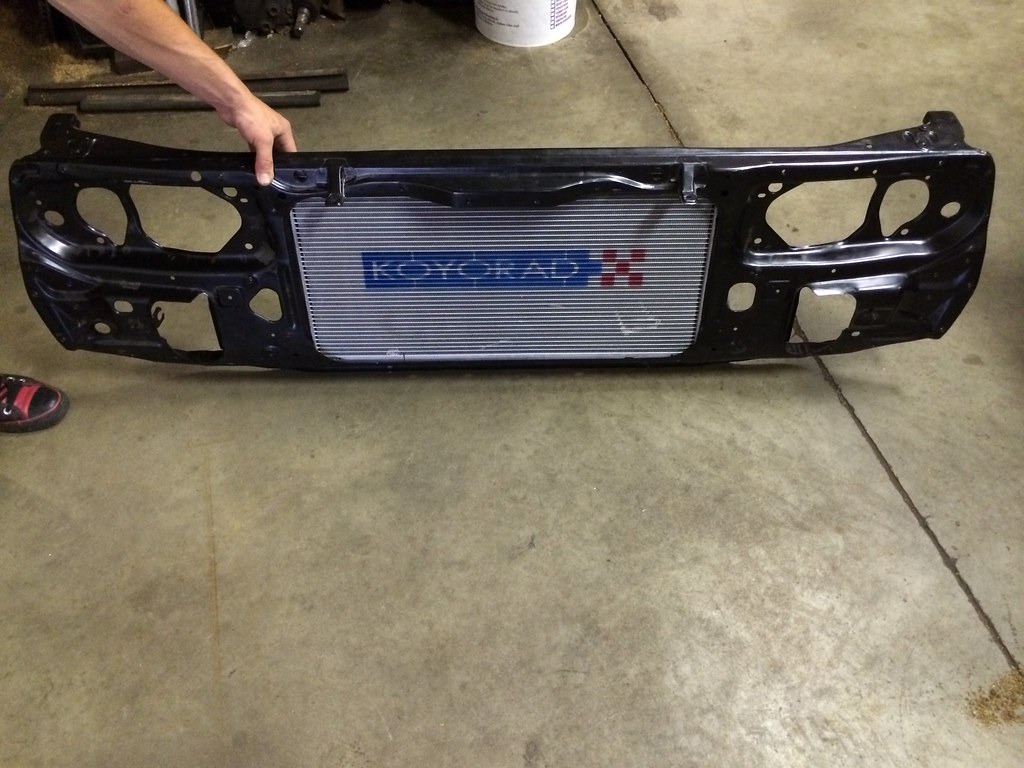
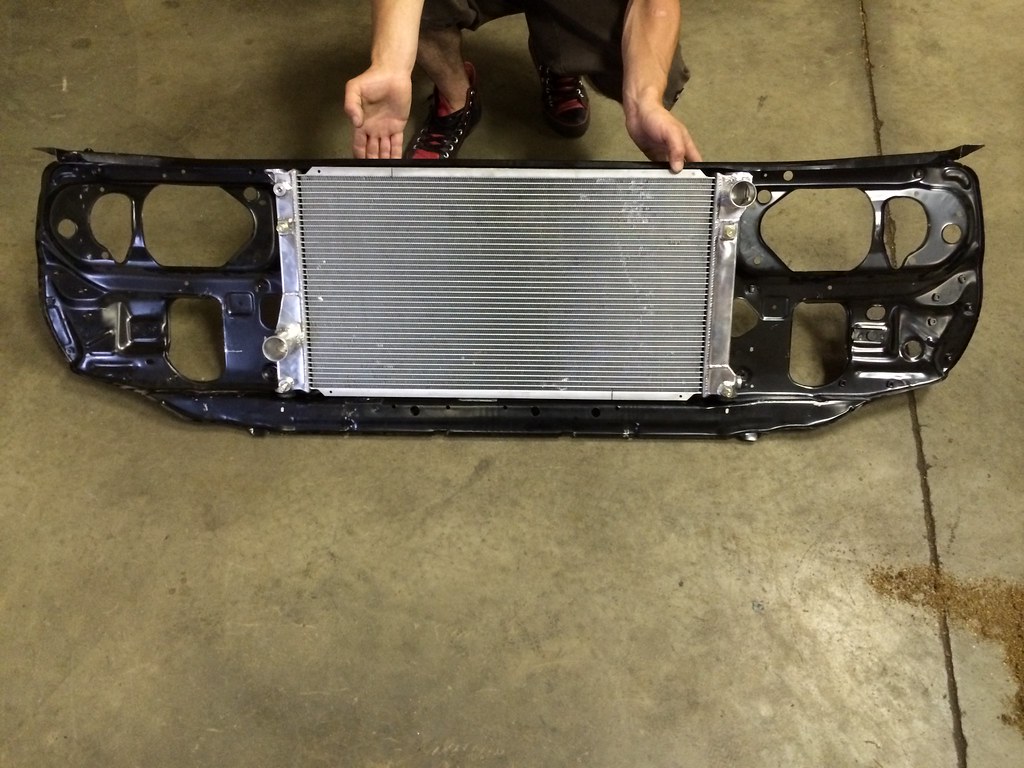
very excited about this radiator ! its a brand spanking new OEM Subaru 1988 Subaru XT6 2.7L H6 Radiator, its 2 core and also has the proper port size for inlet also outlet as a new EJ motors use.
it's also a perfect match to my EA82T turbo radiator, same size same width same cap location same mount points and also XT6 rad hoses to complete the job.
I wish I new all this from the start of the build, but it sure is going to be sweet next summer on the race track to do more laps in the heat, also the spal fans will bolt up in the same position as the gl-10 turbo mt rad. with the bigger radiator and my oil cooler this should complement the motor very well now.

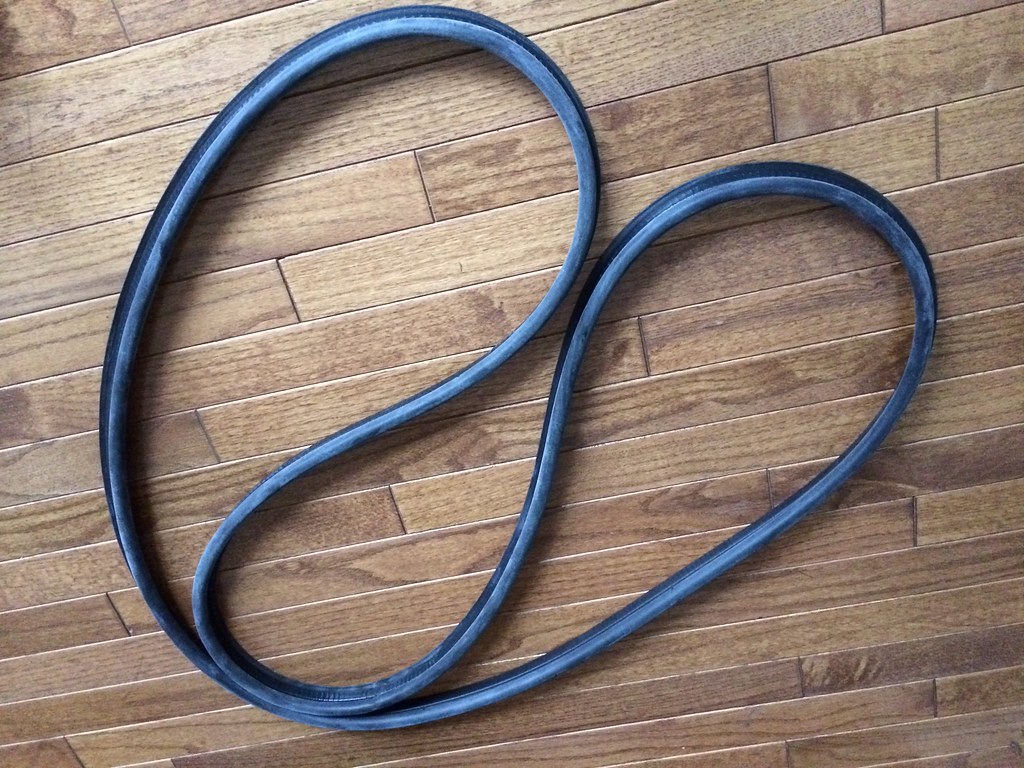
and my new trunk seal which took a long time maybe it was made for me in japan but it came in also oem subaru for that perfect fit, i had a small rip in mine that i didnt like.
it's also a perfect match to my EA82T turbo radiator, same size same width same cap location same mount points and also XT6 rad hoses to complete the job.
I wish I new all this from the start of the build, but it sure is going to be sweet next summer on the race track to do more laps in the heat, also the spal fans will bolt up in the same position as the gl-10 turbo mt rad. with the bigger radiator and my oil cooler this should complement the motor very well now.
and my new trunk seal which took a long time maybe it was made for me in japan but it came in also oem subaru for that perfect fit, i had a small rip in mine that i didnt like.
Thread Starter
Scooby Regular
Joined: Jun 2015
Posts: 99
Likes: 1
From: Canada
I been slacking on my updates, but most my parts are in for the spare EJ22T motor. i decide to get all new case bolts washers caps pretty much everything lol.
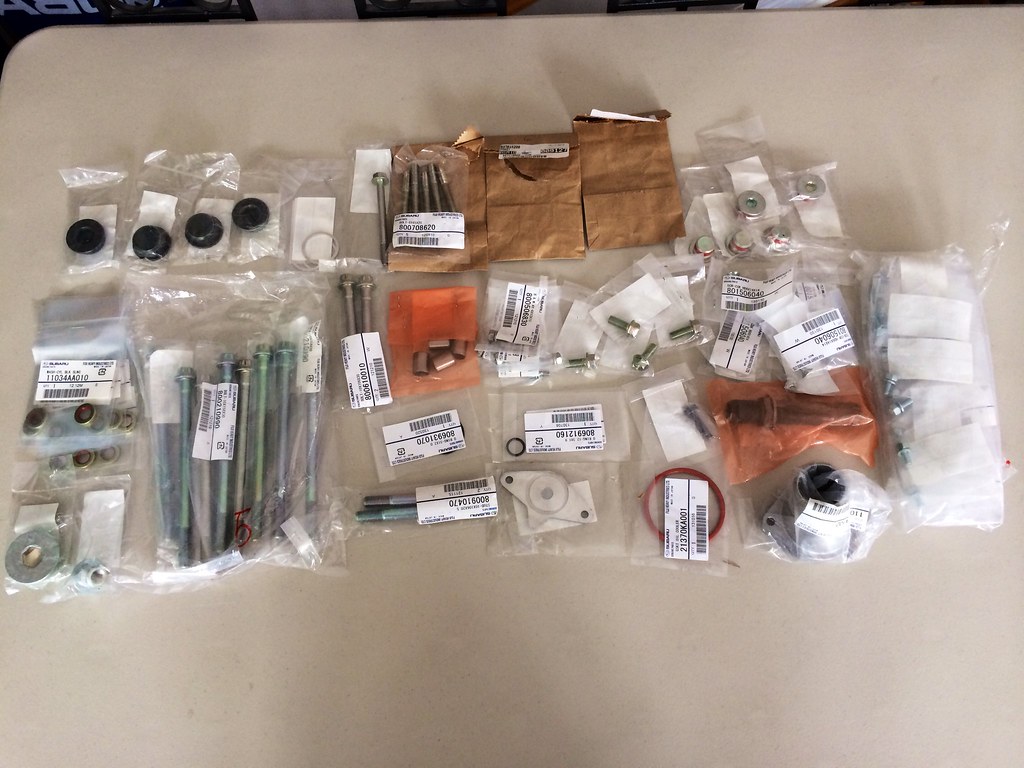
also got a new weather stripping for the hood, the original one had a small tear in it.
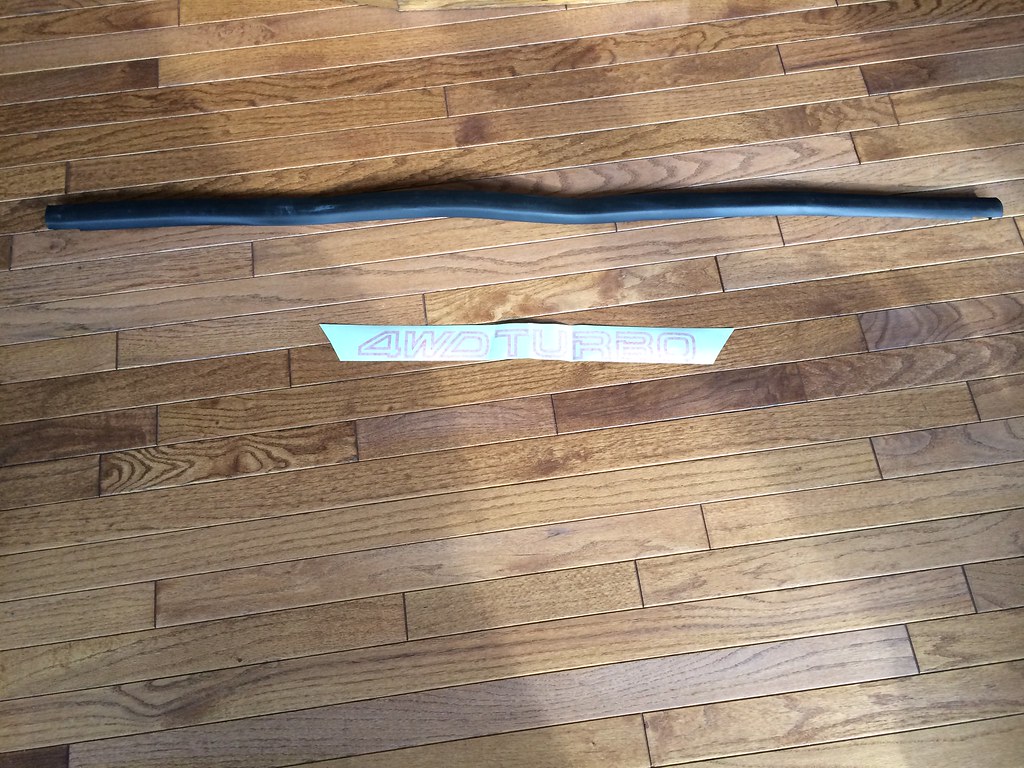
also picked up the original stickers for my rear doors, i have turbo on the door from factory but my car was a FWD not AWD... so i have to give it the subaru justice of the AWD.
also got a new weather stripping for the hood, the original one had a small tear in it.
also picked up the original stickers for my rear doors, i have turbo on the door from factory but my car was a FWD not AWD... so i have to give it the subaru justice of the AWD.
Thread Starter
Scooby Regular
Joined: Jun 2015
Posts: 99
Likes: 1
From: Canada
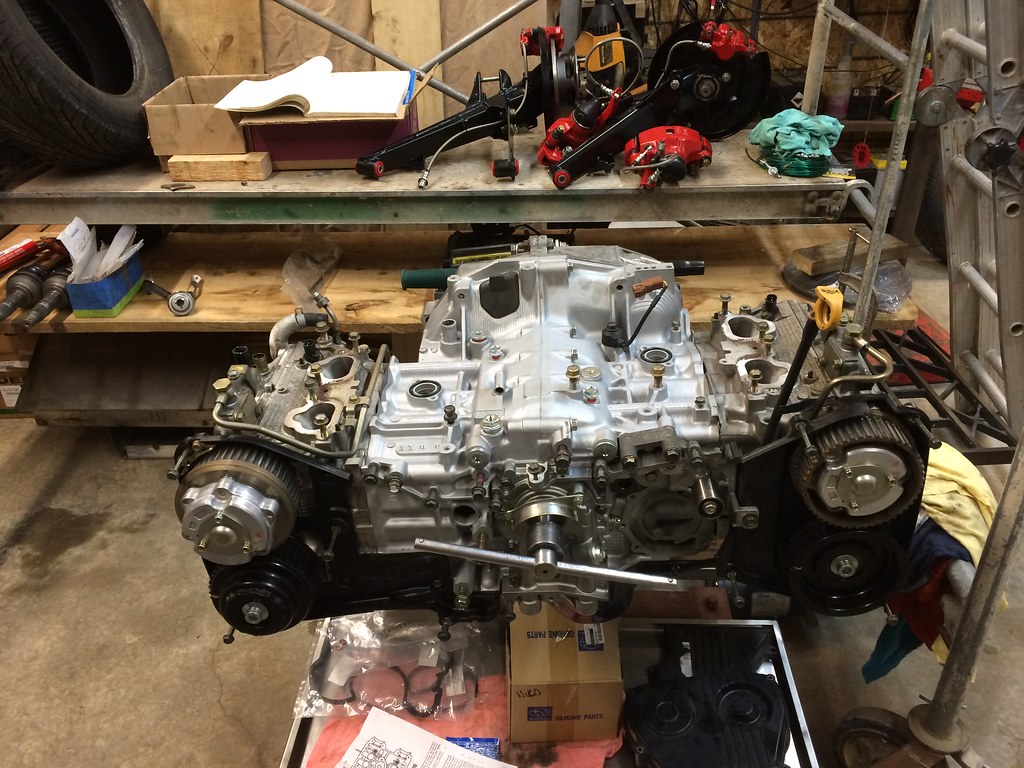
and here we have 2 EJ22T blocks out of 9 cleaned and ready for the shelf for when the time comes, lets hope no more broken motors for 2014 season..
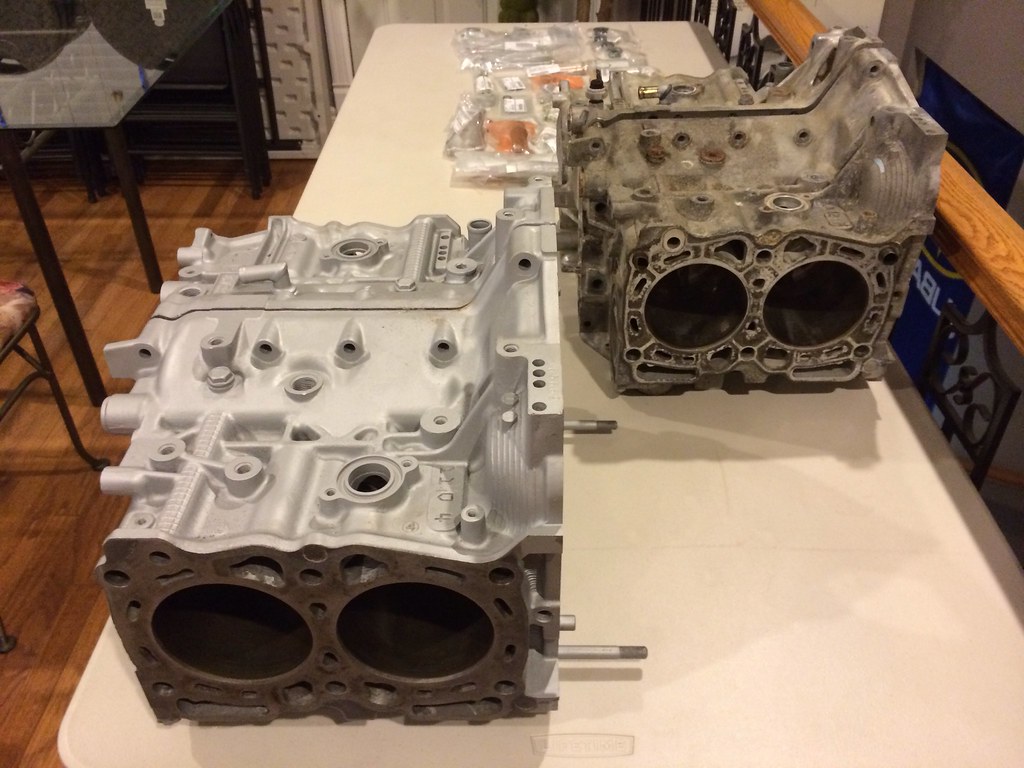
here is the spare EJ22T ill be using and its V9 JDM heads rods pistons all on a wheelie cart lol... this motor will get all the new plugs and JDM oil cooler.
here is the spare EJ22T ill be using and its V9 JDM heads rods pistons all on a wheelie cart lol... this motor will get all the new plugs and JDM oil cooler.
Thread Starter
Scooby Regular
Joined: Jun 2015
Posts: 99
Likes: 1
From: Canada
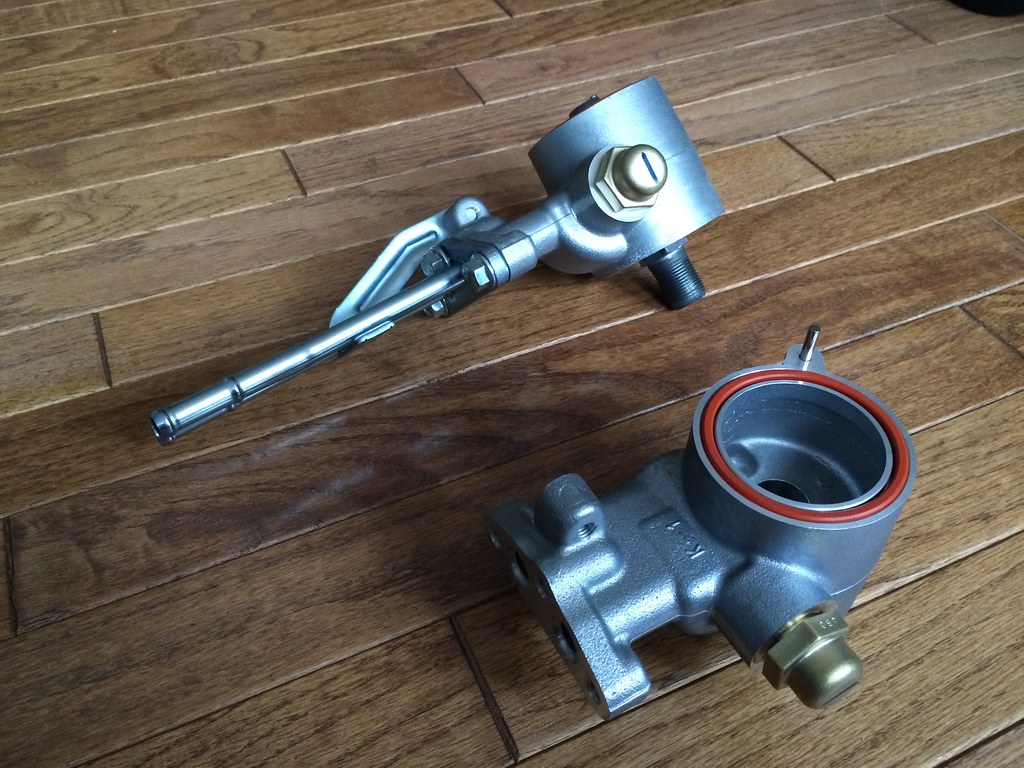
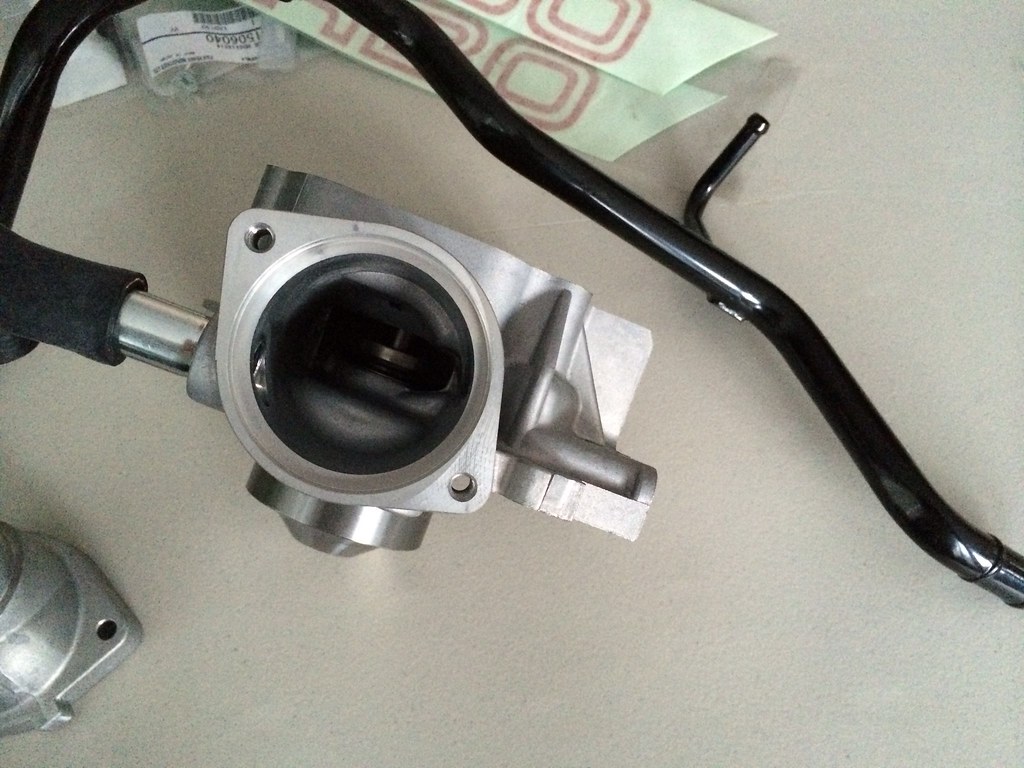
here is my water pump set up, this pump is for a non turbo Subaru "1990 Subaru Legacy 2.2L NA". There is a couple things special to this water pump which works perfect in my build. The black pipe is coolant heater core pipe single, and the hose adapter is H6 ez30
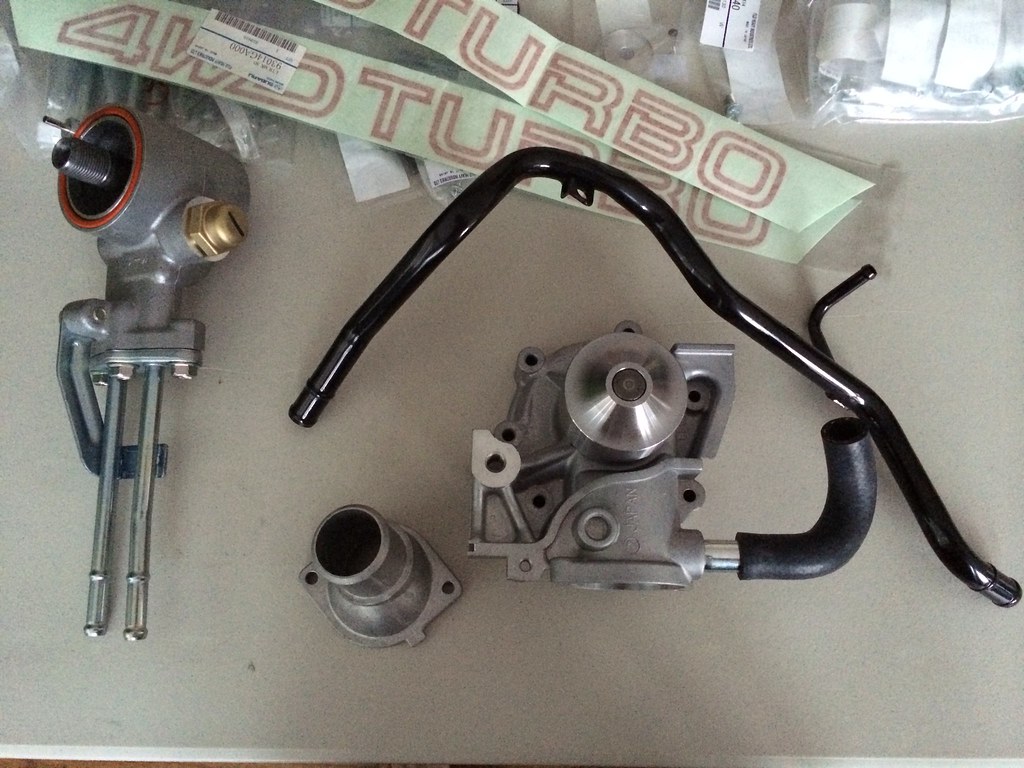
little back ground on the design
The EJ257 and EJ255 engines are using a low cost stamped impeller water pump that is inferior to this JDM spec closed back cast impeller water pump. The stamped impeller pump is less efficient and more susceptable to cavitation. We suggest installing a closed-impeller pump on any performance or motorsport Subaru engine build
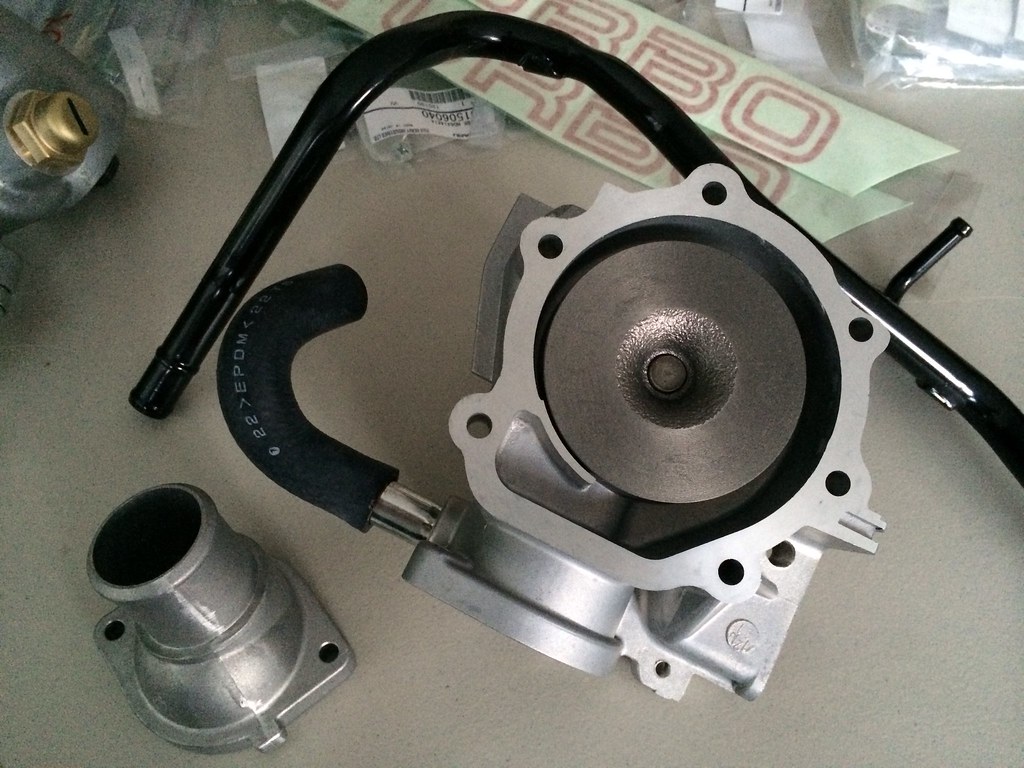
so besides the cast impeller, the inlet port is huge which should help a bit more with coolant flow. on a turbo water pump there is 3 nipple ports... 1 oil cooler... 2 swirl pot... 3 heater core... now because I'm not using a swirl pot and have a rad cap on the rad I can delete that nipple port & the pipe all together.
also my oil cooler has no coolant going into it any more so that port can be deleted also, because of the use of the JDM spec-C S204 adapter.
little back ground on the design
The EJ257 and EJ255 engines are using a low cost stamped impeller water pump that is inferior to this JDM spec closed back cast impeller water pump. The stamped impeller pump is less efficient and more susceptable to cavitation. We suggest installing a closed-impeller pump on any performance or motorsport Subaru engine build
so besides the cast impeller, the inlet port is huge which should help a bit more with coolant flow. on a turbo water pump there is 3 nipple ports... 1 oil cooler... 2 swirl pot... 3 heater core... now because I'm not using a swirl pot and have a rad cap on the rad I can delete that nipple port & the pipe all together.
also my oil cooler has no coolant going into it any more so that port can be deleted also, because of the use of the JDM spec-C S204 adapter.


Thread Starter
Scooby Regular
Joined: Jun 2015
Posts: 99
Likes: 1
From: Canada
got lots of parts coming in for my toy very excited to fix the little problems and add some new updated bits to make this car more fun a race track this year.
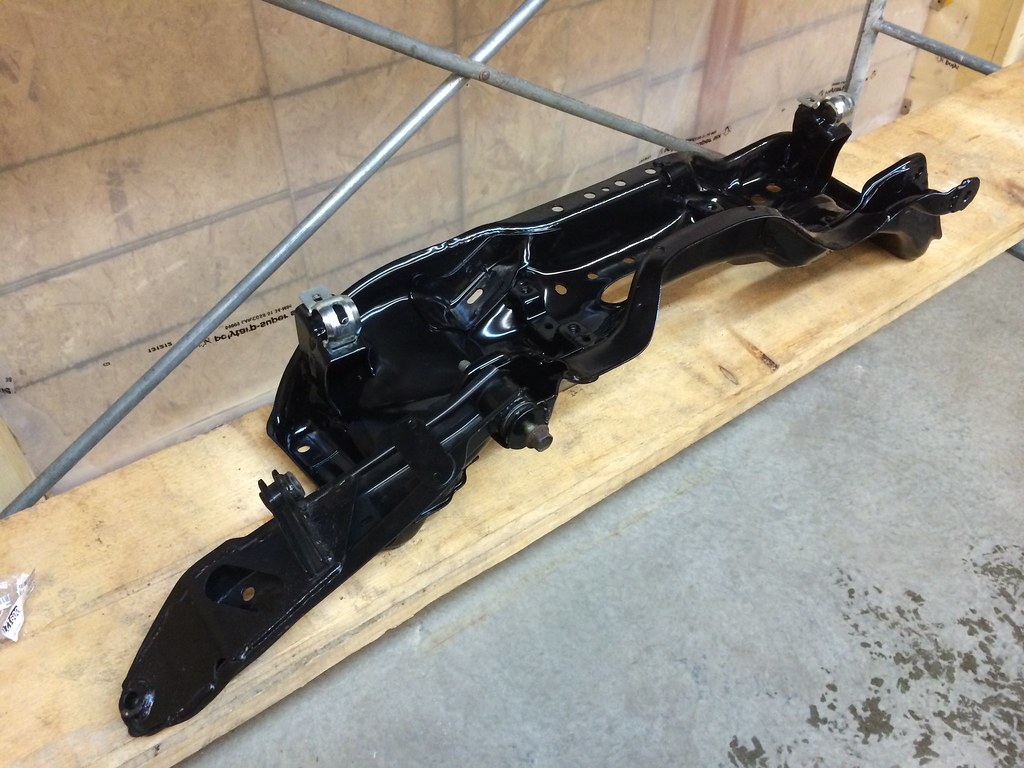
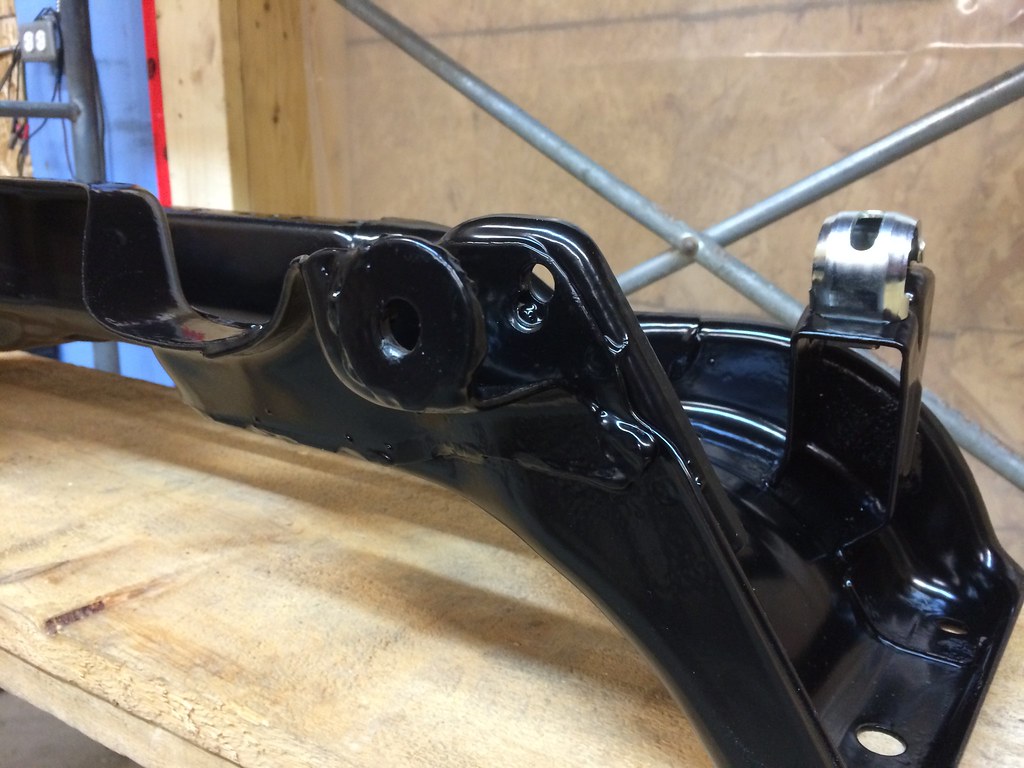
I found a nice GL-10 Turbo cross member from the local scrap yards had it sand blasted and powder coated black for that long lasting effect. also did the USMB washer weld on trick to re locate the control arms a bit further out so I wont have rubbing binding problems any more with the XT6 control arms.
here you can see the old hole with new hole
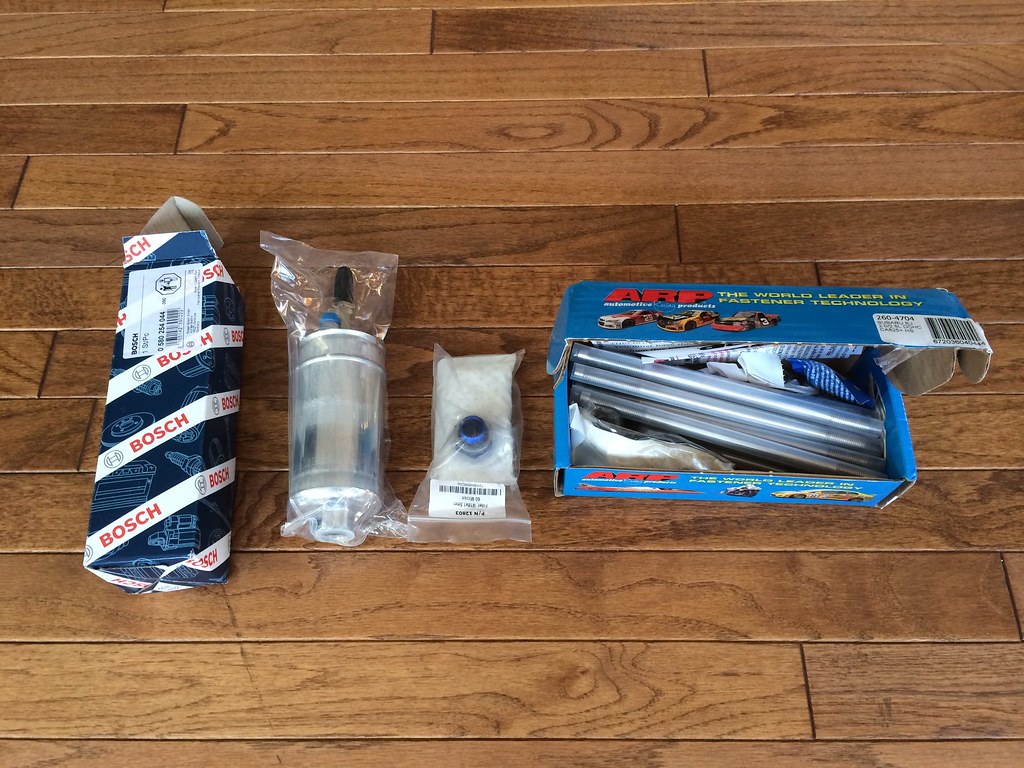
my spare Bosch 044 came in (might use this for my other build going on will see) and my arp head studs 625+ for the spare motor, still waiting for the new subaru crankshaft to come in from subaru japan to build the block which wont be much longer.
I found a nice GL-10 Turbo cross member from the local scrap yards had it sand blasted and powder coated black for that long lasting effect. also did the USMB washer weld on trick to re locate the control arms a bit further out so I wont have rubbing binding problems any more with the XT6 control arms.
here you can see the old hole with new hole
my spare Bosch 044 came in (might use this for my other build going on will see) and my arp head studs 625+ for the spare motor, still waiting for the new subaru crankshaft to come in from subaru japan to build the block which wont be much longer.
Thread Starter
Scooby Regular
Joined: Jun 2015
Posts: 99
Likes: 1
From: Canada
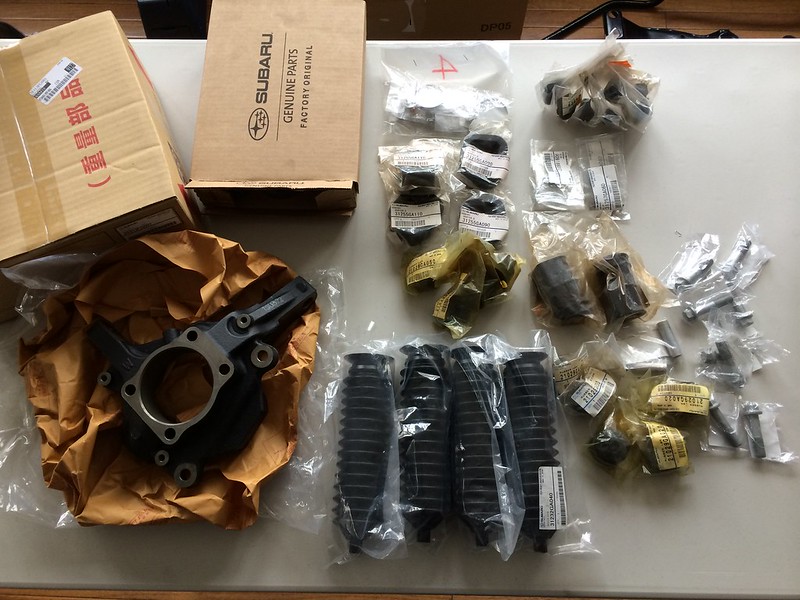
So I been collecting parts for my car now do to everything being Super RARE or no longer available (NLA) from Subaru any more.
just in case I bend something or I need to replace something, some of the stuff is still getting sand blasted and powder coated.
front control arms bushings XT6 only white line # W51458. you must melt out the XT6 bushing and re use the shell for this to work.
top corner in Pic is bushing and shell
there rear mustache bar on the older Subaru's also have a bushing that can be replaced with a white line part number # W91379. this part fits on all new Subaru's T bar holding the diff up. to make this bushing work you must burn out your old metal shell that the bolt goes into, then drill out the white line bushing to the same size as the bolt shell.
pic bushings is in center XT6 control arms you can see them.
there will be more bushing's coming to firm up the ride on my car, I need to measure them still and cross fit from a newer Subaru once all stuff comes in.
Thread Starter
Scooby Regular
Joined: Jun 2015
Posts: 99
Likes: 1
From: Canada
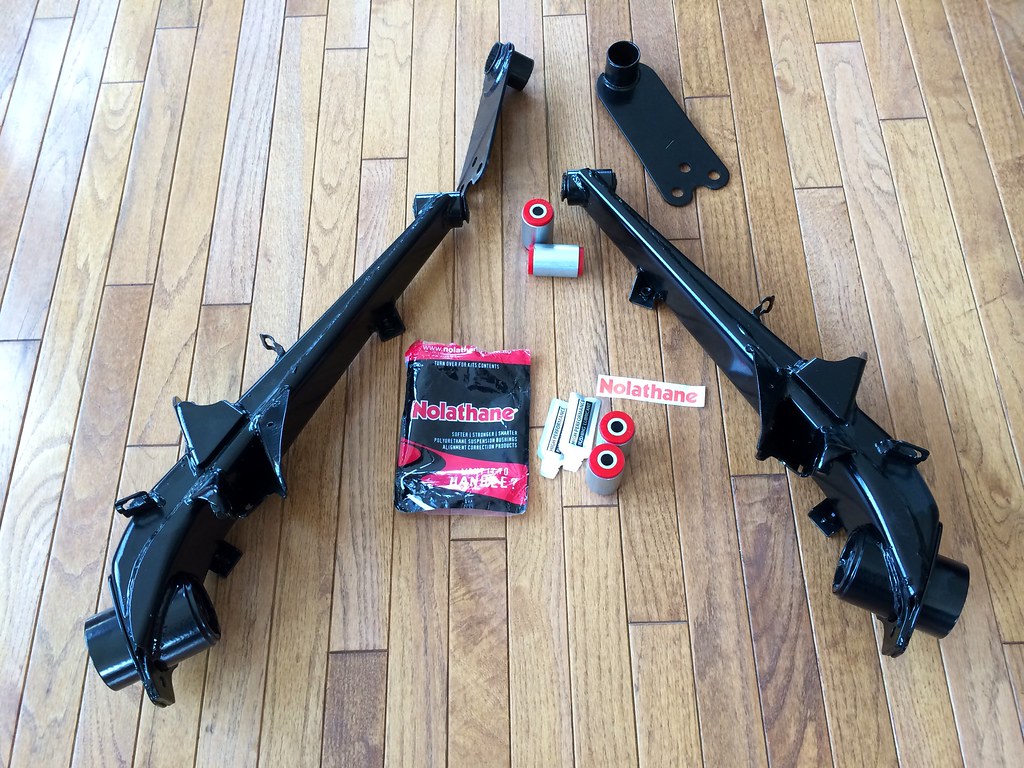
today my Nolathane bushings came in for my Subaru XT6 control arms, for people that never heard of Nolathane, there the owner of Whiteline which is more popular in north america then in Australia but the boys down under know all this all ready lol.
Now I'm waiting for my other bushings from SuperPRO which should cover the rest of my underside bushings and give me that firm more responsive ride around the race track this year.
Nolathane # 46200
direct swap made with the shell
Now I'm waiting for my other bushings from SuperPRO which should cover the rest of my underside bushings and give me that firm more responsive ride around the race track this year.
Nolathane # 46200
direct swap made with the shell
Thread Starter
Scooby Regular
Joined: Jun 2015
Posts: 99
Likes: 1
From: Canada
here is the drain back for the dip stick for the Mann Hummel Provent 200 set up I have made... this is for a friend of mine which has a built Subaru also, same design as my original one I made for my Leone.
ill also be making a easy adapter for the inlet on the Provent 200, so its easy to connect the block vent and valve covers all in one tube with out making back pressure free flowing for better movement of air.
used a stand grinder then cleaned up with a file and deburring tool.
ill weld this up and paint it so it stays nice and clean rust free.

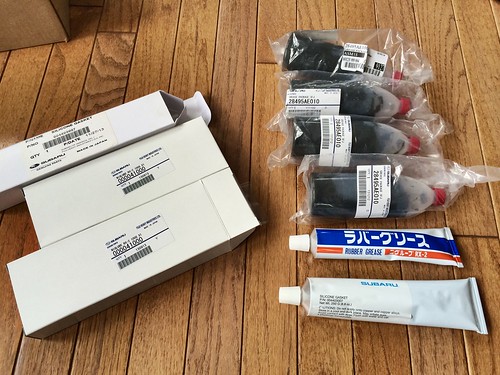
when building a subaru motor fuji bond or fixing the brakes RX2 grease and servicing the cv axles and cv boots you got the proper grease from subaru !
ill also be making a easy adapter for the inlet on the Provent 200, so its easy to connect the block vent and valve covers all in one tube with out making back pressure free flowing for better movement of air.
used a stand grinder then cleaned up with a file and deburring tool.
ill weld this up and paint it so it stays nice and clean rust free.
when building a subaru motor fuji bond or fixing the brakes RX2 grease and servicing the cv axles and cv boots you got the proper grease from subaru !
Thread Starter
Scooby Regular
Joined: Jun 2015
Posts: 99
Likes: 1
From: Canada
well I finished the welding the dip sticks for the return line for the Provent 200. I also made a adapter piece because I have had a couple say the pipes inlet are to big and hose will not fit this and that...
the pipe I made is for the block vent and both valve covers, came out ok should do the trick and not block as much air as T ing the tubes up.. more air you can move the better.

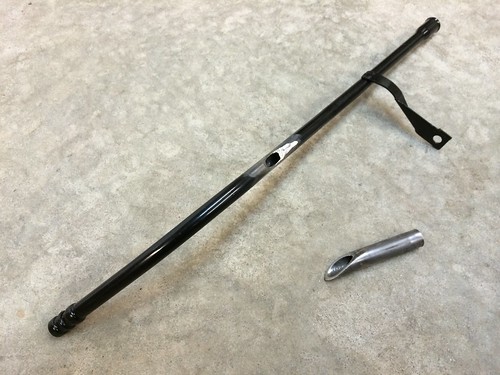
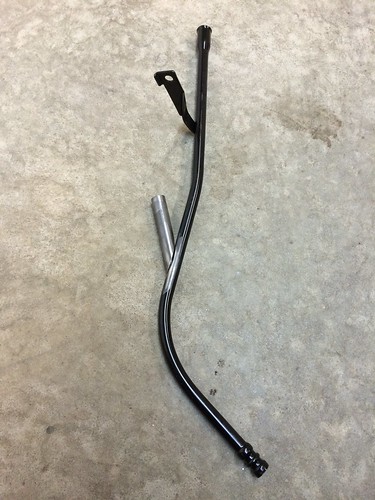
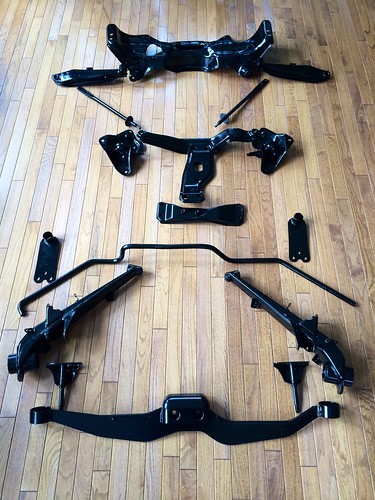
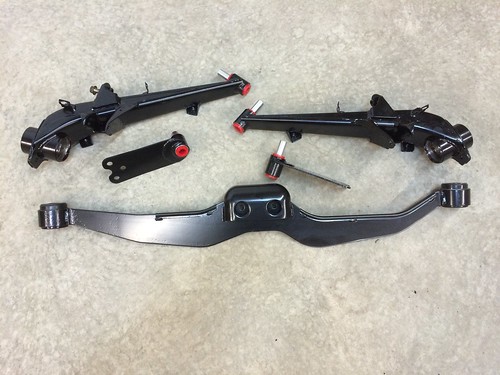
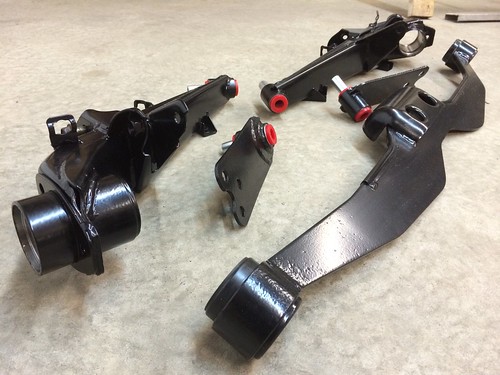
all the under side of a GL / XT / XT6 / Loyale sand blasted and powder coated to last a long time... Turbo cross member, XT6 arms front rear, XT6 20mm sway bar, XT6 5mt or 6mt cross member. I'm just missing the rear cross member which I need to find a spare to work with.
Whiteline & Nolathane bushings in place now got to do new wheel bearings and there done.
the pipe I made is for the block vent and both valve covers, came out ok should do the trick and not block as much air as T ing the tubes up.. more air you can move the better.
all the under side of a GL / XT / XT6 / Loyale sand blasted and powder coated to last a long time... Turbo cross member, XT6 arms front rear, XT6 20mm sway bar, XT6 5mt or 6mt cross member. I'm just missing the rear cross member which I need to find a spare to work with.
Whiteline & Nolathane bushings in place now got to do new wheel bearings and there done.
Thread Starter
Scooby Regular
Joined: Jun 2015
Posts: 99
Likes: 1
From: Canada
with the help of Franz @ DieboldAutosport he pointed me in the direction of Karim @ Lachute Performance for this Aim Fuel level adapter for a Subaru.
the Aim dash needed a converter to give it proper signal on a factory fuel sending unit. The sending unit is for the OEM subaru Analog dash in the 1986 ~ 1994 Subaru GL or Loyale, my Oem unit was a digital dash so it need to be changed to the different Ohm unit.
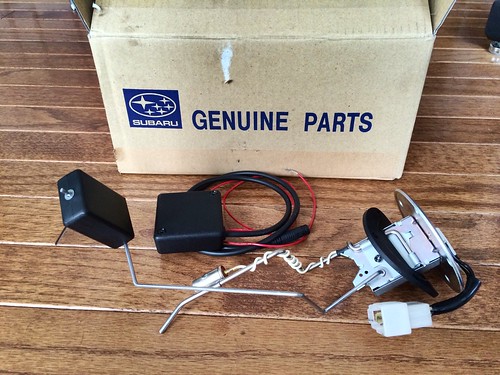
the Aim dash needed a converter to give it proper signal on a factory fuel sending unit. The sending unit is for the OEM subaru Analog dash in the 1986 ~ 1994 Subaru GL or Loyale, my Oem unit was a digital dash so it need to be changed to the different Ohm unit.
Thread Starter
Scooby Regular
Joined: Jun 2015
Posts: 99
Likes: 1
From: Canada
so I just got most of the SuperPro bushings in and new bolts nuts washers every where from Subaru oem 
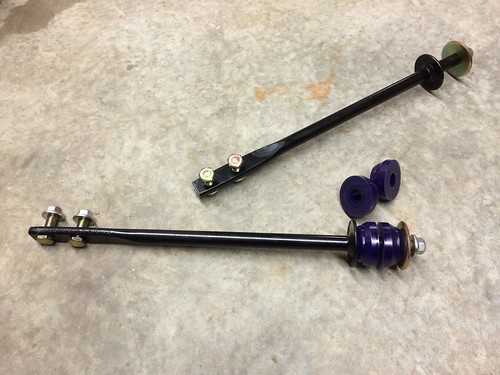
80's Subaru radius rod SuperPro # SPF2534K for 18mm bar, check your bar width if you decide to get these. this are made so much better then the whiteline ones that don't even fit in the socket.
80's Subaru 4WD Differential Pinion Mount Bushing, press bushing out melt out middle add SuperPro # SPF3005K with lots of grease and your done... last year I used a newer whiteline bushing from a impreza this year ill use the proper one. New oem subaru bolts and nuts are on back order still.

88 - 91 Subaru XT6 rear hubs 20MM sway bar, this was a tricky one had to cross reference Nolathane XT6/Vortex number to these proper bushings from SuperPro # SPF0361-20. Oem brackets bolts and nuts from Subaru
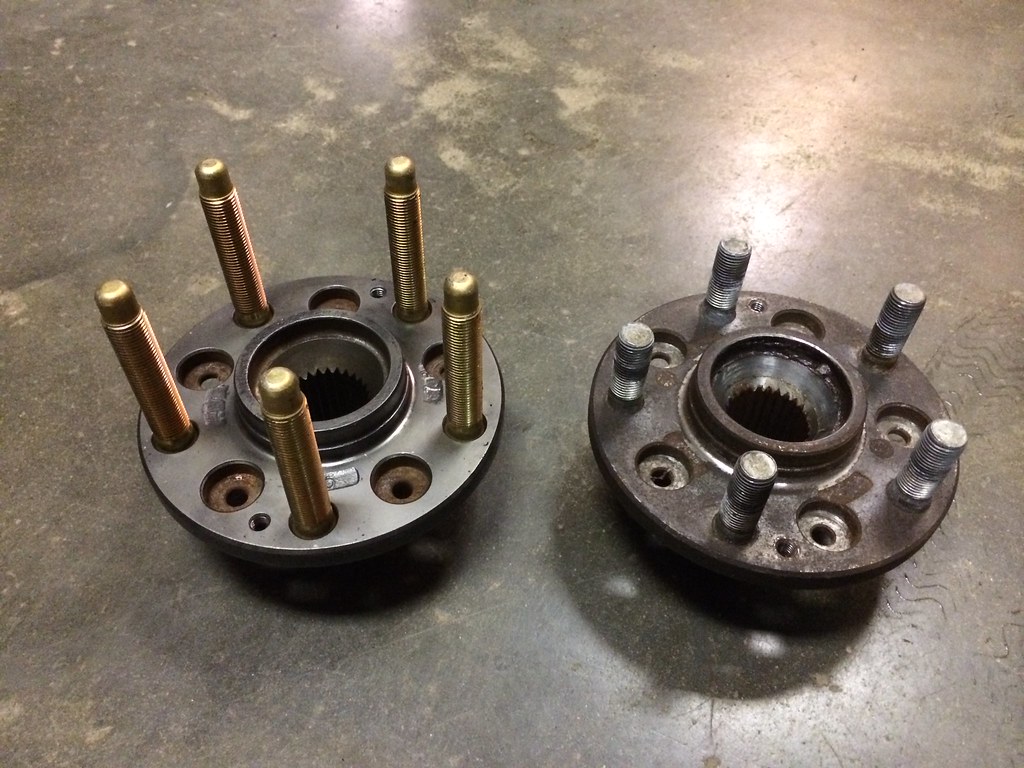
some people didn't get to see my Before & After pics, I had to get the ball rolling so I just got another spare set of XT6 5x100 rear set up in and this is what they look like from the wrecker's
STi 6mt Gear-linkage, Support Bar, Front Bush SuperPro # SPF2462K

80s Subaru Rear suspension mounts oem Subaru with SuperPro # SPF2755SK for the shock absorber's to give less movement in the control arm. you only need 4, I'm working on my next project car.

80's Subaru oem rear cross member bushing, this one is going to be tricky to upgrade. ill have to come up with something even cut the bushing mount out and weld up something to a newer style. I have a couple idea's in my head, but ill need to think of a good way to stiff this up. one idea is getting it made solid out of aluminium... there is also one more bushing in the rear cross member, it hasn't come in yet once I get that one to play with ill know where to start.

80's Subaru radius rod SuperPro # SPF2534K for 18mm bar, check your bar width if you decide to get these. this are made so much better then the whiteline ones that don't even fit in the socket.
80's Subaru 4WD Differential Pinion Mount Bushing, press bushing out melt out middle add SuperPro # SPF3005K with lots of grease and your done... last year I used a newer whiteline bushing from a impreza this year ill use the proper one. New oem subaru bolts and nuts are on back order still.
88 - 91 Subaru XT6 rear hubs 20MM sway bar, this was a tricky one had to cross reference Nolathane XT6/Vortex number to these proper bushings from SuperPro # SPF0361-20. Oem brackets bolts and nuts from Subaru
some people didn't get to see my Before & After pics, I had to get the ball rolling so I just got another spare set of XT6 5x100 rear set up in and this is what they look like from the wrecker's
STi 6mt Gear-linkage, Support Bar, Front Bush SuperPro # SPF2462K
80s Subaru Rear suspension mounts oem Subaru with SuperPro # SPF2755SK for the shock absorber's to give less movement in the control arm. you only need 4, I'm working on my next project car.
80's Subaru oem rear cross member bushing, this one is going to be tricky to upgrade. ill have to come up with something even cut the bushing mount out and weld up something to a newer style. I have a couple idea's in my head, but ill need to think of a good way to stiff this up. one idea is getting it made solid out of aluminium... there is also one more bushing in the rear cross member, it hasn't come in yet once I get that one to play with ill know where to start.
Thread Starter
Scooby Regular
Joined: Jun 2015
Posts: 99
Likes: 1
From: Canada
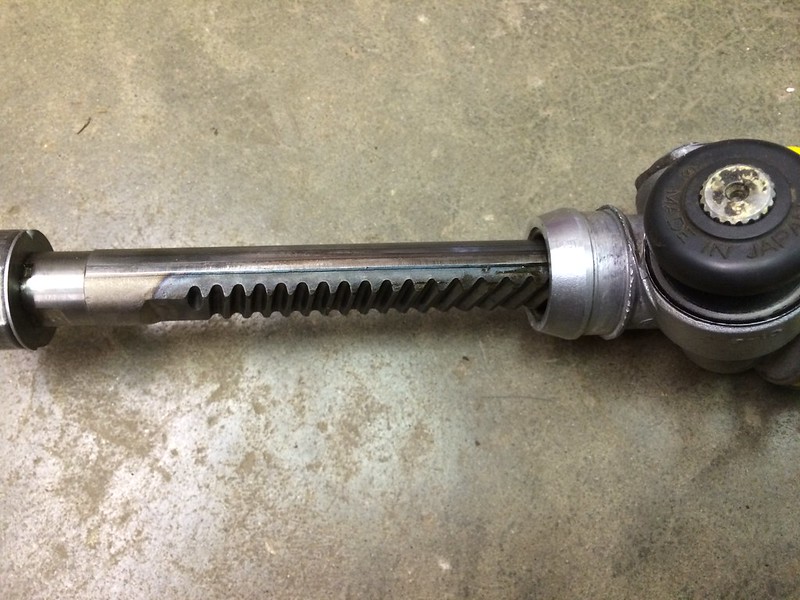
finally found one of these (really found 2 one for the spare build I got in the works). Manual steering rack OEM Subaru VGR ( variable gear ratio ) which means, less weight, less heat, less stress on the motor.
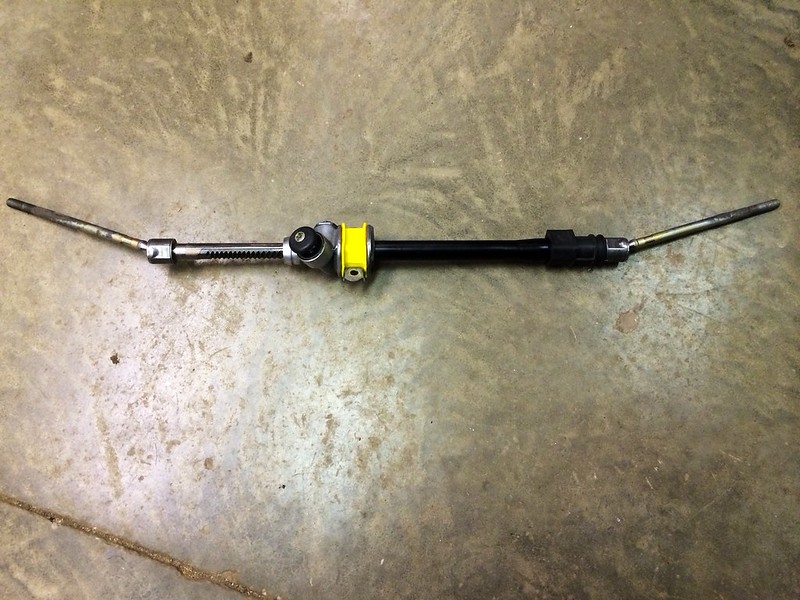
VGR teeth change
right from Japan antic vintage Subaru grill badges for my Leone and the keys also. I'd Like to thank Billy @JPNHunt for getting me this stuff !! great guy to deal with if anyone is wondering !!

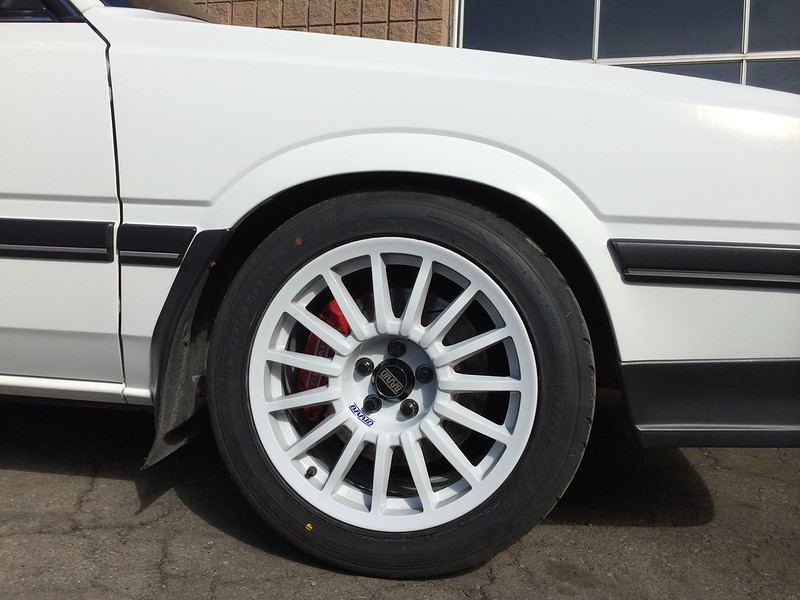
I didn't think they would fit, lots of late night number crunching worked.... 225/45/16 DUNLOP DIREZZA ZⅡ + 16x8 et45 Braid custom made rally wheels just for the perfect fit.
VGR teeth change
right from Japan antic vintage Subaru grill badges for my Leone and the keys also. I'd Like to thank Billy @JPNHunt for getting me this stuff !! great guy to deal with if anyone is wondering !!
I didn't think they would fit, lots of late night number crunching worked.... 225/45/16 DUNLOP DIREZZA ZⅡ + 16x8 et45 Braid custom made rally wheels just for the perfect fit.
Thread Starter
Scooby Regular
Joined: Jun 2015
Posts: 99
Likes: 1
From: Canada
well people have asked how did I bolt up the coil overs in the rear so easy. in the pictures you can see everything in order.
what kit I used is the HSD STi GRB 08-12 set up, what I keep from my Leone is the top mount bracket and spring perch cap. drill the same size hole as the washer from the HSD kit so the spring perch cap will go on.
then pop out the bushings & tube from the HSD GR STi stuff and use them on your new set up.
the only other thing is the lower mount on a GR STi has a 55mm wide bushing tube, you would need to cut it down to 45mm size to fit in the rear control arm lower. the bolt is the same 12mm size flange bolt so no need for a spacer in the bushing tube.
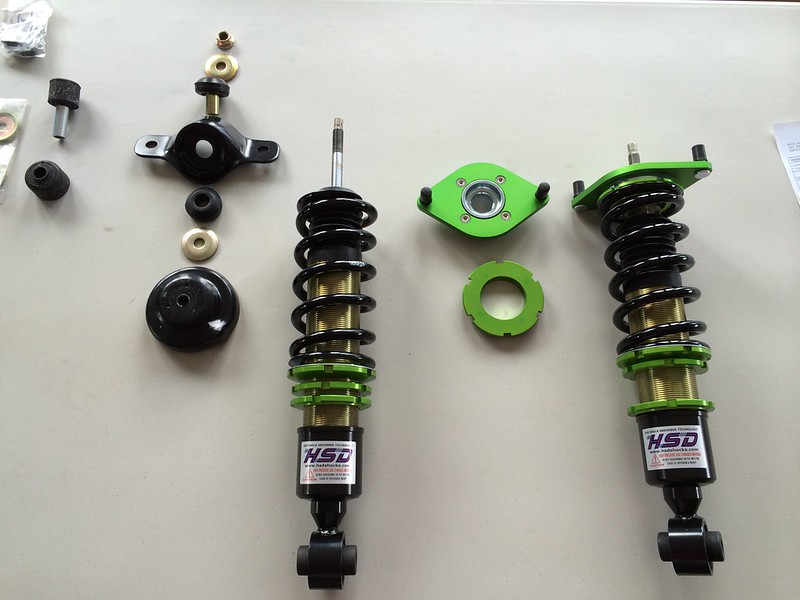
all put together

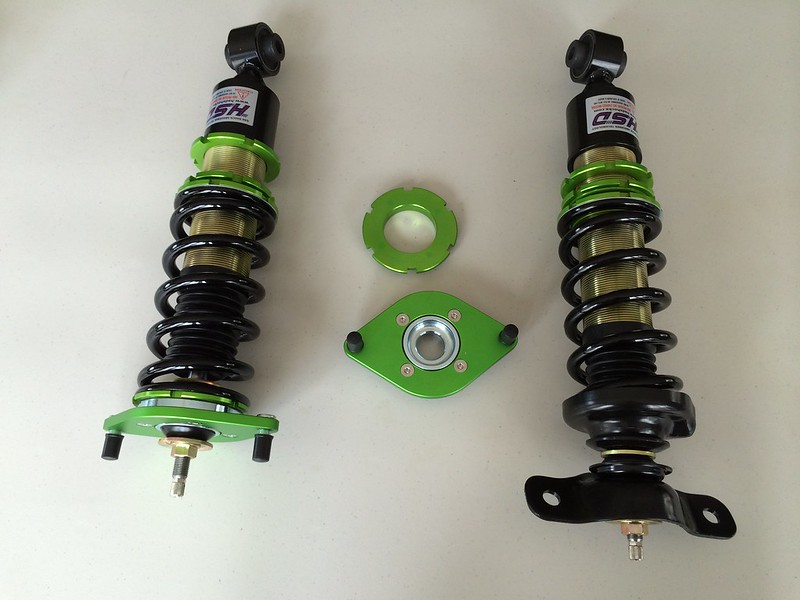
so if one is going to be buliding a Leone in the future the best kit to get would be the Subaru GRB STi 08-12 suspension kit. ohlins ? KW ? Bilstein ? future for me for sure 
the front you would need the GRB STi 08-12 knuckle with the bolt on bearing which is better they say for its bigger bearing, the top plate will not work unless you drill it out to match your car top mount pattern which is pretty much the same as a 1989-2001 Legacy impreza car pattern.
also the rear in the BRZ is the same as the GRB, the front is the same as a 1989-2001 impreza legacy but the shock is shorter but will work also with the non larger knuckles.
what kit I used is the HSD STi GRB 08-12 set up, what I keep from my Leone is the top mount bracket and spring perch cap. drill the same size hole as the washer from the HSD kit so the spring perch cap will go on.
then pop out the bushings & tube from the HSD GR STi stuff and use them on your new set up.
the only other thing is the lower mount on a GR STi has a 55mm wide bushing tube, you would need to cut it down to 45mm size to fit in the rear control arm lower. the bolt is the same 12mm size flange bolt so no need for a spacer in the bushing tube.
all put together
so if one is going to be buliding a Leone in the future the best kit to get would be the Subaru GRB STi 08-12 suspension kit. ohlins ? KW ? Bilstein ?
future for me for sure the front you would need the GRB STi 08-12 knuckle with the bolt on bearing which is better they say for its bigger bearing, the top plate will not work unless you drill it out to match your car top mount pattern which is pretty much the same as a 1989-2001 Legacy impreza car pattern.
also the rear in the BRZ is the same as the GRB, the front is the same as a 1989-2001 impreza legacy but the shock is shorter but will work also with the non larger knuckles.
Thread Starter
Scooby Regular
Joined: Jun 2015
Posts: 99
Likes: 1
From: Canada
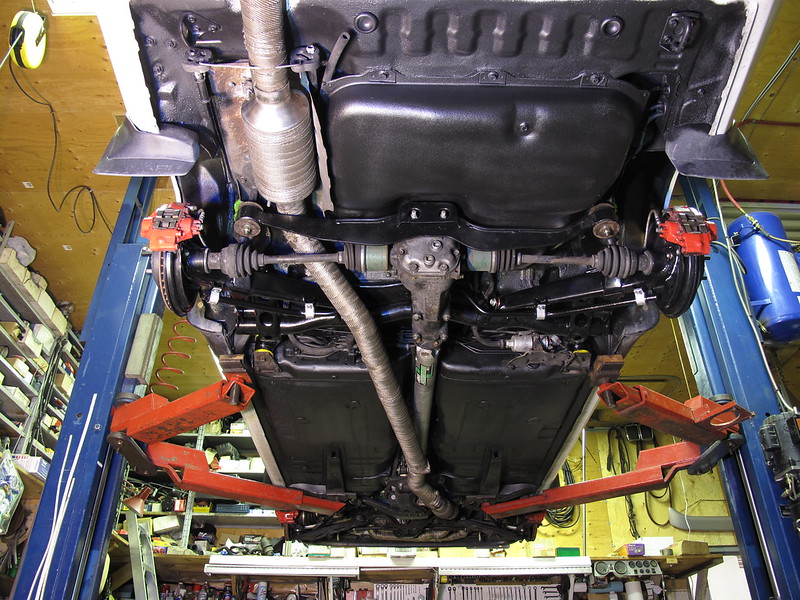
lots and lots of work went down so far, for the front I changed the rubbing in the pockets of the control arms which alone made the car feel amazing... I stripped everything out and under coated it all along with wrapping my exhaust well worth it all even though its a pain.
all the sand blasted powder coated stuff was add along with the upgraded bushings and oem subaru bolts.
the only thing missing now is the front GR sti knuckle bearings, the sti sealed bearings are being made into 5x100 from 5x114 thanks to my good friend that owns a machine shop
super rare no longer made front bumper clips got made from a 3D printer collage kid which made them so good there better then the real ones.. he used some hard plastic and chemical to harden the clips so they last long.

looks amazing now with the second trim on the top of the bumper very happy now.
with all the new bushings repaired shocks & fixed cross member, it feels amazing drives like its on rails ! point and shoot now feel ! ... I still need a corner balance & alignment done so it will only get much better.
straight from japan !! this is the holy grail of part numbers for my car. with this book and part numbers all I can say is WOW WOW..... there is a boat all read in bound from japan to canada with my new parts on it like the JDM skirt kit, the jdm air dam along with much much more things for this car and my other build the Leone Wagon.

all the sand blasted powder coated stuff was add along with the upgraded bushings and oem subaru bolts.
the only thing missing now is the front GR sti knuckle bearings, the sti sealed bearings are being made into 5x100 from 5x114 thanks to my good friend that owns a machine shop
super rare no longer made front bumper clips got made from a 3D printer collage kid which made them so good there better then the real ones.. he used some hard plastic and chemical to harden the clips so they last long.
looks amazing now with the second trim on the top of the bumper very happy now.
with all the new bushings repaired shocks & fixed cross member, it feels amazing drives like its on rails ! point and shoot now feel ! ... I still need a corner balance & alignment done so it will only get much better.
straight from japan !! this is the holy grail of part numbers for my car. with this book and part numbers all I can say is WOW WOW..... there is a boat all read in bound from japan to canada with my new parts on it like the JDM skirt kit, the jdm air dam along with much much more things for this car and my other build the Leone Wagon.
Thread Starter
Scooby Regular
Joined: Jun 2015
Posts: 99
Likes: 1
From: Canada
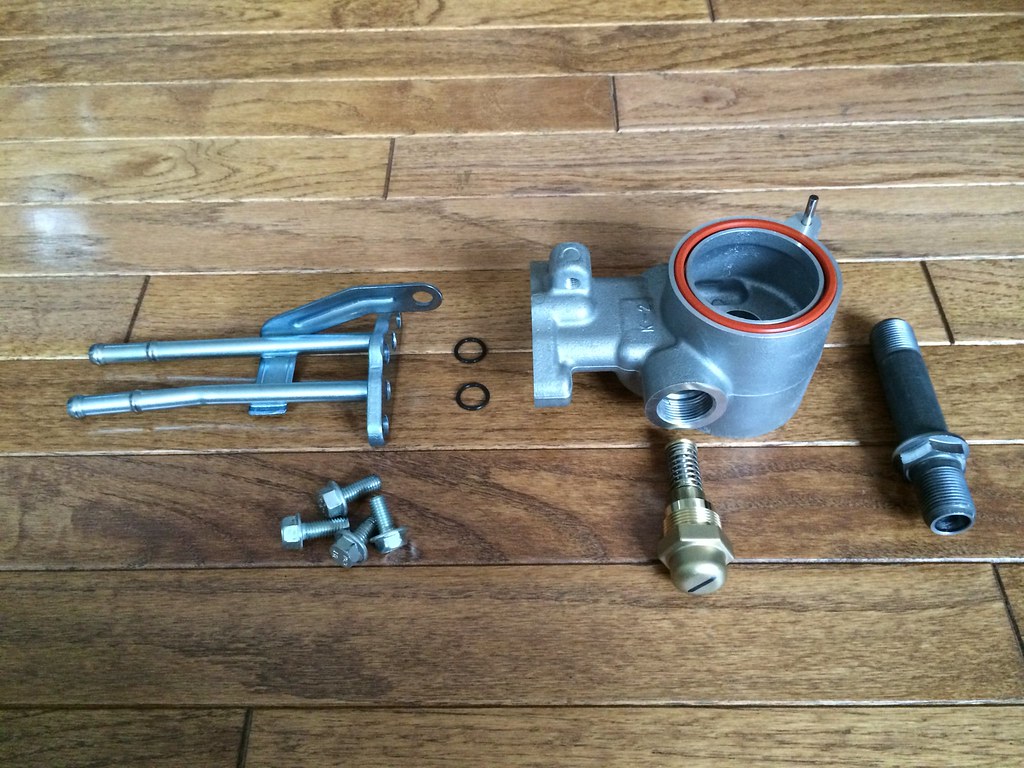
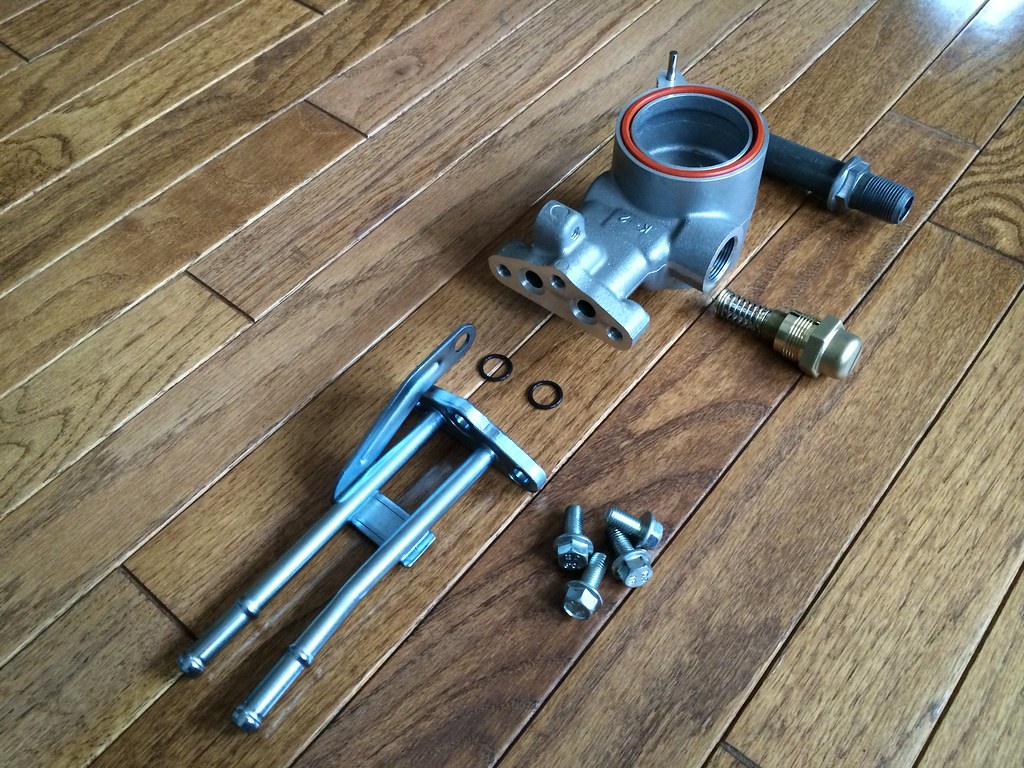
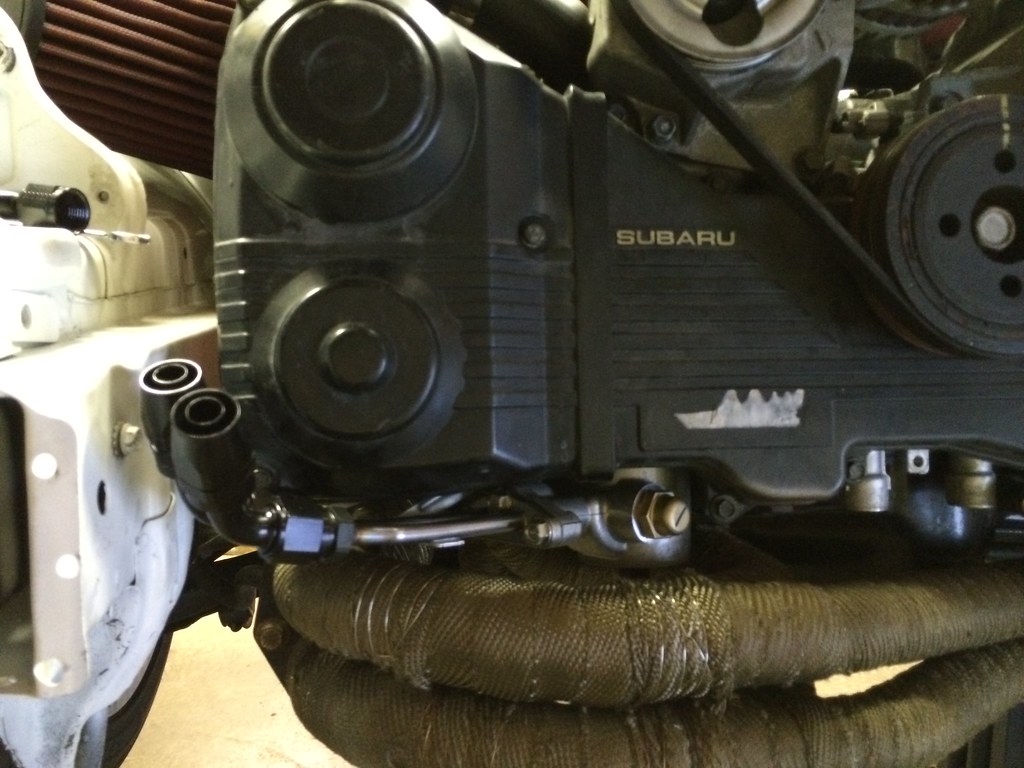
aeroquip hose fittings and line for the jdm Spec-C oil cooler
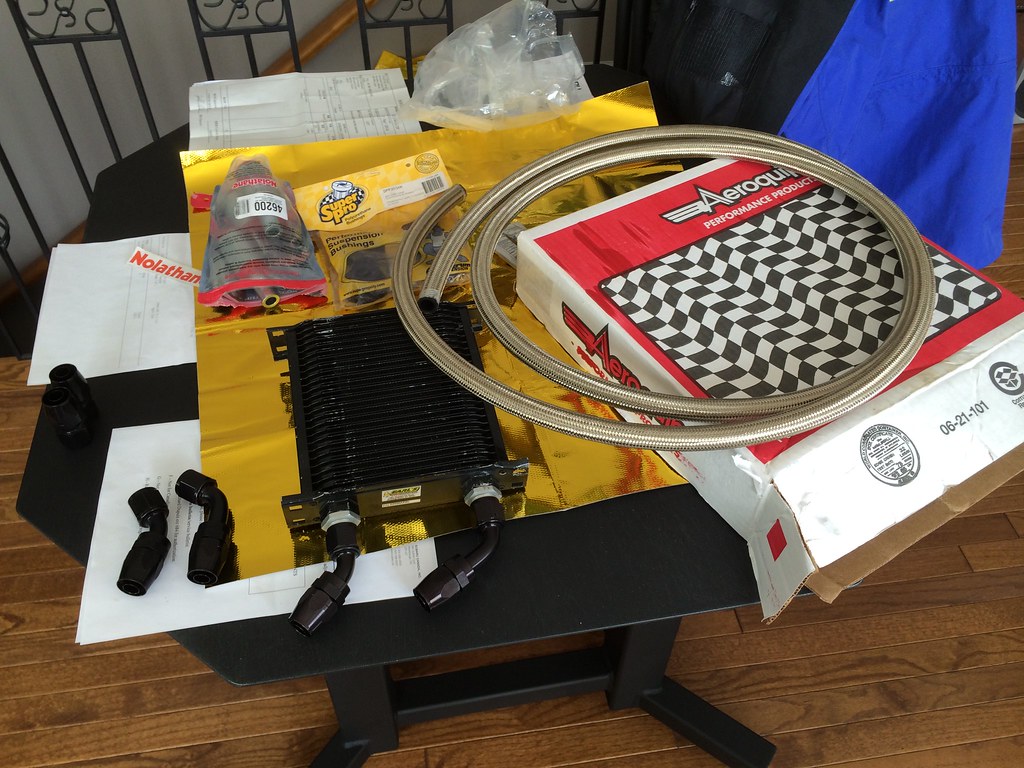
got my arp studs in the xt6 hubs
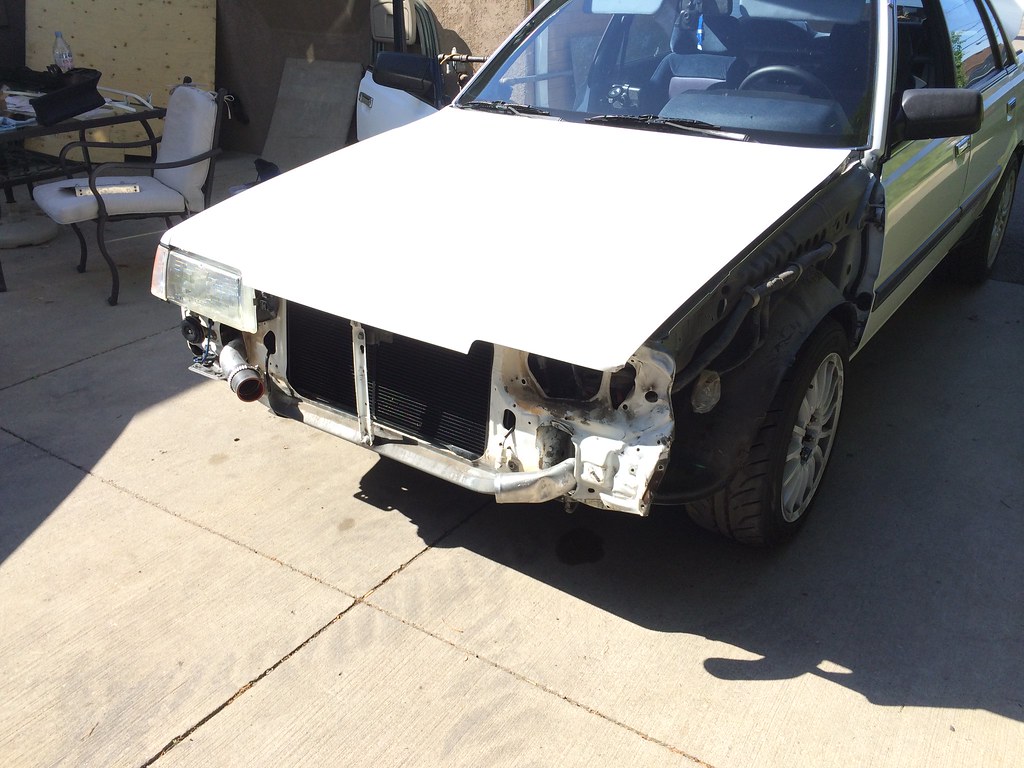
June 1... and then the virgin Leone meets a guard rail while saving my driving license & insurance hike

time to rebuild with all new factory oem parts that are getting hard to find For REAL !
cut the front rad support off not it will be bolt on for that quick release motor swaps lol
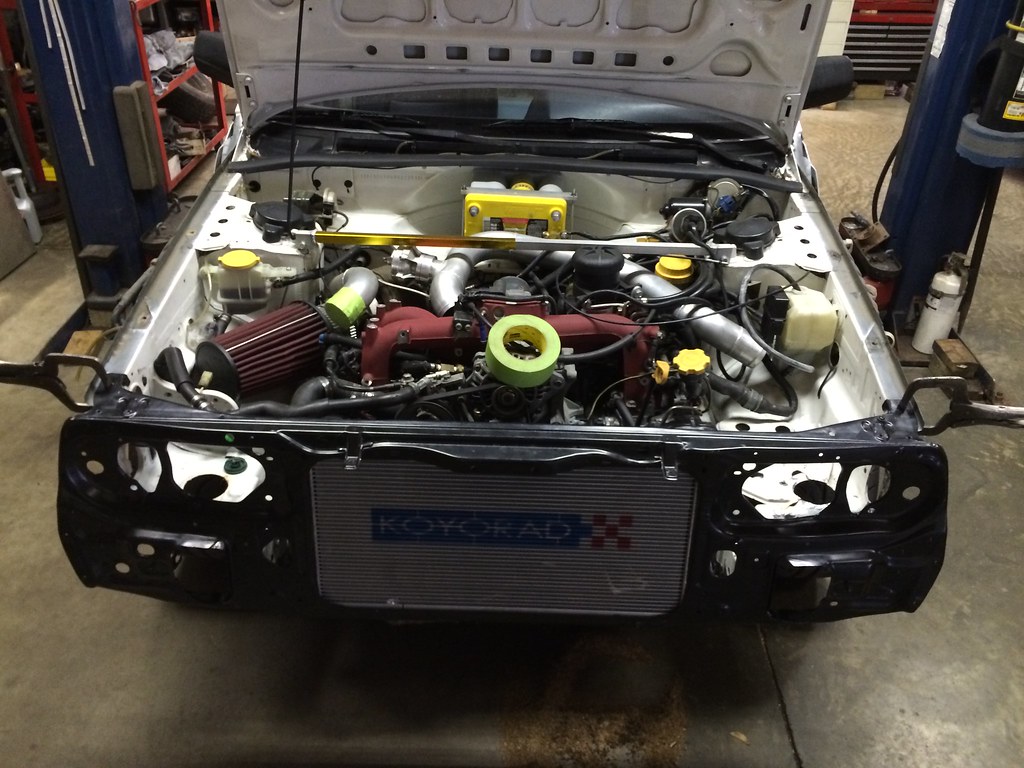
got around to adding the BRZ koyo rad OEM subaru rad support new
test fit and drilling holes for bolt on action
jdm Spec-C cooler ready ! Franz welded my AN fittings for me
powder coated and bolted up all stainless steel bolts where all the spot welds where with oil cooler

everything lines up and my spare bumper beam sand blasted and powder coated also

brz filler neck and radiator cap fits nice
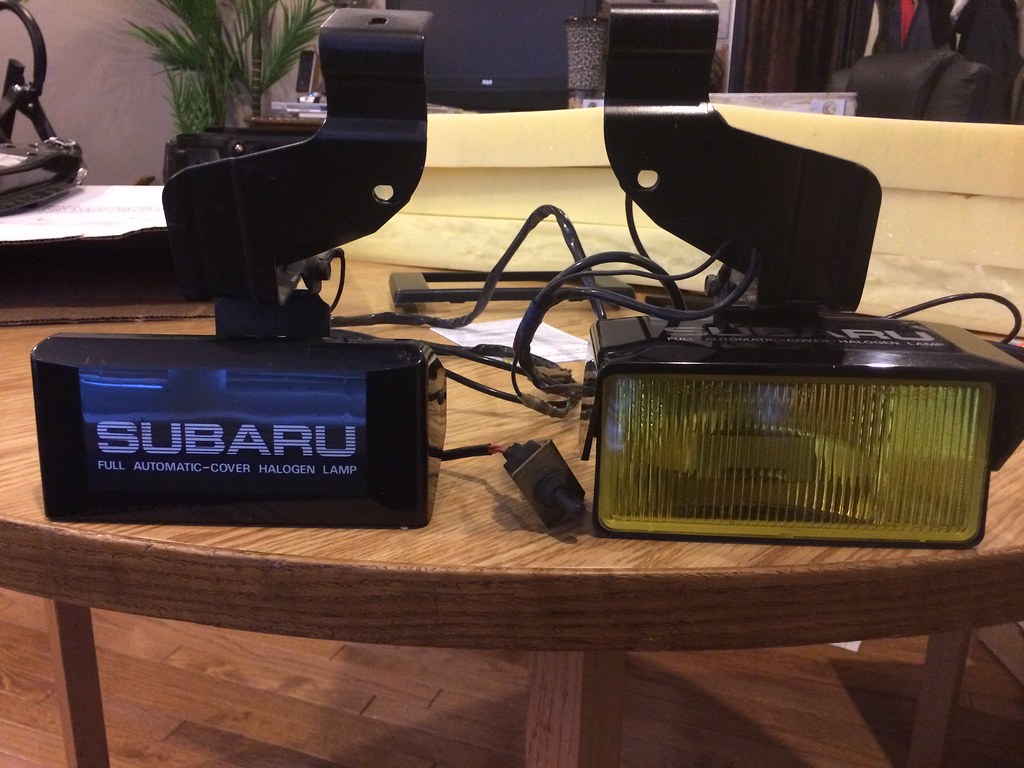
and some jdm Leone goods, the fogs with power flip the covers on there own lol pretty slick 80s subaru stuff
strip down ready for the paint job

single stage white BASF Glasurit single stage paint like the factory did
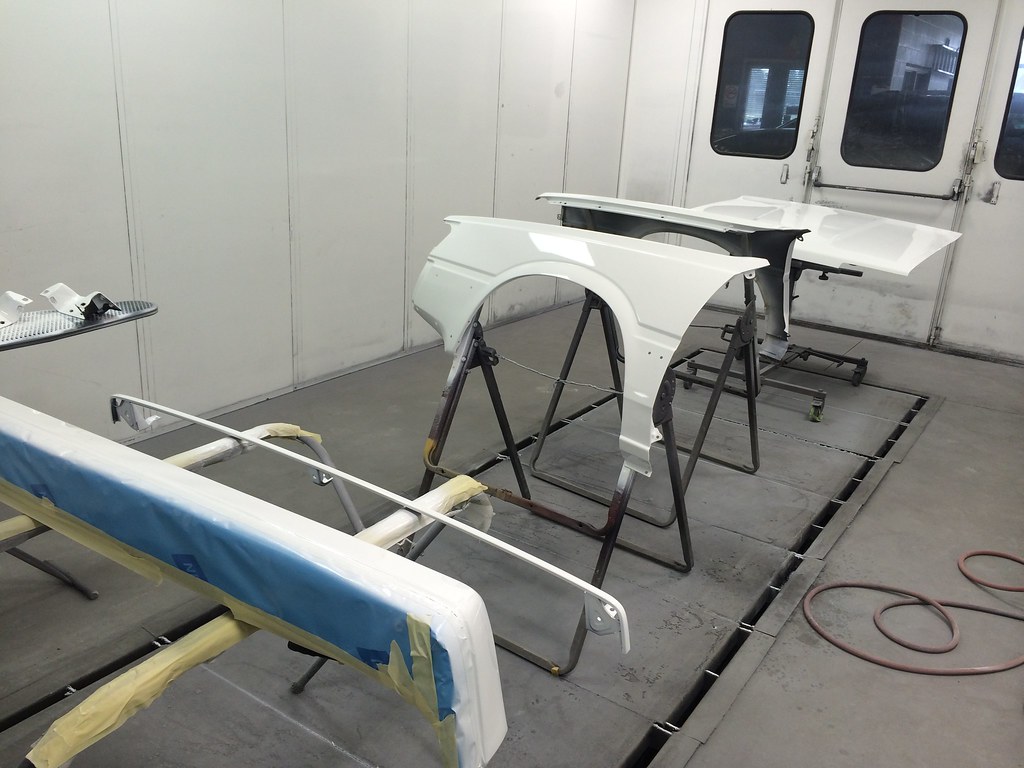
$o $hiny and new !.. wow was my factory paint so dull
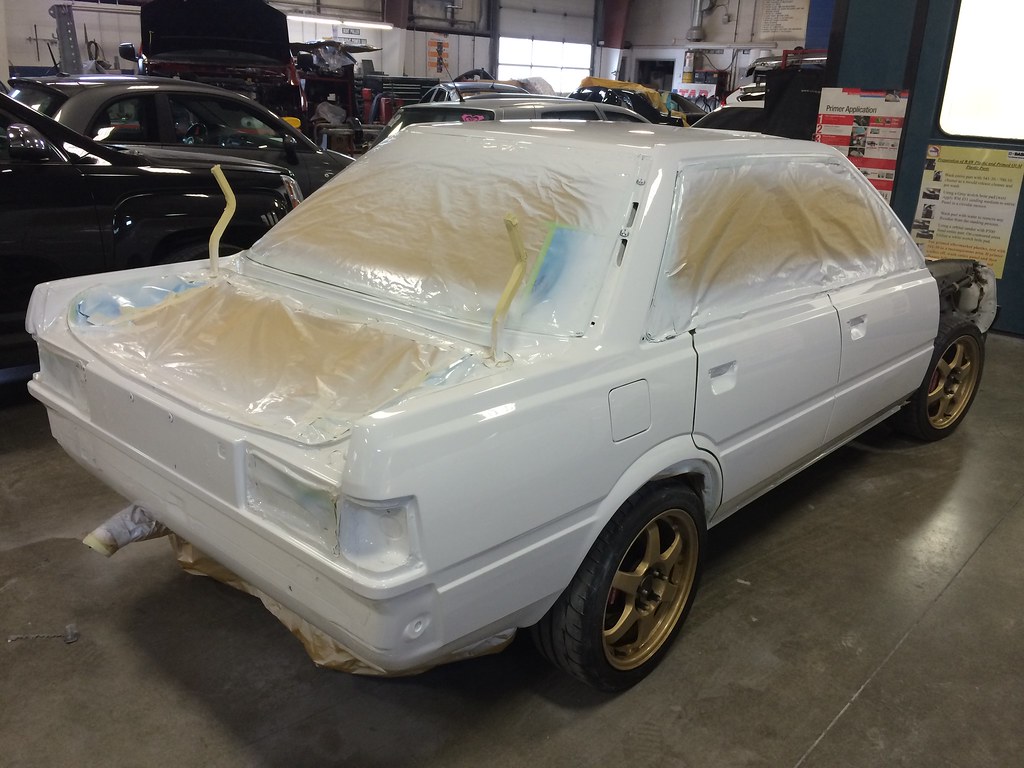
more brand new everything from the dealership oem, shiny paint needs new stickers and symbols
home sweet home ready for me to put her back together again

all most done

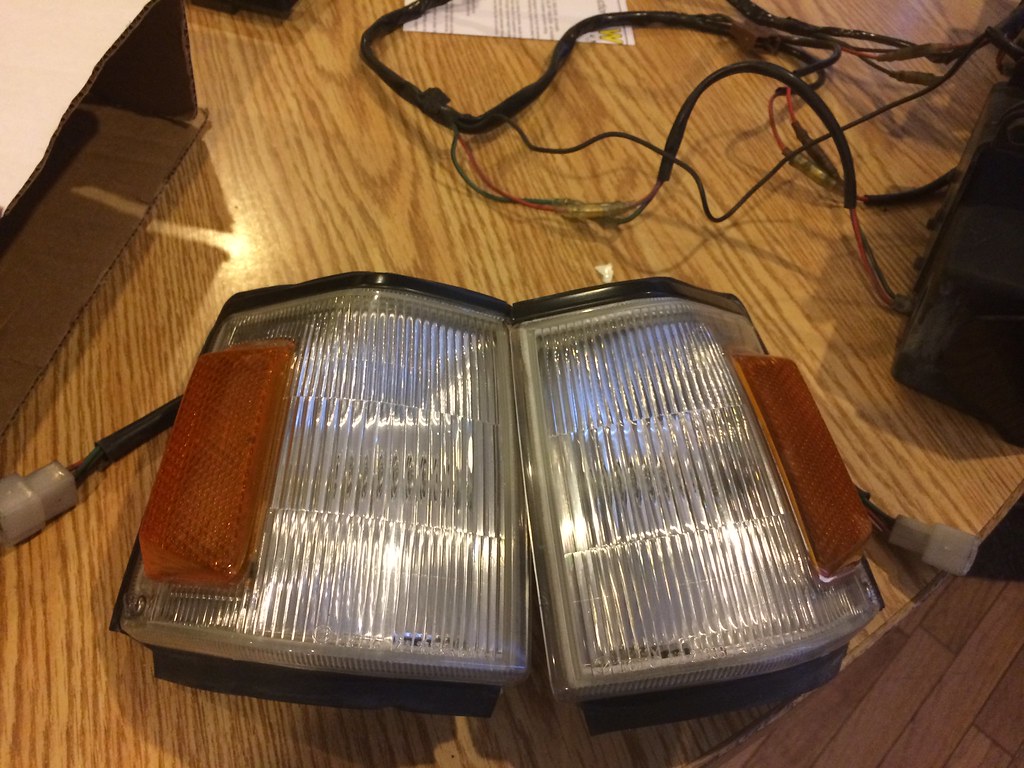
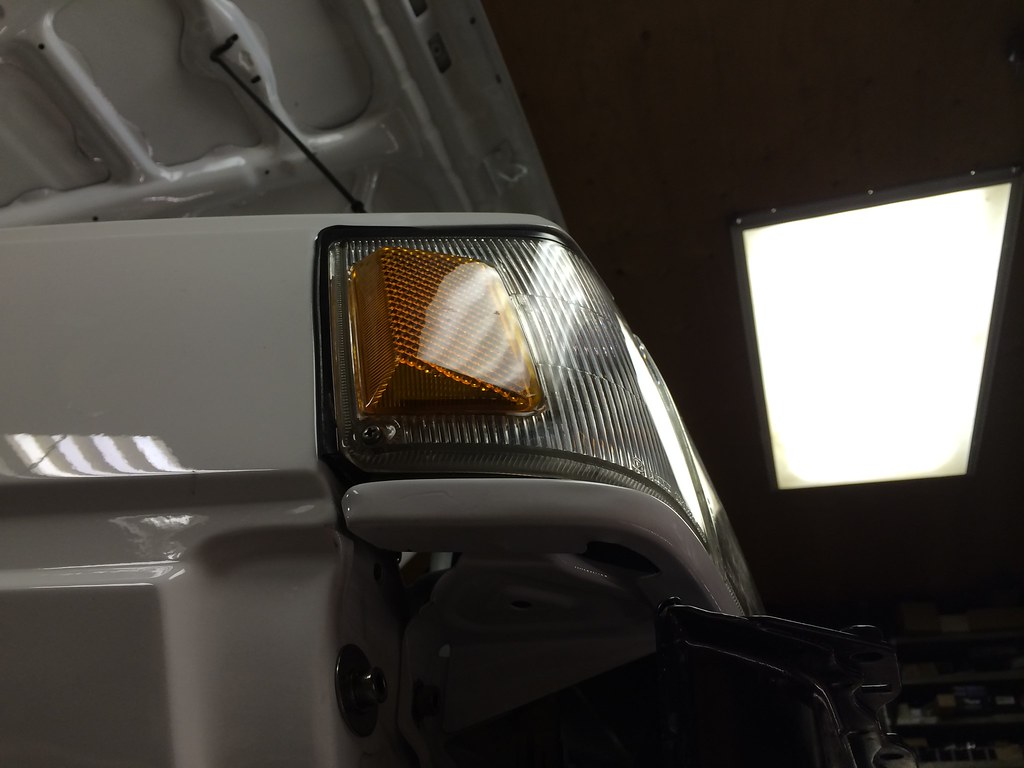
jdm 3D corner lights sick
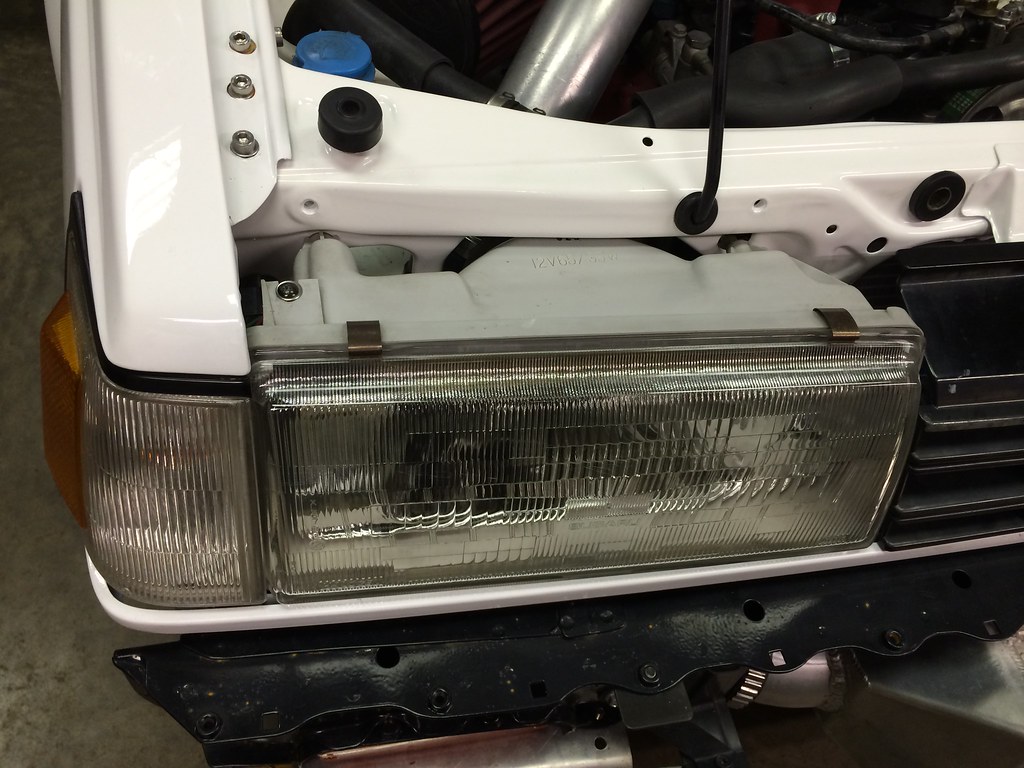
jdm SUPER light weight head lights with H4 bulb's
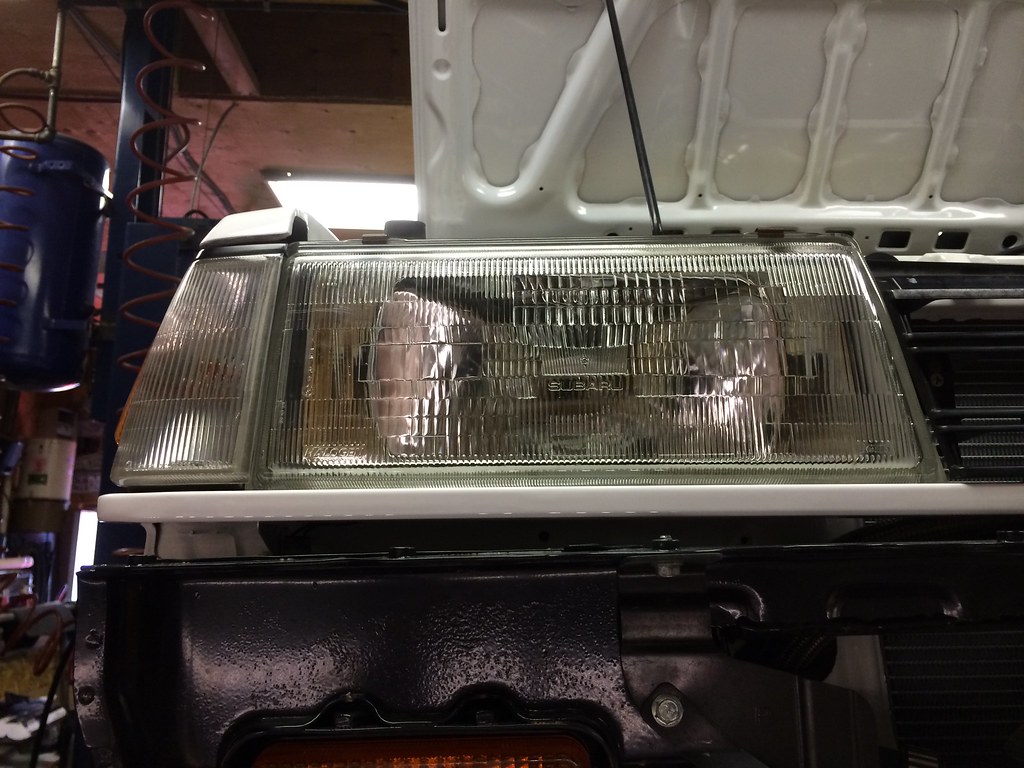
jdm lights dont blind on coming traffic these are also used in europe so beam pattern is straight on a wall with no cut lines pretty cool
black stuff all back on door moldings mud flaps and lower air spoiler..
lost two moldings for front fender, new ones on the way
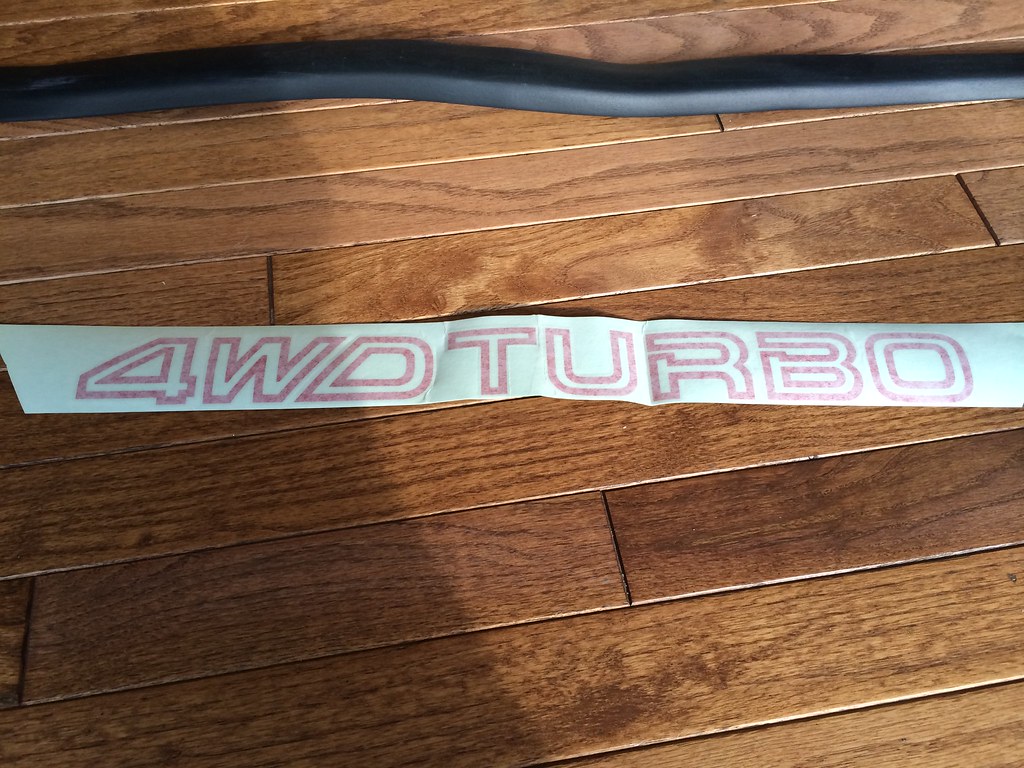
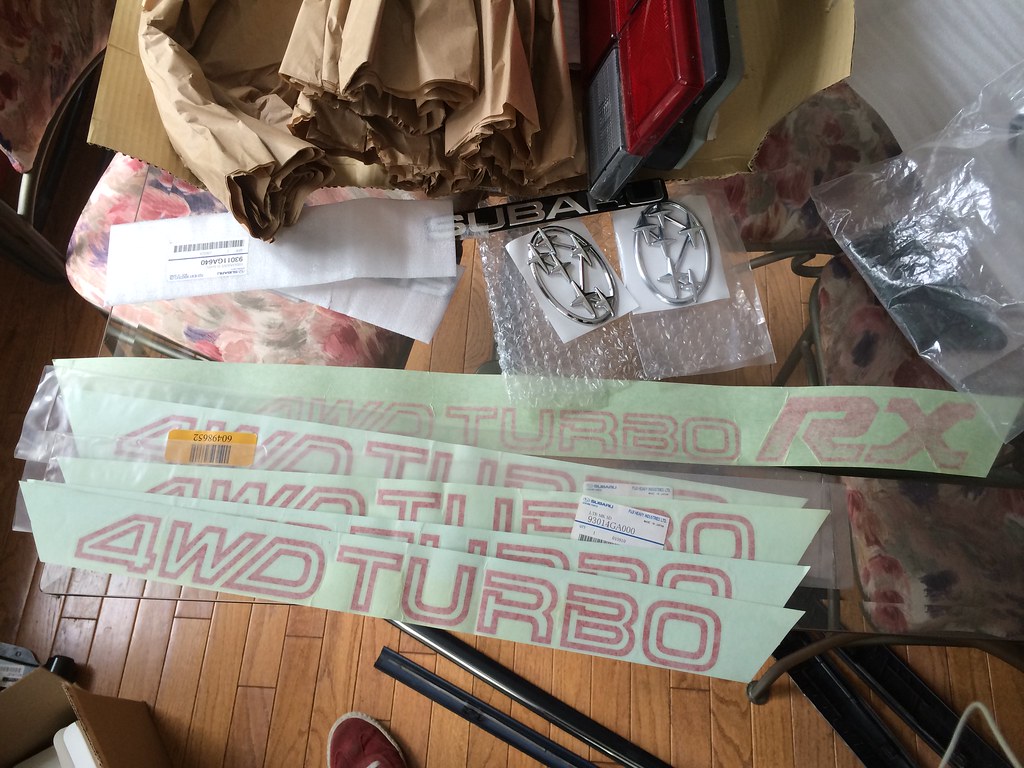
new oem turbo stickers and jdm Leone tail lights
had to add 4WD in my TURBO lol.. started life as FWD now its a real subaru
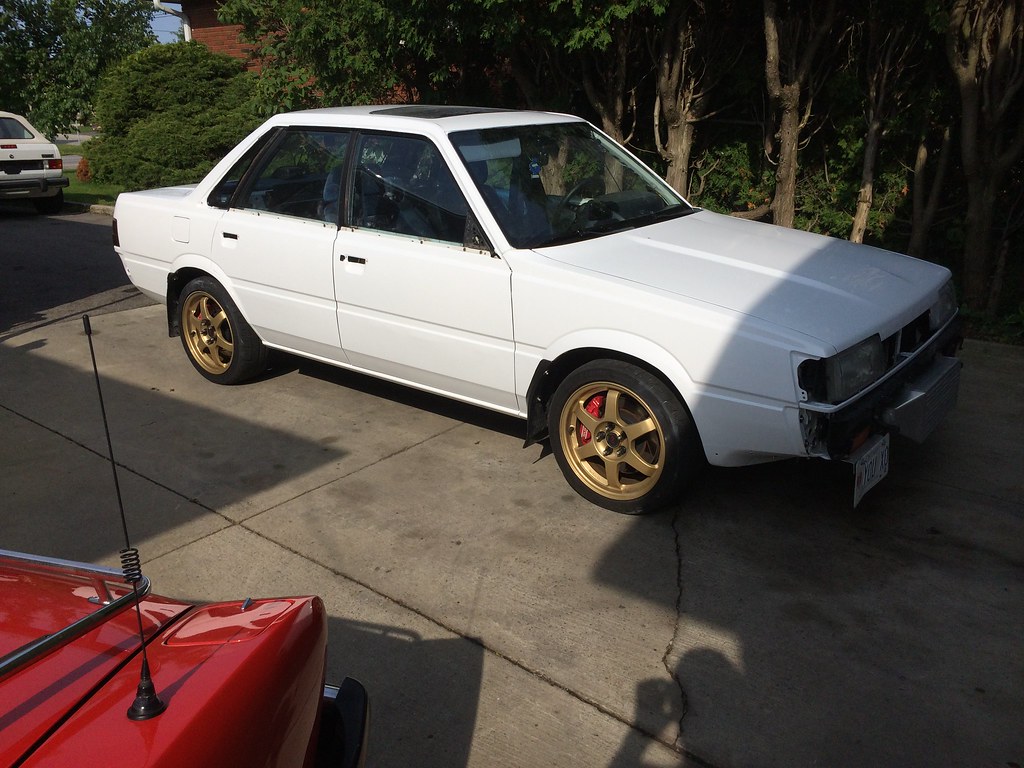
all updated and still got small things to add again, trim parts around the windows and front bumper cover.
got my arp studs in the xt6 hubs
June 1... and then the virgin Leone meets a guard rail while saving my driving license & insurance hike
time to rebuild with all new factory oem parts that are getting hard to find For REAL !
cut the front rad support off not it will be bolt on for that quick release motor swaps lol
got around to adding the BRZ koyo rad OEM subaru rad support new
test fit and drilling holes for bolt on action
jdm Spec-C cooler ready ! Franz welded my AN fittings for me
powder coated and bolted up all stainless steel bolts where all the spot welds where with oil cooler
everything lines up and my spare bumper beam sand blasted and powder coated also
brz filler neck and radiator cap fits nice
and some jdm Leone goods, the fogs with power flip the covers on there own lol pretty slick 80s subaru stuff
strip down ready for the paint job
single stage white BASF Glasurit single stage paint like the factory did
$o $hiny and new !.. wow was my factory paint so dull
more brand new everything from the dealership oem, shiny paint needs new stickers and symbols
home sweet home ready for me to put her back together again
all most done
jdm 3D corner lights sick
jdm SUPER light weight head lights with H4 bulb's
jdm lights dont blind on coming traffic these are also used in europe so beam pattern is straight on a wall with no cut lines pretty cool
black stuff all back on door moldings mud flaps and lower air spoiler..
lost two moldings for front fender, new ones on the way
new oem turbo stickers and jdm Leone tail lights
had to add 4WD in my TURBO lol.. started life as FWD now its a real subaru
all updated and still got small things to add again, trim parts around the windows and front bumper cover.
Thread Starter
Scooby Regular
Joined: Jun 2015
Posts: 99
Likes: 1
From: Canada
so decided to improve the handling of the car a bit better and I noticed the 2015 uses rear spherical bearings. I had a machine shop shave them down each side 1.5mm and made a spacer to take up the slack for pressing them in my lower suspension mount in the rear of my coil overs
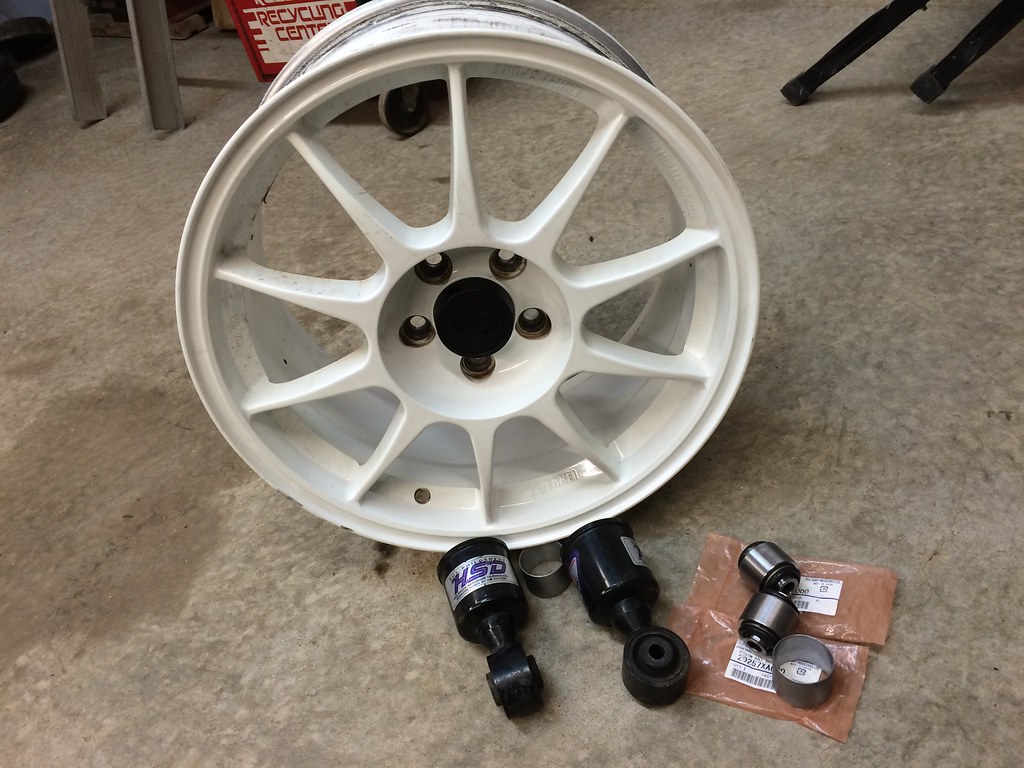
locally I found a nice set of ES-Tarmac ENKEI wheels 5x100 16x8 et45 14lbs wheels, super light weight compared to my braid wheels
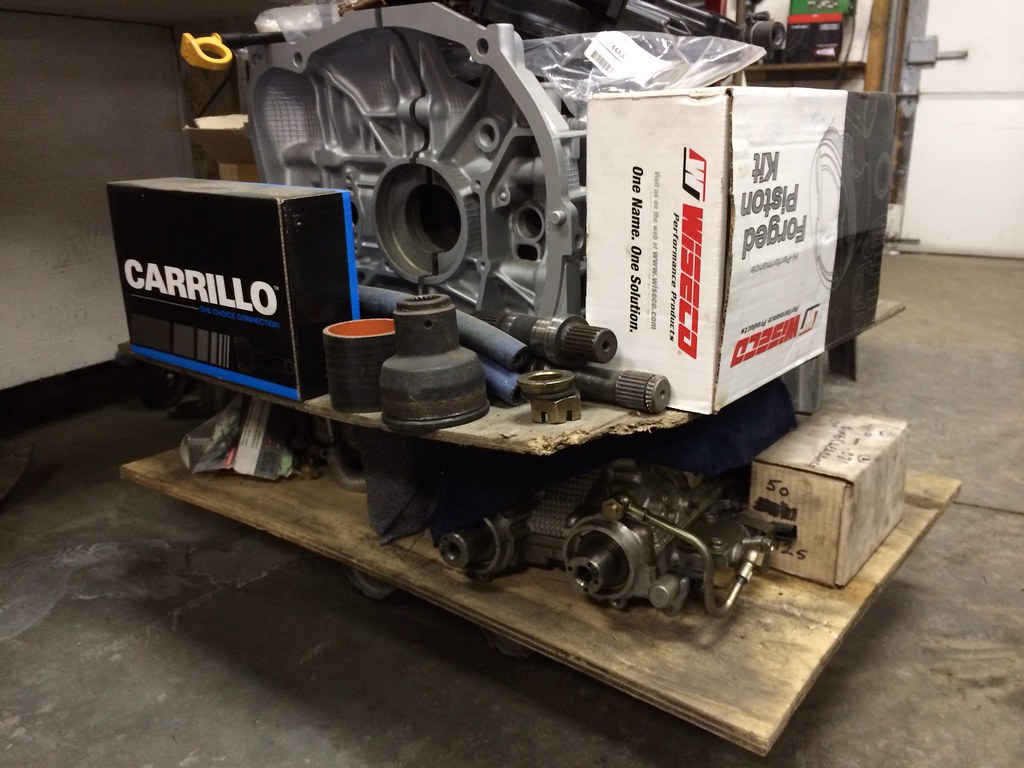
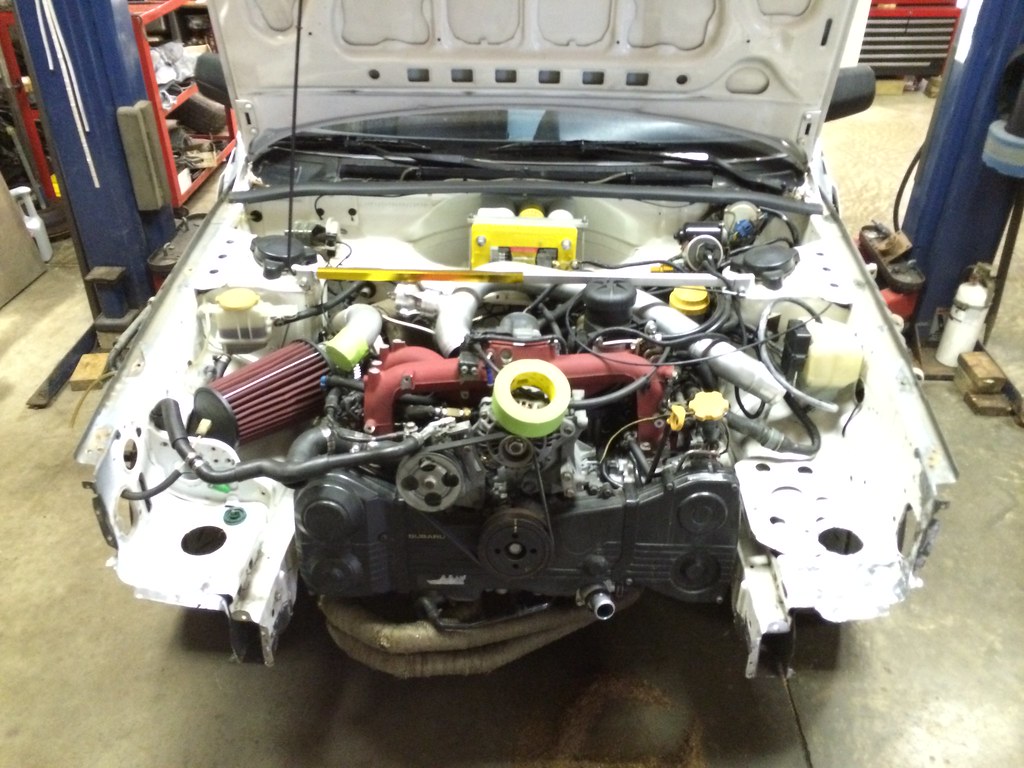
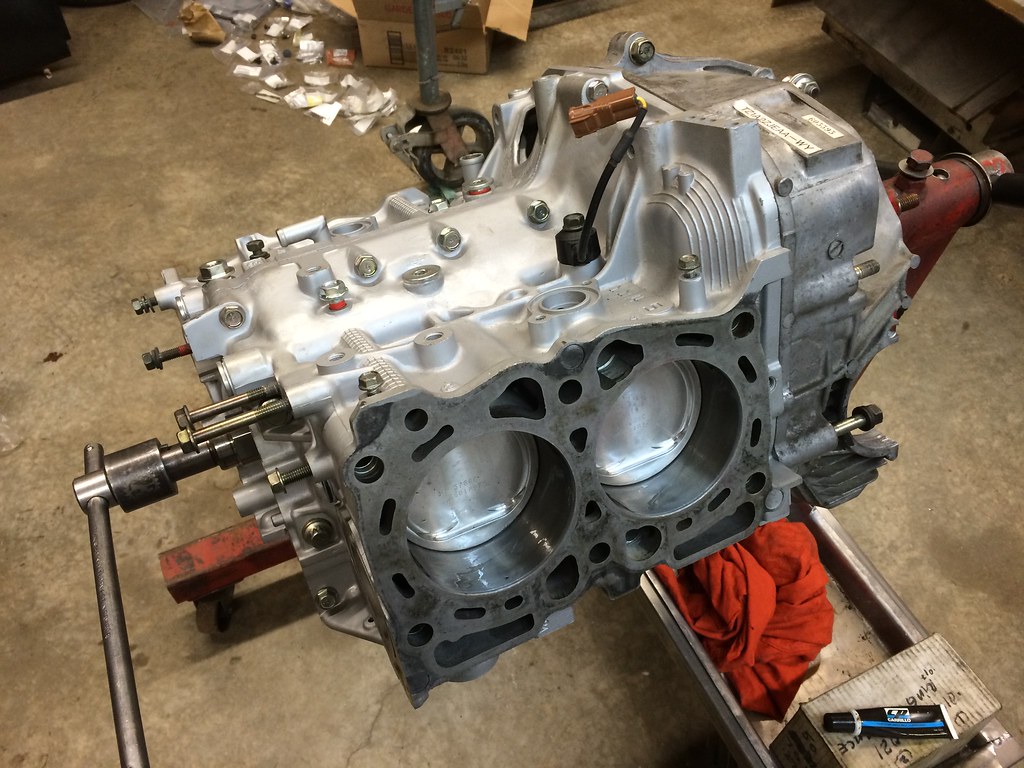
started to build the spare motor, Ej22T stock crank, 10mm oil pump, ACL bearings, Carrillo Rods, Wiseco pistons, cometic head gaskets, ARP Custom Age 625+, V9 STi heads, killer b pick up, and allot of new factory case bolts and plugs gaskets
locally I found a nice set of ES-Tarmac ENKEI wheels 5x100 16x8 et45 14lbs wheels, super light weight compared to my braid wheels
started to build the spare motor, Ej22T stock crank, 10mm oil pump, ACL bearings, Carrillo Rods, Wiseco pistons, cometic head gaskets, ARP Custom Age 625+, V9 STi heads, killer b pick up, and allot of new factory case bolts and plugs gaskets
Thread Starter
Scooby Regular
Joined: Jun 2015
Posts: 99
Likes: 1
From: Canada
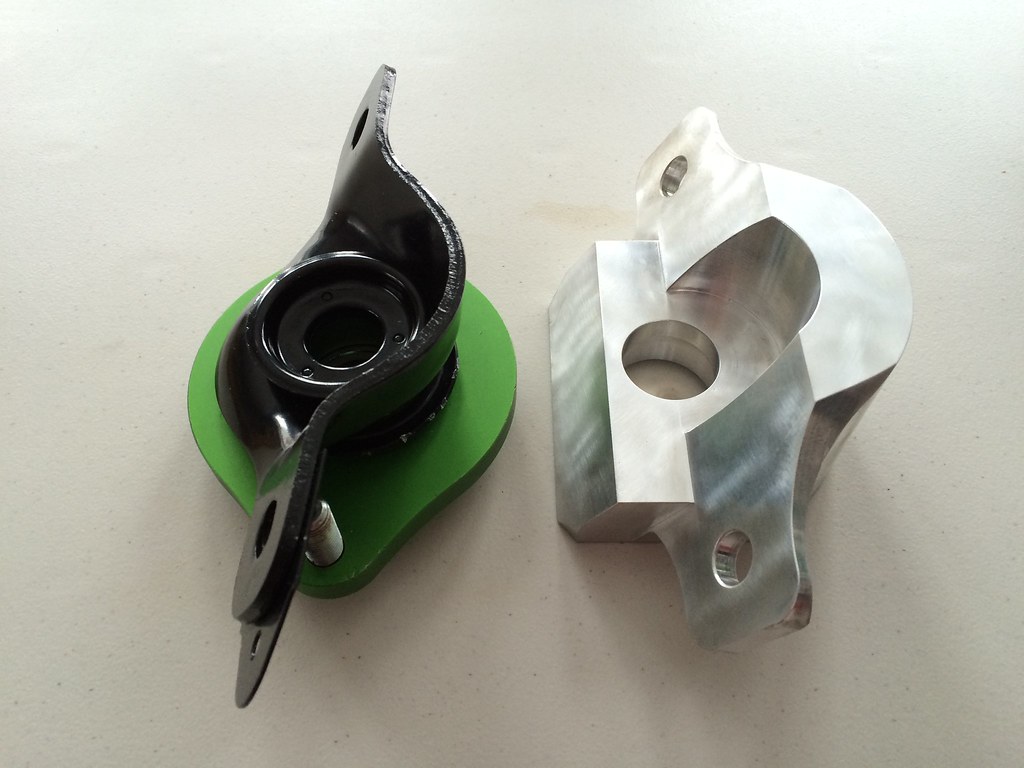
so this is what else I'm working on at the moment along with the lower pillow ball bushing for my coil overs, I decided to get a one piece unit made so I can get rid of the rubber spacers and all that mess..
this is a prototype unit to test on the car then i can get them made up once it fits ok.
black is 80s strut mount, green is coil over mount.. needs a bit more work to be perfect fit


also found the rear garnish in japan for my car, maybe ill put it on. to many holes to drill in a clean car.
this is a prototype unit to test on the car then i can get them made up once it fits ok.
black is 80s strut mount, green is coil over mount.. needs a bit more work to be perfect fit
also found the rear garnish in japan for my car, maybe ill put it on. to many holes to drill in a clean car.
Thread Starter
Scooby Regular
Joined: Jun 2015
Posts: 99
Likes: 1
From: Canada
subaru 80's old meets subaru 2012 new moulded into one...
cnc billet aluminium & anodized black, now I can add a pillow ball at the top mount like the front..


next project is cnc billet aluminium front control arms with pillow ball and 1' longer so I can get some larger cv axles to with stand the abuse I am about to put down. cv axles will be new age subaru length.
cnc billet aluminium & anodized black, now I can add a pillow ball at the top mount like the front..
next project is cnc billet aluminium front control arms with pillow ball and 1' longer so I can get some larger cv axles to with stand the abuse I am about to put down. cv axles will be new age subaru length.
Thread Starter
Scooby Regular
Joined: Jun 2015
Posts: 99
Likes: 1
From: Canada
so this is my rear top hats bolted up with spherical bearings.. the lower cups also have 2015 STi spherical bearings made buy subaru which I needed to make a spacer.
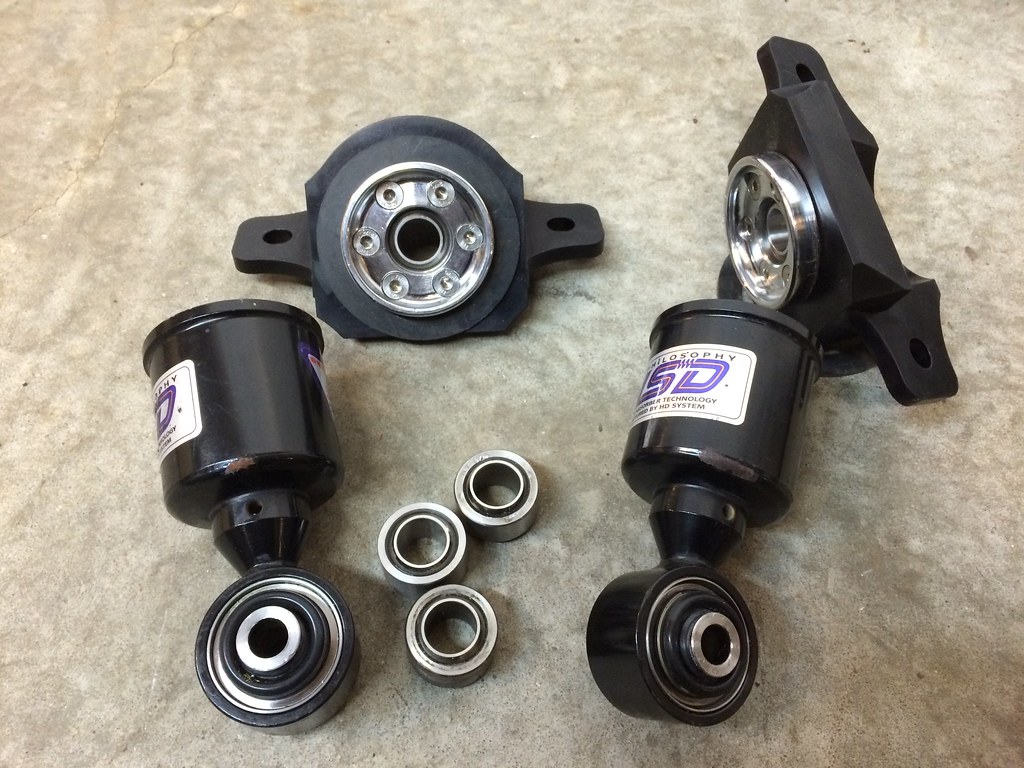
I decide to get serious with my coil-overs to make this car handle like a top notch missile and I got the GR STi Ohlins road & track set.. I have to do two mod's to make them fit perfect which is the lower rear bushing mount will be made new with a STi spherical bearing and drill the front top plates to early subaru size like leone/gc8. my reactions from just holding the ohlins is how light weight they are WOW half the weight of my hsd..
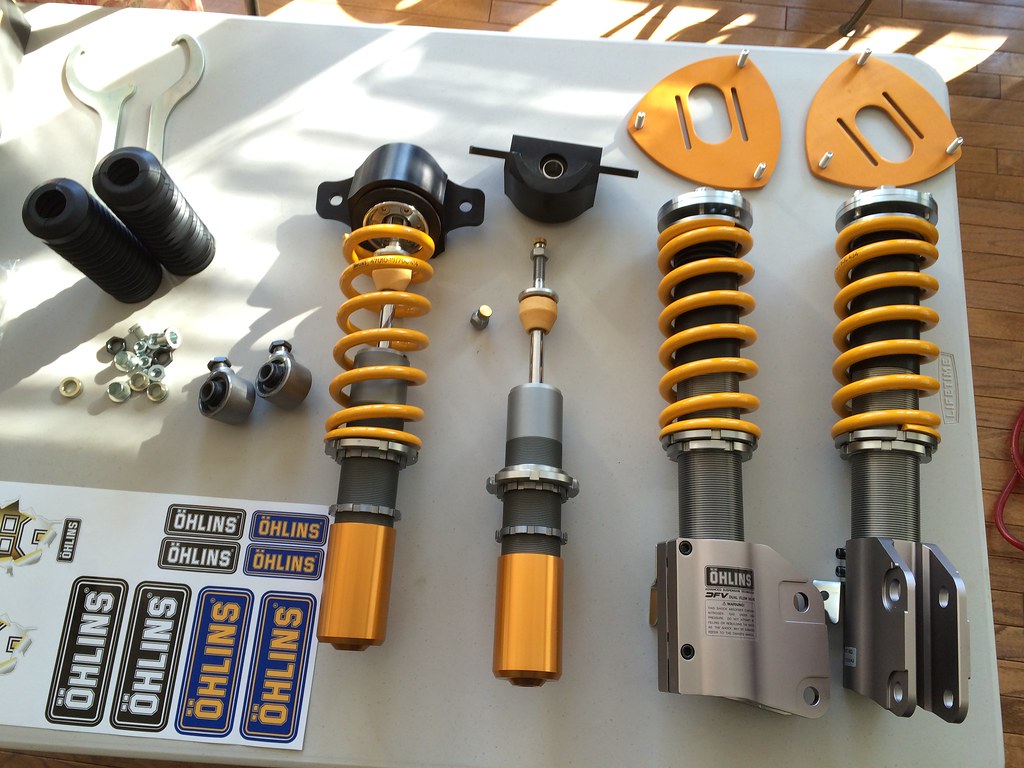
like to thank jake @ ohlins usa for hooking me up with the extend clickers also !.. there on the way.
I decide to get serious with my coil-overs to make this car handle like a top notch missile and I got the GR STi Ohlins road & track set.. I have to do two mod's to make them fit perfect which is the lower rear bushing mount will be made new with a STi spherical bearing and drill the front top plates to early subaru size like leone/gc8. my reactions from just holding the ohlins is how light weight they are WOW half the weight of my hsd..
like to thank jake @ ohlins usa for hooking me up with the extend clickers also !.. there on the way.
Thread Starter
Scooby Regular
Joined: Jun 2015
Posts: 99
Likes: 1
From: Canada
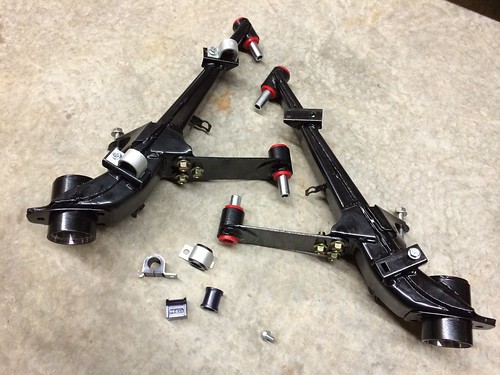
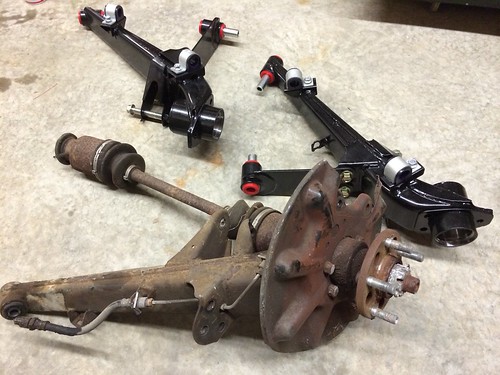
so here they are, my very own aluminium control arms like the big boy STi have. now the little Leone can be up to STi spec !
But the little Leone has 1up on the STi with the 2015 STi oem pillow ball bushing in its place
25mm longer so now I can run oem cv axles from a STi or those 800hp ones..


But the little Leone has 1up on the STi with the 2015 STi oem pillow ball bushing in its place
25mm longer so now I can run oem cv axles from a STi or those 800hp ones..