The Four and the Rotary
 14 November 2014, 10:13 AM
#121
Scooby Regular
Thread Starter

Thanks guys. Comments are always very welcomed.
Been tucking into the 'boring' behind the scenes bits. Wiring, running lines etc.
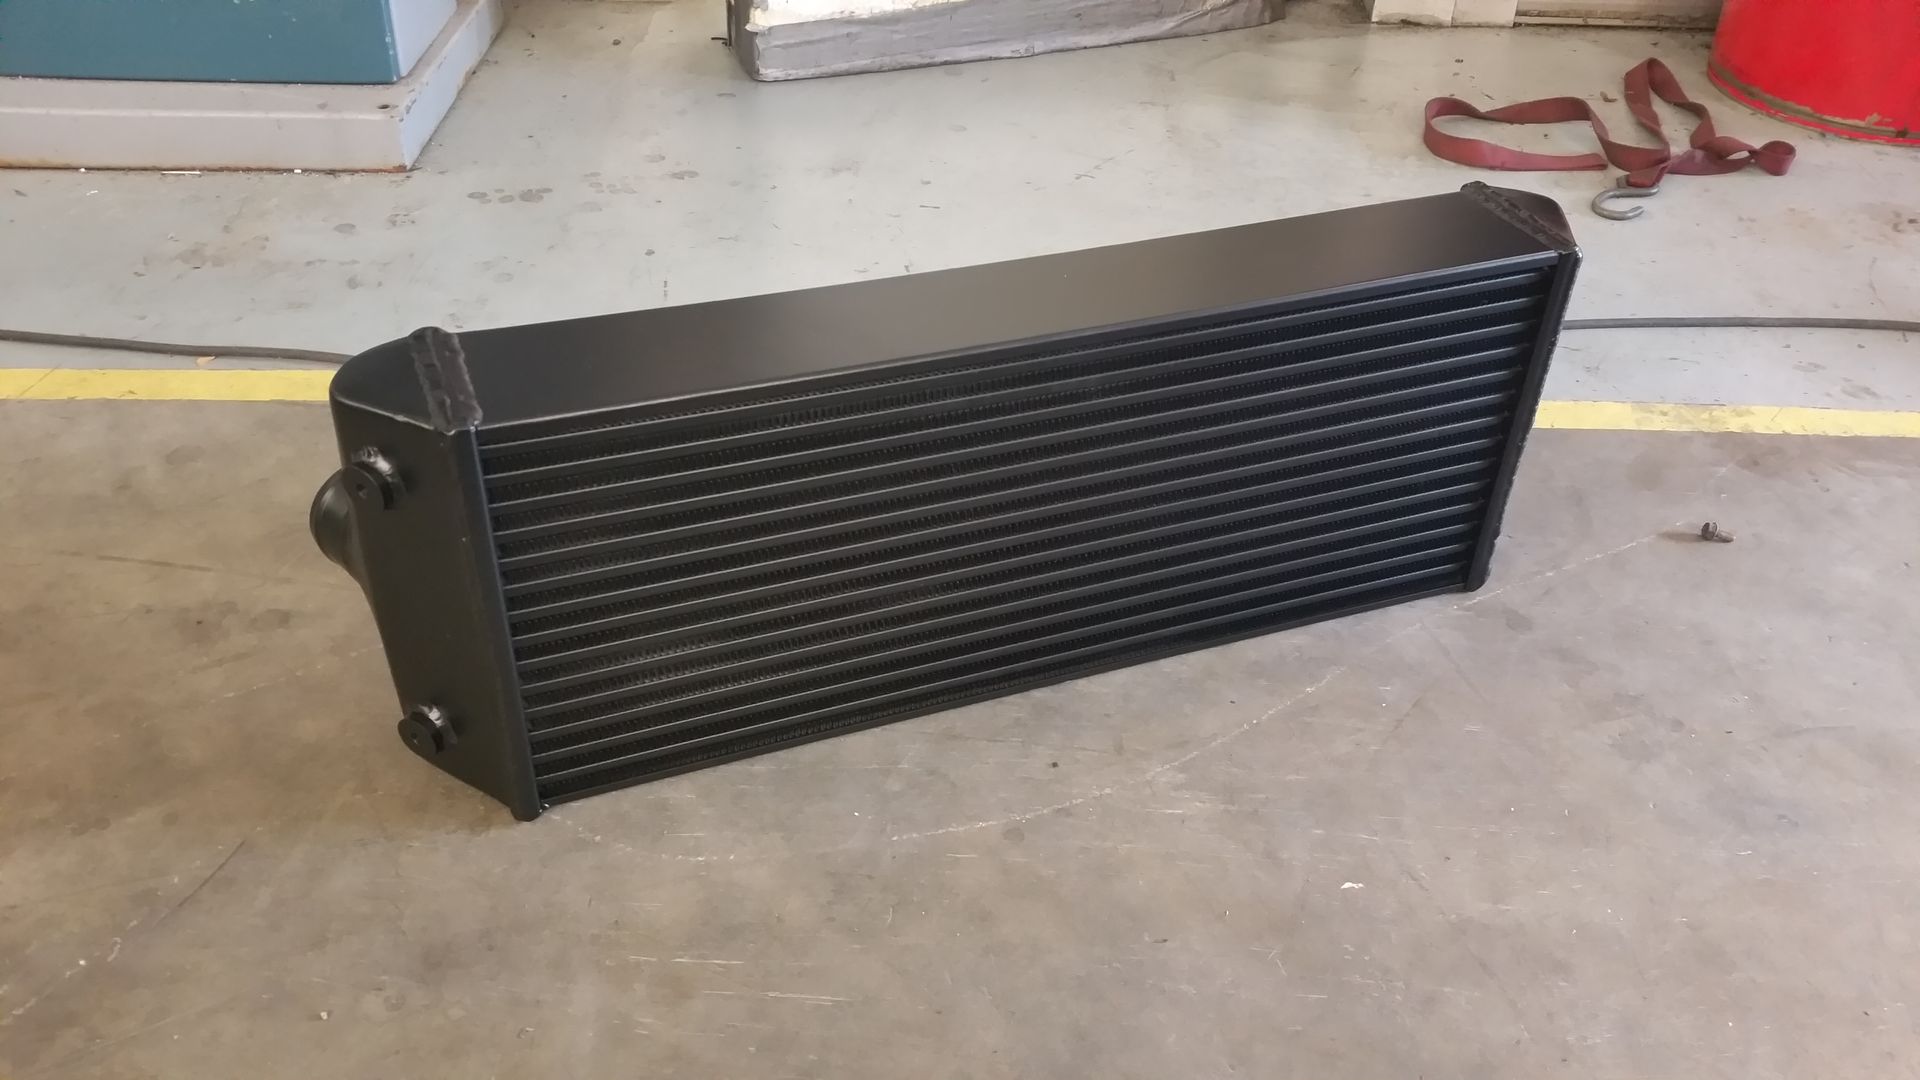
Changed the turbo mount from the bulk head to off the block and finally got my intercooler core through.
Turbo mount :
intercooler just resting in place to show how's it will sit although that won't quite be it's final resting place.
Been tucking into the 'boring' behind the scenes bits. Wiring, running lines etc.
Changed the turbo mount from the bulk head to off the block and finally got my intercooler core through.
Turbo mount :

intercooler just resting in place to show how's it will sit although that won't quite be it's final resting place.


Last edited by seventune; 02 June 2015 at 11:49 PM.


 20 November 2014, 10:53 PM
#123
Scooby Regular
Thread Starter
righty,
Intercooler finished and coloured:
As you have probably see in the older pics I've had to mess aground who the slam panel. This left head headlights and remaining section of the slam panel a touch wobbley so I had knocked up a bracket to take up the slack. Not the prettiest but will do the trick.
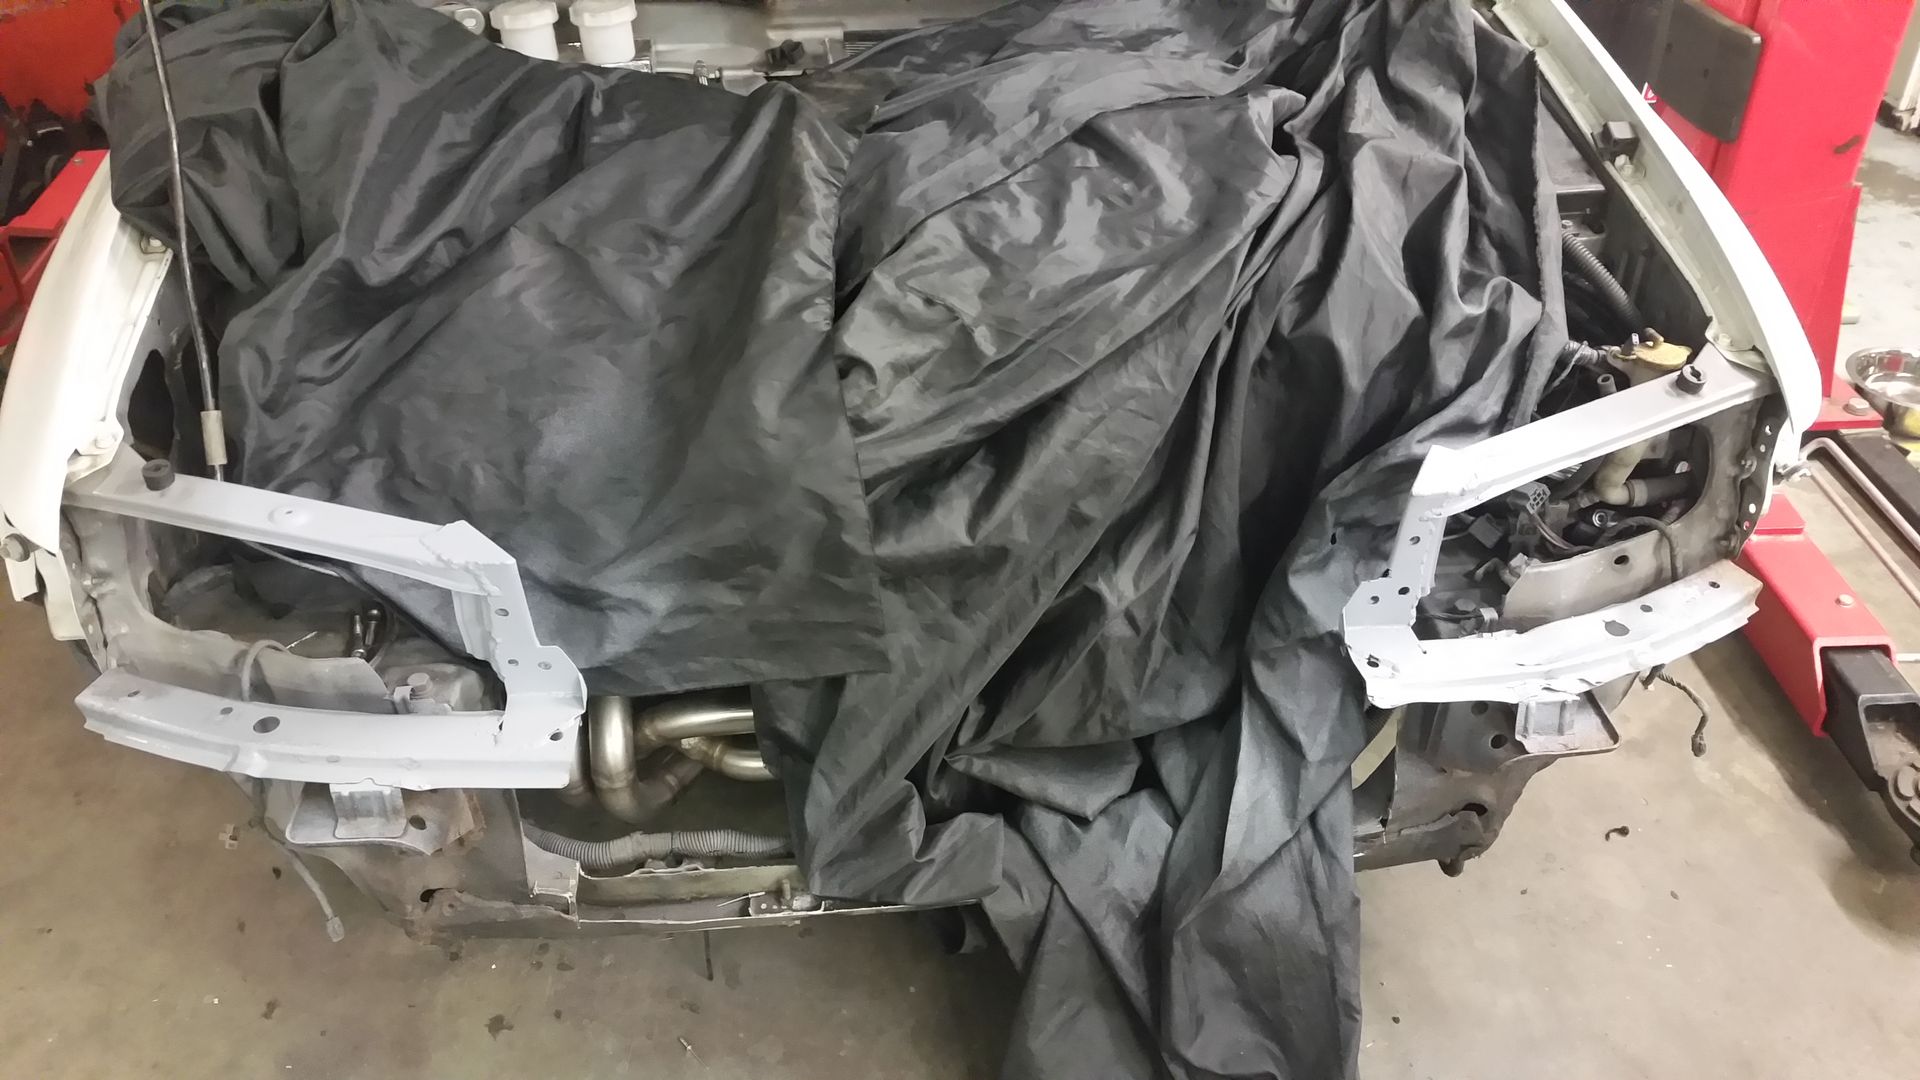
Then the intercooler in place. The rad is in place but not finished yet. Will get the intercooler pipes sorted in the morning.
Intercooler finished and coloured:

As you have probably see in the older pics I've had to mess aground who the slam panel. This left head headlights and remaining section of the slam panel a touch wobbley so I had knocked up a bracket to take up the slack. Not the prettiest but will do the trick.


Then the intercooler in place. The rad is in place but not finished yet. Will get the intercooler pipes sorted in the morning.


Last edited by seventune; 02 June 2015 at 11:51 PM.


 05 December 2014, 08:57 PM
#130
Scooby Regular
Thread Starter
Thanks guys,
So got into the build today got a fair whack of niggelly jobs done. Everything is wired up and in aside from the rad fans (need to buy those still ) and one of the fuel pumps in the rear.
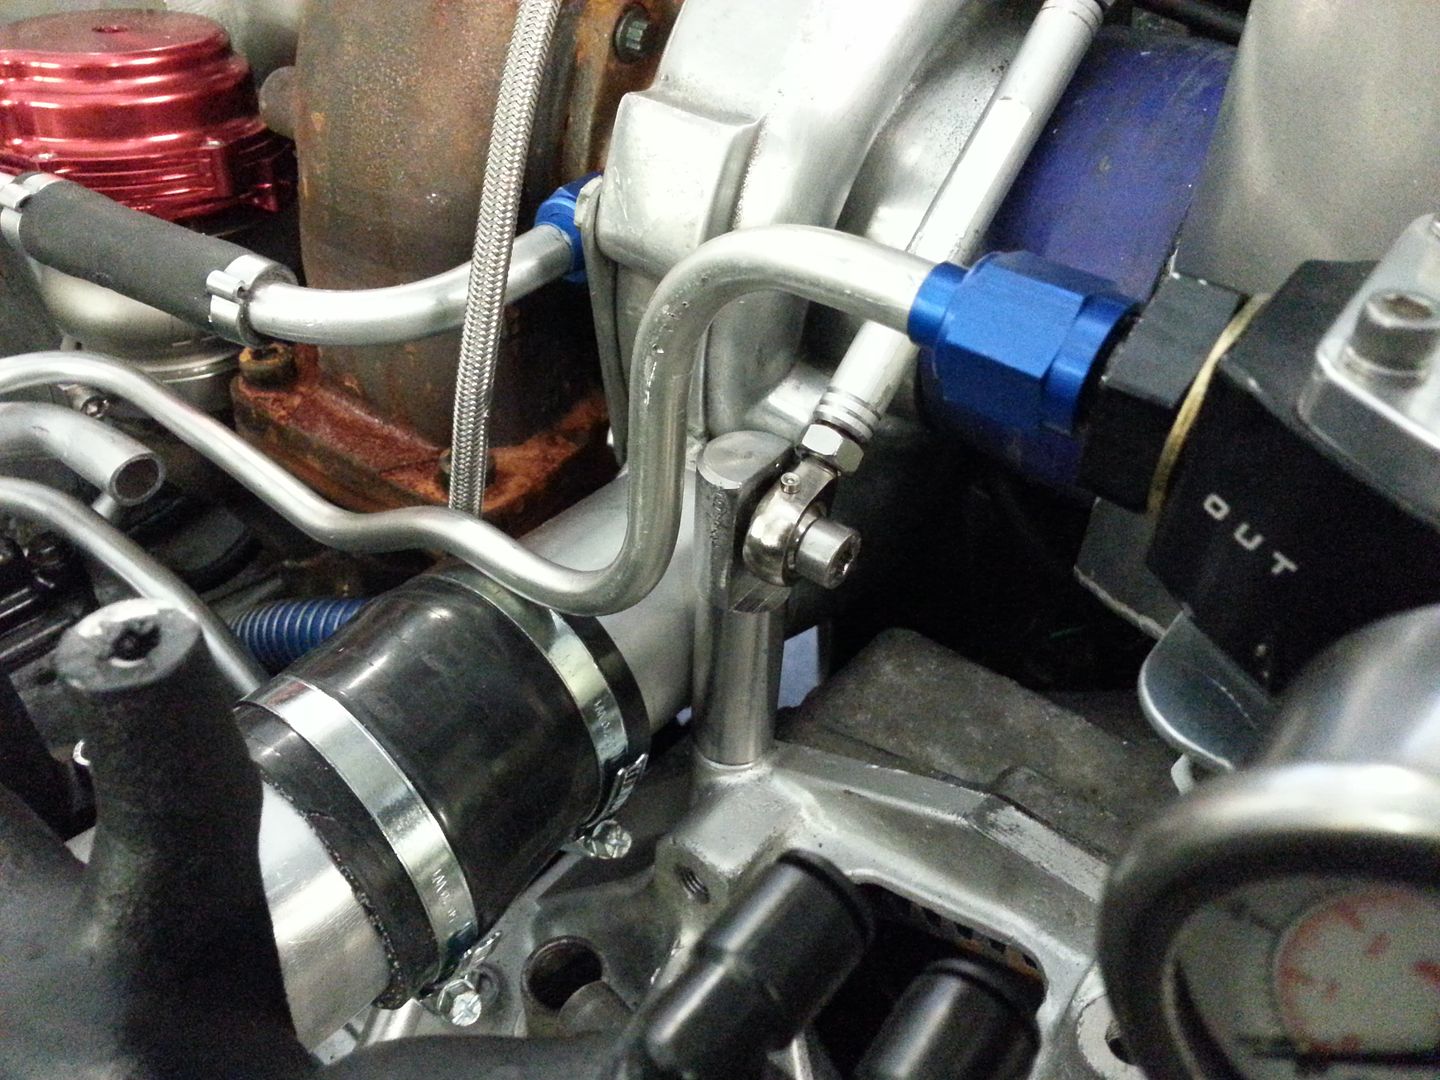
All of the vaccum plumbing is done. Along with most of the pedal box lines. Still need to do the brake lines. I desperately need too redo the HT leads. I can't live with those being red. An upgrade to new age coil packs will be in order at some point. Winds me up the BOV and wastegate being red. Few more of the pipes still need coating too along with the rad. I was hoping to get all the water system tied up today but the tube never turned up as promised by the supplier.
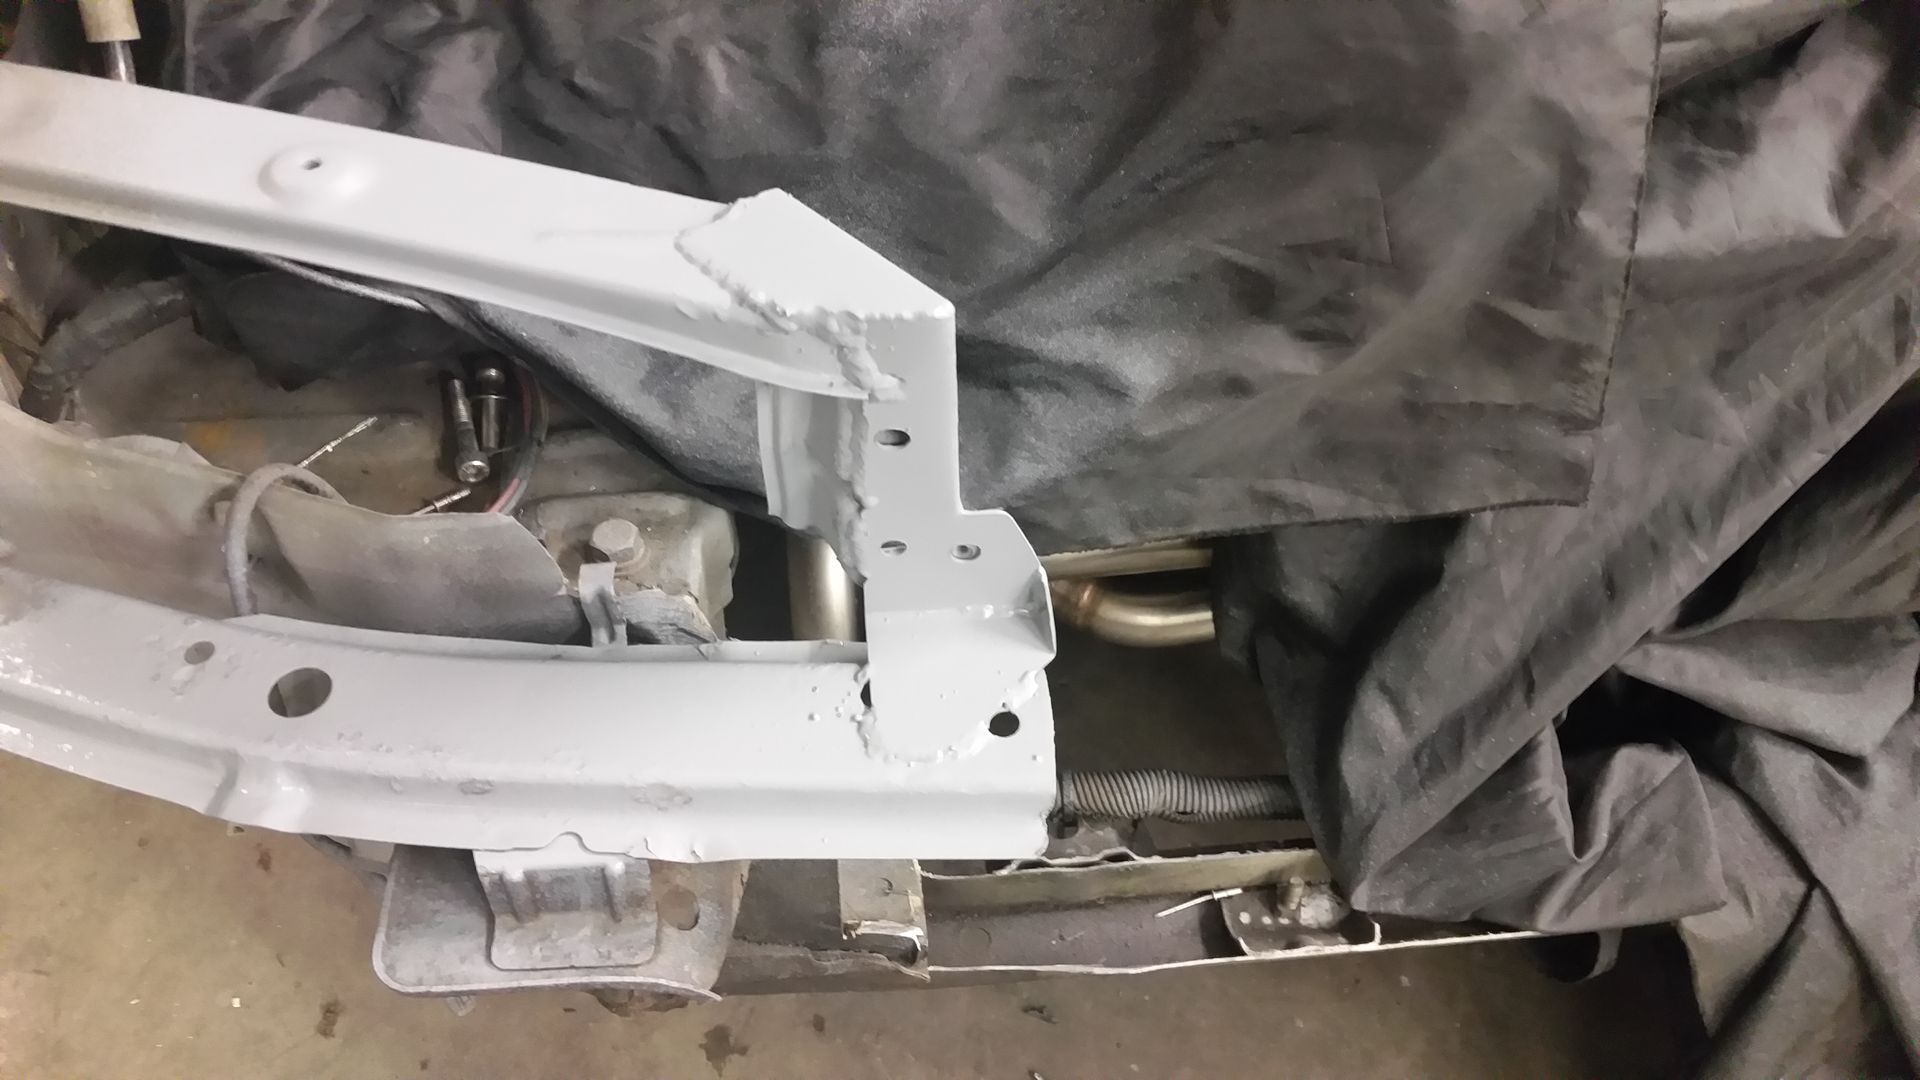
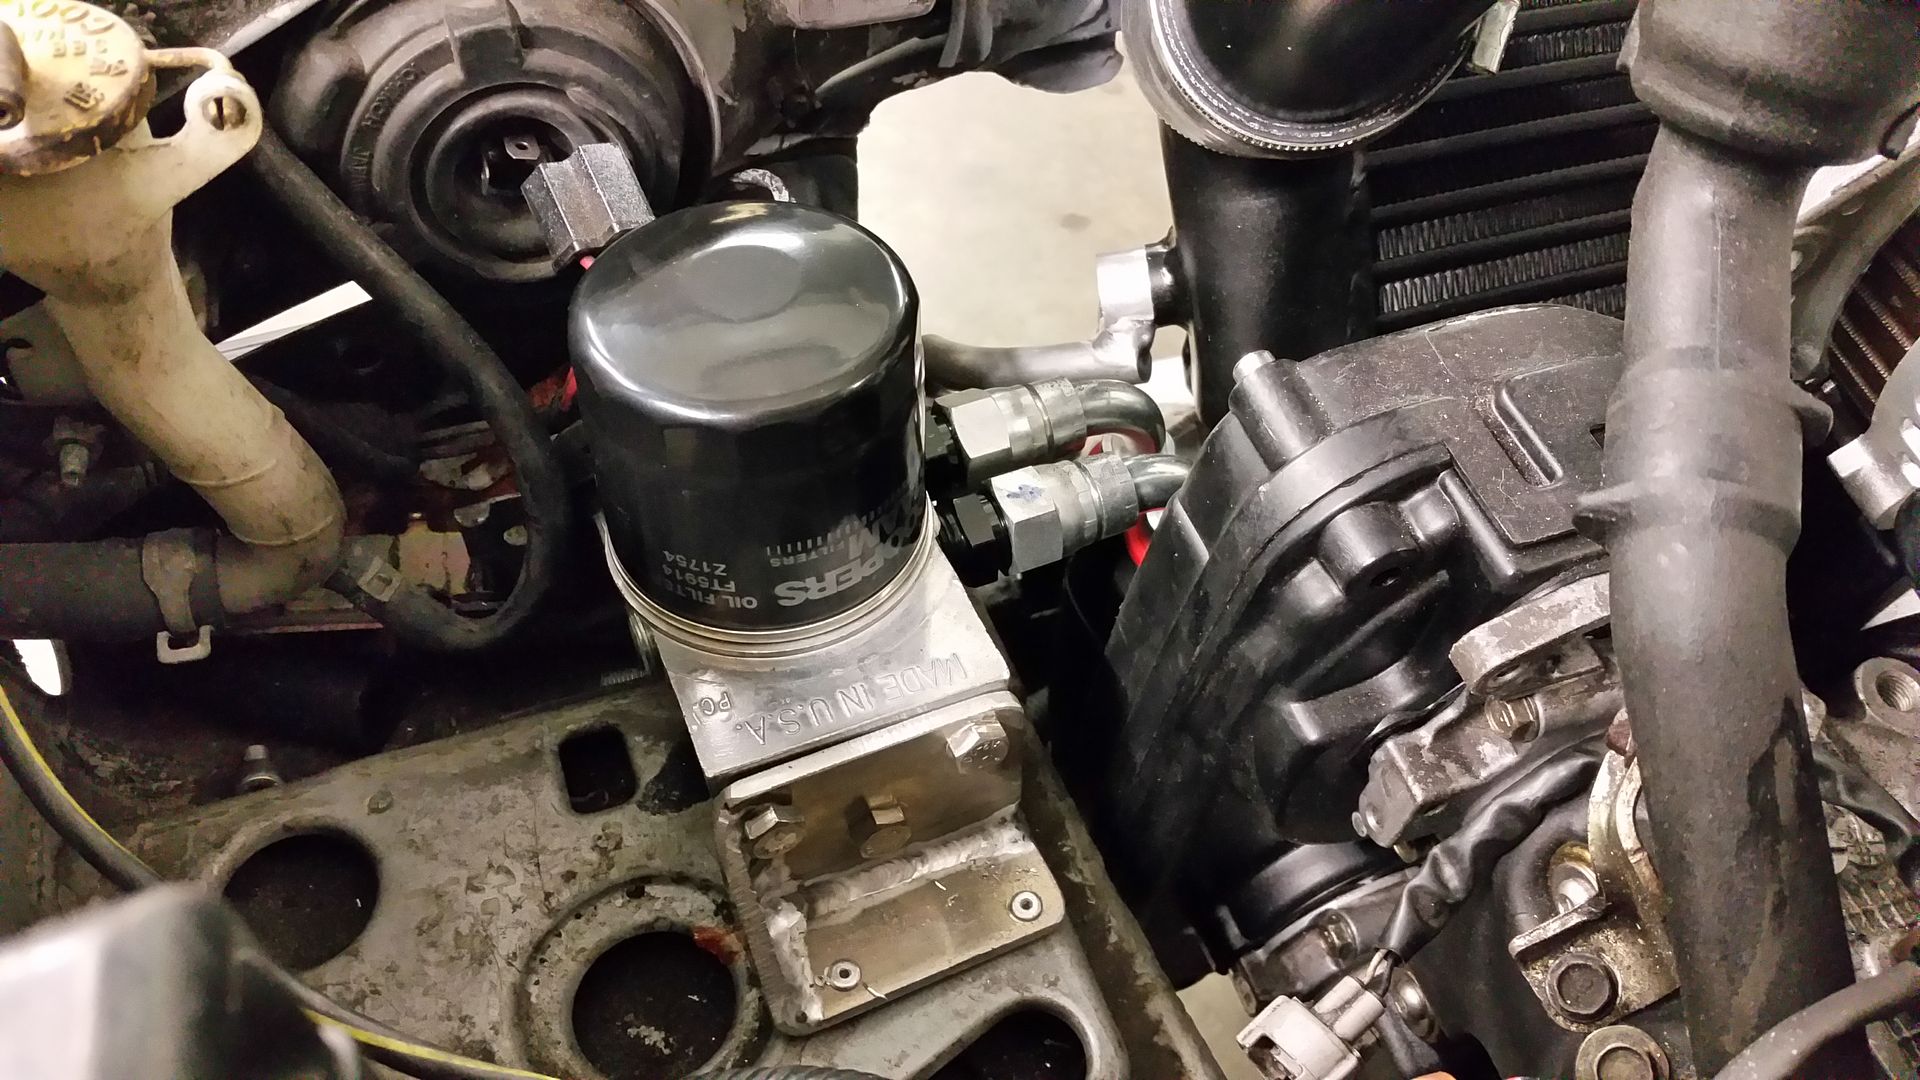
Oil filter relocation and cooler is also now in. Need to make some ducting for that and also for the v mounted intercooler.
Vac pipe stuff behind the plenum
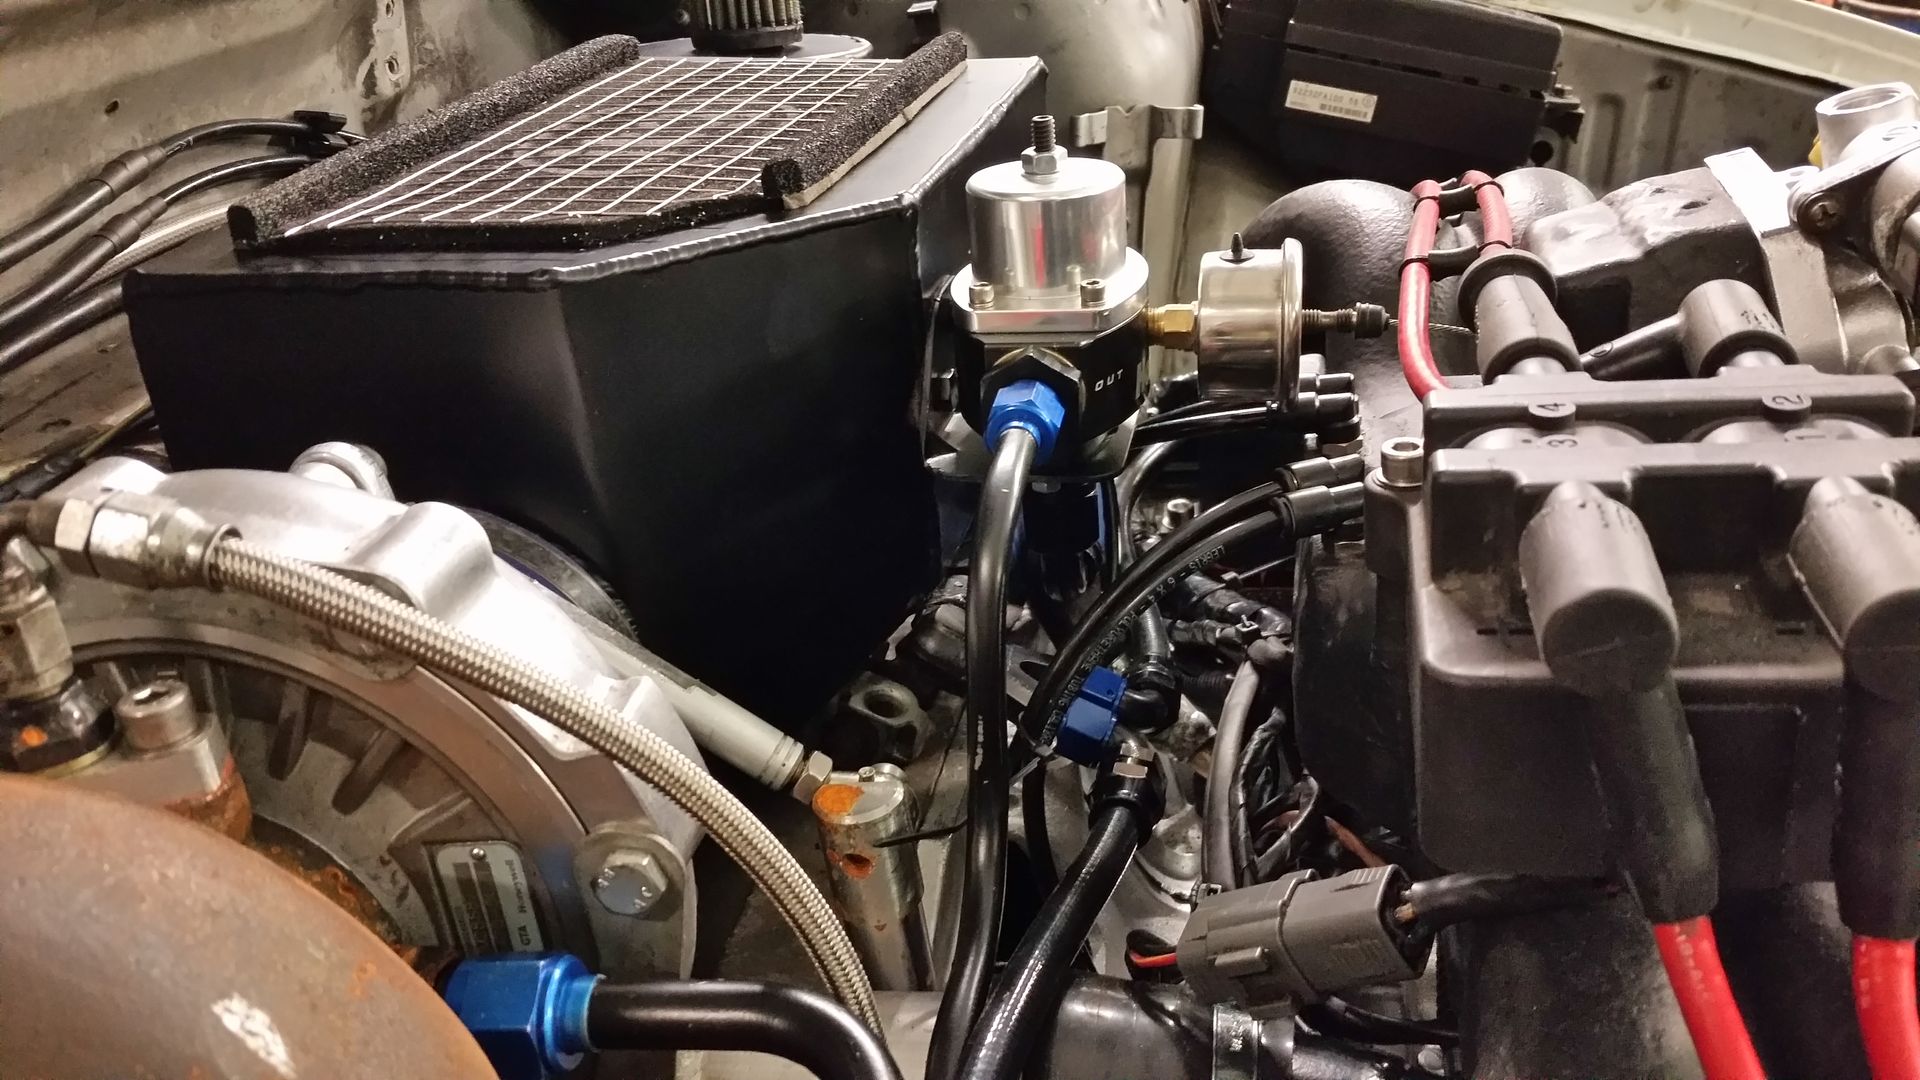
v mount intercooler brackets either side now in
oil cooler and relocated filter

So got into the build today got a fair whack of niggelly jobs done. Everything is wired up and in aside from the rad fans (need to buy those still ) and one of the fuel pumps in the rear.
All of the vaccum plumbing is done. Along with most of the pedal box lines. Still need to do the brake lines. I desperately need too redo the HT leads. I can't live with those being red. An upgrade to new age coil packs will be in order at some point. Winds me up the BOV and wastegate being red. Few more of the pipes still need coating too along with the rad. I was hoping to get all the water system tied up today but the tube never turned up as promised by the supplier.
Oil filter relocation and cooler is also now in. Need to make some ducting for that and also for the v mounted intercooler.
Vac pipe stuff behind the plenum

v mount intercooler brackets either side now in

oil cooler and relocated filter


Last edited by seventune; 02 June 2015 at 11:52 PM.
 22 December 2014, 02:05 PM
#132
Scooby Regular
Thread Starter
Thanks dude, will be running very soon. Few bits and loose ends to nip up. Early Jan I reckon.
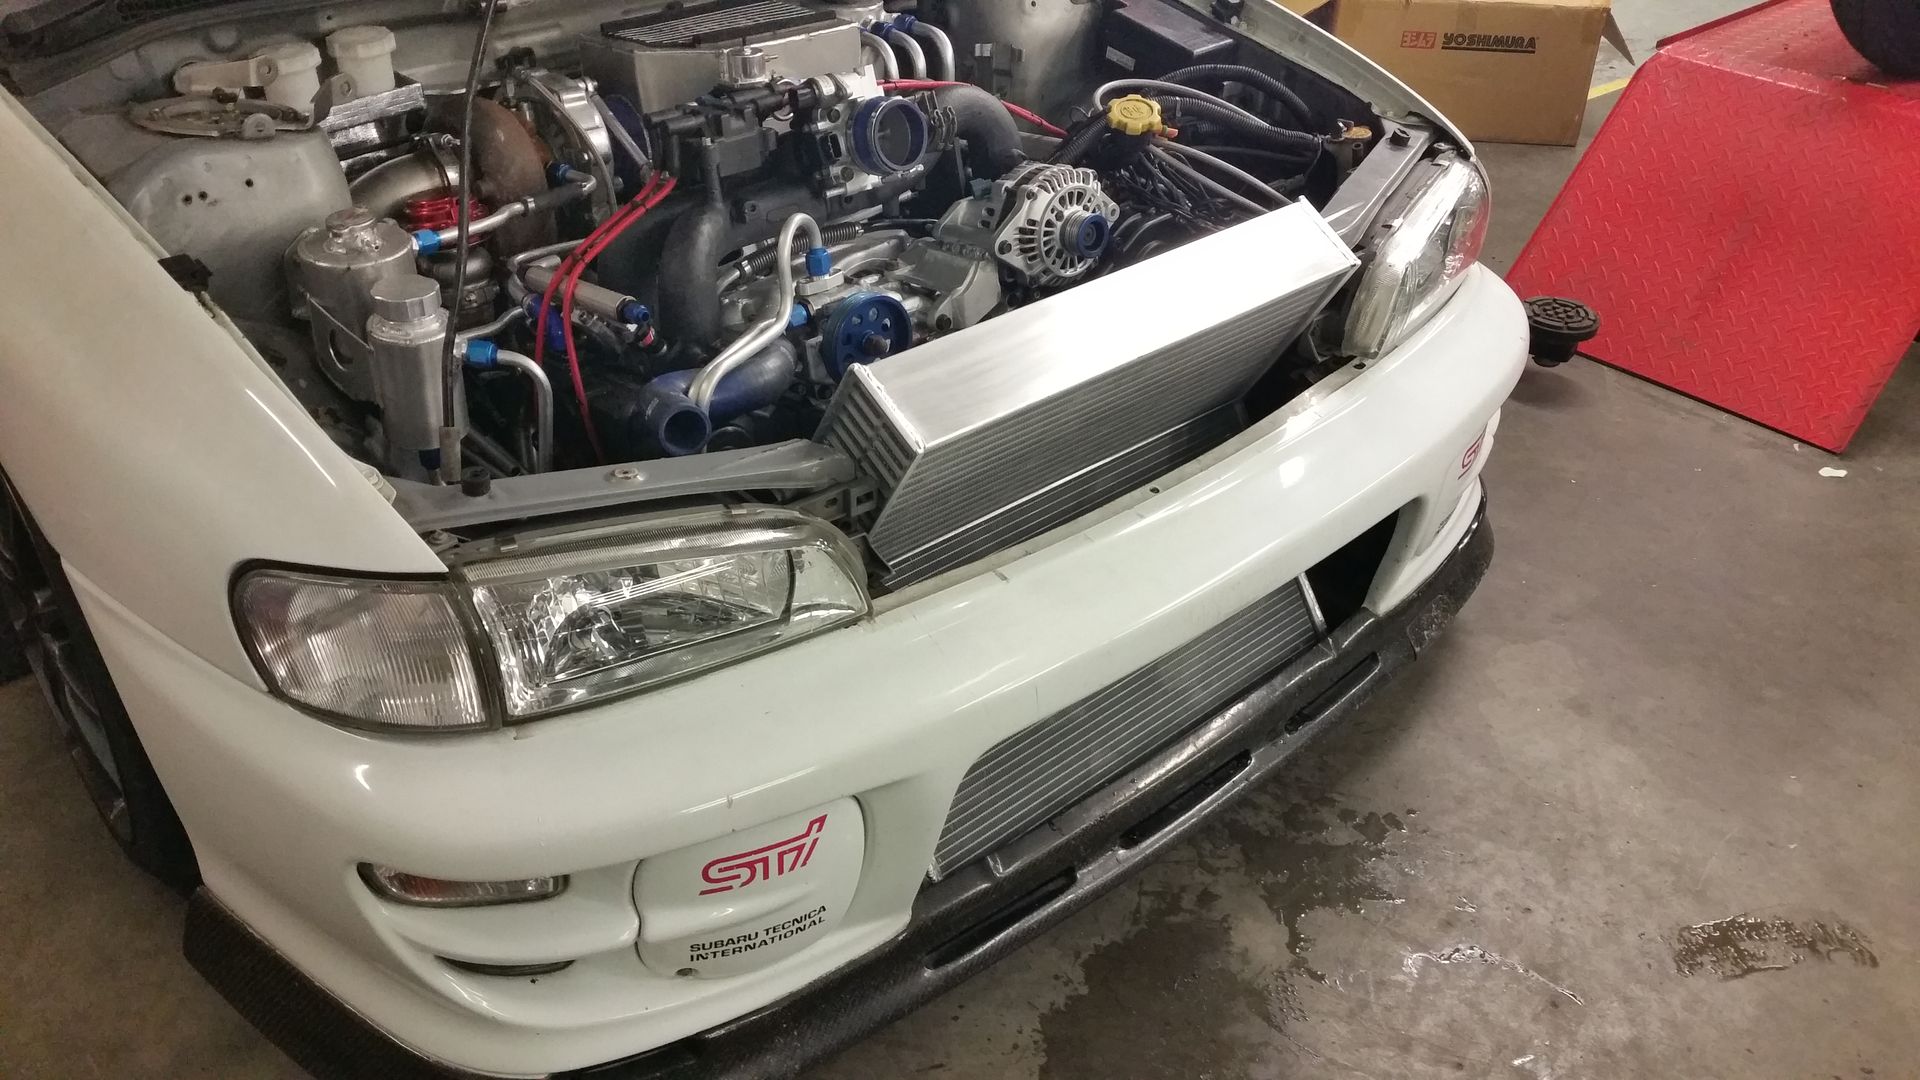
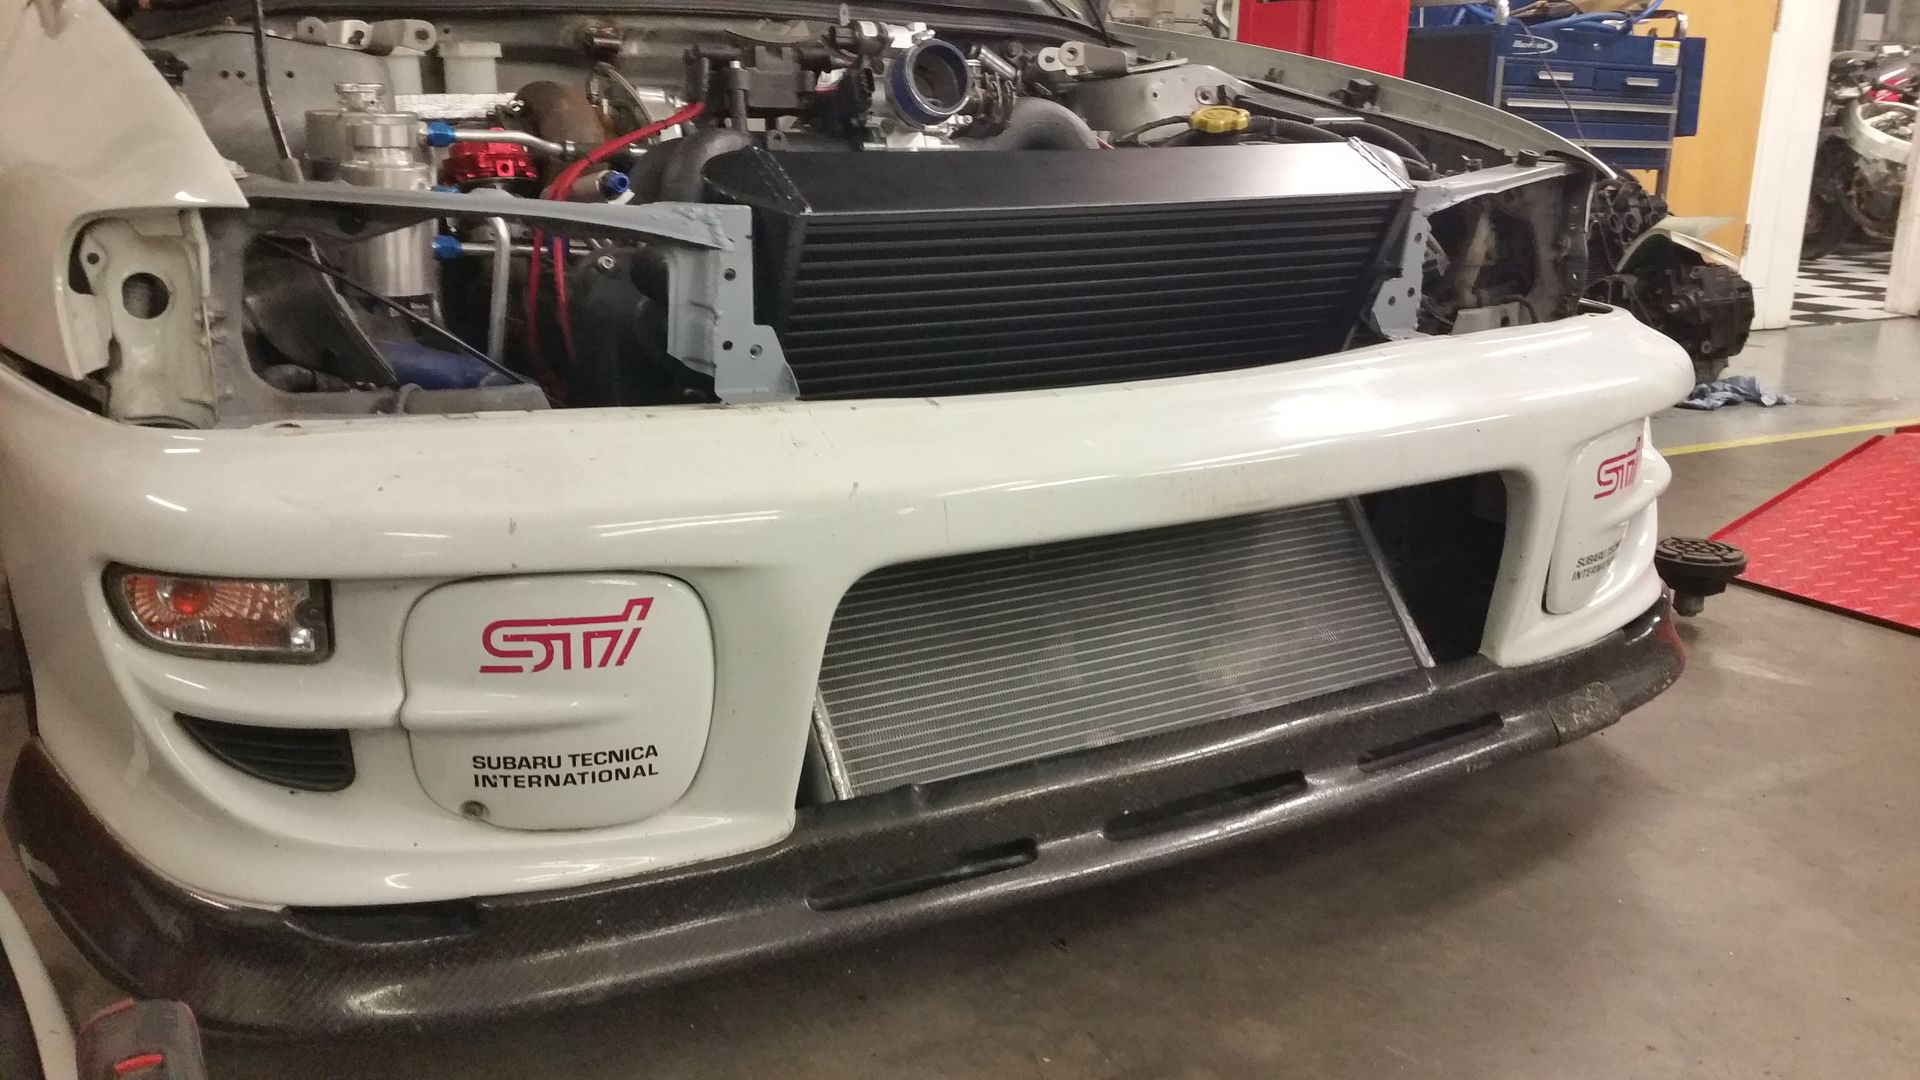
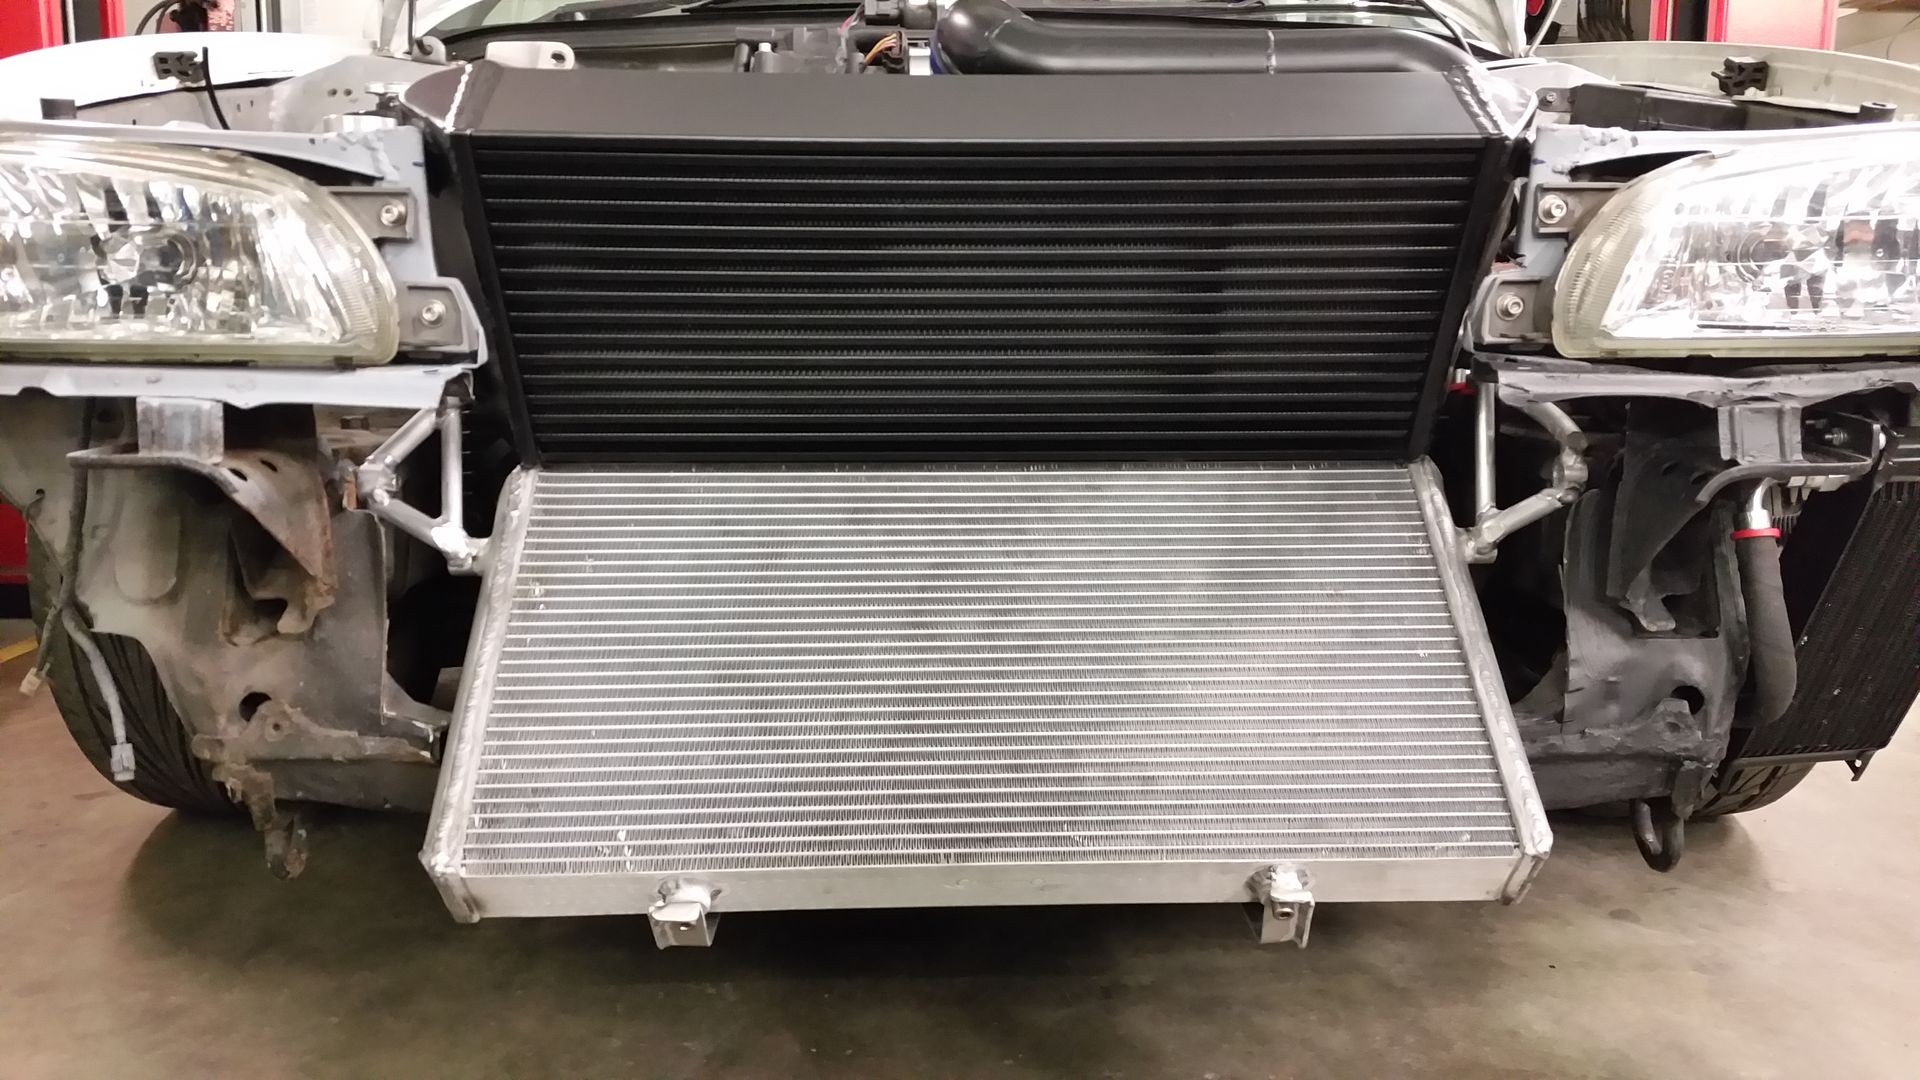
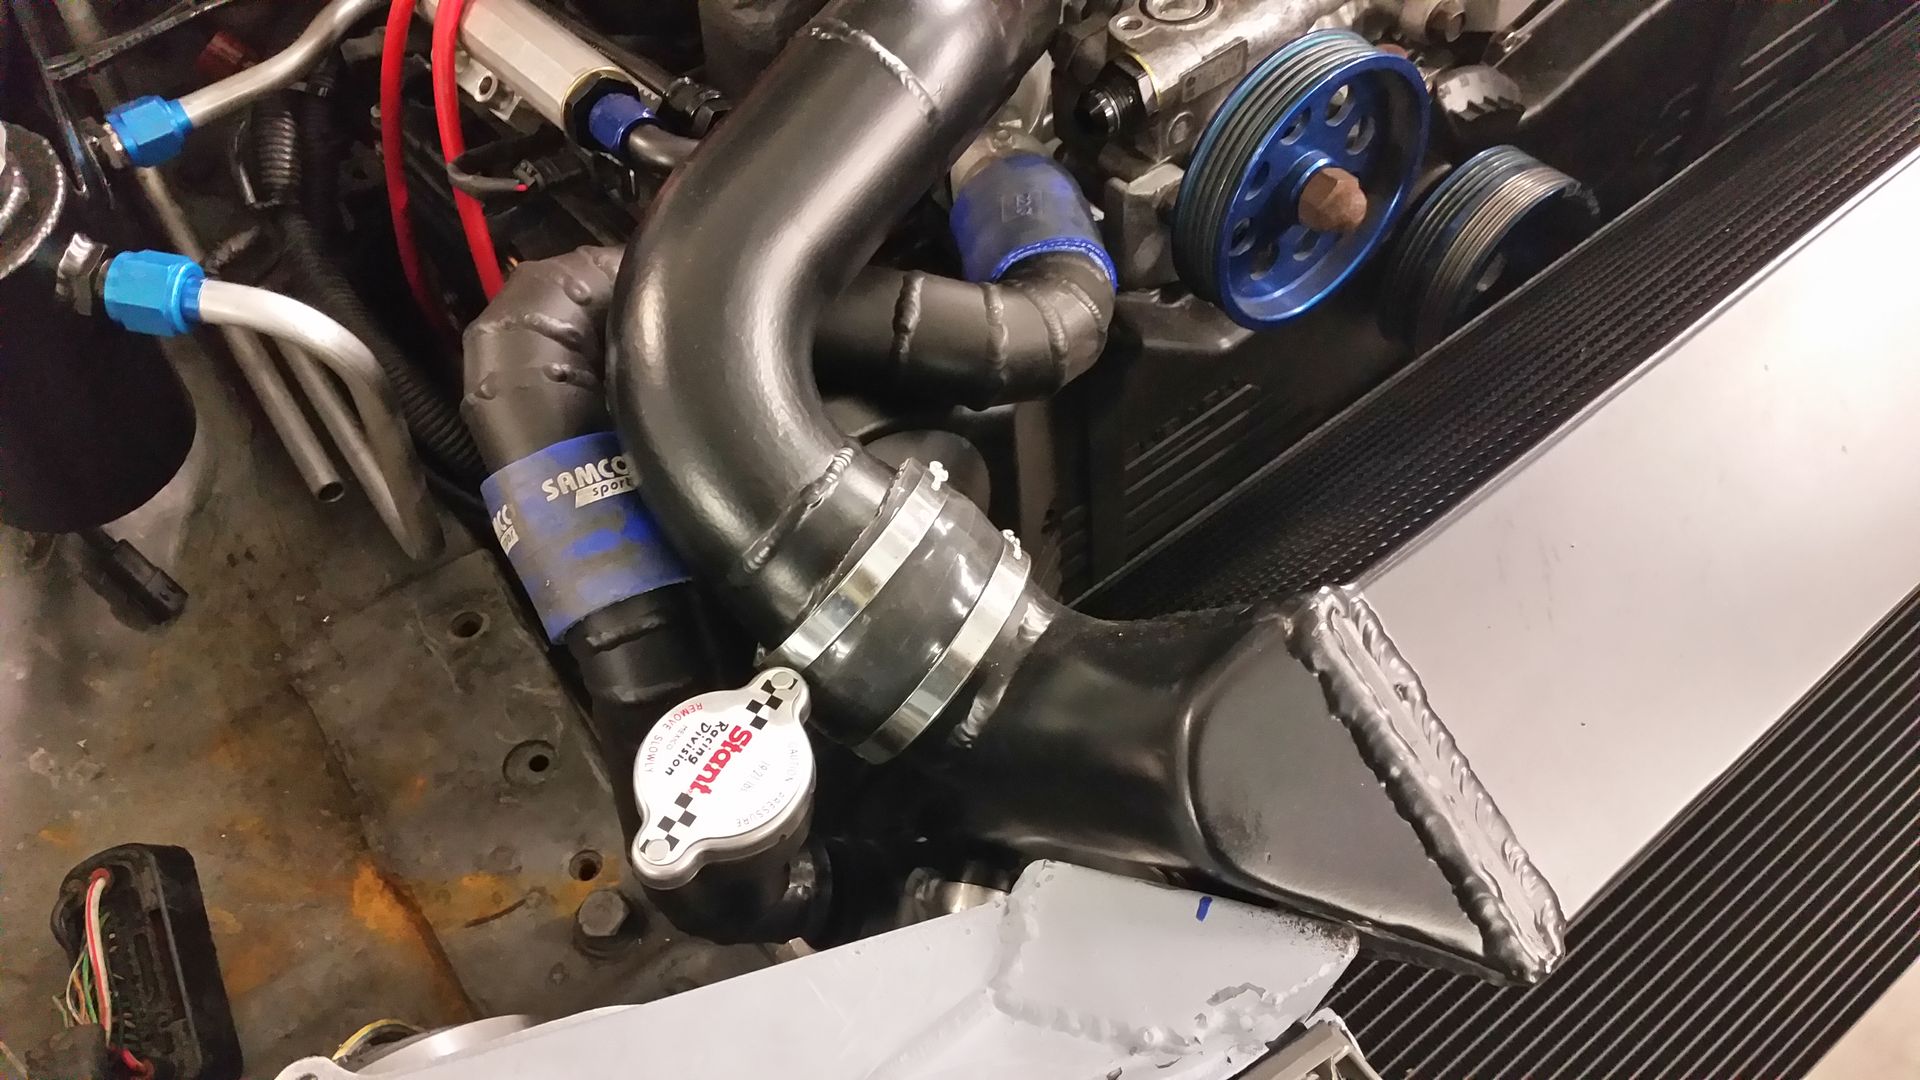
Finally got all the v mounted intercooler in and finished. You'll note that the rad pipes are cut and welded. They won't be staying like that for too long. Had to do it that way so I could figure out all the best and routing as it quite tight under the cooler. I've also put in a 2nd filling point for the coolant to help with bleeding the system. But it's all in and for the most part I'm pretty happy with they way it all sits in there.
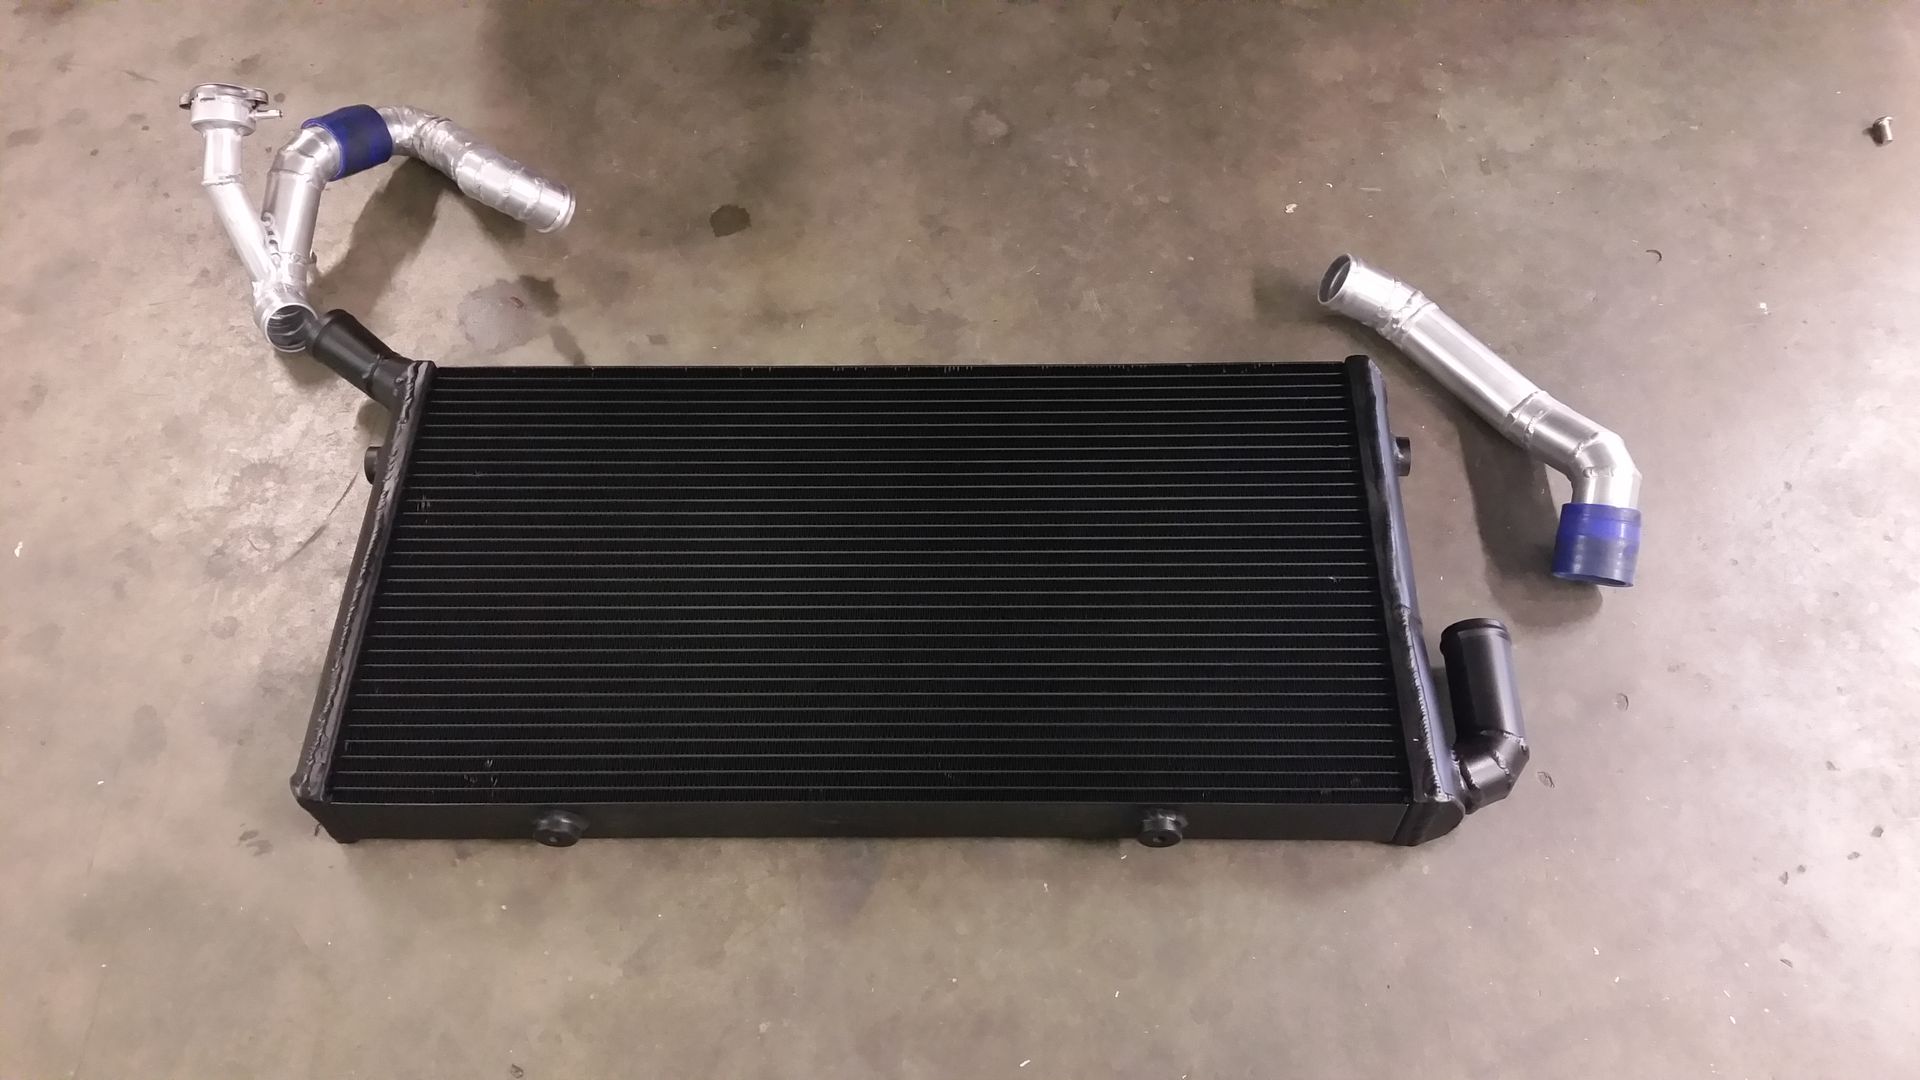
You can see how I needed to snake the pipe under the cooler pipe. Now I have the angles etc I will be ordering proper bends to make it nicer.
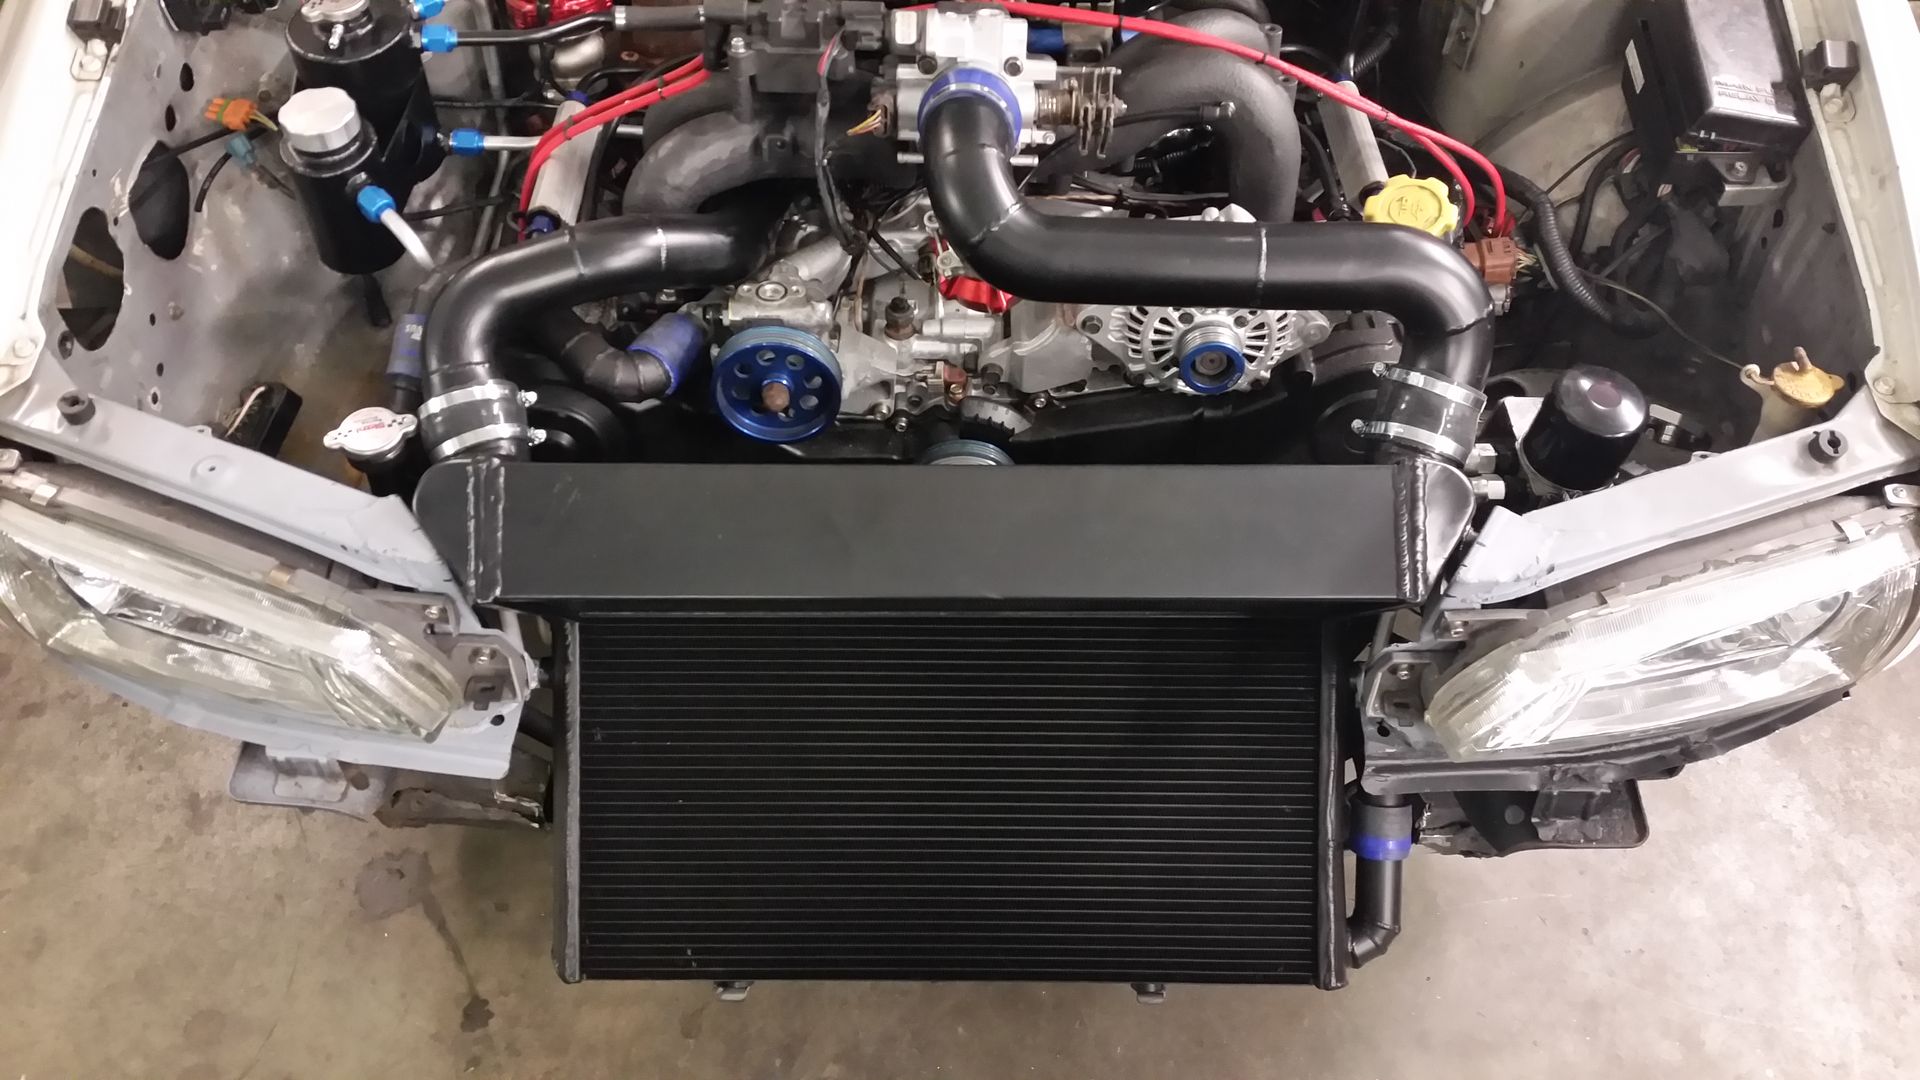
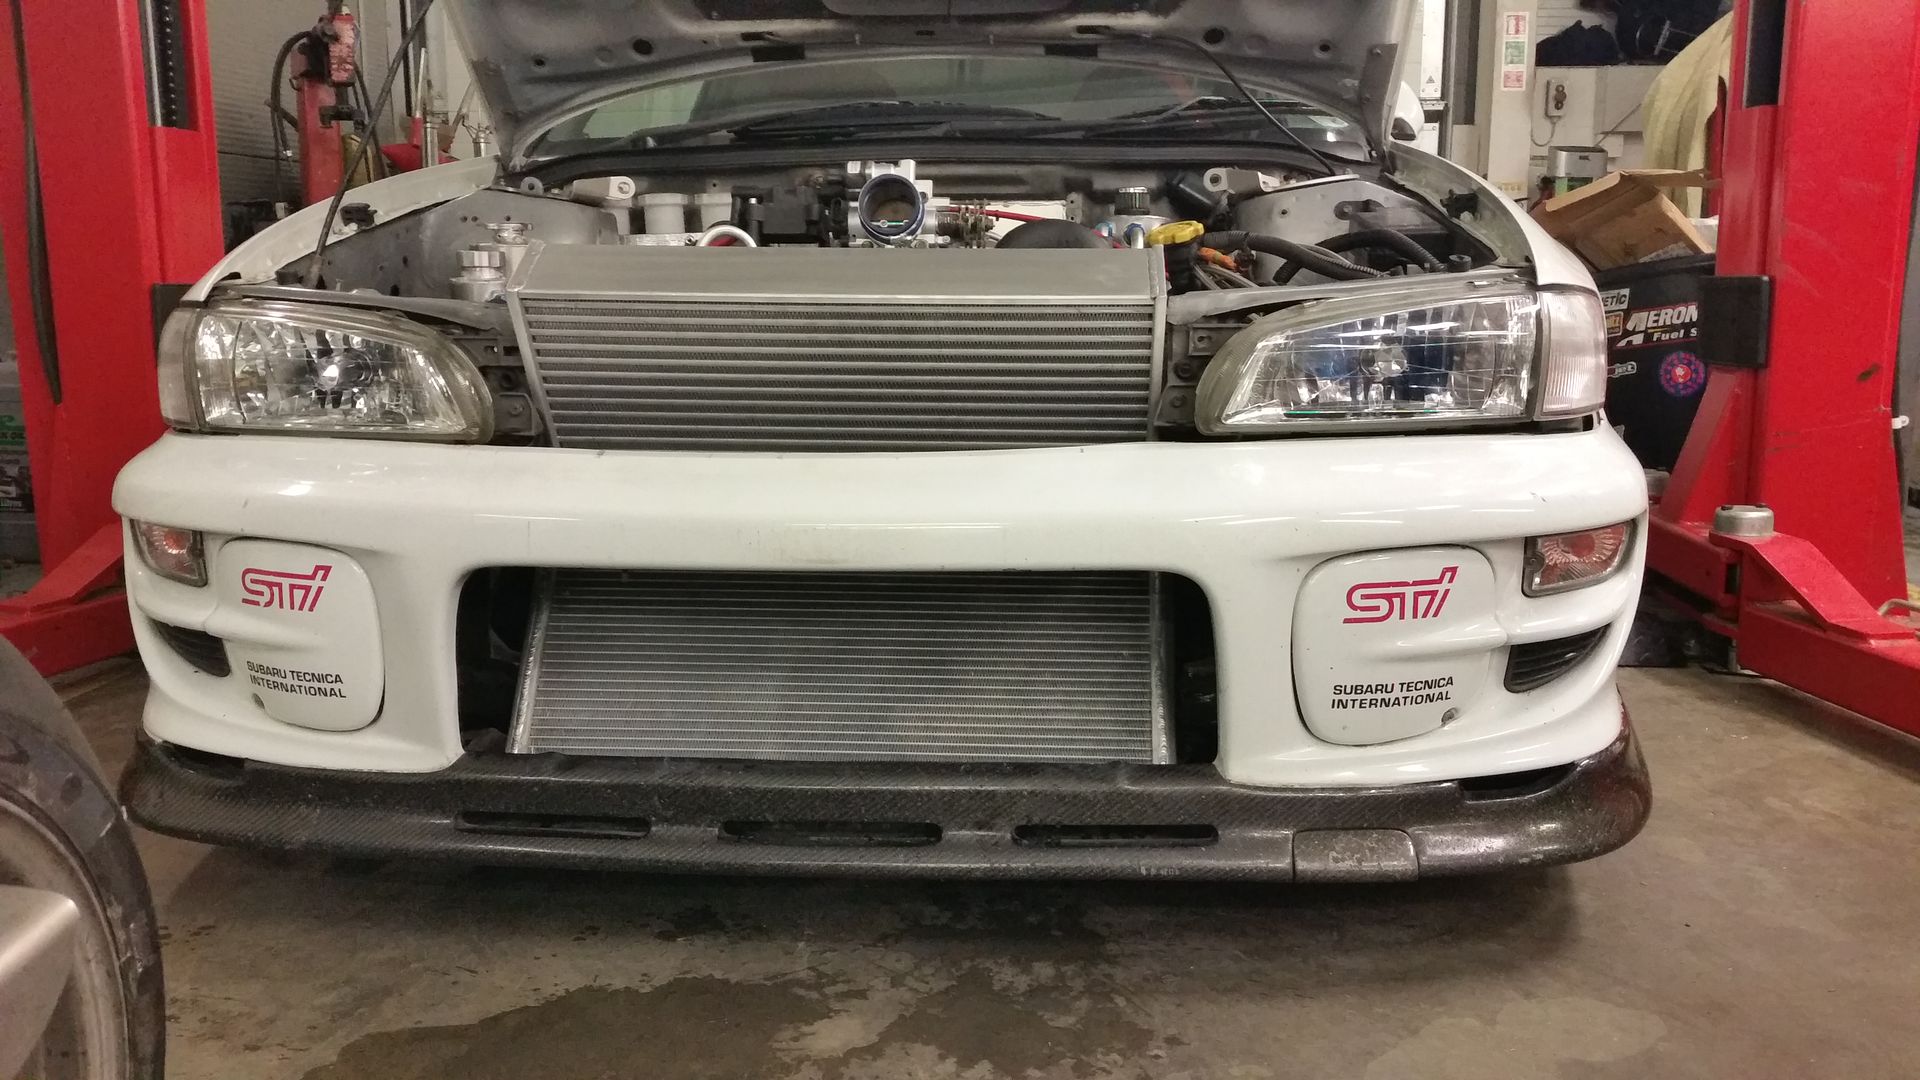
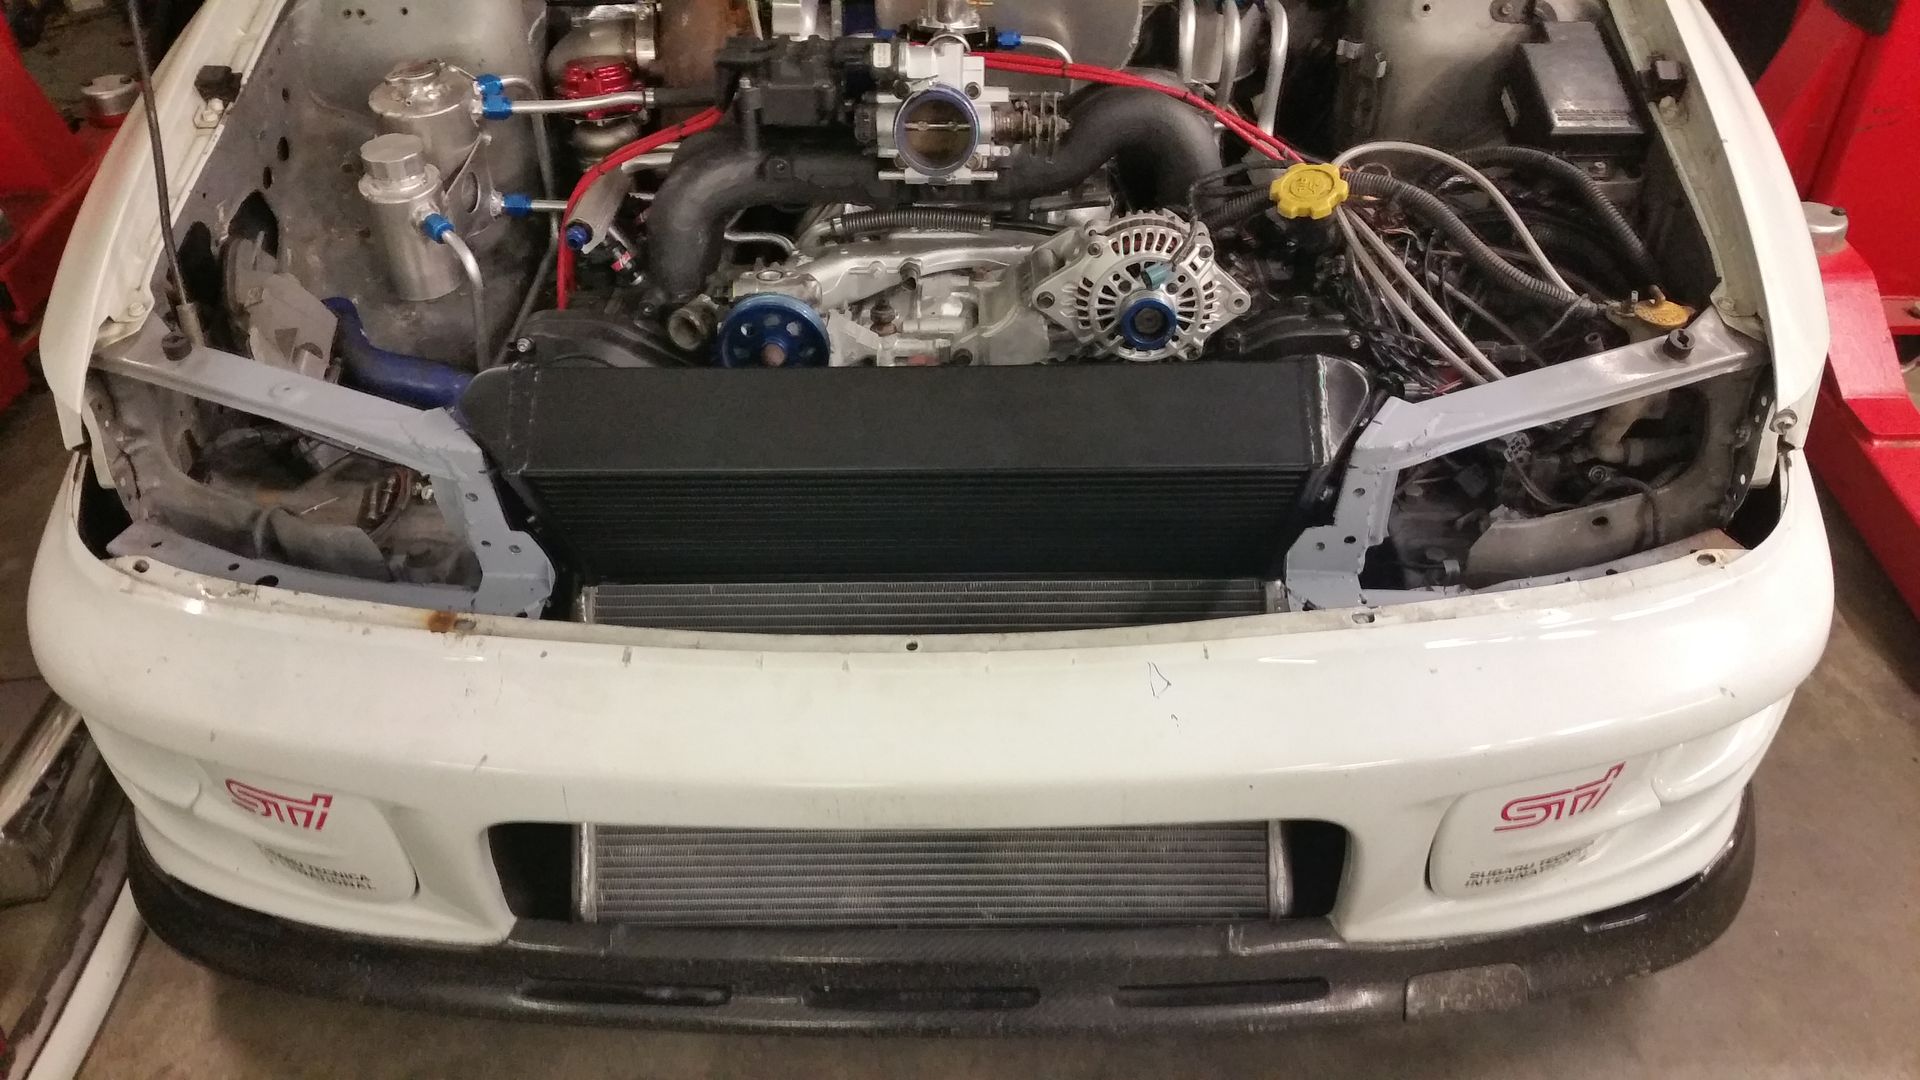
With the bumper back on....
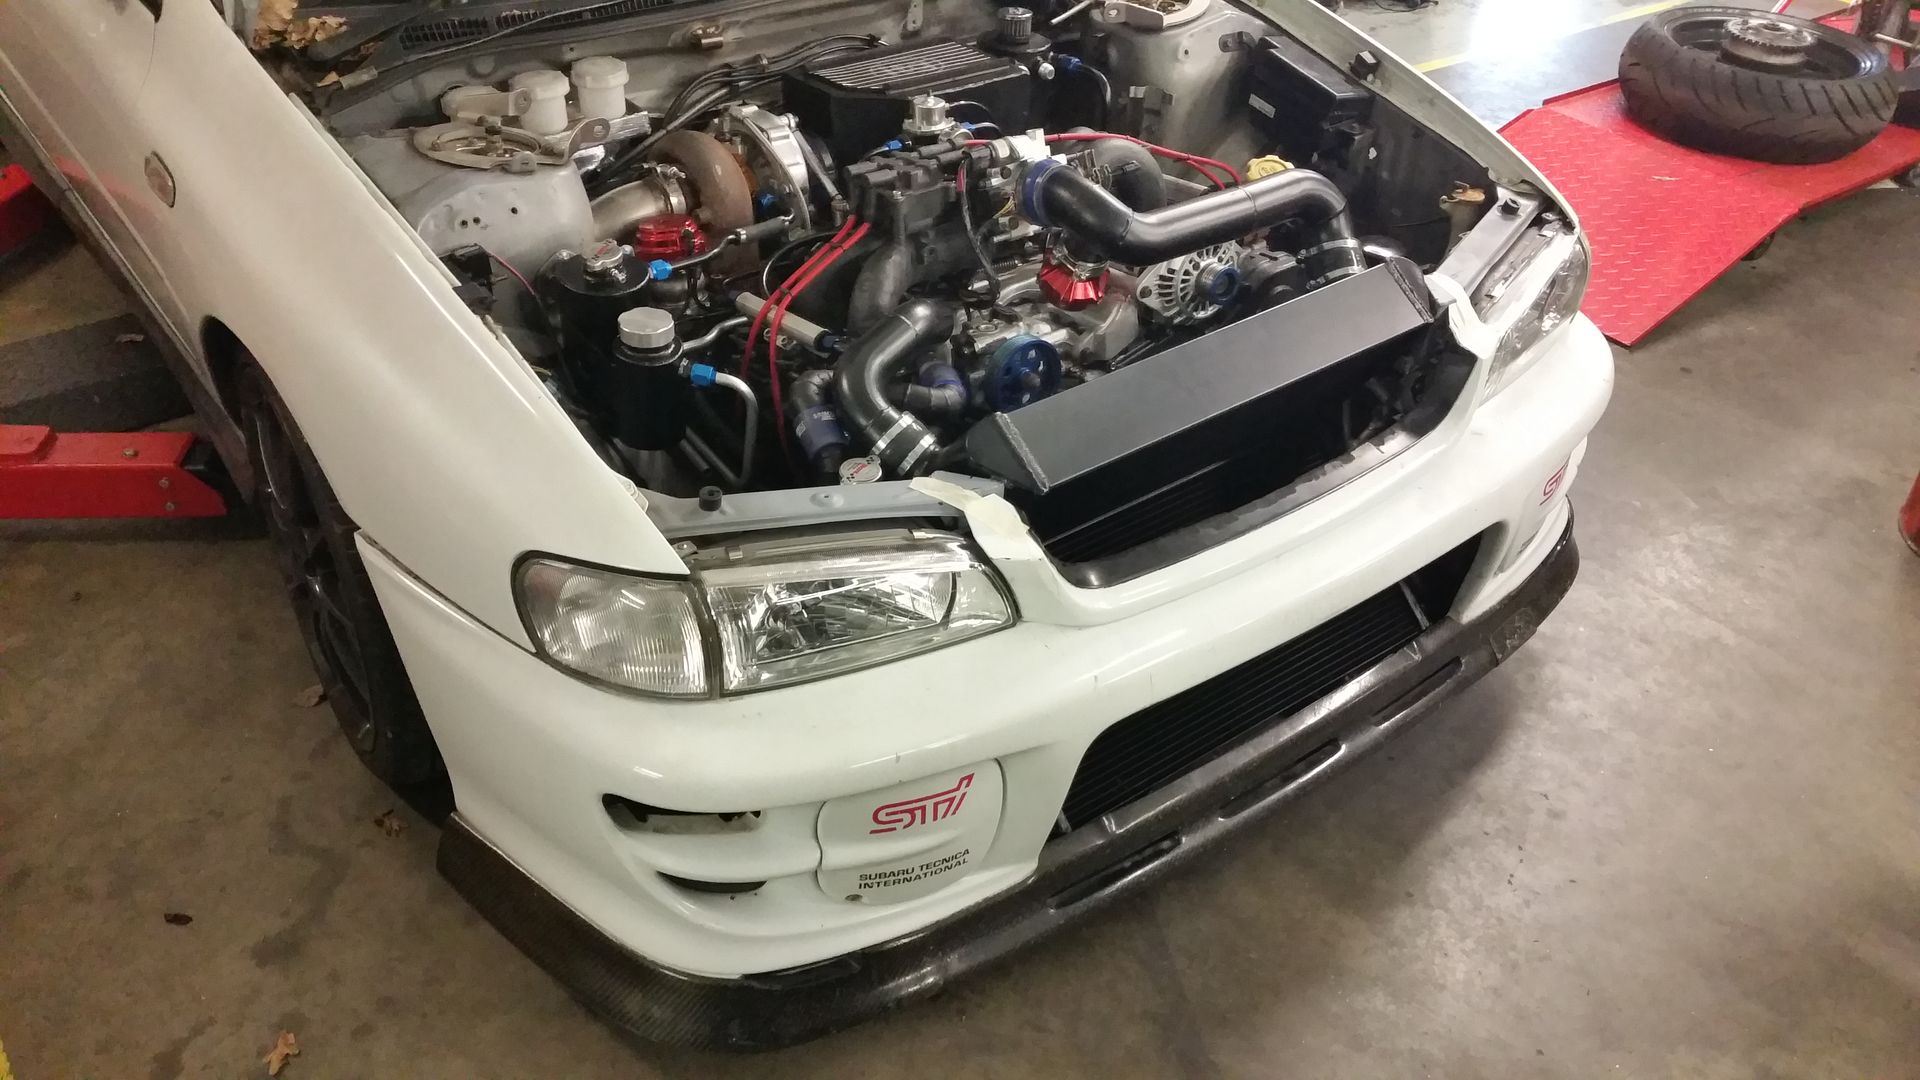
All stelthy like...... no one will ever know
Finally got all the v mounted intercooler in and finished. You'll note that the rad pipes are cut and welded. They won't be staying like that for too long. Had to do it that way so I could figure out all the best and routing as it quite tight under the cooler. I've also put in a 2nd filling point for the coolant to help with bleeding the system. But it's all in and for the most part I'm pretty happy with they way it all sits in there.

You can see how I needed to snake the pipe under the cooler pipe. Now I have the angles etc I will be ordering proper bends to make it nicer.


With the bumper back on....

All stelthy like...... no one will ever know

Last edited by seventune; 02 June 2015 at 11:52 PM.
 03 January 2015, 05:03 PM
#136
Scooby Regular
Thread Starter
Cheers guys, always interesting to see how people receive projects like this when things are done differently.
I've just ordered 4 new boots in the form of the NS-2R. Seemly as good as many "road" tyres in the wet and better in the dry. So you don't know if you don't try. And if they don't work on the road ill throw the Rainsport 3's on.
Also going to re paint the wheels.if I can before the tyres turn up.
I've just ordered 4 new boots in the form of the NS-2R. Seemly as good as many "road" tyres in the wet and better in the dry. So you don't know if you don't try. And if they don't work on the road ill throw the Rainsport 3's on.
Also going to re paint the wheels.if I can before the tyres turn up.
 10 January 2015, 09:17 AM
#138
Scooby Regular
Thread Starter
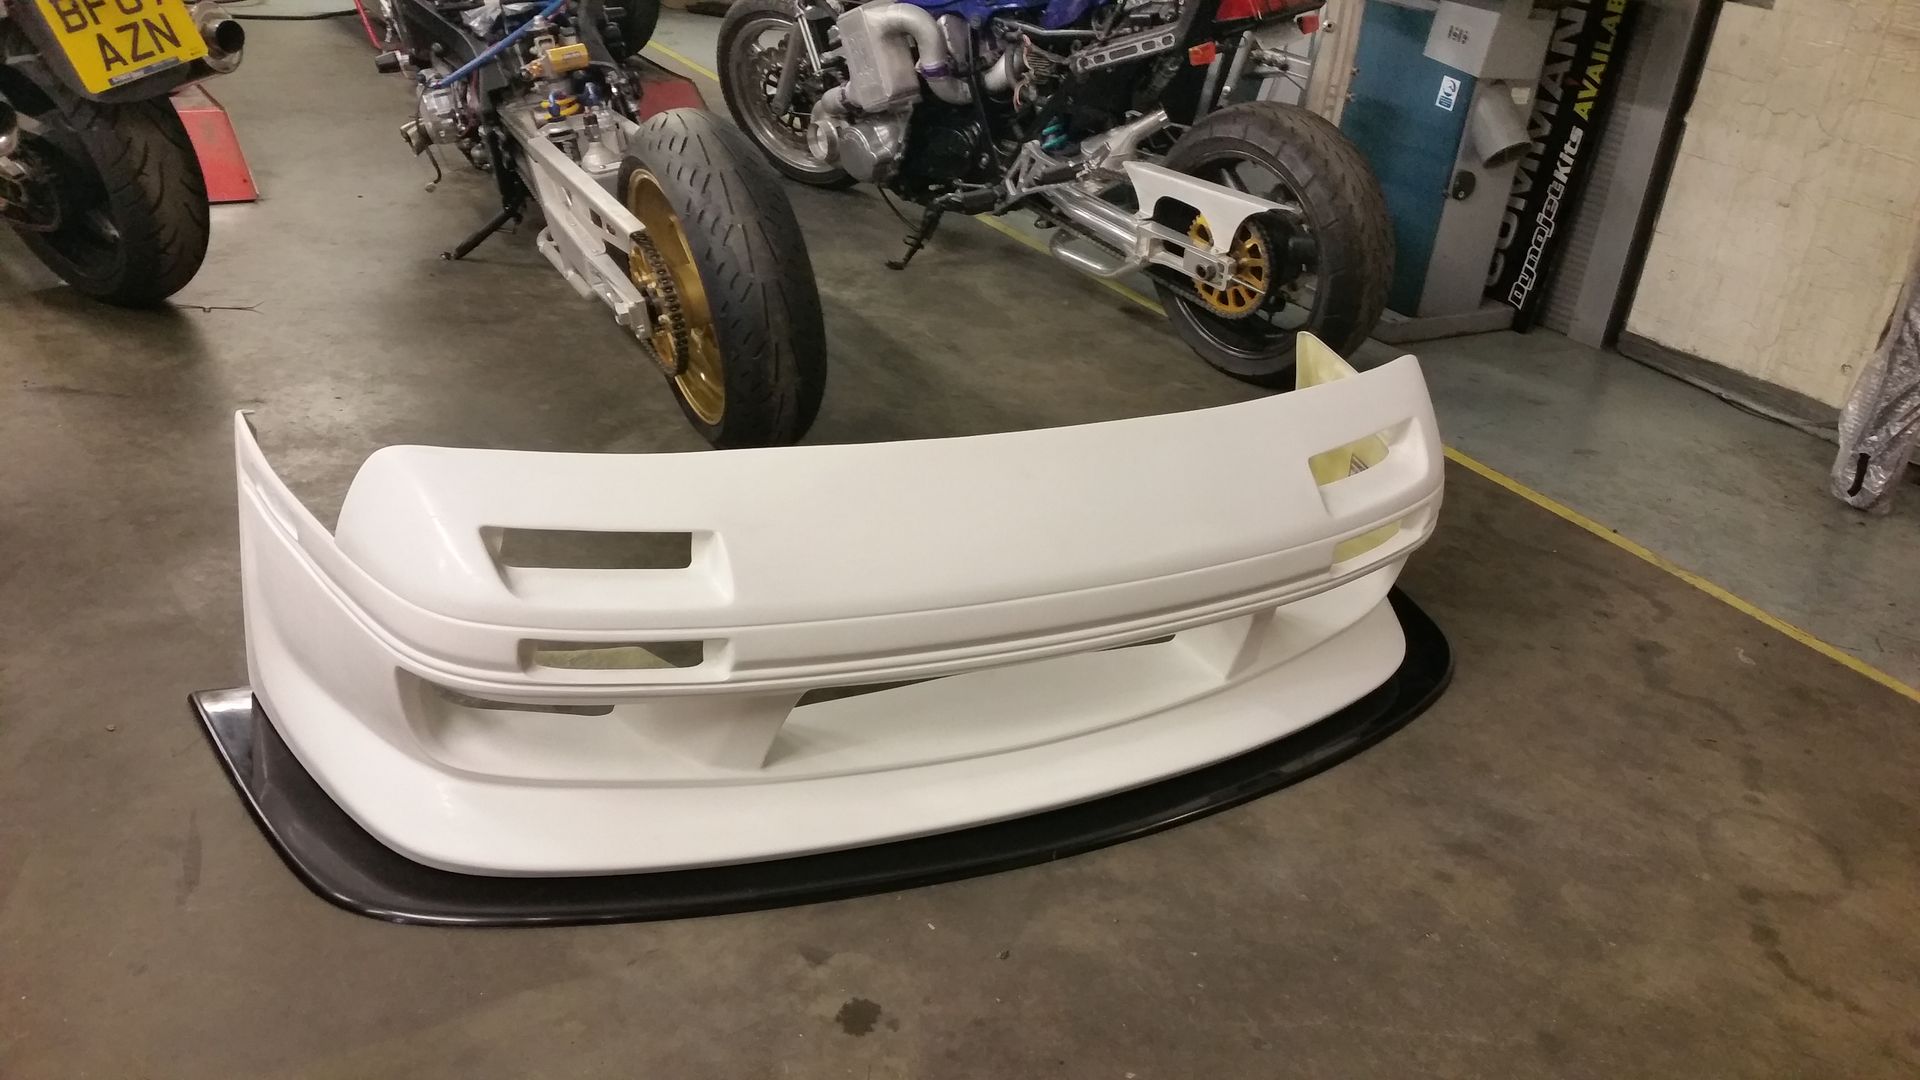
Got the front bumper through the other morning along with the splitter for the RX7. The splitter is the widest they do, because my arches are wider than stock at the front to suit the 10j wheels, so that may well need to have strip taken out the middle. The bumper will also need to be modded to suit the wings.
The pop up are being done away with in favour of fixed units like on the RE-A 2000 style kit. So bit more modding in that area will need to be addressed too.
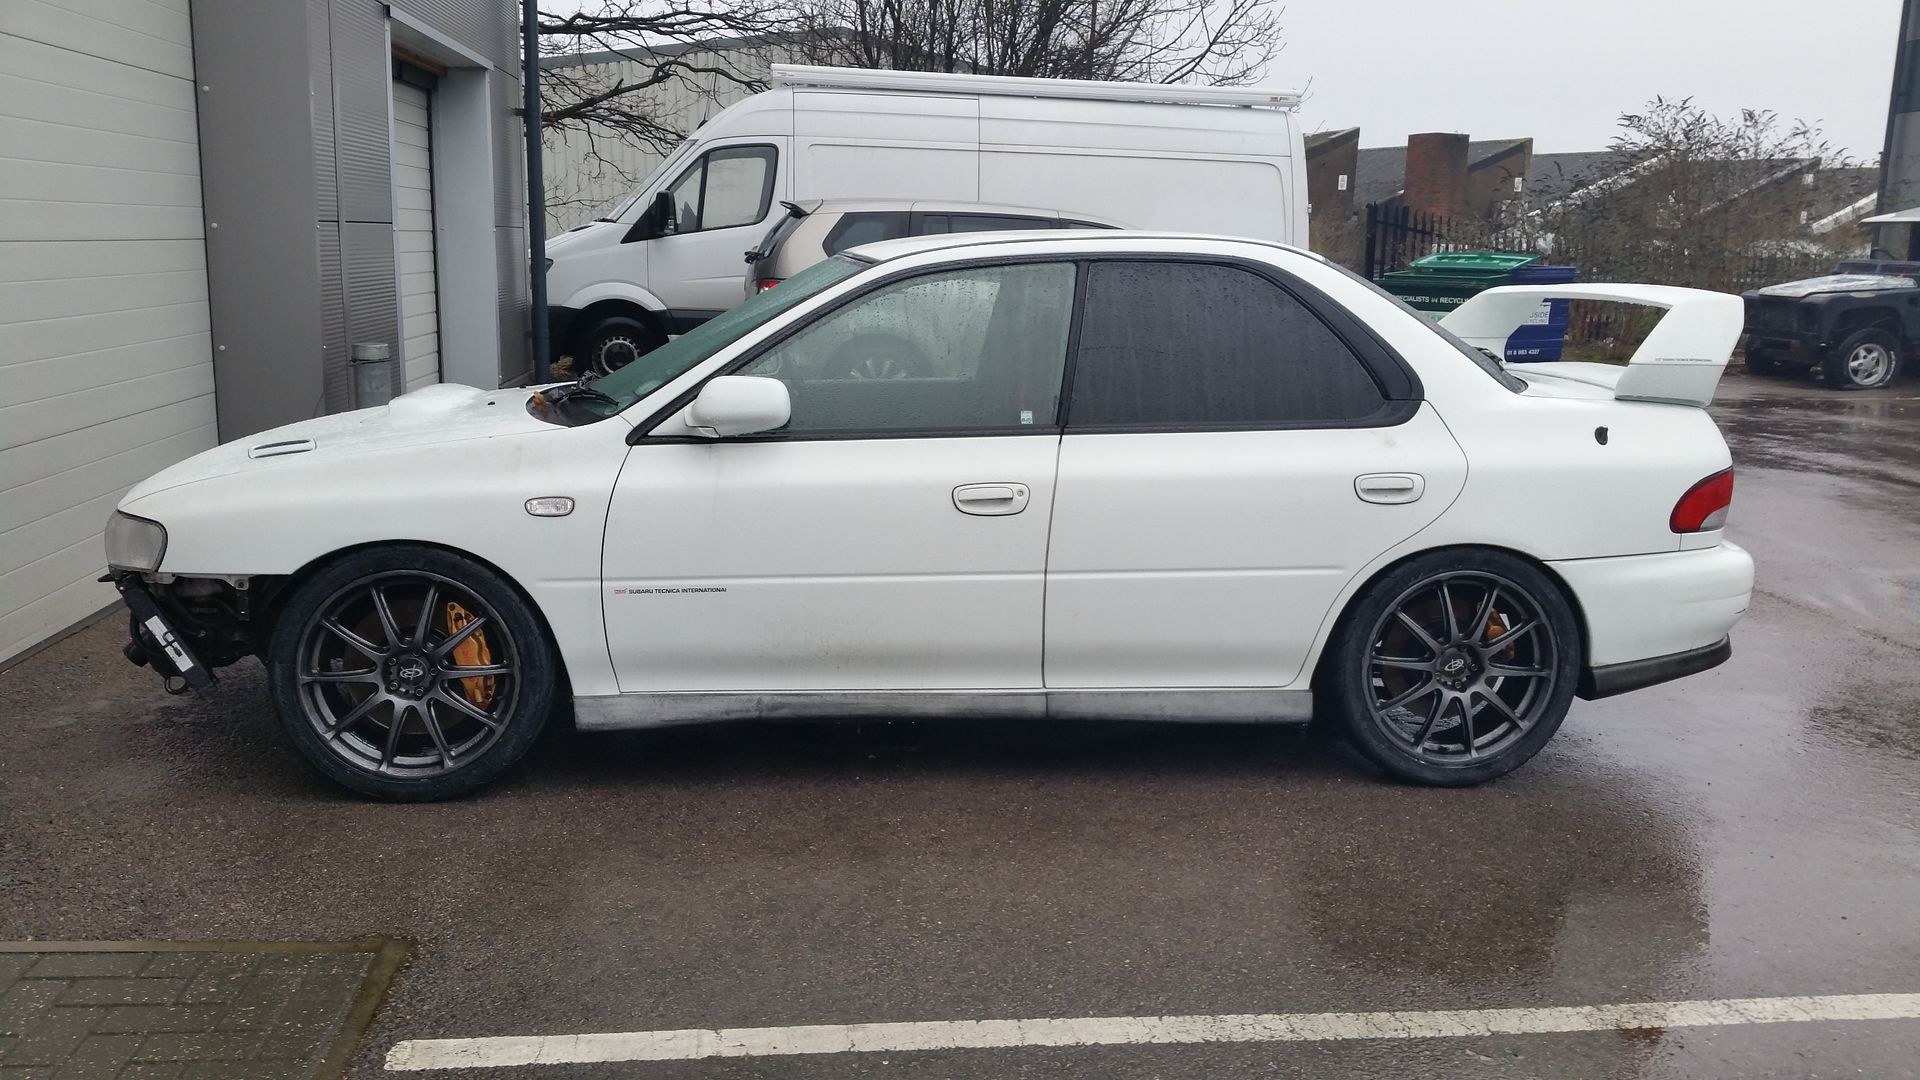
And on the scoob. Got the tyres on. Again they are 225/40/18 NS -2R. They fit a whole load better than the previous 215/35/18 tyres. Look much better too. I think they give the car a better looking stance.

Pedal box is also fitted in place just need to make all the lines.

I'll be on with some more interesting stuff next week hopefully get the old girl fired up and ready for mapping.
The pop up are being done away with in favour of fixed units like on the RE-A 2000 style kit. So bit more modding in that area will need to be addressed too.

And on the scoob. Got the tyres on. Again they are 225/40/18 NS -2R. They fit a whole load better than the previous 215/35/18 tyres. Look much better too. I think they give the car a better looking stance.


Pedal box is also fitted in place just need to make all the lines.

I'll be on with some more interesting stuff next week hopefully get the old girl fired up and ready for mapping.
Last edited by seventune; 02 June 2015 at 11:53 PM.
 10 January 2015, 10:51 AM
#140
Scooby Regular
Thread Starter
Not had a go on them yet. But a number people rate them better than the R888 both on and off road. Apprently the AD08 is a more comparable tyre in the dry in track conditions. Personally I don't like the R888 never have. The Yoko are amazing to too expensive and too soft, in terms of ware, for the road. I was considering the Khumo V70A I have had great results with those in the past but again .... money.
To be honest I was looking at all the usual 'performance' tyres so your hankook/avon/ khumo/ uniroyal and Bridgestone etc and all them have a C rating in the wet (apart from the A rated Uniroyal). These NS -2R'S have a B rating and they offer a lot more contact with the road in the dry being a trackday tyre. So for the price I thought why not just try them.
To be honest I was looking at all the usual 'performance' tyres so your hankook/avon/ khumo/ uniroyal and Bridgestone etc and all them have a C rating in the wet (apart from the A rated Uniroyal). These NS -2R'S have a B rating and they offer a lot more contact with the road in the dry being a trackday tyre. So for the price I thought why not just try them.
07 February 2015, 06:34 PM
#141
Scooby Regular
Thread Starter
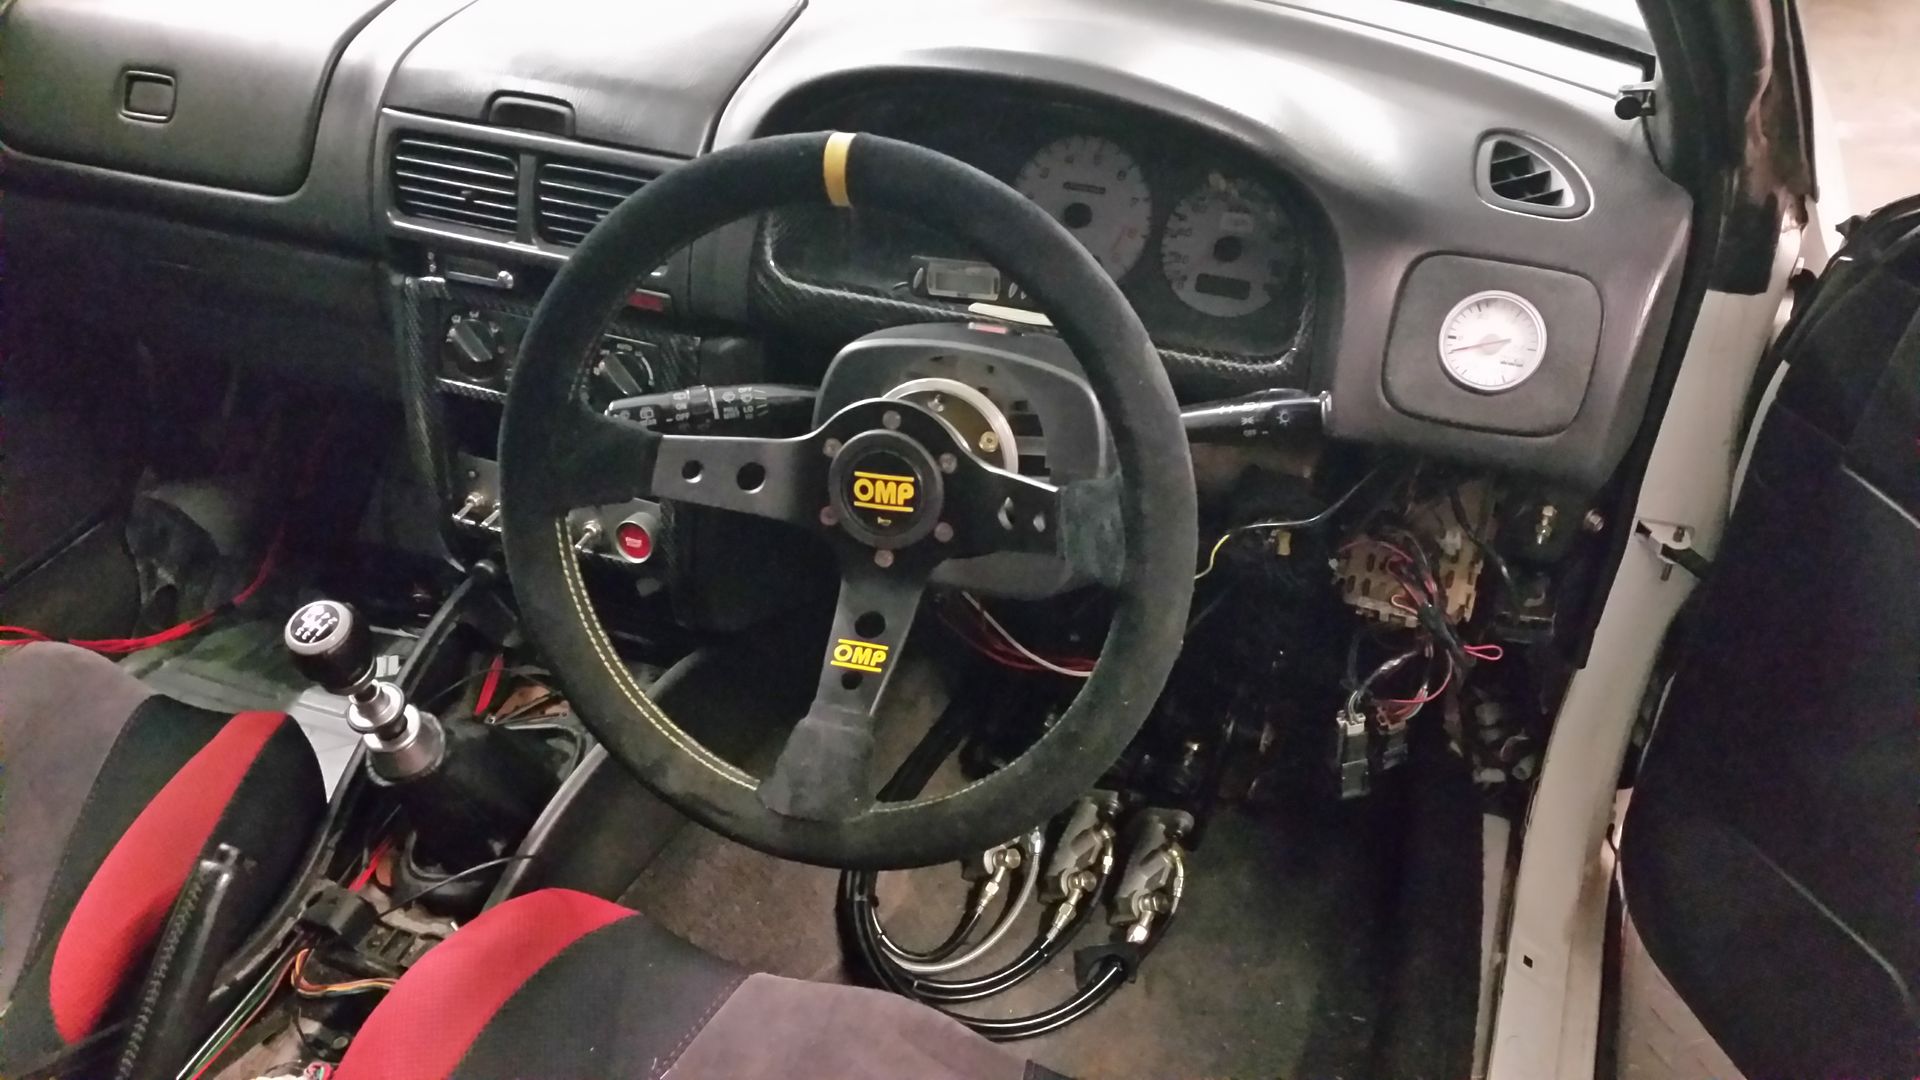
Its funny the closer you get to turning the key the more you realise that despite all your lists, checks, double checks and final checks just how many 'small' jobs you have to do in order to get to the finish line. After a couple of days of wiring relays, putting in kill switches and machining adaptors I'm actually now very close to getting the oil/coolant in and turning the key. Or pressing the button as the case now may be.
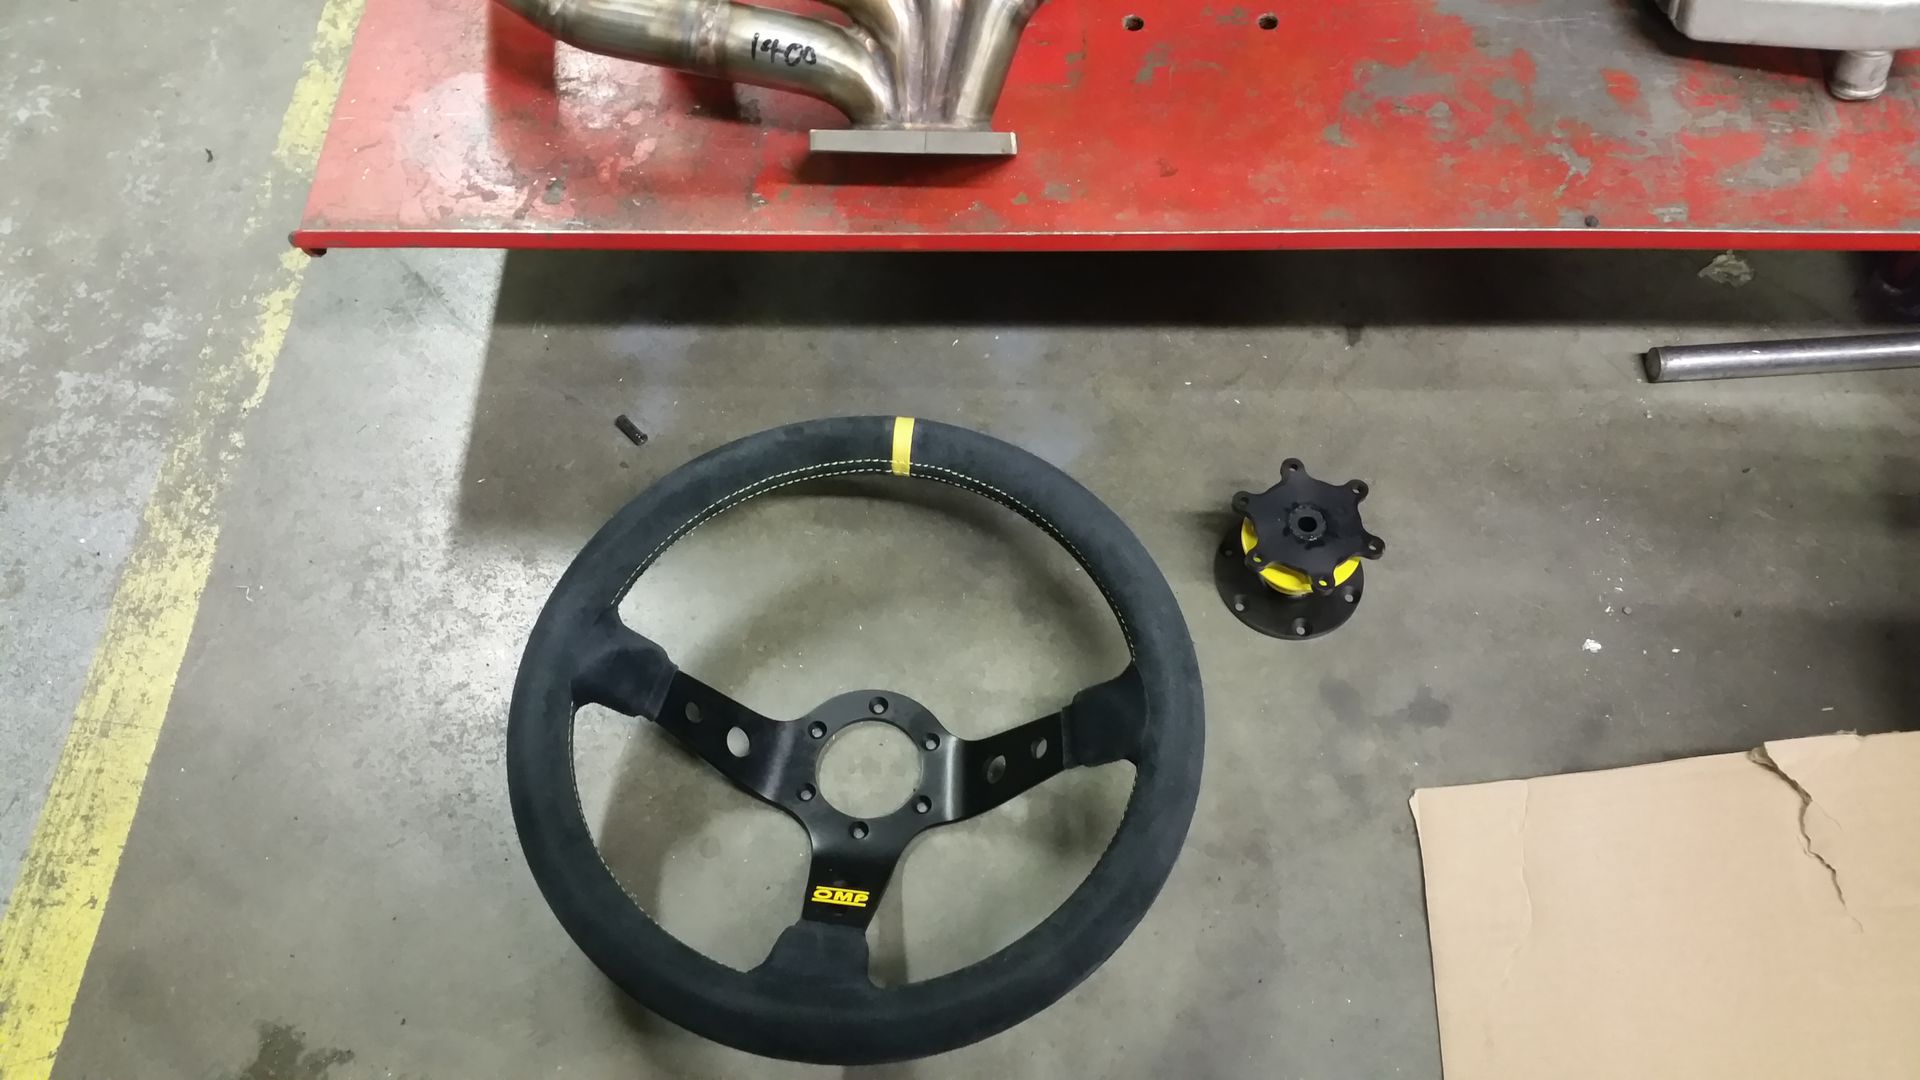
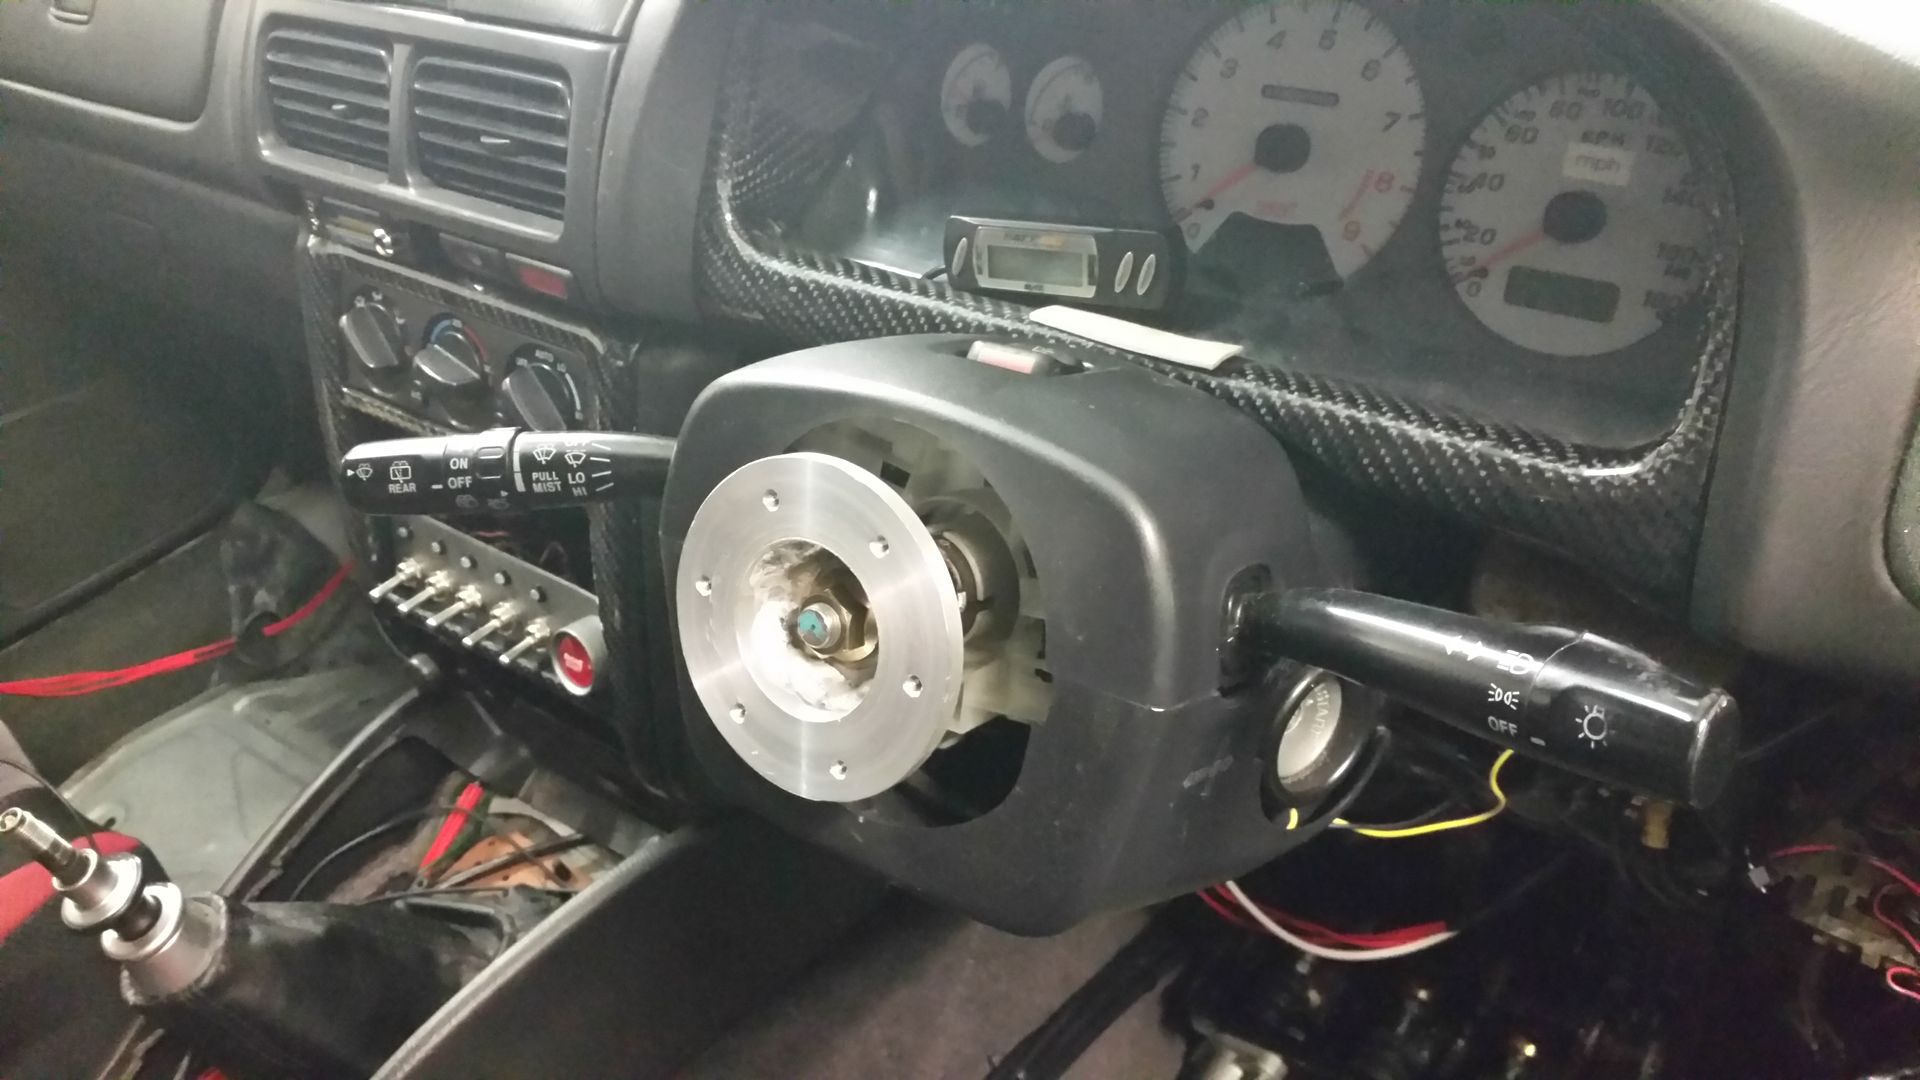
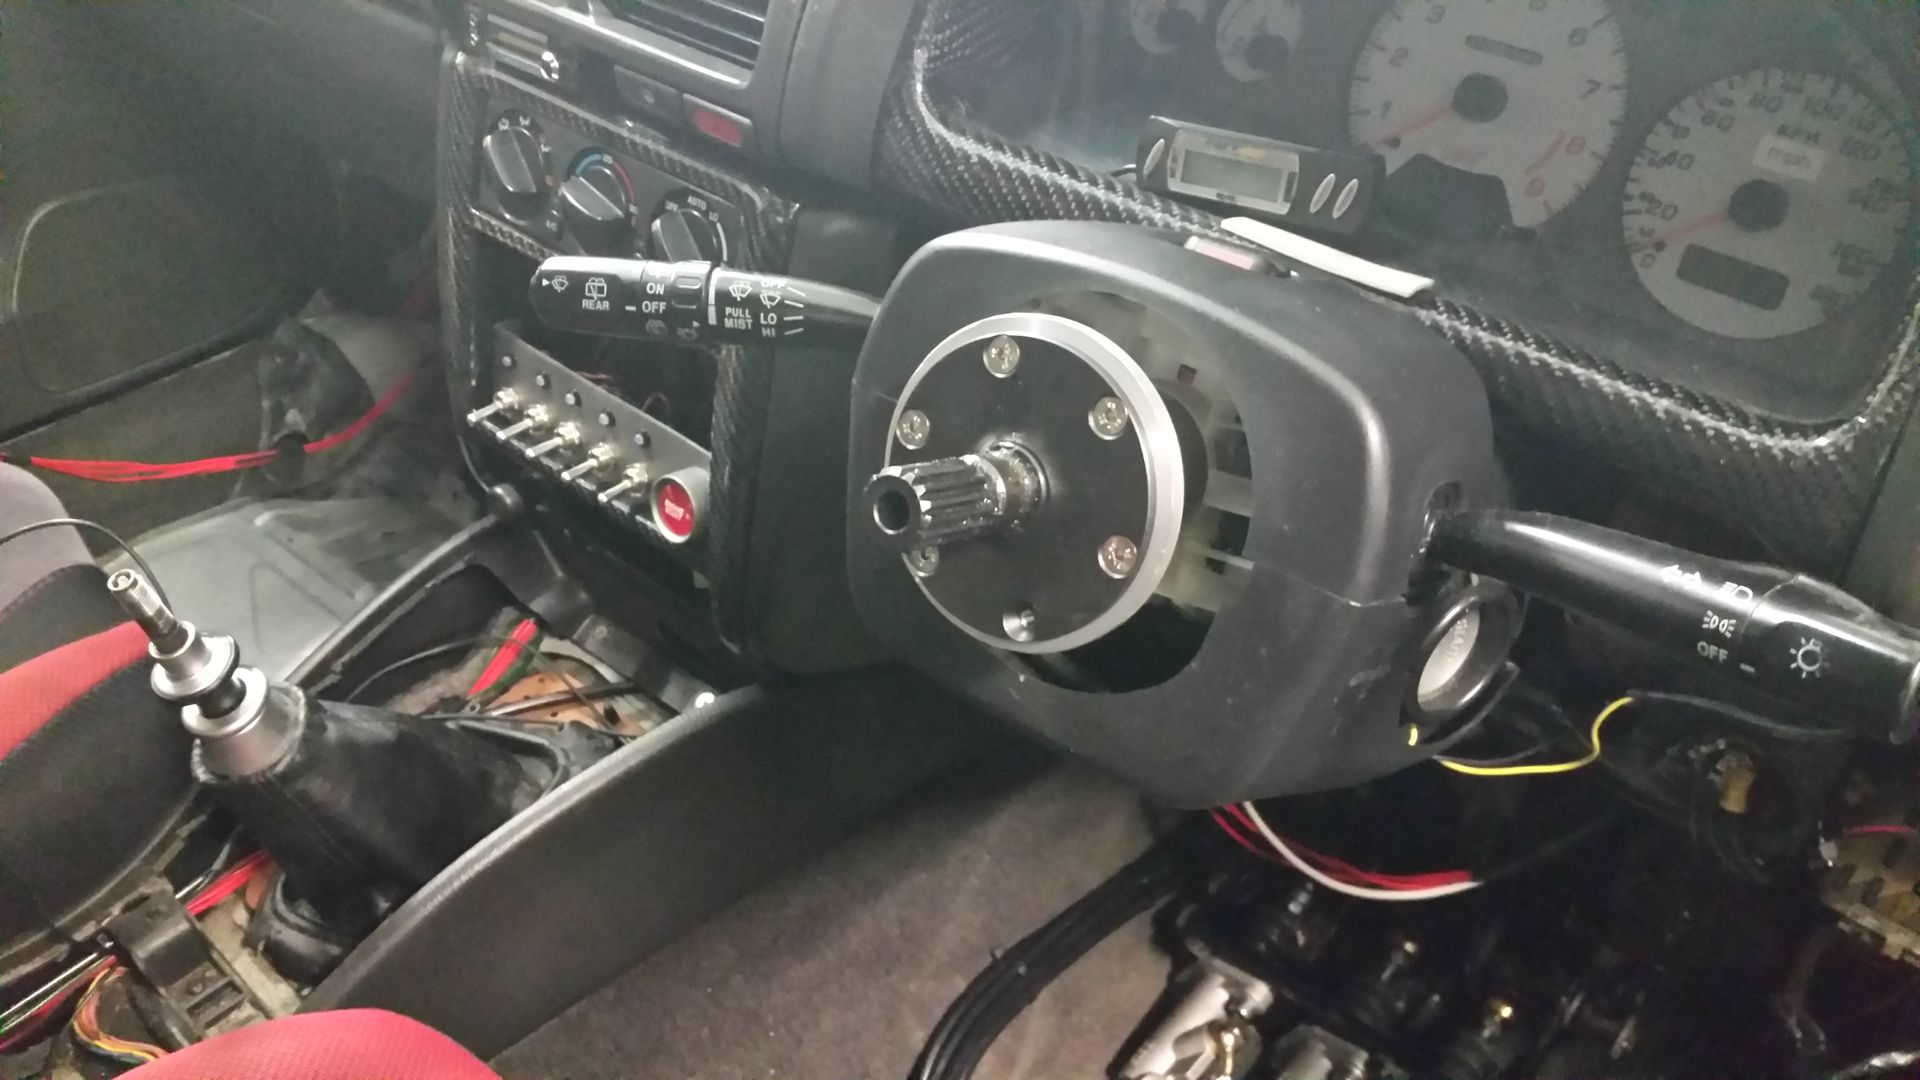
All the new brake line are made and run. Pedal box is fully in. I need to make the kick plate to cover the cylinders. Because of the new pedal position I've had to change the steering wheel.
Used that opportunity to purchase a new OMP wheel and Quick release boss. The steering wheel sits flush on the quick release boss which doesn't allow the horn to sit in the wheel. So I had to make a boss for that. Then I'm in the middle of machining an adaptor to go from the factory spline in the steering colum to match the blot pattern on the quick release boss.
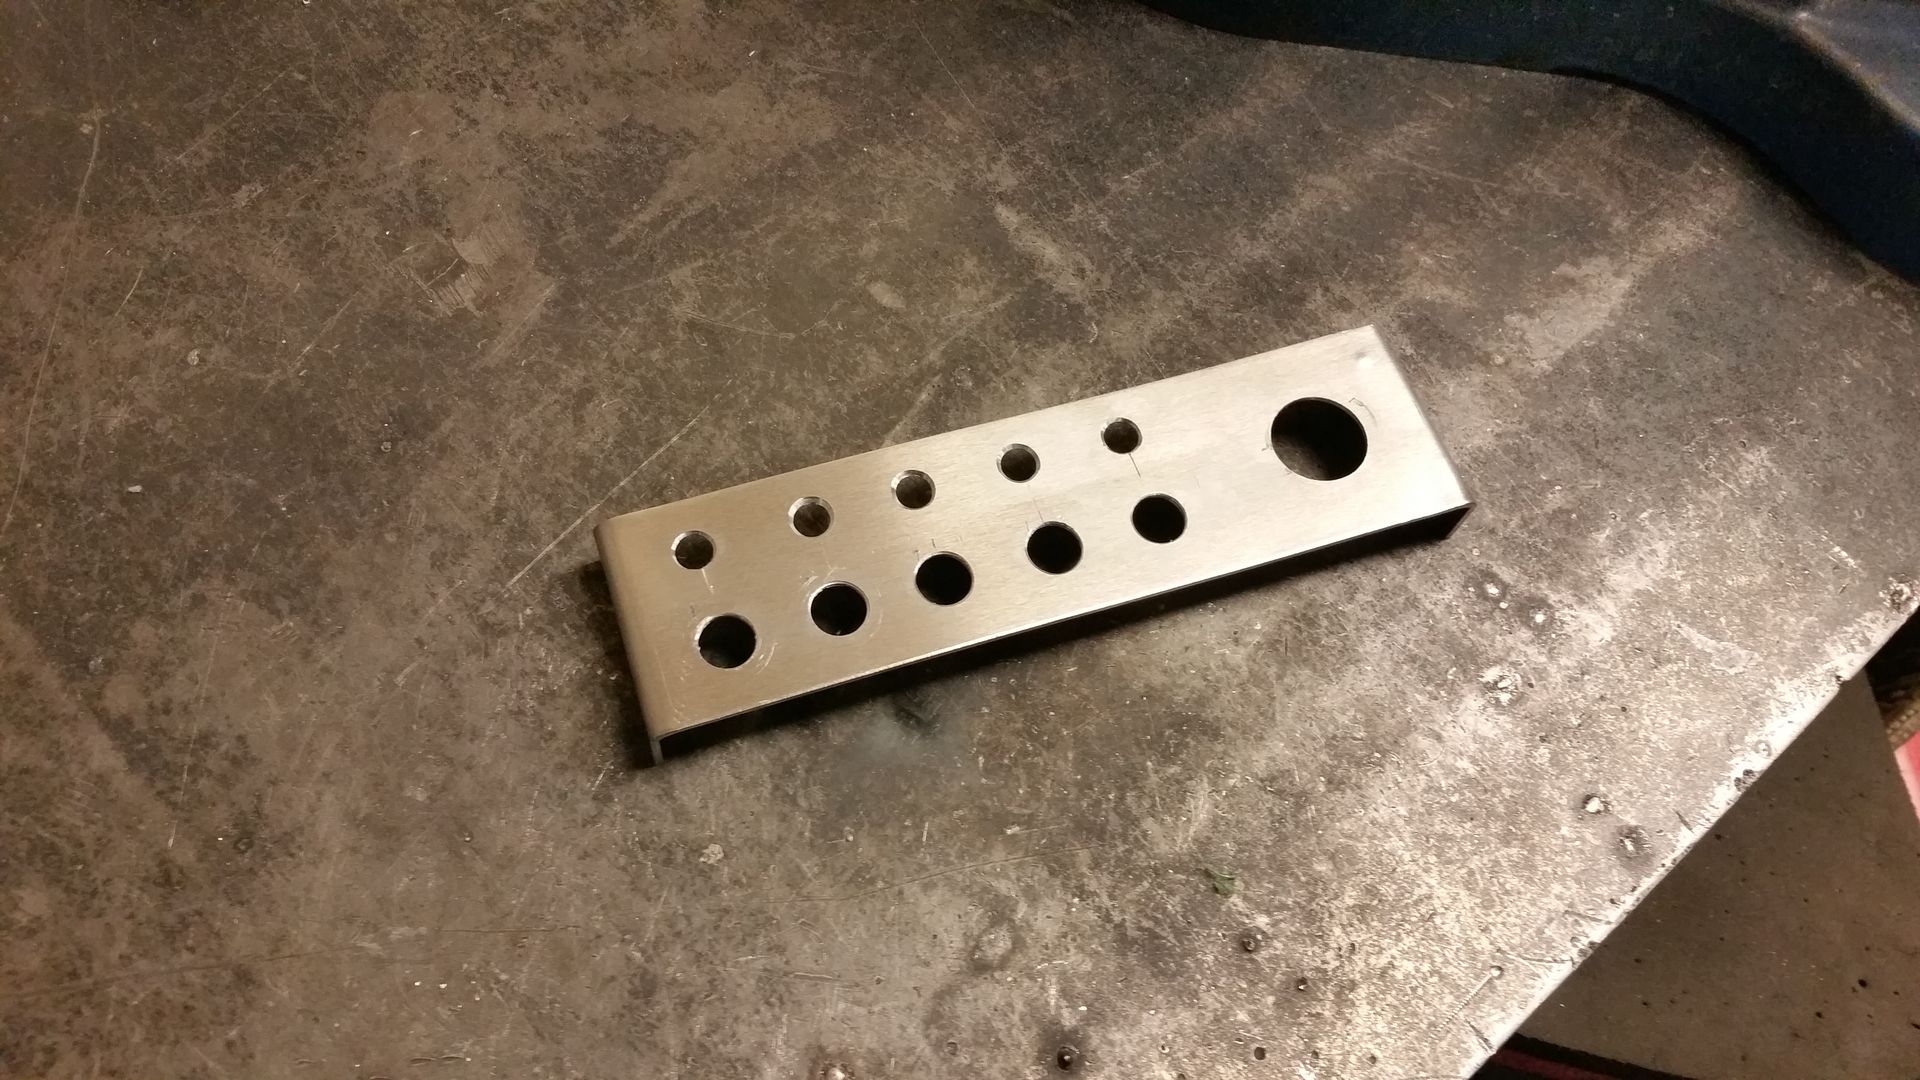
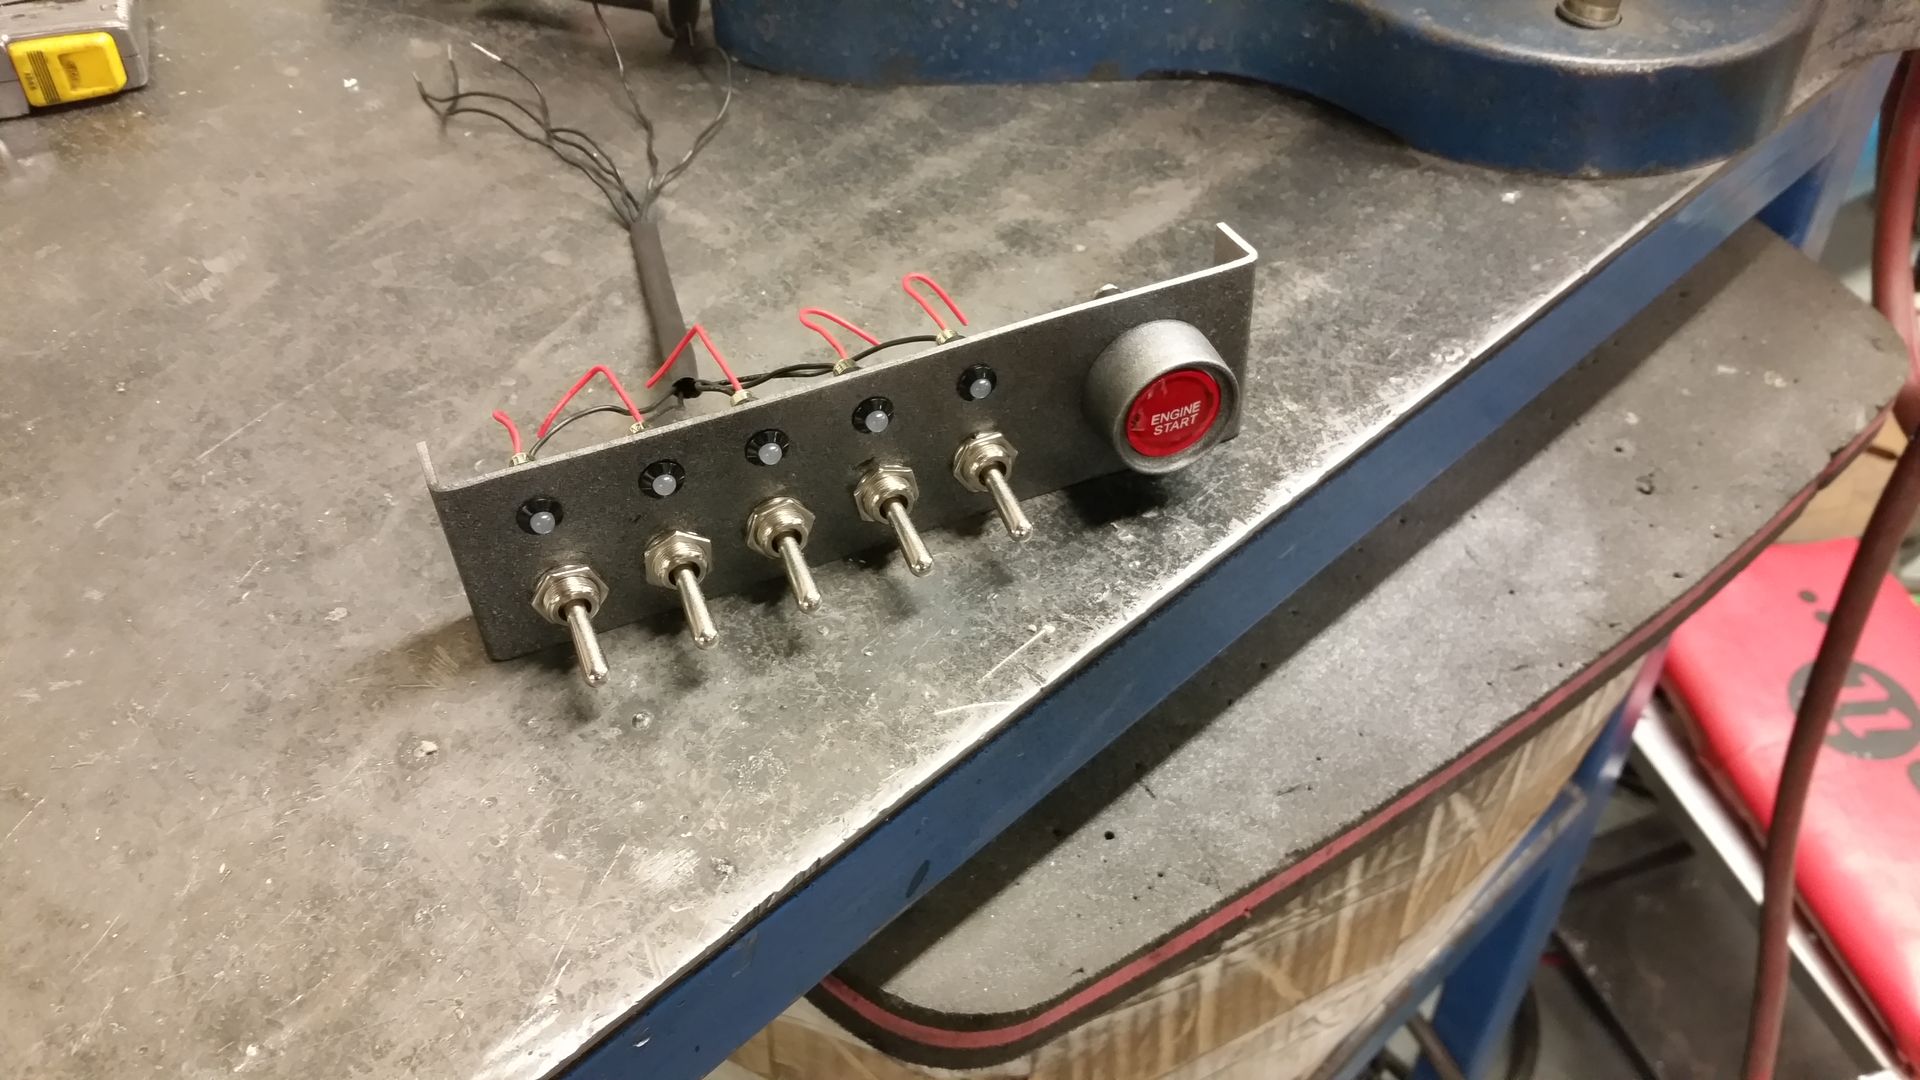
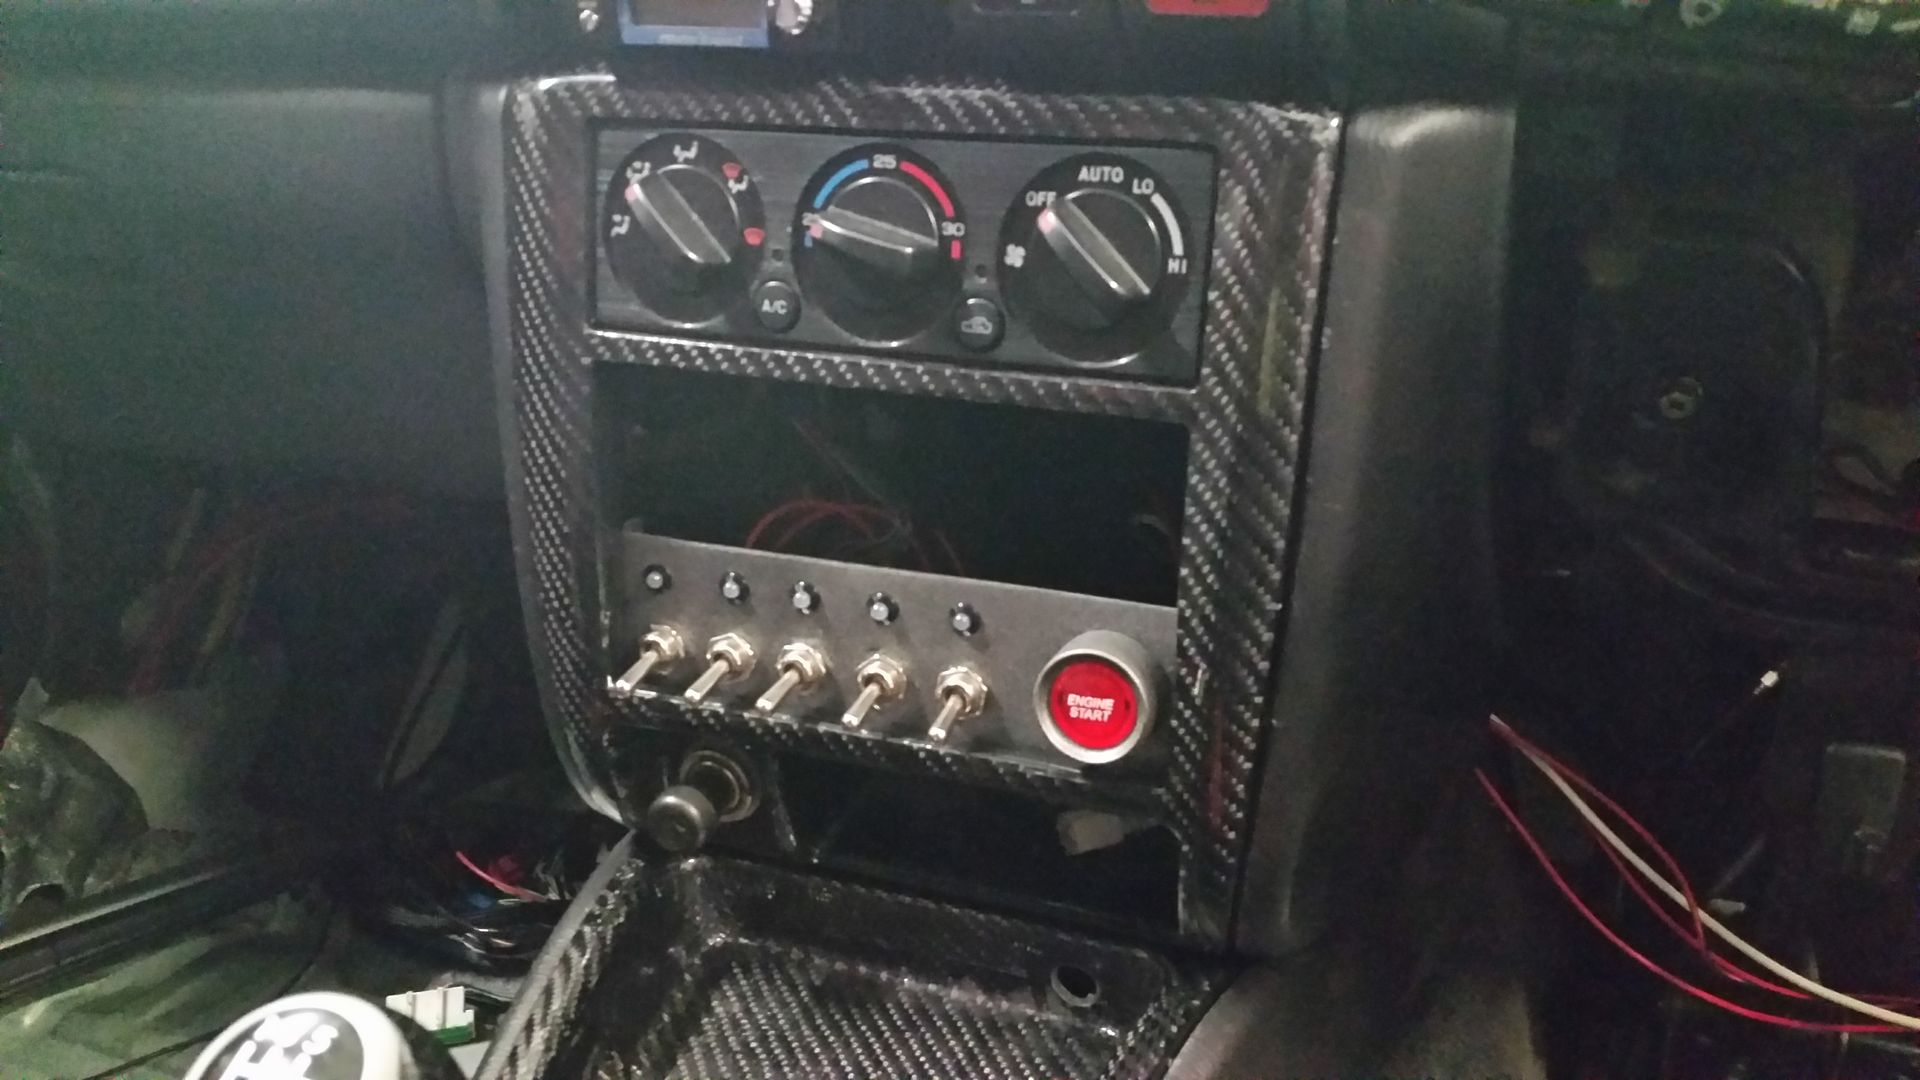
Kill switches and relays for fuel pumps/ignition/fans and push start. When a little like this:
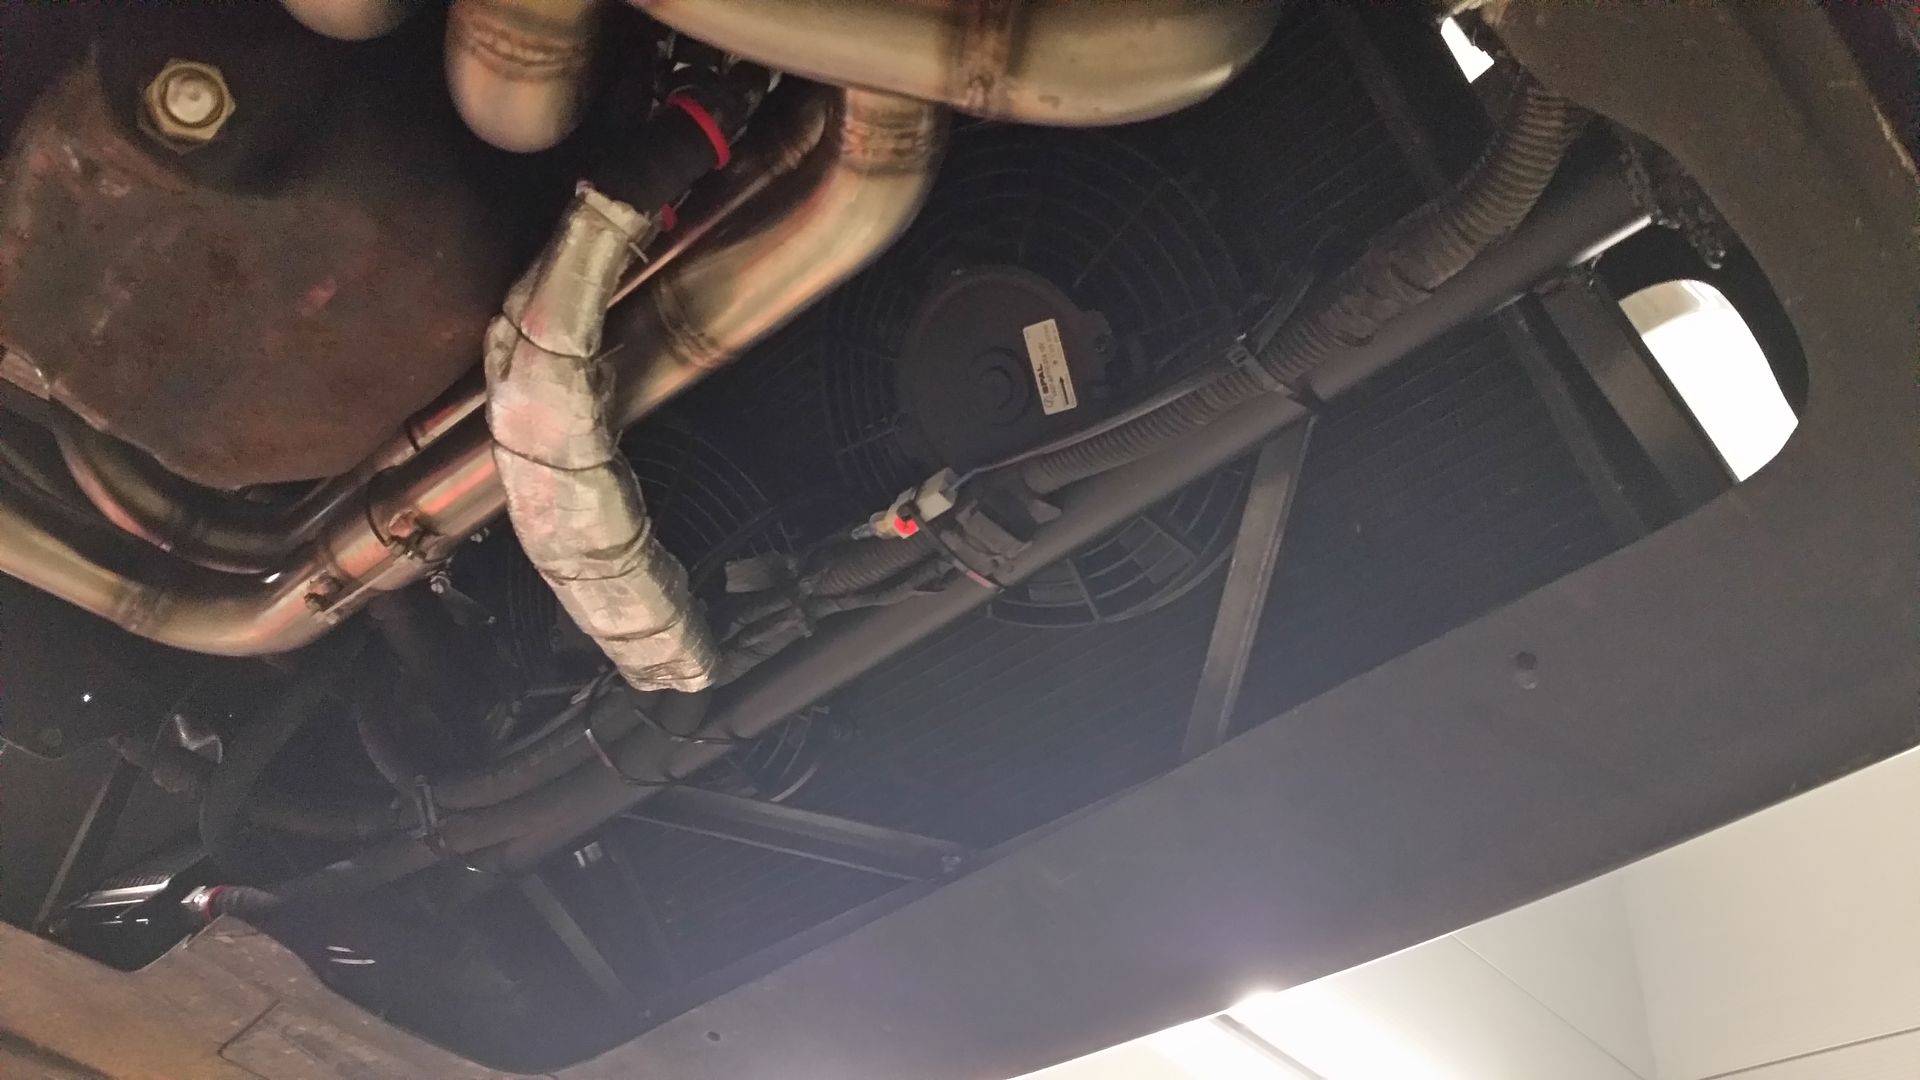
And a quick one of the fans..... exciting :/
Battery relocated to the boot. New lines run there also. So a handful of small jobs and tidy ups then i'll fire the old girl up.
All the new brake line are made and run. Pedal box is fully in. I need to make the kick plate to cover the cylinders. Because of the new pedal position I've had to change the steering wheel.
Used that opportunity to purchase a new OMP wheel and Quick release boss. The steering wheel sits flush on the quick release boss which doesn't allow the horn to sit in the wheel. So I had to make a boss for that. Then I'm in the middle of machining an adaptor to go from the factory spline in the steering colum to match the blot pattern on the quick release boss.


Kill switches and relays for fuel pumps/ignition/fans and push start. When a little like this:


And a quick one of the fans..... exciting :/

Battery relocated to the boot. New lines run there also. So a handful of small jobs and tidy ups then i'll fire the old girl up.
Last edited by seventune; 02 June 2015 at 11:54 PM.
 07 February 2015, 11:23 PM
#144
Scooby Regular
iTrader: (3)

Join Date: Aug 2010
Location: Manchester
Posts: 641
Likes: 0
Received 0 Likes
on
0 Posts
Brilliant work.I have a few questions  was the inlet just as straight forward as spinning it round or was there more to it.And could I have a closer picture of your alternator set up showing the mods please
was the inlet just as straight forward as spinning it round or was there more to it.And could I have a closer picture of your alternator set up showing the mods please
07 February 2015, 11:55 PM
#145
Scooby Regular
Thread Starter
Thanks dude.
If your referring to the manifold on the bench its for a customers GSX 1400. One of the more tame turbo kits we do. Will be around 230/240hp
The alternator is currently be remodded a bit but yes I will get some. On the manifold. In terms of the manifold itself yes if you turn it around it simply bolts back down reversed. But there is more to do. Water header tank needs relocating. Throttle cable needs altering. The throttle position/idle control valve wiring all need extending. The intercooler pipes will need modding. You may find that the intercooler pipe that comes of the throttle body may hit the underside of bonnet. Mine did but I have thermal spacers under mine which raises the height of it. So there are a few other bits you need to do to spin it around.
cheers
10 February 2015, 11:46 AM
#146
Scooby Regular
Thread Starter
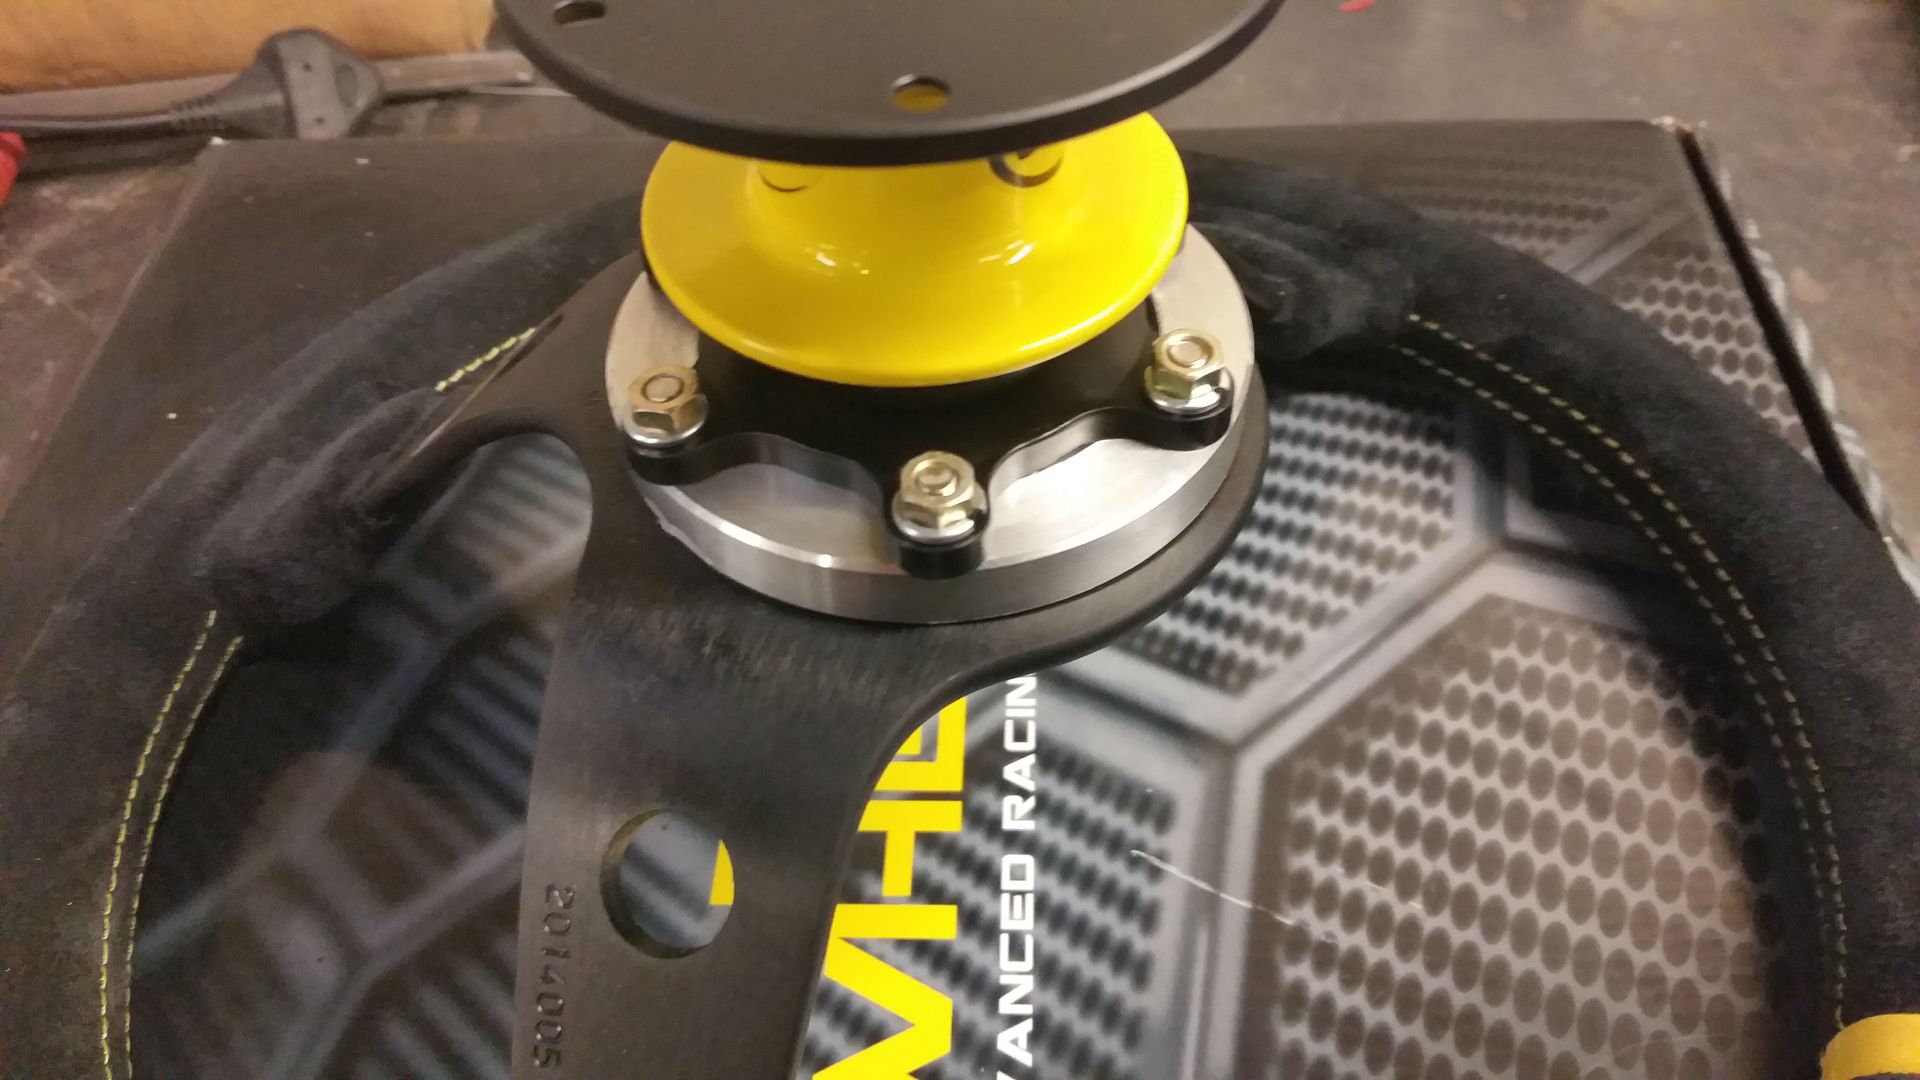
Got the steering in this morning. I'm going get a little boot to sit up being the new boss to cover the gap between the coloum and plastic covers. Now you may think way go to all the effort and not just buy and off the shelf adaptor. The answer is the distance. With the pedals being further back I bought a dished steering wheel to compensate. Then with the quick release mechanism it added a lot of length to the wheel assembly. I made this boss to make that all as short as possible. In doing saves about 2" which was perfect.
I cut the spline out of the stock wheel. The made an ally ring so that the two would be an interference fit. Then welded them front and back. This boss would then take the wheel hub.
Centre machined down
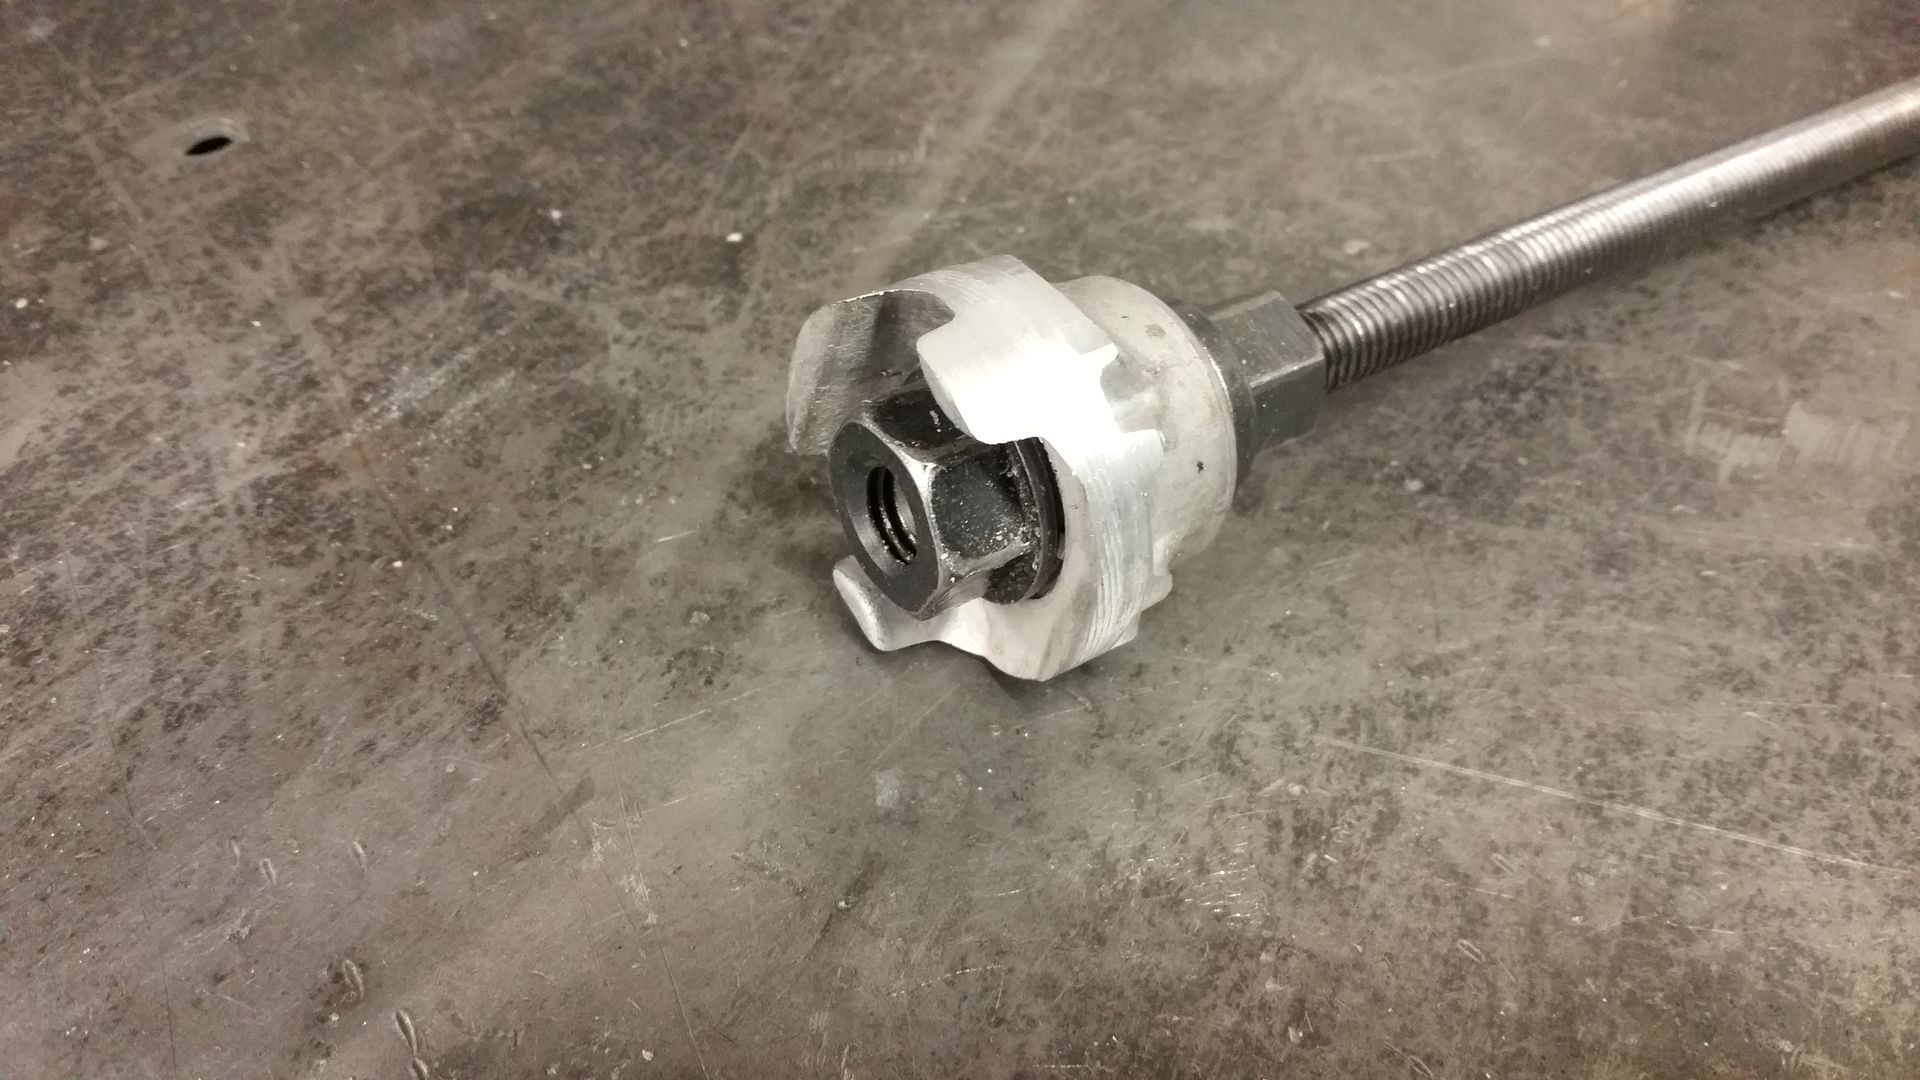
new ring
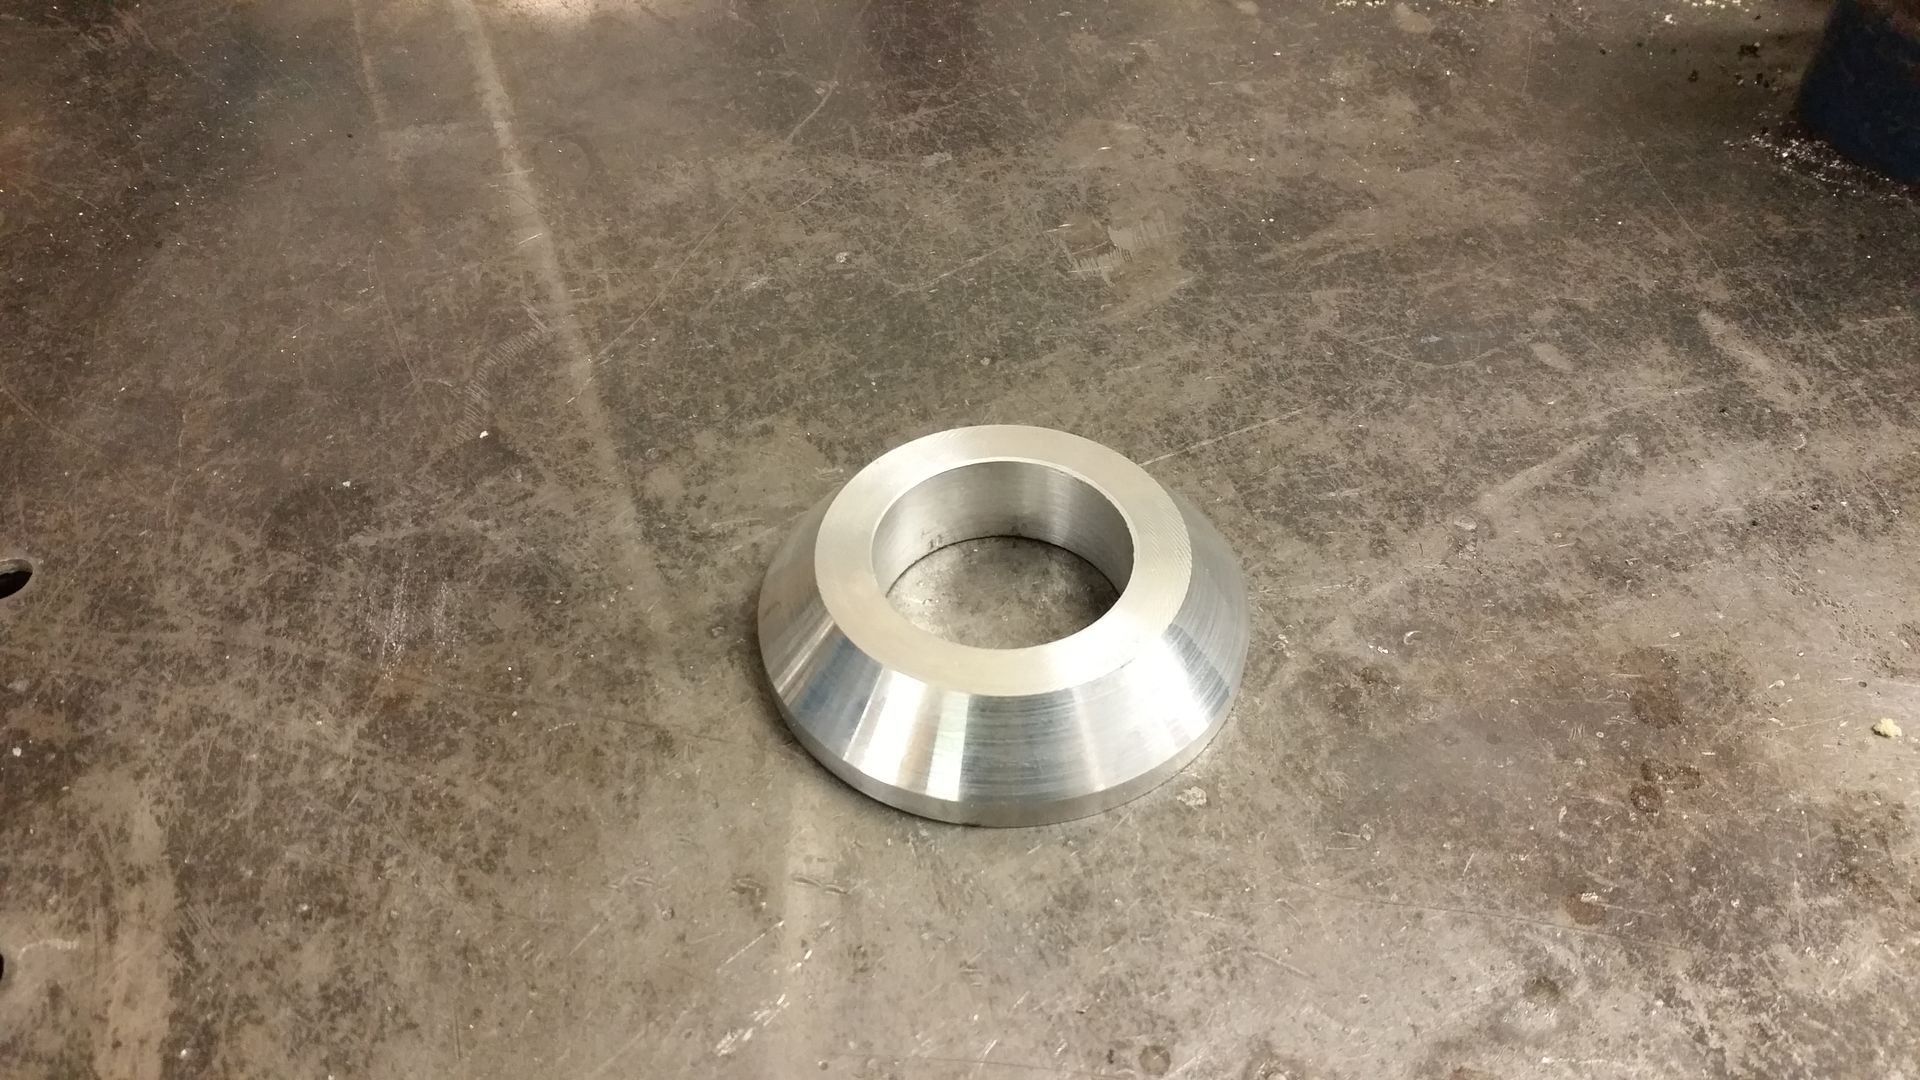
I cut the spline out of the stock wheel. The made an ally ring so that the two would be an interference fit. Then welded them front and back. This boss would then take the wheel hub.
Centre machined down

new ring


Last edited by seventune; 14 August 2015 at 12:40 AM.

 11 February 2015, 09:49 AM
#150
Scooby Regular
Thread Starter
Thanks chap. Oddly the gear stick is still a comfortable distance away. It's all moved so much I can't recall my previous seating location 