
Classic brake master cylinder stopper - Fitting Guide

Thread Starter

Joined: Apr 2005
Posts: 11,778
Likes: 4
From: Newcastle. 330bhp-289lb/ft @ 1bar boost - 12.4s @ 105mph
Since I couldn't find one online, why not?  Hopefully this rough guide will be of help to others.
This guide is NOT suitable for left hand drive cars, or Newage cars I think. Definitely not for LHD though.
In true Haynes manual style, I'd rate this at about 3 spanners. It's not especially difficult, more that it's an awkward fiddly job to do.
Mine was purchased from Chris at CDF Racing, via group buy on here a number of years ago.
Library photo of what you receive, erm borrowed from Motorsports Developments, who are now one of the appointed stockists for CDF Racing.

Owners of cars fitted with TMIC's and FE turbo's will have to work out themselves what needs removing at times, but, this guide should still be applicable.
Right, where to start?
Tools. You don't need many to actually do the job, couple of spanners, sockets and a ratchet. 10, 12 and 13mm items.
I should have taken photo's as I went, but as I had no intention of doing this write up at the time, I didn't. I'll make it up as go along, and besides, some places were nigh on impossible to get a decent photo of.
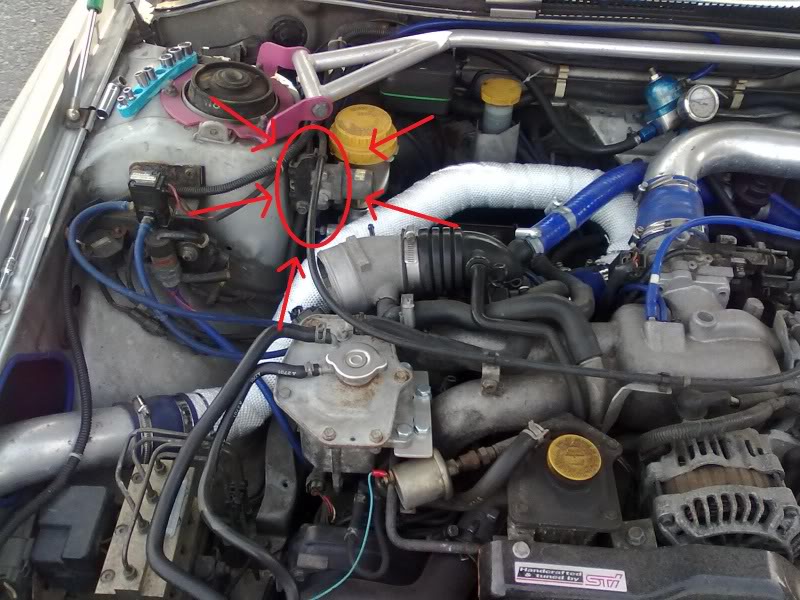
The scene before you start, old photo;

Start by removing any the intercooler pipe from the turbo, induction kit and MAF sensor. I'm pretty sure the TMIC will have to be removed if one is fitted.
You'll be removing this bracket first, as part of the brake stopper mounts in it's place;
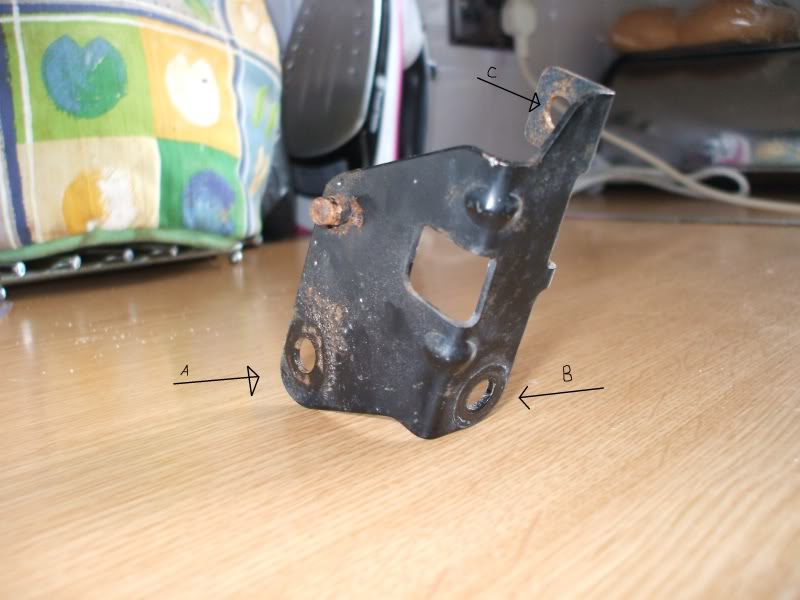
This is bolted to what I think is the brake bias valve and to the strut. Hi-lighted in the pic below;
A: This hole, and dowel above it are on the strut
B: This is the hole used to bolt it to the brake bias valve
C: This hole is for the clip that holds the throttle cable
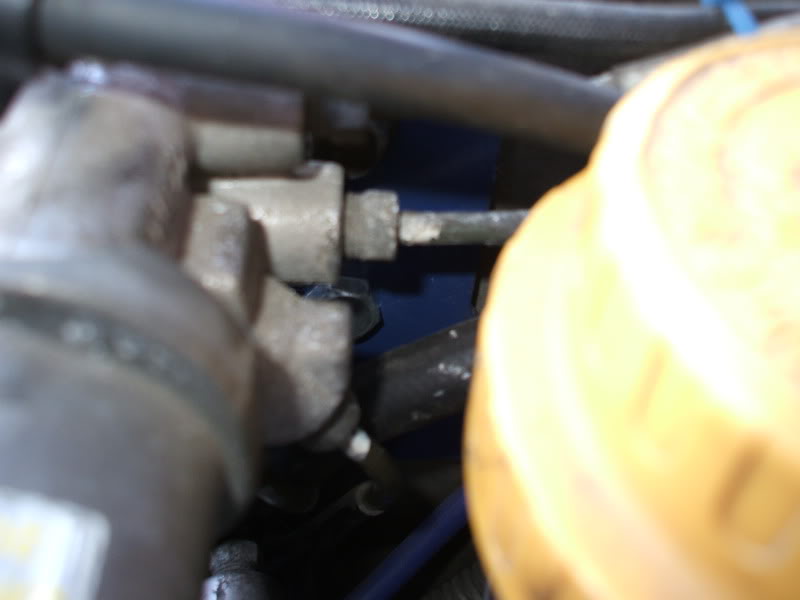
The bolt, for position A is a proper bitch to get at. I didn't take a before pic, but it's just visible in the pic below that I took earlier.
It's the shiny bolt in the middle of the picture;
Remove bolts A and B, unclip the throttle cable and remove said bracket.
Right, this is where I think most people will be getting stuck - I know I was. How does the damn thing actually fit?
Here is how.
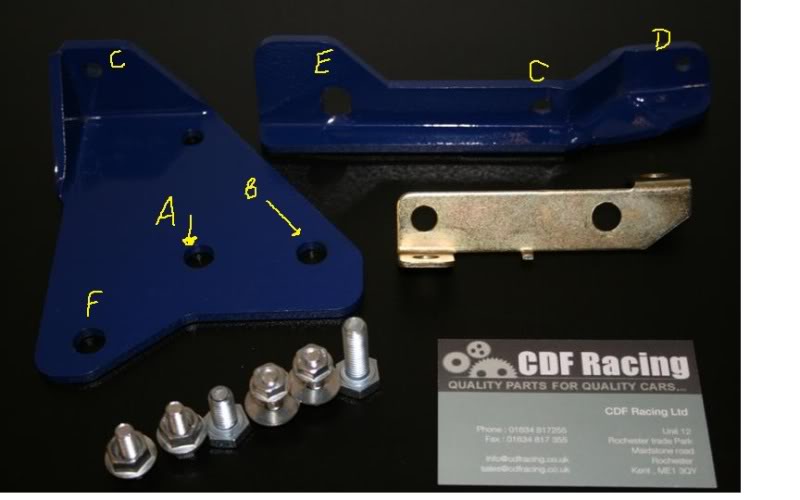
A, B, F are strut side mounting points
C are joining points
D is for the stopper
E is the strut forward mounting point
The silver bracket also shown is the last part to be fitted.
Remember the bracket that you just removed, use it for reference now. You won't be re-using it, but it's handy.
In the pic above, the hole labled A is the same hole as A on the bracket, hole B is what would be the locating dowel on the bracket. Hole F is on the strut, but I couldn't get at it to put a bolt in as it's obstructed by the brake fluid reservoir.
A helper would be very useful at this point, as to get the bolt in hole B, you have to push the bias valve out of the way towards the master cylinder. Even then space is limited.
The keen eyed amongst you will have noted that there a 2 holes labled as C in the above pic, this is how you join the 2 blue parts together.
Basically, bolt the larger blue plate in place, B at the top, and position C at the front of the strut.
When the large plate is in place, attach the long bar at position C and you'll have something like this;

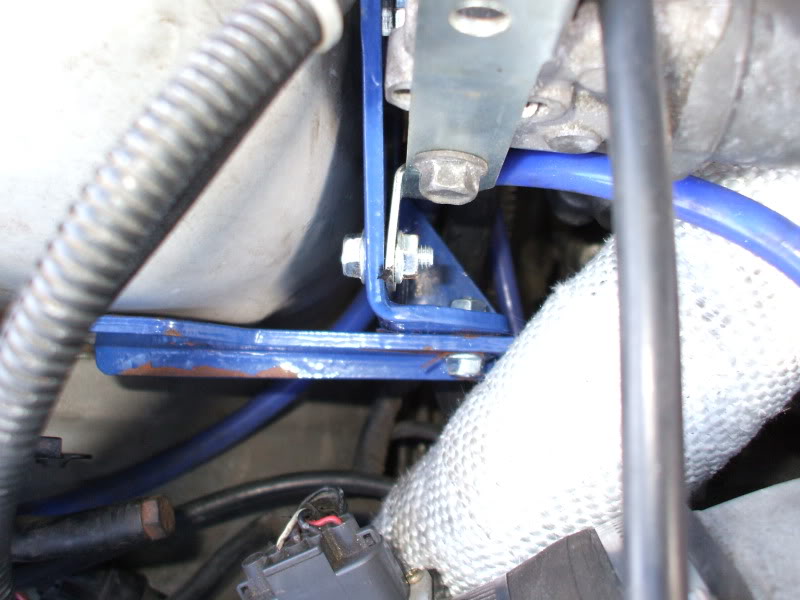
At this point you should bolt through position E into the strut, but my bar is drilled in the wrong place, so I haven't bothered yet.
I received a little alloy gubbins that you use to brace the end of the master cylinder against the long bar, as so;
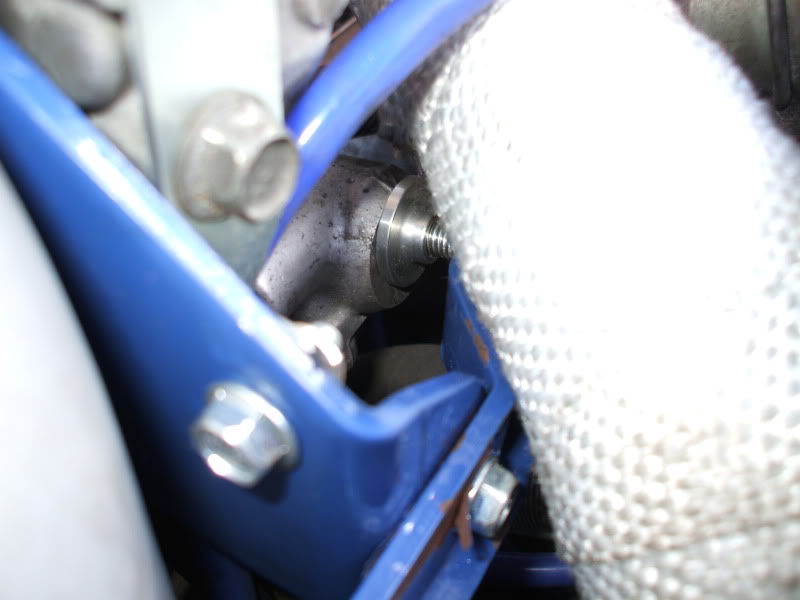
Use a bolt through position D and sort of screw the alloy bit against the master cylinder. The hole was threaded on mine, others may not be though.
Lastly, take the silver bracket, and bolt it to the brake bias valve, like so;
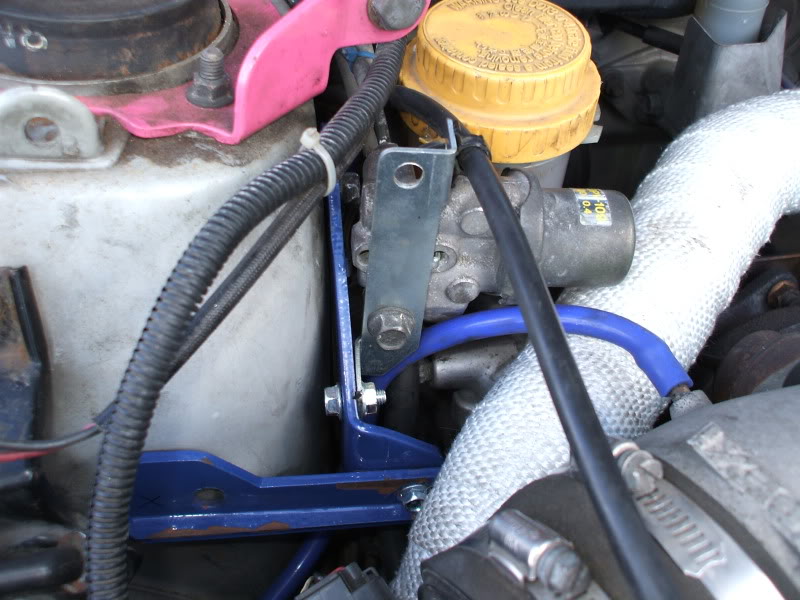
There is one hole that I didn't lable, again the keen eyed will have noticed this, join the silver bracket through this hole and one on the silver bracket adjacent to it, as shown in the pic above. Also re-attach the throttle cable.
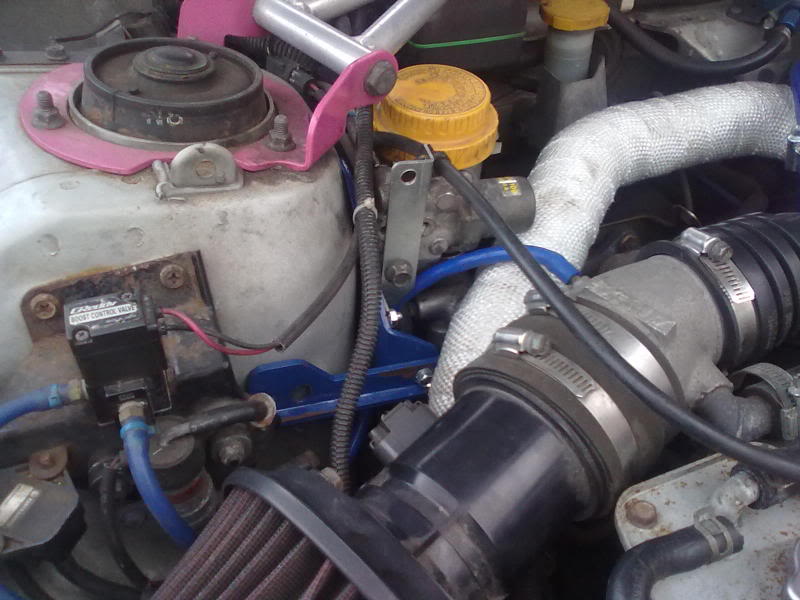
Re-fit TMIC if removed, intercooler pipe and induction, stand back and admire your hard work.
Finished;
Thanks to:
Chris at CDF Racing for the kit.
Alyn at AS Performance for his very valuable advice.
Disclaimer.
Modifying can be risky, any mishaps/breakages are not the responsibility of the author. Any omissions/errors are not the liability of the author. If in doubt, contact a trained professional to undertake the work.
Hopefully this rough guide will be of help to others.This guide is NOT suitable for left hand drive cars, or Newage cars I think. Definitely not for LHD though.
In true Haynes manual style, I'd rate this at about 3 spanners. It's not especially difficult, more that it's an awkward fiddly job to do.
Mine was purchased from Chris at CDF Racing, via group buy on here a number of years ago.
Library photo of what you receive, erm borrowed from Motorsports Developments, who are now one of the appointed stockists for CDF Racing.
Owners of cars fitted with TMIC's and FE turbo's will have to work out themselves what needs removing at times, but, this guide should still be applicable.
Right, where to start?
Tools. You don't need many to actually do the job, couple of spanners, sockets and a ratchet. 10, 12 and 13mm items.
I should have taken photo's as I went, but as I had no intention of doing this write up at the time, I didn't. I'll make it up as go along, and besides, some places were nigh on impossible to get a decent photo of.
The scene before you start, old photo;
Start by removing any the intercooler pipe from the turbo, induction kit and MAF sensor. I'm pretty sure the TMIC will have to be removed if one is fitted.
You'll be removing this bracket first, as part of the brake stopper mounts in it's place;
This is bolted to what I think is the brake bias valve and to the strut. Hi-lighted in the pic below;
A: This hole, and dowel above it are on the strut
B: This is the hole used to bolt it to the brake bias valve
C: This hole is for the clip that holds the throttle cable
The bolt, for position A is a proper bitch to get at.
I didn't take a before pic, but it's just visible in the pic below that I took earlier. It's the shiny bolt in the middle of the picture;
Remove bolts A and B, unclip the throttle cable and remove said bracket.
Right, this is where I think most people will be getting stuck - I know I was. How does the damn thing actually fit?
Here is how.
A, B, F are strut side mounting points
C are joining points
D is for the stopper
E is the strut forward mounting point
The silver bracket also shown is the last part to be fitted.
Remember the bracket that you just removed, use it for reference now. You won't be re-using it, but it's handy.
In the pic above, the hole labled A is the same hole as A on the bracket, hole B is what would be the locating dowel on the bracket. Hole F is on the strut, but I couldn't get at it to put a bolt in as it's obstructed by the brake fluid reservoir.
A helper would be very useful at this point, as to get the bolt in hole B, you have to push the bias valve out of the way towards the master cylinder. Even then space is limited.
The keen eyed amongst you will have noted that there a 2 holes labled as C in the above pic, this is how you join the 2 blue parts together.
Basically, bolt the larger blue plate in place, B at the top, and position C at the front of the strut.
When the large plate is in place, attach the long bar at position C and you'll have something like this;
At this point you should bolt through position E into the strut, but my bar is drilled in the wrong place, so I haven't bothered yet.
I received a little alloy gubbins that you use to brace the end of the master cylinder against the long bar, as so;
Use a bolt through position D and sort of screw the alloy bit against the master cylinder. The hole was threaded on mine, others may not be though.
Lastly, take the silver bracket, and bolt it to the brake bias valve, like so;
There is one hole that I didn't lable, again the keen eyed will have noticed this, join the silver bracket through this hole and one on the silver bracket adjacent to it, as shown in the pic above. Also re-attach the throttle cable.
Re-fit TMIC if removed, intercooler pipe and induction, stand back and admire your hard work.
Finished;
Thanks to:
Chris at CDF Racing for the kit.
Alyn at AS Performance for his very valuable advice.
Disclaimer.
Modifying can be risky, any mishaps/breakages are not the responsibility of the author. Any omissions/errors are not the liability of the author. If in doubt, contact a trained professional to undertake the work.


Thread
Thread Starter
Forum
Replies
Last Post
Mattybr5@MB Developments
Full Cars Breaking For Spares
34
Nov 7, 2024 04:10 PM
Scott@ScoobySpares
Full Cars Breaking For Spares
61
Jan 11, 2021 03:08 PM
Scott@ScoobySpares
Full Cars Breaking For Spares
7
Dec 14, 2015 08:16 AM
HEL Performance
Car Parts For Sale
28
Oct 13, 2015 07:36 PM