Notices
General Technical
Sponsored by:
Sponsored by: CARiD

Replacing Rear Subframe rubber mounts

Thread Tools
 
Search this Thread
 
Old Sep 3, 2016 | 09:21 PM
  #1  
The Rig's Avatar
The Rig
Thread Starter
Scooby Regular
20 Year Member
iTrader: (13)
 
Joined: Dec 2002
Posts: 7,891
Likes: 8
Default Replacing Rear Subframe rubber mounts

Edit

Don't buy from Polytorq , they know this product doesn't fit correctly yet advise you get what you pay for , avoid Polytorq from Wrexham .


I noticed on my classic the rear subframe / crossmember mounting rubbers are well and truly fubard , so my question , can I remove the bolts , old rubbers with it still on the car , ie jack it up on stands , jack under diff , undo bolts , lower diff using the jack to lower the subframe and replace bushes with these


http://m.ebay.co.uk/itm/Subaru-Impre...ATCHING_ACTIVE

Last edited by The Rig; Sep 22, 2016 at 01:08 AM.
Reply
Old Sep 4, 2016 | 12:15 AM
  #2  
The Rig's Avatar
The Rig
Thread Starter
Scooby Regular
20 Year Member
iTrader: (13)
 
Joined: Dec 2002
Posts: 7,891
Likes: 8
Default

Pressed in ? They are only rubber ( old ones ) and the new ones poly , wouldn't of thought they needed pressing in/ out ?

It's the 4 bolts that hold the rear subframe in that the diff / control arms attach to

Not attempted it yet so I may be talking ****e lol
Reply
Old Sep 4, 2016 | 12:23 AM
  #3  
The Rig's Avatar
The Rig
Thread Starter
Scooby Regular
20 Year Member
iTrader: (13)
 
Joined: Dec 2002
Posts: 7,891
Likes: 8
Default

https://www.google.co.uk/search?q=su...OOhbbKQIFlM%3A


The 4 bolts on this

Last edited by The Rig; Sep 4, 2016 at 12:25 AM.
Reply
Old Sep 4, 2016 | 11:00 AM
  #4  
Laupy's Avatar
Laupy
Scooby Regular
10 Year Member
iTrader: (2)
 
Joined: Apr 2013
Posts: 129
Likes: 5
From: Lyme Regis, Dorset
Default

Just replaced mine with the same ones you found on ebay. Originals are cartridge type and required me to burn the rubber out before then hacksawing and chiseling out the remaining metal shell. New ones just get lubed and then pushed in easily by hand. I'm not saying it would be impossible to do in situ, just really, really difficult.
Reply
Old Sep 4, 2016 | 11:35 AM
  #5  
The Rig's Avatar
The Rig
Thread Starter
Scooby Regular
20 Year Member
iTrader: (13)
 
Joined: Dec 2002
Posts: 7,891
Likes: 8
Default

Ok cheers guys, mine are really brittle, cracked, 1 has even lost a complete circumference of rubber in my hand (hence knowing they need replacing ha ) im hoping they are that brittle i can brutally remove them with subframe still in place, ie, remove 4 bolts, jack supporting the diff and lower it all about 6" if possible to do the job.

cheers for input guys, is it easy to remove the subframe entirely or worth having a bash in situ 1st ?
Reply
Old Sep 4, 2016 | 11:35 AM
  #6  
JDM_Stig's Avatar
JDM_Stig
Scooby Regular
15 Year Member
Liked
Loved
iTrader: (3)
 
Joined: Feb 2009
Posts: 5,873
Likes: 44
From: Mount Weather
Default

make your own press to remove old ones in situ,
washer, long bolt and socket bigger then old bush, then press into old socket,
have a measure up, you may find a press thats about for other cars, I know the old Vectra B rear arm press works on a couple of subaru bushes, but not sure on the one in question.
hth
Reply
Old Sep 4, 2016 | 11:37 AM
  #7  
The Rig's Avatar
The Rig
Thread Starter
Scooby Regular
20 Year Member
iTrader: (13)
 
Joined: Dec 2002
Posts: 7,891
Likes: 8
Default

Hmmm, good thinking batman :-) , im sure i have some threaded bar and can get the big washer etc, cheers
Reply
Old Sep 4, 2016 | 04:34 PM
  #8  
1509joe's Avatar
1509joe
Scooby Regular
15 Year Member
Liked
Loved
Community Favorite
iTrader: (2)
 
Joined: Jan 2009
Posts: 3,487
Likes: 316
From: Not sure
Default

Air hacksaw drill old rubber out cut old bushing outer shell then it near falls out. Clean hole lube slip new ones in job done.
Reply
Old Sep 16, 2016 | 09:48 PM
  #9  
The Rig's Avatar
The Rig
Thread Starter
Scooby Regular
20 Year Member
iTrader: (13)
 
Joined: Dec 2002
Posts: 7,891
Likes: 8
Default

Right, ive removed the 4 bolts, they were in there well !

ive lowered the subframe so got plenty of room, i tried the method of some threaded bar, the bush moves a bit but then it locks up, im guessing the rubber is well and truelly glued in there.

so im off tomorrow to buy a camping gas canister and hopefully a flame nozzle to try and burn the rubber out, there isnt much room to burn the rubber out tho, i mean, the hole the rubber sits in is pretty tight !
Reply
Old Sep 17, 2016 | 07:52 AM
  #10  
JDM_Stig's Avatar
JDM_Stig
Scooby Regular
15 Year Member
Liked
Loved
iTrader: (3)
 
Joined: Feb 2009
Posts: 5,873
Likes: 44
From: Mount Weather
Default

Run a hole saw down the rubber to remove
It takes the centre out leaving just a steel shell.

https://www.google.co.uk/search?q=18...Xg4EZihrIeM%3A
Reply
Old Sep 17, 2016 | 11:13 AM
  #11  
The Rig's Avatar
The Rig
Thread Starter
Scooby Regular
20 Year Member
iTrader: (13)
 
Joined: Dec 2002
Posts: 7,891
Likes: 8
Default

Hmm, thats a thought, ive measured the metal pin, its about 24-25mm, locally i can only get a 25mm holesaw, id like 26mm but might be worth getting the 25mm holesaw, use the blowtorch to burn the rubber and then have a bash with holesaw if burning doesnt work

At least its not raining ha ha

cheers
Reply
Old Sep 17, 2016 | 11:22 AM
  #12  
JDM_Stig's Avatar
JDM_Stig
Scooby Regular
15 Year Member
Liked
Loved
iTrader: (3)
 
Joined: Feb 2009
Posts: 5,873
Likes: 44
From: Mount Weather
Default

Originally Posted by The Rig
Hmm, thats a thought, ive measured the metal pin, its about 24-25mm, locally i can only get a 25mm holesaw, id like 26mm but might be worth getting the 25mm holesaw, use the blowtorch to burn the rubber and then have a bash with holesaw if burning doesnt work

At least its not raining ha ha

cheers
If you use the holesaw go as slow as you can to keep the heat down, to stop the rubber gripping.
Reply
Old Sep 17, 2016 | 04:27 PM
  #13  
The Rig's Avatar
The Rig
Thread Starter
Scooby Regular
20 Year Member
iTrader: (13)
 
Joined: Dec 2002
Posts: 7,891
Likes: 8
Default

Well i get the blow torch and it made light work of them, got a bit toastie near the fuel tank lol, had a piece of wood shielding it but still, was pretty warm under there !

But hey, all 4 old bushes out, new ones going in tomorrow, just hope they fit ha

Reply
Old Sep 17, 2016 | 05:00 PM
  #14  
Don Clark's Avatar
Don Clark
Scooby Regular
20 Year Member
Liked
Loved
Community Favorite
 
Joined: Feb 2003
Posts: 7,837
Likes: 834
From: Harpenden
Default

I don't see any of the outer steel shell of the bushes in that picture.
Without removing them the new bushes may not fit.

Originally Posted by 1509joe
Air hacksaw drill old rubber out cut old bushing outer shell then it near falls out. Clean hole lube slip new ones in job done.
Reply
Old Sep 17, 2016 | 05:27 PM
  #15  
The Rig's Avatar
The Rig
Thread Starter
Scooby Regular
20 Year Member
iTrader: (13)
 
Joined: Dec 2002
Posts: 7,891
Likes: 8
Default

Ah **** dont tell me that , I thought what was left was part of subframe , I'm guessing these are the outer shell ? How the heck do these come out , I don't have an air hacksaw !!

Blowtorch and whack it out ?


Reply
Old Sep 17, 2016 | 06:17 PM
  #16  
JDM_Stig's Avatar
JDM_Stig
Scooby Regular
15 Year Member
Liked
Loved
iTrader: (3)
 
Joined: Feb 2009
Posts: 5,873
Likes: 44
From: Mount Weather
Default

You normally tap the shell out with a cold chisel once rubber is out,
As the rubber is gone the shell should collapse quite easily now and tap out.
Reply
Old Sep 17, 2016 | 06:48 PM
  #17  
The Rig's Avatar
The Rig
Thread Starter
Scooby Regular
20 Year Member
iTrader: (13)
 
Joined: Dec 2002
Posts: 7,891
Likes: 8
Default

Ok bud cheers , I have a thick tipped chisel , I could use that to whack the lower part and see if crushes it , failing that buy a thin tipped chisel and tap under the washer area on top

Sheesh thought I'd got it ready to put new bushes in ha
Reply
Old Sep 17, 2016 | 07:04 PM
  #18  
mickywrx's Avatar
mickywrx
Unmapped 12.4s @ 105
20 Year Member
iTrader: (29)
 
Joined: Apr 2005
Posts: 11,778
Likes: 4
From: Newcastle. 330bhp-289lb/ft @ 1bar boost - 12.4s @ 105mph
Post

Are you trying to do this in-situ, Dean? Or is it off the car?
Reply
Old Sep 17, 2016 | 07:35 PM
  #19  
The Rig's Avatar
The Rig
Thread Starter
Scooby Regular
20 Year Member
iTrader: (13)
 
Joined: Dec 2002
Posts: 7,891
Likes: 8
Default

In Situ bud , don't fancy removing the subframe , there's ebern nough room so far with it on the car , just fiddly
Reply
Old Sep 17, 2016 | 07:49 PM
  #20  
mickywrx's Avatar
mickywrx
Unmapped 12.4s @ 105
20 Year Member
iTrader: (29)
 
Joined: Apr 2005
Posts: 11,778
Likes: 4
From: Newcastle. 330bhp-289lb/ft @ 1bar boost - 12.4s @ 105mph
Post

You'll probably struggle to whack the sleeve out with the subframe in place.
Reply
Old Sep 17, 2016 | 07:51 PM
  #21  
JDM_Stig's Avatar
JDM_Stig
Scooby Regular
15 Year Member
Liked
Loved
iTrader: (3)
 
Joined: Feb 2009
Posts: 5,873
Likes: 44
From: Mount Weather
Default

if your struggling to reach any steel bar that is long enough to hit , a small jemmy bar would do and a lump hammer.
Reply
Old Sep 17, 2016 | 08:56 PM
  #22  
The Rig's Avatar
The Rig
Thread Starter
Scooby Regular
20 Year Member
iTrader: (13)
 
Joined: Dec 2002
Posts: 7,891
Likes: 8
Default

Cheers guys , I intend to lower subframe , then fit a socket between subframe and chassis then jack back up to give clearance but also support the subframe from wobbling , wish me luck lads
Reply
Old Sep 17, 2016 | 08:59 PM
  #23  
JDM_Stig's Avatar
JDM_Stig
Scooby Regular
15 Year Member
Liked
Loved
iTrader: (3)
 
Joined: Feb 2009
Posts: 5,873
Likes: 44
From: Mount Weather
Default

have you tried a new bush in the old hole as is ?

edited, i doubt it will fit as this is what you are replacing.


hth

Last edited by JDM_Stig; Sep 17, 2016 at 09:06 PM.
Reply
Old Sep 17, 2016 | 09:45 PM
  #24  
The Rig's Avatar
The Rig
Thread Starter
Scooby Regular
20 Year Member
iTrader: (13)
 
Joined: Dec 2002
Posts: 7,891
Likes: 8
Default

Crikey not seen what the originals looked like , cheers bud

I will use the blow torch to heat it up then thwack it to death lol
Reply
Old Sep 17, 2016 | 11:45 PM
  #25  
my94wrx's Avatar
my94wrx
Scooby Regular
iTrader: (4)
 
Joined: Feb 2009
Posts: 2,885
Likes: 1
Default

Originally Posted by The Rig
Crikey not seen what the originals looked like , cheers bud

I will use the blow torch to heat it up then thwack it to death lol
if you are still struggling to get the steel sleeves out with some heat, carefully cut slot in them with a hack saw and they will fly out.
Reply
Old Sep 18, 2016 | 12:02 AM
  #26  
The Rig's Avatar
The Rig
Thread Starter
Scooby Regular
20 Year Member
iTrader: (13)
 
Joined: Dec 2002
Posts: 7,891
Likes: 8
Default

Yeah , that's the next plan , hacksaw blade in between 2 bits of wood for a handle

Cheers bud
Reply
Old Sep 18, 2016 | 01:19 AM
  #27  
jody0702's Avatar
jody0702
Scooby Regular
 
Joined: Apr 2008
Posts: 82
Likes: 0
From: Devon
Default

Originally Posted by The Rig
Yeah , that's the next plan , hacksaw blade in between 2 bits of wood for a handle

Cheers bud
Mine was removed to do the job as was replacing everything at the time which made things easier!! The remaining outer shell has to be cut through to enable you to smash out from underneath. I actually fed a hacksaw blade through the mount then reattached the hacksaw handle to make it easier! You can also drive a screwdriver from above between the subframe and lip of outer shell to free it up a bit. I used the sti mounts from icp and they didn't just slide in...I tried then used my bros press. Those poly ones should be easier, just grease them up n try the homemade press
Reply
Old Sep 18, 2016 | 05:27 PM
  #28  
The Rig's Avatar
The Rig
Thread Starter
Scooby Regular
20 Year Member
iTrader: (13)
 
Joined: Dec 2002
Posts: 7,891
Likes: 8
Default

Well, that was a ball ache and 5 hours of my life gone, But, as mentioned, couldnt do the job on the car, it didnt help i didnt realise the sleeves were inside the part on the subframe, i thought the part on the subframe was the sleeve ha ha so that went well to start with !

Backbox off, trailing arms off, heat shield off, antiroll bar moved out the way, the list goes on ha

The subframe is removed, the sleevs are out ! Now to put it all back together ANOTHER DAY lol !

what a horrible job, not many bolts but sheesh, hard to get at, hard to undo, espeically when the car is on your drive way not on a ramp !

I did go overzelous and get too deep on one sleeve, hope it doesnt have an impact on the subframe ?

i noticed the trailing arm bushes arent the best but can i remove that long massive bolt, can i heck !!

heres some pics


Reply
Old Sep 18, 2016 | 05:29 PM
  #29  
The Rig's Avatar
The Rig
Thread Starter
Scooby Regular
20 Year Member
iTrader: (13)
 
Joined: Dec 2002
Posts: 7,891
Likes: 8
Default

Oh, cheers again all for the info and help along the way , much appreciated

Reply
Old Sep 20, 2016 | 01:12 AM
  #30  
The Rig's Avatar
The Rig
Thread Starter
Scooby Regular
20 Year Member
iTrader: (13)
 
Joined: Dec 2002
Posts: 7,891
Likes: 8
Default

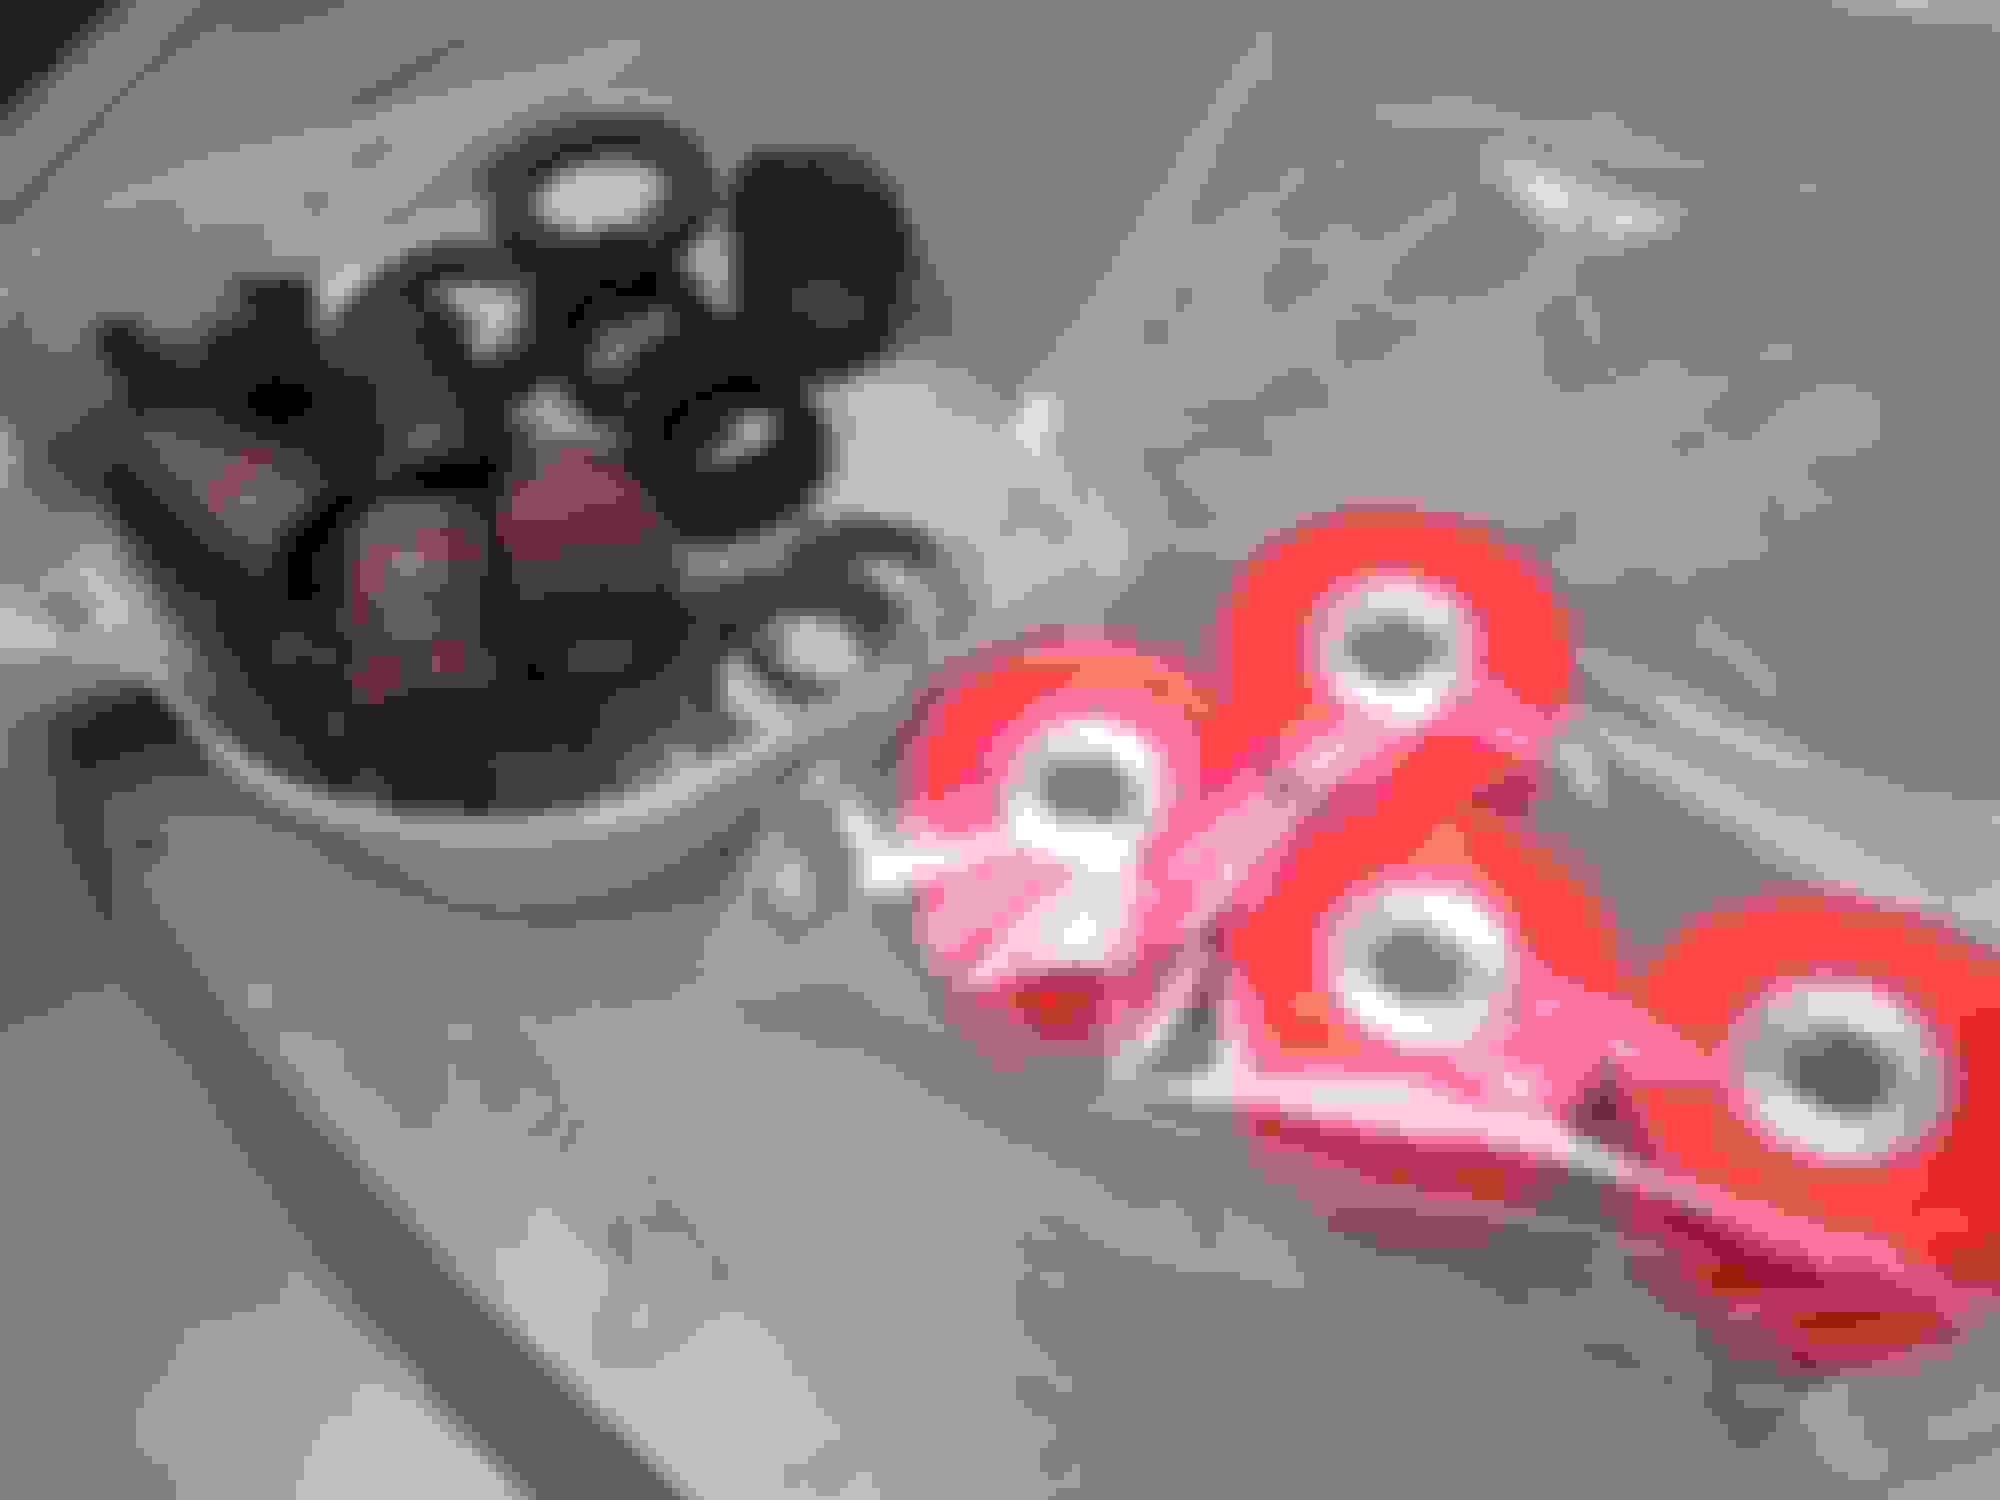
Me again guys, ive fitted the new poly bushes but they seem a little odd, heres a piced, as they come in 2 halves, i put the longer half through the top and connected the other half underneath, but it leaves it like this


Do i trim the protruding bit off ?

Have i fitted them correctly, altho when i tried the reverse that didnt seem right either ???

The bushes in question, with the 2 halves

Reply


All times are GMT +1. The time now is 02:15 PM.