
STI RA winter project


Thread Starter
Scooby Regular

Joined: Apr 2003
Posts: 215
Likes: 0
From: Surrey
Thought I'd put my RA project on here along with Silver Scooby Sport's.
I got the car just over a month ago as a winter drive while my Spec C Type RA is in storage for the salty months. (posts taken from my Type RA forum thread)
Thought I'd start a thread about my RA since I know I'll end up doing a few things to it over the winter.
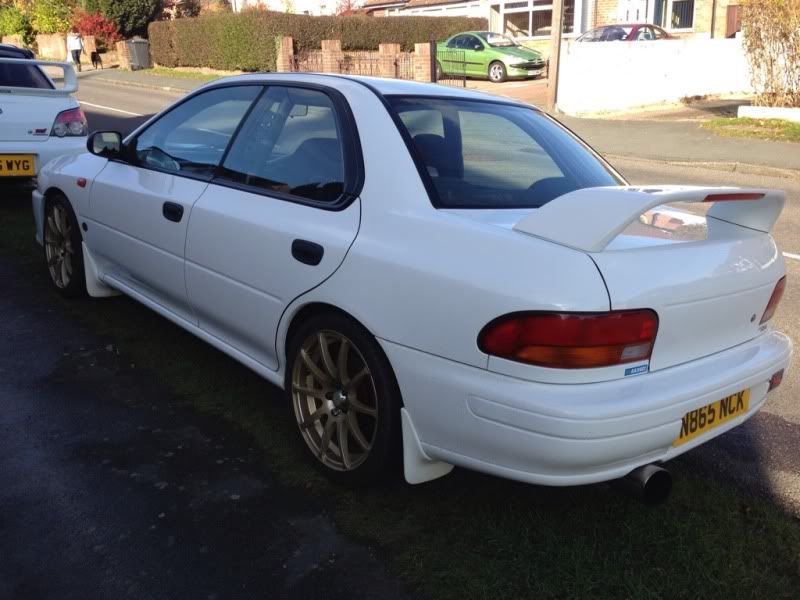
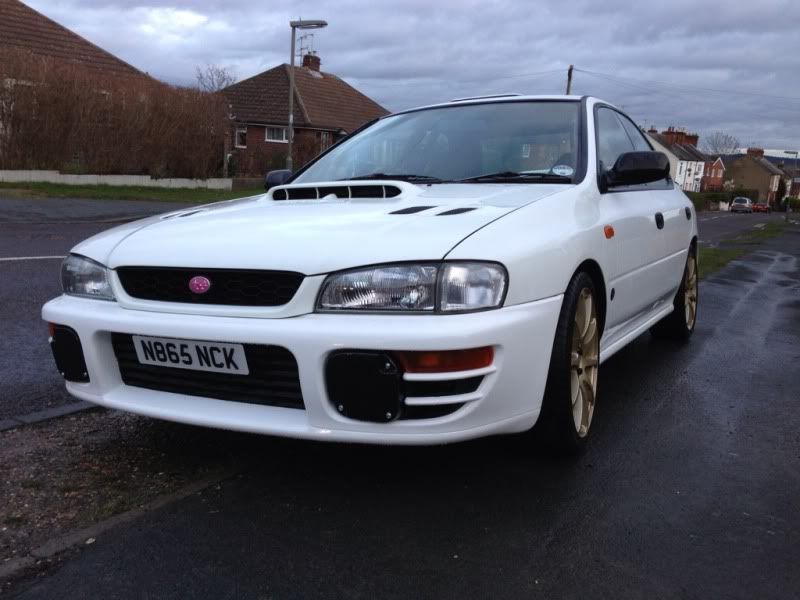
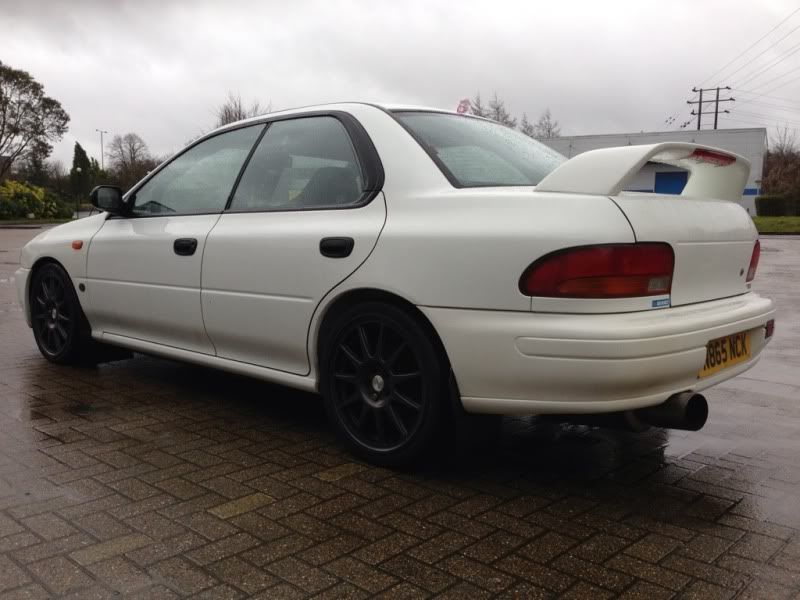
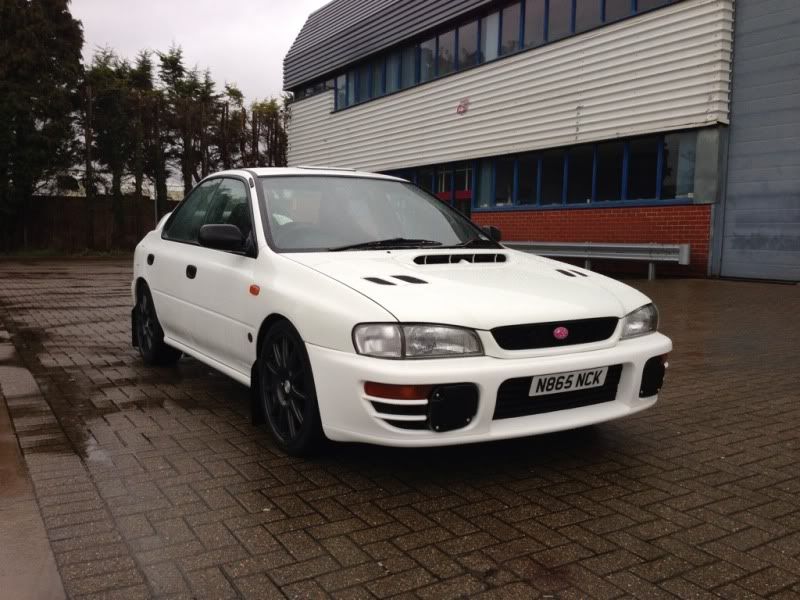
Its a MY96 that I rescued from being hidden in a garage for the last 4 years. It's showing 69,000 on the clock but I have no idea how many of those are miles or km. I do know it's done circa 2,000 miles in the last four years during the summers. From the look of the interior and bodywork it's in good condition so I'm guessing of the 69k most of them are km as it looks very tidy.
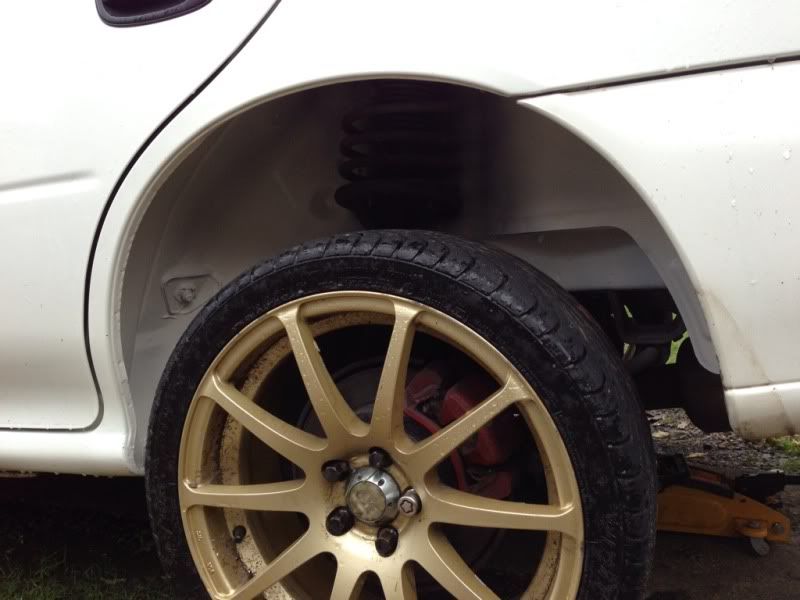
It's unfortunately got a 22B style front bumper which will be getting changed and the wheels are not to my taste. It's also had a face lifted front end put on which is ok but ideally I wanted the pre face lifted look. However after owning an RB5 that suffered from rust I really wanted a rust free example so was willing to compromise on some things, on this example it was the front end.
Also it's strangely got single pot brakes up front, but does have braided hoses?
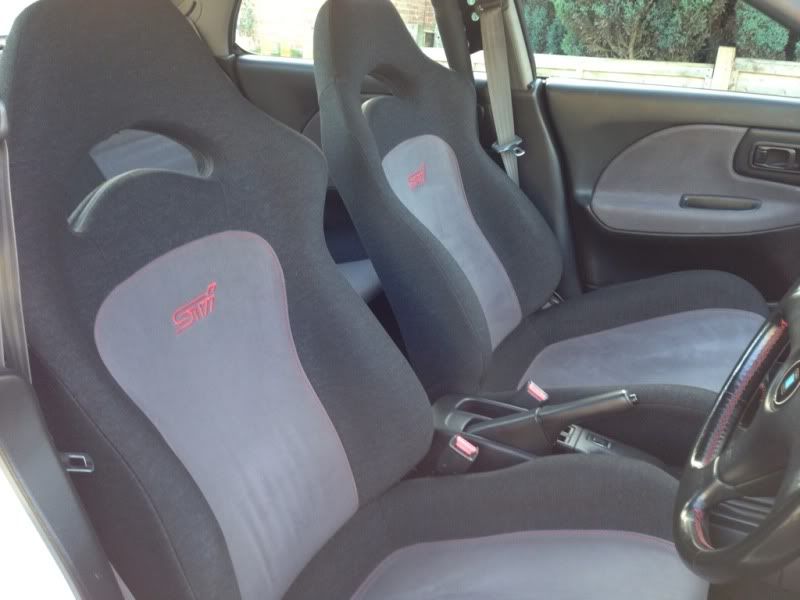
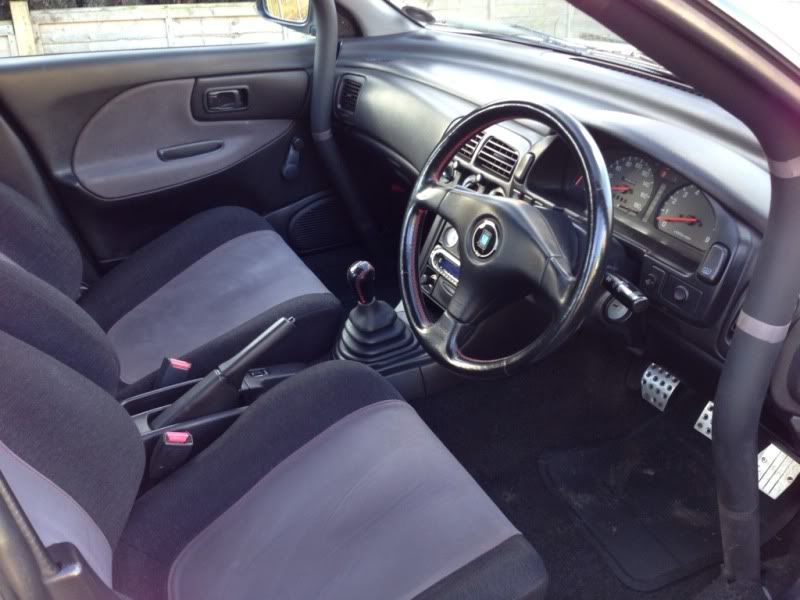
Interior wise it has a full bolt in cage, not sure of the make but that's a bonus as I'm considering hill climbing with it in the new year.
A few pics of when I got it home.

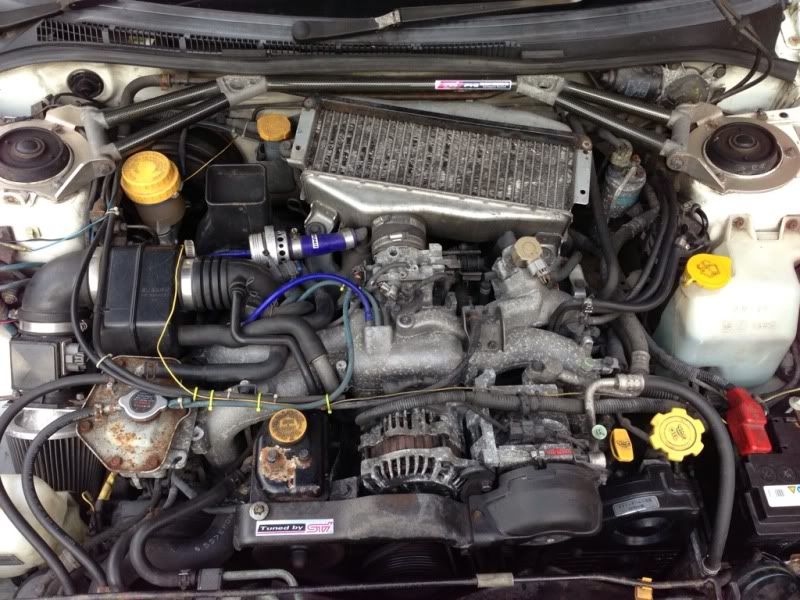
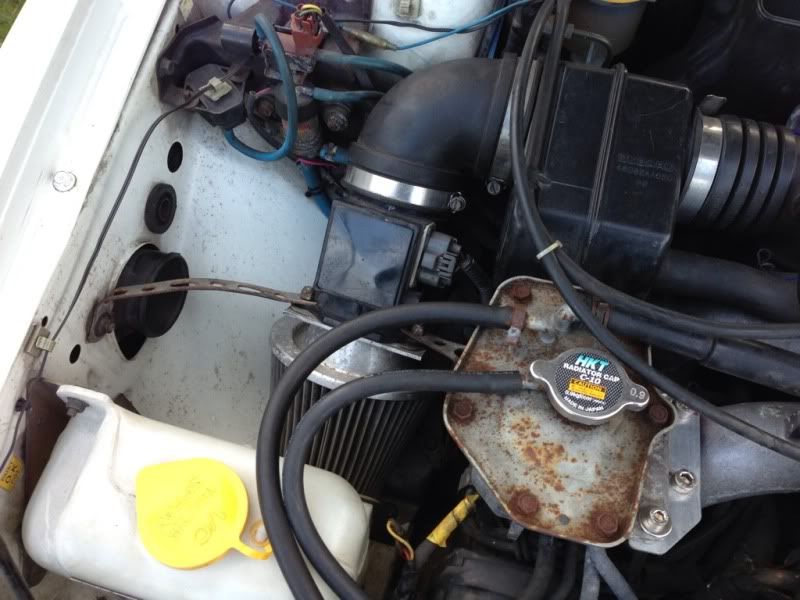
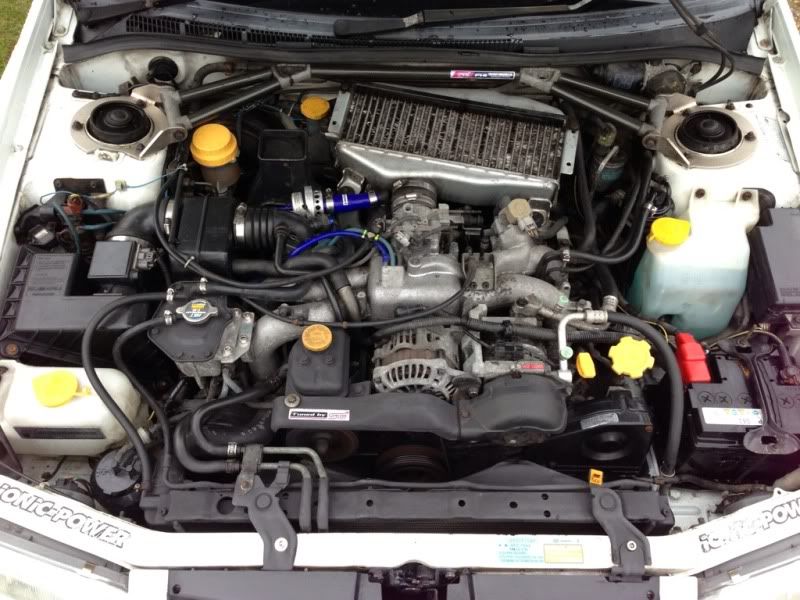
Under the bonnet needs some TLC. I've tidied up the wires zip tied all over the place and connected up the boost gauge. It also has a V3 header tank held on by zip ties but I've since made a bracket to hold it firmly in place.
This is what it was like when I got it home but it's bit cleaner now.
Since I've owned it I've had a few issues. The first was the diff stuck in the locked position and the dash lights not working. A few pulls of the handbrake freed the diff and I found a loose wire behind the dash so diff and lights now working.
Its had new engine, gearbox and diff oil, plus plugs cam belt and aux belt as I had no idea when it was last done.
Ive had a cold run issue appear in the last few days but I'm hoping I've solved that as I found the positive coming away from the battery and it now seems fine - fingers crossed!
I got the car just over a month ago as a winter drive while my Spec C Type RA is in storage for the salty months. (posts taken from my Type RA forum thread)
Thought I'd start a thread about my RA since I know I'll end up doing a few things to it over the winter.
Its a MY96 that I rescued from being hidden in a garage for the last 4 years. It's showing 69,000 on the clock but I have no idea how many of those are miles or km. I do know it's done circa 2,000 miles in the last four years during the summers. From the look of the interior and bodywork it's in good condition so I'm guessing of the 69k most of them are km as it looks very tidy.
It's unfortunately got a 22B style front bumper which will be getting changed and the wheels are not to my taste. It's also had a face lifted front end put on which is ok but ideally I wanted the pre face lifted look. However after owning an RB5 that suffered from rust I really wanted a rust free example so was willing to compromise on some things, on this example it was the front end.
Also it's strangely got single pot brakes up front, but does have braided hoses?
Interior wise it has a full bolt in cage, not sure of the make but that's a bonus as I'm considering hill climbing with it in the new year.
A few pics of when I got it home.
Under the bonnet needs some TLC. I've tidied up the wires zip tied all over the place and connected up the boost gauge. It also has a V3 header tank held on by zip ties but I've since made a bracket to hold it firmly in place.
This is what it was like when I got it home but it's bit cleaner now.
Since I've owned it I've had a few issues. The first was the diff stuck in the locked position and the dash lights not working. A few pulls of the handbrake freed the diff and I found a loose wire behind the dash so diff and lights now working.
Its had new engine, gearbox and diff oil, plus plugs cam belt and aux belt as I had no idea when it was last done.
Ive had a cold run issue appear in the last few days but I'm hoping I've solved that as I found the positive coming away from the battery and it now seems fine - fingers crossed!
Thread Starter
Scooby Regular
Joined: Apr 2003
Posts: 215
Likes: 0
From: Surrey
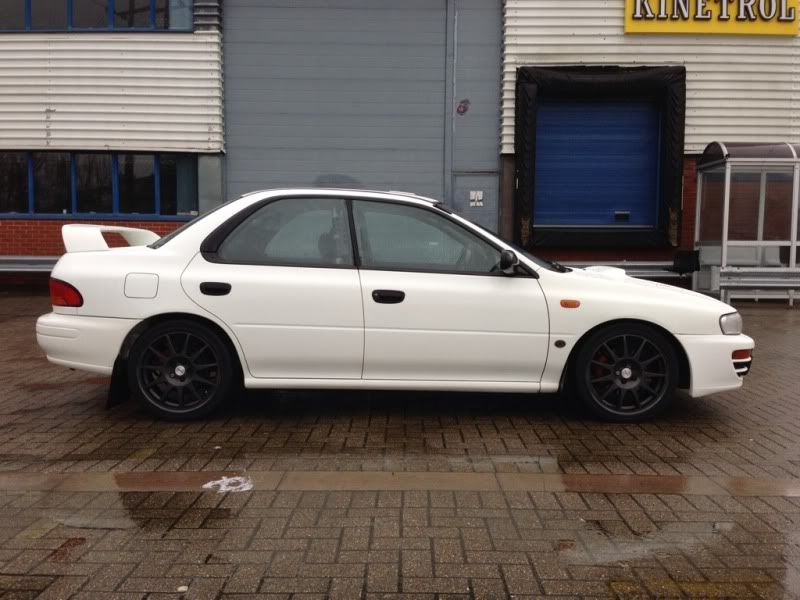
The inside edge of the rear arches have been rolled so the paint was starting to flake so took the opportunity of the dry weather today to work on the rear arches.
Before.

Lots of sanding, rust treatment and then painted with a few coats of white stone chip.
Before.
Lots of sanding, rust treatment and then painted with a few coats of white stone chip.
Thread Starter
Scooby Regular
Joined: Apr 2003
Posts: 215
Likes: 0
From: Surrey
Busy weekend as I took advantage of the dry days we've had and decided that I'd unseal my RA.
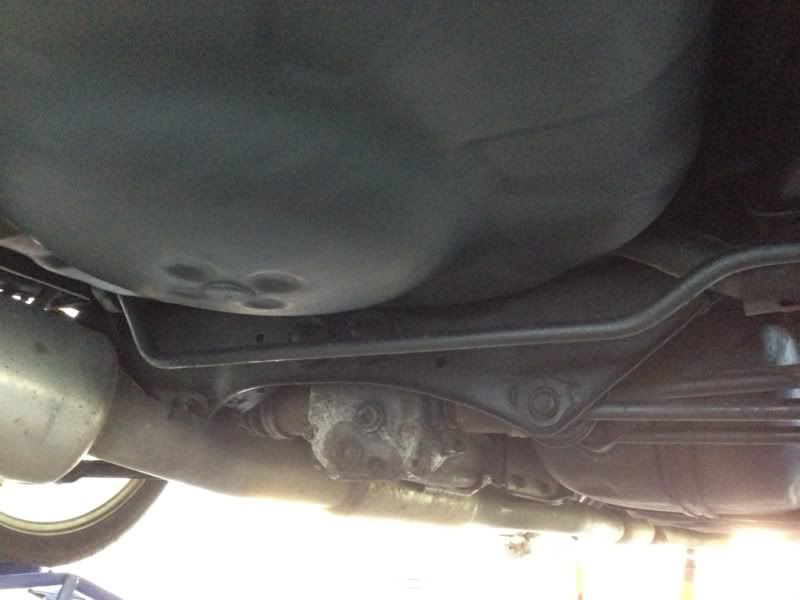
The underside was not to bad, but as I'll be using it over the winter I thought I'd give it some protection.
This is what it was like.

Hours of wire brushing, krust and a couple of coats of underseal with waxoil it now looks like this.

It was a nasty job to do as it gets everywhere and rolling around under a car for two days has done nothing for my own body.
I could do with taking the bumper skins of and giving them some TLC but that will wait.
Also stone chipped my front arches but forgot to take pics of those.
My sills had been used for jacking so were bent and starting to rust so I also worked on them.
Before.

After.

The underside was not to bad, but as I'll be using it over the winter I thought I'd give it some protection.
This is what it was like.
Hours of wire brushing, krust and a couple of coats of underseal with waxoil it now looks like this.
It was a nasty job to do as it gets everywhere and rolling around under a car for two days has done nothing for my own body.
I could do with taking the bumper skins of and giving them some TLC but that will wait.
Also stone chipped my front arches but forgot to take pics of those.
My sills had been used for jacking so were bent and starting to rust so I also worked on them.
Before.
After.

Thread Starter
Scooby Regular
Joined: Apr 2003
Posts: 215
Likes: 0
From: Surrey
After unsealing I thought I'd replace the induction kit as I thought that would be a 5 minute job.
The car came with this cone filter held in place with some quality fixings.
Ive read to many bad things about a cone filter on impreza's regarding MAF's and them just taking in hot air so I'd been looking for a good eBay deal on a standard air box and got this.
It was such a pain to fit trying to line up the screws into the brackets on the bottom, had to take of header and the second little air box and it still took 30mins to line it up!
Next is the header tank as its seen better days.
Thread Starter
Scooby Regular
Joined: Apr 2003
Posts: 215
Likes: 0
From: Surrey
I found myself a bumper to replace the 22b style one and it got delivered yesterday but it was looking a little bit sorry for its self.
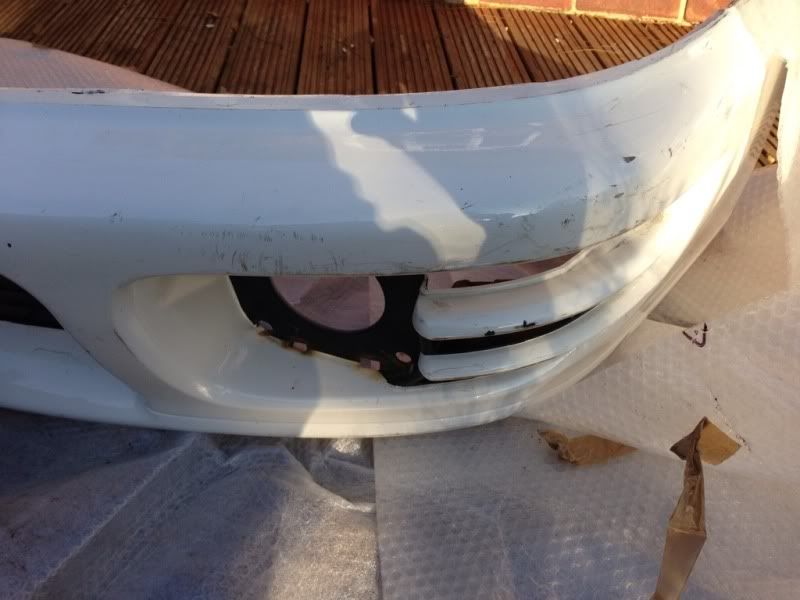
It looked like it needed a respray as it was so scratched and full of marks. The danger of eBay as it looked in quite good condition from the images supplied!*
I priced up sanding it myself then getting it sprayed and thought that's the route I need to take, however...
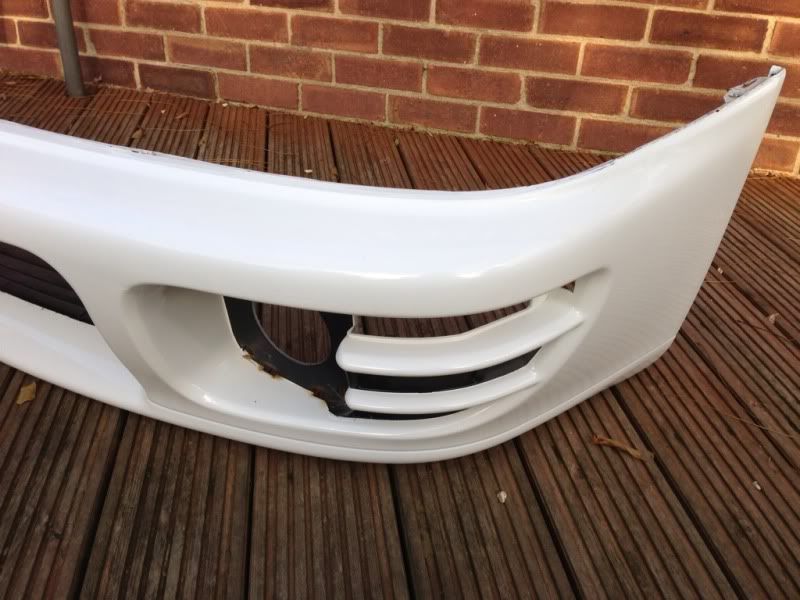
I thought I'd try my luck and see if it would polish up. By luck all the marks except a few were just on the surface so with my DA and quite a harder cutting polish it came up looking good. No longer needs a spray so very happy.
Fitting it tomorrow!
It looked like it needed a respray as it was so scratched and full of marks. The danger of eBay as it looked in quite good condition from the images supplied!*
I priced up sanding it myself then getting it sprayed and thought that's the route I need to take, however...
I thought I'd try my luck and see if it would polish up. By luck all the marks except a few were just on the surface so with my DA and quite a harder cutting polish it came up looking good. No longer needs a spray so very happy.
Fitting it tomorrow!
Thread Starter
Scooby Regular
Joined: Apr 2003
Posts: 215
Likes: 0
From: Surrey
Well it took all day but got the bumper fitted.
I used this guide to remove / replace my skin so I'll post the link to save me repeating it:
FRONT MOUNT INTERCOOLER PROJECT - ScoobyNet
Getting the old bumper of was not to bad. However one bolt on the bumper end that fits to the wing had rusted solid. The bolt is retained in a plastic clip so that just twisted and snapped the wing fitting!!! The bolt then came of with the old bumper and I needed to saw the bolt to get it off.
Once the skin was free this is what I was left with.
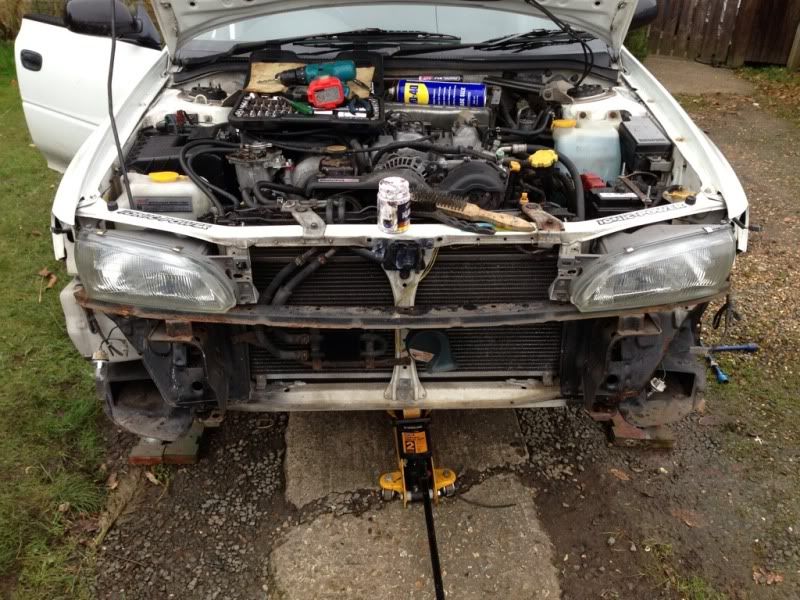
It was not to bad, a little rust was starting to bubble on the rail but other than that it looked ok. Still it was back with the wire brush drill adaptors, krust and then I primed it and sprayed it black.
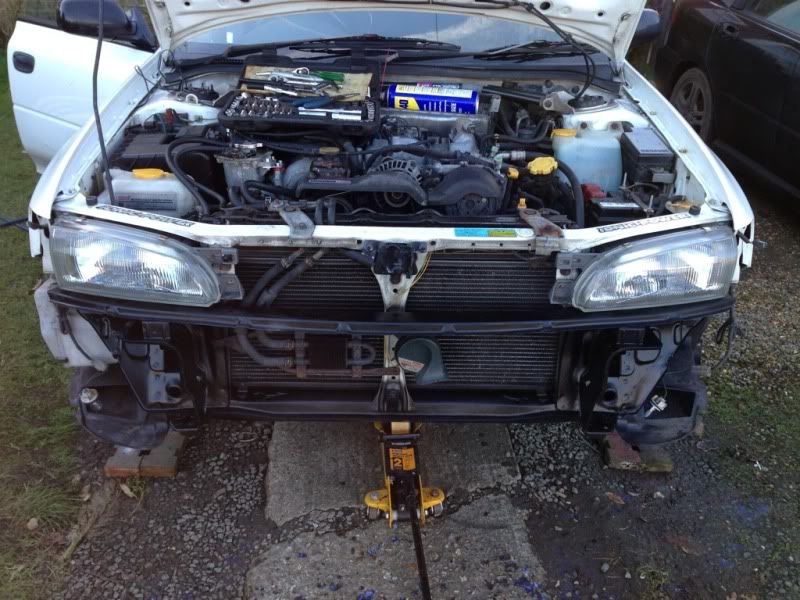
Then the fun started getting the new skin back in place. It lined up ok along the front top edge but the bolts onto the wings were a little testing. In the end both fixings on the wings broke so I need to drill new holes into the wing on the bottom edge on the lip where the bumper sits and fix with new bolts about 20mm forward of the old fixings.
If anyone else wants to remove the bumper I'd advise have a spare set of the wing / bumper fixings and ensure you have sprayed the old ones with something like WD40 the evening before.
So now I need to polish the rest of the car as only the bumper has been polished so it looks white and the rest of the car now looks yellow.
I've not yet ordered any paint for the fog covers as I had planned to get them sprayed when I was going to spray the bumper. So for the time being they will stay black, which I kind of like, but white would be better.
I used this guide to remove / replace my skin so I'll post the link to save me repeating it:
FRONT MOUNT INTERCOOLER PROJECT - ScoobyNet
Getting the old bumper of was not to bad. However one bolt on the bumper end that fits to the wing had rusted solid. The bolt is retained in a plastic clip so that just twisted and snapped the wing fitting!!! The bolt then came of with the old bumper and I needed to saw the bolt to get it off.
Once the skin was free this is what I was left with.
It was not to bad, a little rust was starting to bubble on the rail but other than that it looked ok. Still it was back with the wire brush drill adaptors, krust and then I primed it and sprayed it black.
Then the fun started getting the new skin back in place. It lined up ok along the front top edge but the bolts onto the wings were a little testing. In the end both fixings on the wings broke so I need to drill new holes into the wing on the bottom edge on the lip where the bumper sits and fix with new bolts about 20mm forward of the old fixings.
If anyone else wants to remove the bumper I'd advise have a spare set of the wing / bumper fixings and ensure you have sprayed the old ones with something like WD40 the evening before.
So now I need to polish the rest of the car as only the bumper has been polished so it looks white and the rest of the car now looks yellow.
I've not yet ordered any paint for the fog covers as I had planned to get them sprayed when I was going to spray the bumper. So for the time being they will stay black, which I kind of like, but white would be better.
Trending Topics
Thread Starter
Scooby Regular
Joined: Apr 2003
Posts: 215
Likes: 0
From: Surrey
Making the most of not being at work I've done a few little jobs this week.
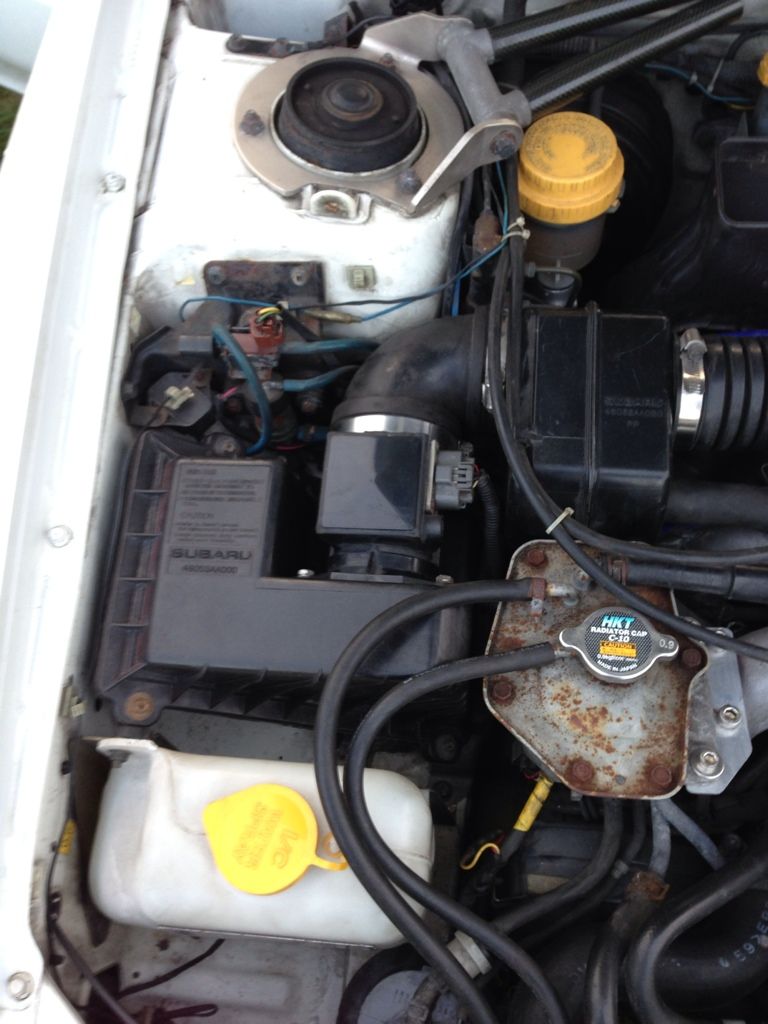
First was to give the engine bay a little tidy up as rust was developing on the header tank and and a few other places, this is what it looked like when I got the car:
After cleaning up and spraying a few parts it now looks like this:
I've lost count of how many bolts I've sheared so far on this car!!!
I had to fight the temptation to give everything a really good clean but I knew I'd be wasting my time as the car is getting used in this wet and muddy weather.
As well as giving it a tidy under the bonnet I fitted a standard battery clamp as the metal bar that was being used did the job but was not the best to look at!
I also decided to see if I could get my rear heated window to work. It has no current at the window and all the fuses are ok so I decided to look at the switch. I had no current coming out of the switch so decided to take it apart.

The small ball bearing had come away from the spring so I reassembled and I now have power coming out of the switch! However the heated rear window is still not working? I need to find a wiring diagram to see what happens behind the dash as the wires leave the switch with power but enter the footwell with no current?
Also fitted a new set of mud flaps to protect the sills.

I'm hoping the weather starts to dry as I'm desperate to give the car a really good clean, clay, polish, sealant and wax but I need a day of no rain! Although I bought the RA as a winter drive I can't bare it having such a dirty car.
Next is the brakes, won the bidding on a set of 4 pots so just need some new discs and pads then brakes will be sorted. I have also found a set of new rims but not quite done the deal yet.
First was to give the engine bay a little tidy up as rust was developing on the header tank and and a few other places, this is what it looked like when I got the car:
After cleaning up and spraying a few parts it now looks like this:
I've lost count of how many bolts I've sheared so far on this car!!!
I had to fight the temptation to give everything a really good clean but I knew I'd be wasting my time as the car is getting used in this wet and muddy weather.
As well as giving it a tidy under the bonnet I fitted a standard battery clamp as the metal bar that was being used did the job but was not the best to look at!
I also decided to see if I could get my rear heated window to work. It has no current at the window and all the fuses are ok so I decided to look at the switch. I had no current coming out of the switch so decided to take it apart.
The small ball bearing had come away from the spring so I reassembled and I now have power coming out of the switch! However the heated rear window is still not working? I need to find a wiring diagram to see what happens behind the dash as the wires leave the switch with power but enter the footwell with no current?
Also fitted a new set of mud flaps to protect the sills.
I'm hoping the weather starts to dry as I'm desperate to give the car a really good clean, clay, polish, sealant and wax but I need a day of no rain! Although I bought the RA as a winter drive I can't bare it having such a dirty car.
Next is the brakes, won the bidding on a set of 4 pots so just need some new discs and pads then brakes will be sorted. I have also found a set of new rims but not quite done the deal yet.
Thread Starter
Scooby Regular
Joined: Apr 2003
Posts: 215
Likes: 0
From: Surrey
Managed to get my parcel shelf sorted out this week. It had speakers cut into it by a previous owner so I took those out (to much extra weight!) and then took the self out before Christmas so the RA has been looking like this for a few weeks.
I got some material and re-trimmed the shelf with the aid of spray on contact adhesive so it now looks like this. (really bad photo I'm afraid)

However today I've been on a 500 mile round trip to collect these. (note to self - RA's are really not made for motorways!)*

Ideally I wanted a set of ST2's or Revolution's but non came up for sale at a price I'm prepared to spend. Also I'm in desperate need of new tyres as the Stunner tyres I currently have (no I'm not making up that brand) have scared me a few to many times so I was going to live with the alloys I had and put a new set of rubber on them. I then found these for sale with decent tyres and life still left in them so made a cheeky offer that was accepted. The Turini's are in fantastic condition, not a mark on them, they are like new so I think I got a good deal.
I'll fit them tomorrow and post some pics.
Once I have the brakes done I'm not sure what to do on it next?
I got some material and re-trimmed the shelf with the aid of spray on contact adhesive so it now looks like this. (really bad photo I'm afraid)
However today I've been on a 500 mile round trip to collect these. (note to self - RA's are really not made for motorways!)*
Ideally I wanted a set of ST2's or Revolution's but non came up for sale at a price I'm prepared to spend. Also I'm in desperate need of new tyres as the Stunner tyres I currently have (no I'm not making up that brand) have scared me a few to many times so I was going to live with the alloys I had and put a new set of rubber on them. I then found these for sale with decent tyres and life still left in them so made a cheeky offer that was accepted. The Turini's are in fantastic condition, not a mark on them, they are like new so I think I got a good deal.
I'll fit them tomorrow and post some pics.
Once I have the brakes done I'm not sure what to do on it next?


Thread Starter
Scooby Regular
Joined: Apr 2003
Posts: 215
Likes: 0
From: Surrey
What better way to see in 2013 and shake of my sore head than tidying up my exhaust (or drain pipe?).

Only had the energy for a little bit of elbow grease.


Not sure what to do about the rusty strap other than sand in back, rust treat it and spray it, or just leave it until I find a nice group n smaller diameter back box?
Only had the energy for a little bit of elbow grease.
Not sure what to do about the rusty strap other than sand in back, rust treat it and spray it, or just leave it until I find a nice group n smaller diameter back box?
 and looking at different ways to approach it
Thread Starter
Scooby Regular
Joined: Apr 2003
Posts: 215
Likes: 0
From: Surrey
I'm interested to see what route you take for the underside.


Thread Starter
Scooby Regular
Joined: Apr 2003
Posts: 215
Likes: 0
From: Surrey
I'd like to put it back to the pre face lift look but this was just meant to be a winter car, not a big project. However if eBay throws up an original bonnet and lights at the right price I may be interested.
Your not mistaken given your location, I assume you drive past my house or have seen me out and about?
Your not mistaken given your location, I assume you drive past my house or have seen me out and about?

Thread Starter
Scooby Regular
Joined: Apr 2003
Posts: 215
Likes: 0
From: Surrey
Yep, quite a few I looked at had knackered seats, although I don't know the miles covered it does seem low mileage as wear and tear is low.
It does ride quite harsh though but it's been lowered on unknown spring, ideally I'd like some standard springs back on it, anyone know what the standard springs would be for a V2 STI RA?
Do you have green alloys?
If so I've seen you a few times, last was the day before the Prodrive event when I was cleaning my Spec C RA for the timeline then I saw your car the next day up at prodrive?
It does ride quite harsh though but it's been lowered on unknown spring, ideally I'd like some standard springs back on it, anyone know what the standard springs would be for a V2 STI RA?
If so I've seen you a few times, last was the day before the Prodrive event when I was cleaning my Spec C RA for the timeline then I saw your car the next day up at prodrive?
I'm going to a local breaker on Friday afternoon as I need a few bits... I'll have a good look what they have as the last time there were loads of early bits there, I'll see if they have lights, bonnet and grill when I'm looking for my parts.
Thread Starter
Scooby Regular
Joined: Apr 2003
Posts: 215
Likes: 0
From: Surrey
This is what I've used on my arches, however I've noticed today it's not adhered to well in a couple of places, maybe the surface wasn't keyed well enough though. When the weather dries up I'll give it another go.
Hammerite Stonechip Shield White 600ml with waxoyl
http://www.halfords.com/webapp/wcs/s...egoryId_165594
Last edited by jimblive; Jan 2, 2013 at 08:20 PM.
Yep, quite a few I looked at had knackered seats, although I don't know the miles covered it does seem low mileage as wear and tear is low.
It does ride quite harsh though but it's been lowered on unknown spring, ideally I'd like some standard springs back on it, anyone know what the standard springs would be for a V2 STI RA?
Do you have green alloys?
If so I've seen you a few times, last was the day before the Prodrive event when I was cleaning my Spec C RA for the timeline then I saw your car the next day up at prodrive?
It does ride quite harsh though but it's been lowered on unknown spring, ideally I'd like some standard springs back on it, anyone know what the standard springs would be for a V2 STI RA?
Do you have green alloys?
If so I've seen you a few times, last was the day before the Prodrive event when I was cleaning my Spec C RA for the timeline then I saw your car the next day up at prodrive?


Thread Starter
Scooby Regular
Joined: Apr 2003
Posts: 215
Likes: 0
From: Surrey
Not had chance to do much to the classic for a few weeks but took the opportunity today to start on my brakes.
I got a good price for a set of four pots over Christmas but the need some work, as you can see;

I had just planned to key the surface but the paint was really soft so I decided to sand it all the way back, took a little bit of elbow grease but got one of them to this stage;

I put a quick cover of primer on and then I'll smooth them back of to apply a top coat of black gloss.

The seals look in good condition and the pistons are smooth so just a coat of paint and they should be a good upgrade once I get some discs.
I got a good price for a set of four pots over Christmas but the need some work, as you can see;
I had just planned to key the surface but the paint was really soft so I decided to sand it all the way back, took a little bit of elbow grease but got one of them to this stage;
I put a quick cover of primer on and then I'll smooth them back of to apply a top coat of black gloss.
The seals look in good condition and the pistons are smooth so just a coat of paint and they should be a good upgrade once I get some discs.