
Scooby Sport Tweaks


Thread Starter

Joined: Mar 2003
Posts: 28,233
Likes: 14
From: In the Doghouse
Now I know that this area is mainly for 'Serious' Projects and frankly my inept half arsed bodging on my scoobs can hardly be classed as either 'technical' or 'serious' but what the hell, it might help some fellow sport owners.
Stage 1
It didnt take long before I started fettling and making a few changes to the sport and it has only been a week !!
There is a lot to do on the car and whilst I have no set plan of what to do and when, I have just started on some areas that needed doing and some bit which cropped up.
This is one of the latter
My mate Paulo had some STi springs and 2 pot calipers/discs/pads left over from his Colin McRae 555 and was very kind to donate them to a worthy cause.
This is how it started out


Wheels off to see the knackered 1 pot sliders


Then with me expertly telling Paulo how to do it , he set about swapping the old discs for the larger spec ones and calipers


I couldnt resist cleaning every part that came off even though I was described as a tart . All washed and painted even though you wont see them

On


And finally how the car looks now with the change in ride height


Oh and the eagle eye readers will notice the Sport decals have gone as well, I have to thank my good lady for that. She set to on the front wing decals and the ones on the back.


Stage 2
Picked this runaround a week ago

Have not had a chance to give the scoob a clean until now. Was busy sorting out a few issues today like brakes, springs etc but at last got out the karcher, rags and engine bay cleaning gear and set to it
This is what I was working with

As far as I can work out the engine has not been touched since it left the factory over 10 years ago ! and it certainly needed some TLC
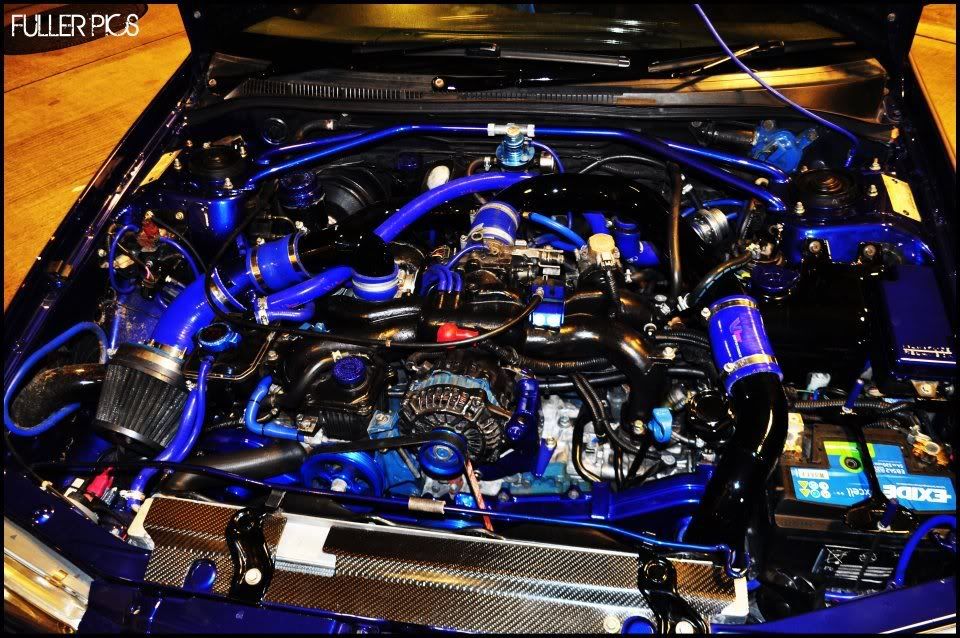
First up was a simple covering of the alternator (non turbo models so no induction or intercooler to cover) then a liberal spraying of Gunk and Megs De-greaser.This was followed by a lot of agitating with various brushes, elbow grease and then the jetwash.
Repeated, engine on for 10 minutes and then mopped up the excess water. Followed this by a liberal spray of Aeropsace 303 and let dry.
This is picture heavy so I apologise in advance but I think the before and after will demonstrate how bad it was
Airbox


Radiator


Front


Coolant


Brake


Coilpack


Washerbottle


Overall


And this is the finished article


Still have the engine bay dress up to complete, some bling, new hoses, battery clamp etc
Stage 1
It didnt take long before I started fettling and making a few changes to the sport and it has only been a week !!
There is a lot to do on the car and whilst I have no set plan of what to do and when, I have just started on some areas that needed doing and some bit which cropped up.
This is one of the latter
My mate Paulo had some STi springs and 2 pot calipers/discs/pads left over from his Colin McRae 555 and was very kind to donate them to a worthy cause.
This is how it started out
Wheels off to see the knackered 1 pot sliders
Then with me expertly telling Paulo how to do it
, he set about swapping the old discs for the larger spec ones and calipersI couldnt resist cleaning every part that came off even though I was described as a tart
. All washed and painted even though you wont see themOn
And finally how the car looks now with the change in ride height
Oh and the eagle eye readers will notice the Sport decals have gone as well, I have to thank my good lady for that. She set to on the front wing decals and the ones on the back.
Stage 2
Picked this runaround a week ago
Have not had a chance to give the scoob a clean until now. Was busy sorting out a few issues today like brakes, springs etc but at last got out the karcher, rags and engine bay cleaning gear and set to it
This is what I was working with
As far as I can work out the engine has not been touched since it left the factory over 10 years ago ! and it certainly needed some TLC
First up was a simple covering of the alternator (non turbo models so no induction or intercooler to cover) then a liberal spraying of Gunk and Megs De-greaser.This was followed by a lot of agitating with various brushes, elbow grease and then the jetwash.
Repeated, engine on for 10 minutes and then mopped up the excess water. Followed this by a liberal spray of Aeropsace 303 and let dry.
This is picture heavy so I apologise in advance but I think the before and after will demonstrate how bad it was
Airbox
Radiator
Front
Coolant
Brake
Coilpack
Washerbottle
Overall
And this is the finished article
Still have the engine bay dress up to complete, some bling, new hoses, battery clamp etc
Thread Starter
Joined: Mar 2003
Posts: 28,233
Likes: 14
From: In the Doghouse
Stage 3
Following on from the 1st stage of tweaks, the next stage is happening this weekend. This is all about the noise and the search for the 'burble' that is sorely missing from the sport as standard.
It dod not help that my entire exhaust system was rusted through and was blowing like a *******
This is what I was dealing with


So decided to get rid of it all and swap it out for something better.
Cobra backbox and centre section/Decat section


And then to finish it off and gain some of that lovely noise, the headers are being swapped

So will see what this brings
Right, for all those guys who were wondering what the system looks like once it is on, this is the before and after shots.
Backbox before
BackBox after


Centre section before

Centre section after

Cat section before

Cat section after

Headers before (yes there was an oil leak from the sump as well") )
)

Headers after (oil leak fixed )
)

All in all a great system from front to back. Still getting used to the difference and will report back how well it copes on motorways and town driving in terms of noise, drone etc. If it is too noisy, I shall swap out the centre section for something with a resonator.
It does sound great though
Now for all of those who wanted to hear the difference, here are some sound files before and after. And yes some of the before sounds make you think I had a diesel tractor. It was the backbox blowing !
Startup before
https://files.me.com/cdodsworth/xfkan5.mov
Rev in car before
https://files.me.com/cdodsworth/936260.mov
Idle before
https://files.me.com/cdodsworth/izqrgt.mp3
Rev backbox before
https://files.me.com/cdodsworth/2fqn10.mov
Startup now
https://files.me.com/cdodsworth/9oxu7u.mov
Rev in car now
https://files.me.com/cdodsworth/ufz809.mov
Idle now
https://files.me.com/cdodsworth/p7edmw.mov
Rev backbox now
https://files.me.com/cdodsworth/bcpxji.mov
A big thanks to Rich at FB Tuning as ever
Following on from the 1st stage of tweaks, the next stage is happening this weekend. This is all about the noise and the search for the 'burble' that is sorely missing from the sport as standard.
It dod not help that my entire exhaust system was rusted through and was blowing like a *******
This is what I was dealing with
So decided to get rid of it all and swap it out for something better.
Cobra backbox and centre section/Decat section
And then to finish it off and gain some of that lovely noise, the headers are being swapped
So will see what this brings
Right, for all those guys who were wondering what the system looks like once it is on, this is the before and after shots.
Backbox before
BackBox after
Centre section before
Centre section after
Cat section before
Cat section after
Headers before (yes there was an oil leak from the sump as well
)Headers after (oil leak fixed
)All in all a great system from front to back. Still getting used to the difference and will report back how well it copes on motorways and town driving in terms of noise, drone etc. If it is too noisy, I shall swap out the centre section for something with a resonator.
It does sound great though
Now for all of those who wanted to hear the difference, here are some sound files before and after. And yes some of the before sounds make you think I had a diesel tractor. It was the backbox blowing !
Startup before
https://files.me.com/cdodsworth/xfkan5.mov
Rev in car before
https://files.me.com/cdodsworth/936260.mov
Idle before
https://files.me.com/cdodsworth/izqrgt.mp3
Rev backbox before
https://files.me.com/cdodsworth/2fqn10.mov
Startup now
https://files.me.com/cdodsworth/9oxu7u.mov
Rev in car now
https://files.me.com/cdodsworth/ufz809.mov
Idle now
https://files.me.com/cdodsworth/p7edmw.mov
Rev backbox now
https://files.me.com/cdodsworth/bcpxji.mov
A big thanks to Rich at FB Tuning as ever
Thread Starter
Joined: Mar 2003
Posts: 28,233
Likes: 14
From: In the Doghouse
Stage 4
Stage 4 was about sorting out the bumper and a few other niggling items.
First up the bumper. When I bought the scoob I knew about the big dent in it but was going to just get a replacement bumper and either get it sprayed or find one the right colour but as funds are tight, I thought sod it, I could sort it out myself ! Now before I could proceed, I discovered a quite shocking bumper bar when I removed the actual bumper.
I know that UK bars tend to be manky, rusty and in a bad state but nothing could have prepared me for this


No wonder my bumper didnt fit or sit right !!!!!!!
Luckily I had a spare bumper bar from my mate Paulo which I had cleaned up and painted so it was a case of a straight swap
The comparison

And fitted


Now whilst the bumper was off, I popped out the wedges, indicators and gave it a good clean back and front then set about sorting out the massive dent.

After a little bit of hot gun action and gentle tweaking I got to this stage. Not bad and a big improvement but could do with some little tweaks later on when I have the time, problem is the plastic was getting thin and I didnt want to break through. After

Next up a little bit of tarting up. Rusty radiator brackets


After

There is Roger Clarke Motorsport slam panel going on next as I had one left over from my last scoob but as the brackets are different from turbo to sport,it needs altering
Horns


All sorted.

Everything fits much better, lights, bumper, grill etc.
The next changes will be de-tangoing the bumper, wedges painted and crystal side lights
Stage 4 was about sorting out the bumper and a few other niggling items.
First up the bumper. When I bought the scoob I knew about the big dent in it but was going to just get a replacement bumper and either get it sprayed or find one the right colour but as funds are tight, I thought sod it, I could sort it out myself ! Now before I could proceed, I discovered a quite shocking bumper bar when I removed the actual bumper.
I know that UK bars tend to be manky, rusty and in a bad state but nothing could have prepared me for this
No wonder my bumper didnt fit or sit right !!!!!!!
Luckily I had a spare bumper bar from my mate Paulo which I had cleaned up and painted so it was a case of a straight swap
The comparison
And fitted
Now whilst the bumper was off, I popped out the wedges, indicators and gave it a good clean back and front then set about sorting out the massive dent.
After a little bit of hot gun action and gentle tweaking I got to this stage. Not bad and a big improvement but could do with some little tweaks later on when I have the time, problem is the plastic was getting thin and I didnt want to break through. After
Next up a little bit of tarting up. Rusty radiator brackets
After
There is Roger Clarke Motorsport slam panel going on next as I had one left over from my last scoob but as the brackets are different from turbo to sport,it needs altering
Horns
All sorted.
Everything fits much better, lights, bumper, grill etc.
The next changes will be de-tangoing the bumper, wedges painted and crystal side lights
Thread Starter
Joined: Mar 2003
Posts: 28,233
Likes: 14
From: In the Doghouse
Stage 5
Front end needed a bit of crystal work and a little tweak to the badge
Before

After


Used the wife's glittery blue nail varnish
At some point a splitter may gone on but it is getting there
Front end needed a bit of crystal work and a little tweak to the badge
Before
After
Used the wife's glittery blue nail varnish
At some point a splitter may gone on but it is getting there
Thread Starter
Joined: Mar 2003
Posts: 28,233
Likes: 14
From: In the Doghouse
Dust Shields
Dust Shields.
After realising that mine were made up of more rust than metal, time to swap them out. Managed to get a decent set off a very nice chap on SN who shipped them really fast all painted in Por15
Old ones

Side by Side

On

You never see them but what the hell
Dust Shields.
After realising that mine were made up of more rust than metal, time to swap them out. Managed to get a decent set off a very nice chap on SN who shipped them really fast all painted in Por15
Old ones
Side by Side
On
You never see them but what the hell

Trending Topics
Joined: Apr 2005
Posts: 11,778
Likes: 4
From: Newcastle. 330bhp-289lb/ft @ 1bar boost - 12.4s @ 105mph


Thread Starter
Joined: Mar 2003
Posts: 28,233
Likes: 14
From: In the Doghouse
Sorry I meant the tool who drives it thinks he is colin mcrae 
Cant do it as the hosepipes are frozen opp north
ta very much
ta very much
Thread Starter
Joined: Mar 2003
Posts: 28,233
Likes: 14
From: In the Doghouse
Thread Starter
Joined: Mar 2003
Posts: 28,233
Likes: 14
From: In the Doghouse
A bit of bumper spat painting. They were the only thing not colour coded so had an afternoon free
Cleaned them, masked them and off we went

Comparing them

and on

Cleaned them, masked them and off we went
Comparing them
and on
Scooby Regular
Joined: Jul 2007
Posts: 453
Likes: 0
From: carrick.under a big stone.
it turns out there was a really nice car under all that grime.. nice one... now go look for a few more gee gees in the sports. theres an easy 170 bhp in them which kinda adds to the fun..
Scooby Regular
Joined: Mar 2008
Posts: 5,365
Likes: 1
From: Aberdare / Daventry


I was running 145bhp on Powerstation's roller in my old 1999 Sport. Borla exhaust manifold, H&S decat pipes, and Prodrive backbox, with K&N induction kit.
As standard it made 123bhp on their rollers, maybe with a remap it could have seen 150-160bhp??
As standard it made 123bhp on their rollers, maybe with a remap it could have seen 150-160bhp??

Thread Starter
Joined: Mar 2003
Posts: 28,233
Likes: 14
From: In the Doghouse
cheers mate
Considering there is a bit of interest now in what bhp these sports can get, can someone who has done it explain how you get this jump from 125 to 150-160 ?
I really cant see how you can make such a big jump with just a change to the panel filter/induction kit and headers
Considering there is a bit of interest now in what bhp these sports can get, can someone who has done it explain how you get this jump from 125 to 150-160 ?
I really cant see how you can make such a big jump with just a change to the panel filter/induction kit and headers
Thats in good nick compared to the one I took off mine My rear one was just as bad, I decided it was time to change it when one of the number plate lamps was dangling down due to the bracket rusting right through! I too have a good condition spare front one should it rust through again!
Cars looking really good Swiss
My rear one was just as bad, I decided it was time to change it when one of the number plate lamps was dangling down due to the bracket rusting right through! I too have a good condition spare front one should it rust through again!Cars looking really good Swiss
Last edited by BLU; Nov 12, 2011 at 09:33 PM.
Thread Starter
Joined: Mar 2003
Posts: 28,233
Likes: 14
From: In the Doghouse
Ahh im glad you would like to see it i have looked after her as promised Glad to see you got another one too, sorry to hijack your post x

(Now a 2.5)
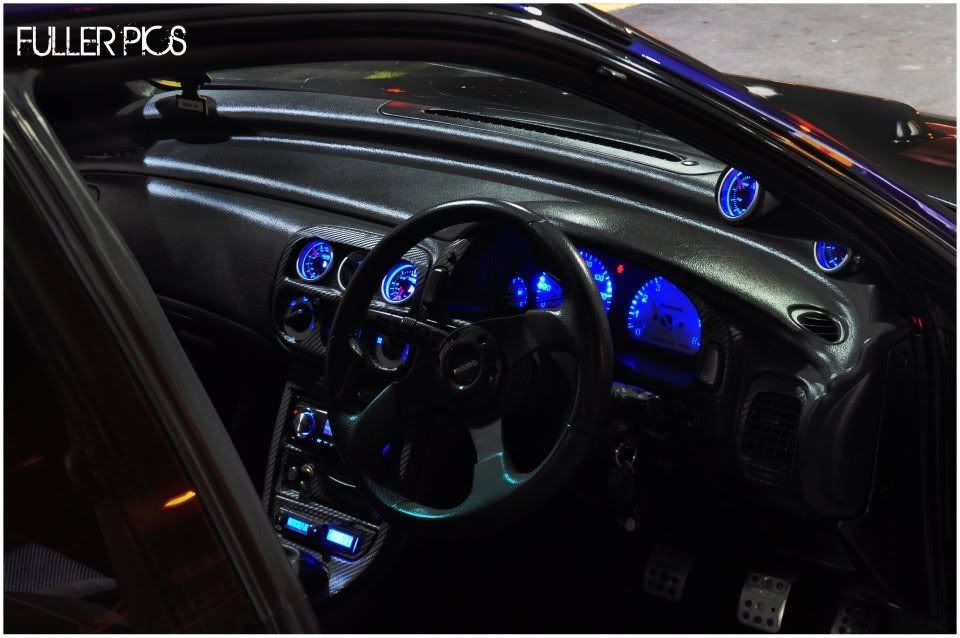
Inside:
From the back (has a carbon roof thats why it looks black)

Hope you like it x
Glad to see you got another one too, sorry to hijack your post x(Now a 2.5)
Inside:
From the back (has a carbon roof thats why it looks black)
Hope you like it x

