
Prodrive Bugeye (Hella) Headlight Strip/Clean and Rebuild - 20 image Heavy!

So, decided that no matter what bulbs I fitted to my UK300's Prodrive headlight, it was just not cutting it. Still really poor light and tonight on the way home from work in rain and dark, unlit roads I was clenching one off pretty much all the way home.
Decided enough was enough. So off they came for a bloody good clean. I have not worked or stripped anything like these down before and couldn't find anything on the interwebz that would help, apart from lots of people moaning about how crap they were
On close inspection I think I have found the problem! Nothing but many years of crap build up on the inside of the glass and lenses.
See below for how I went about rectifying crap light from otherwise really nice headlights.
It all started with this:
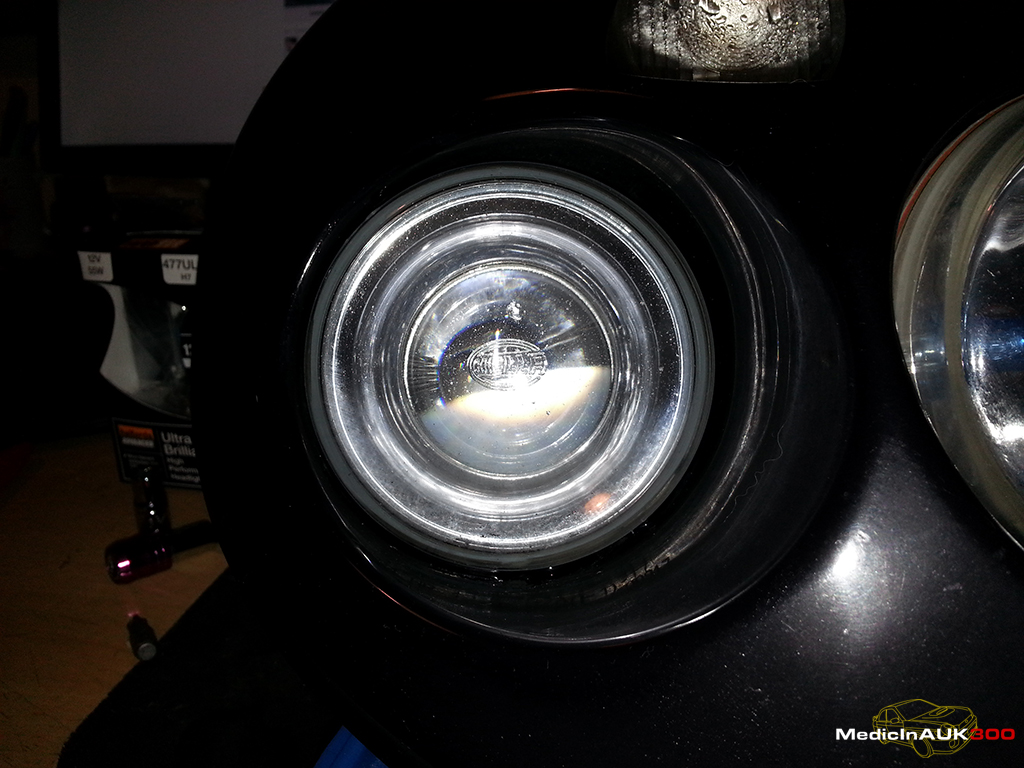
Grimy, dull dipped beam lights.
Once the headlights are removed you will greeted by what looks to be a tangled mess:
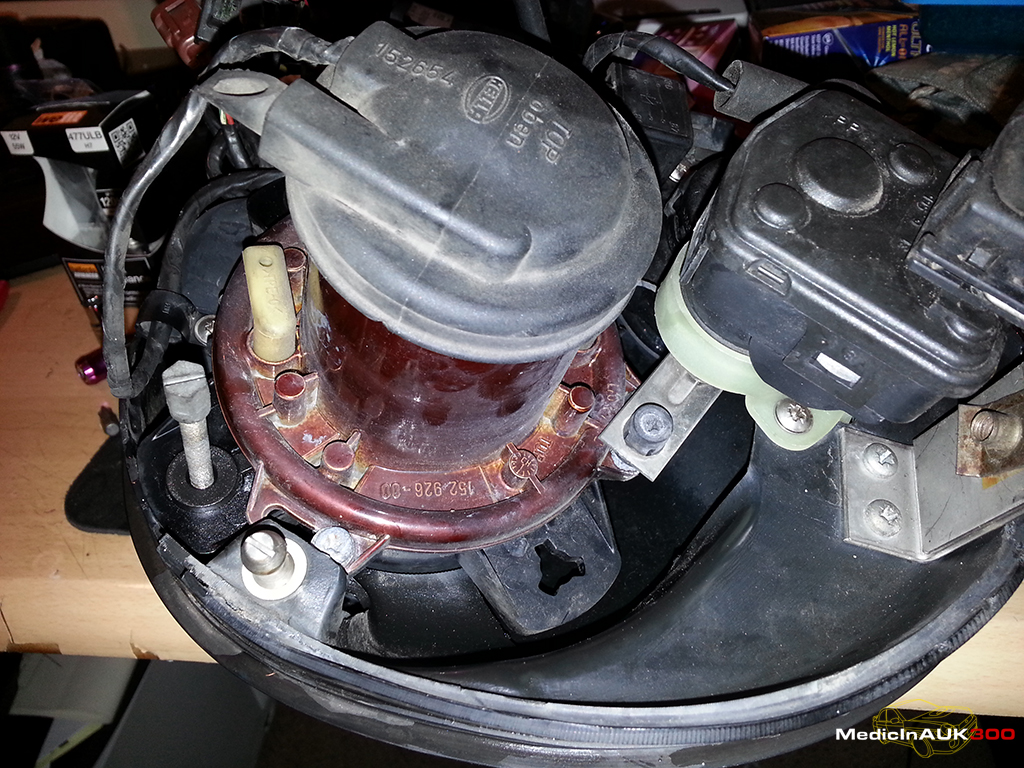
Don't worry though, you only need to unplug the bulb wires once you have carefully removed the rubber boot.
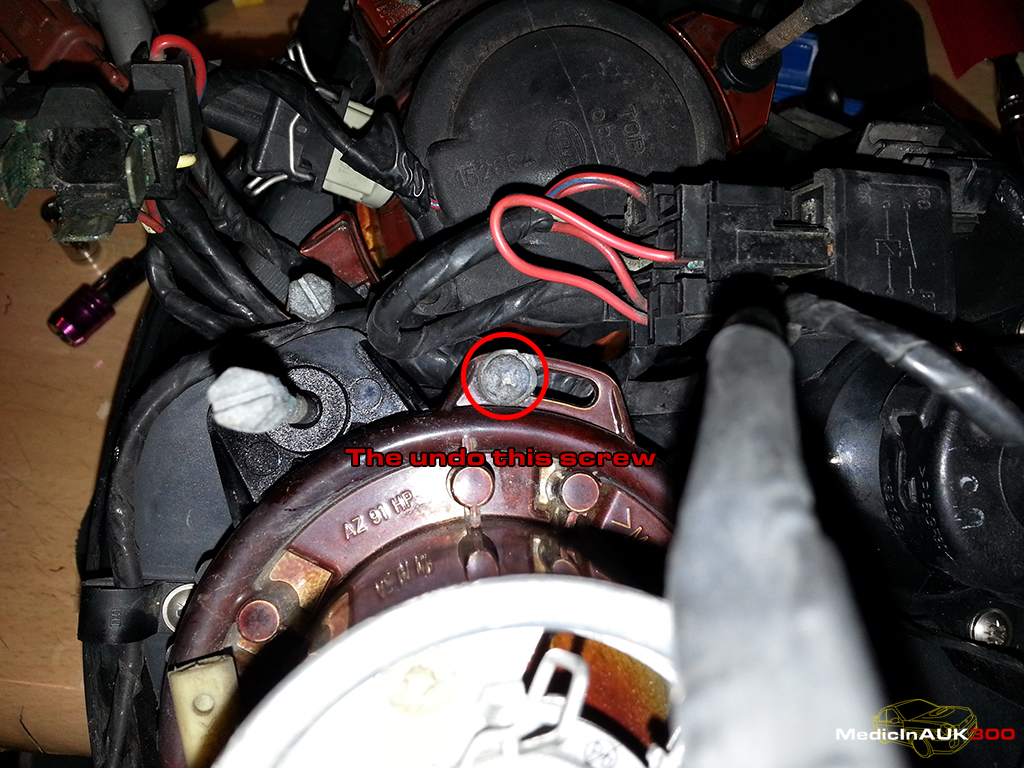
Now, look for the level adjustment motor, pictured below:
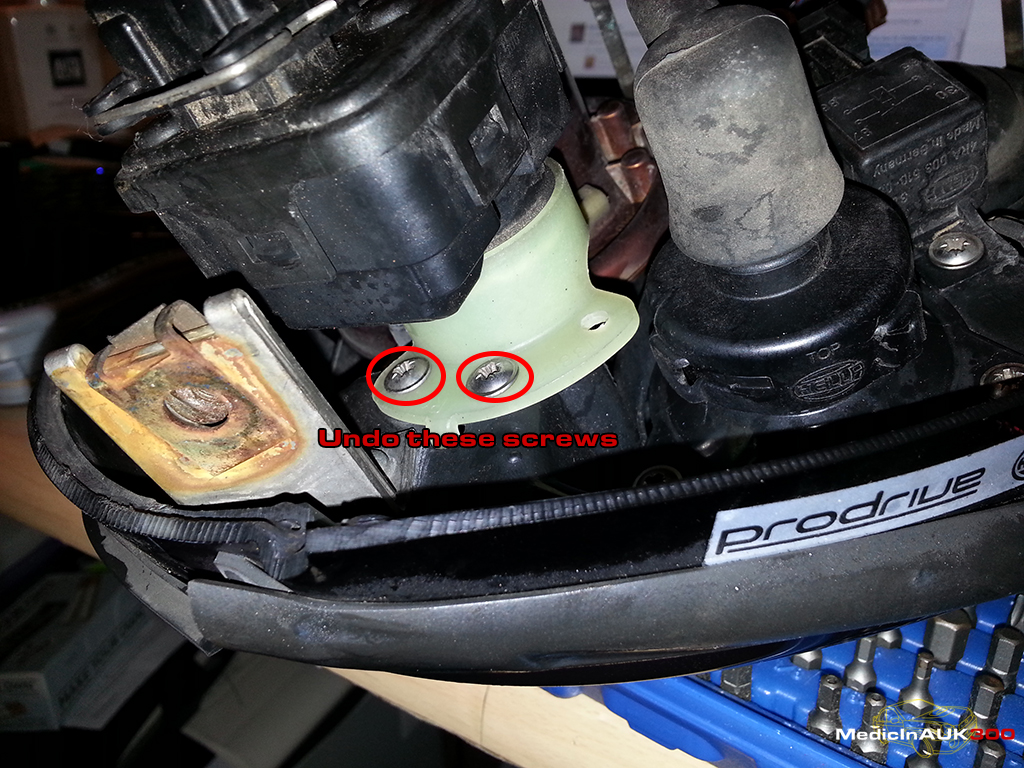
On the drivers side there are two screws, on the passenger side there are three. Procedure is the same for either side with the exception of the extra screw. Remove these and the motor will be lose.
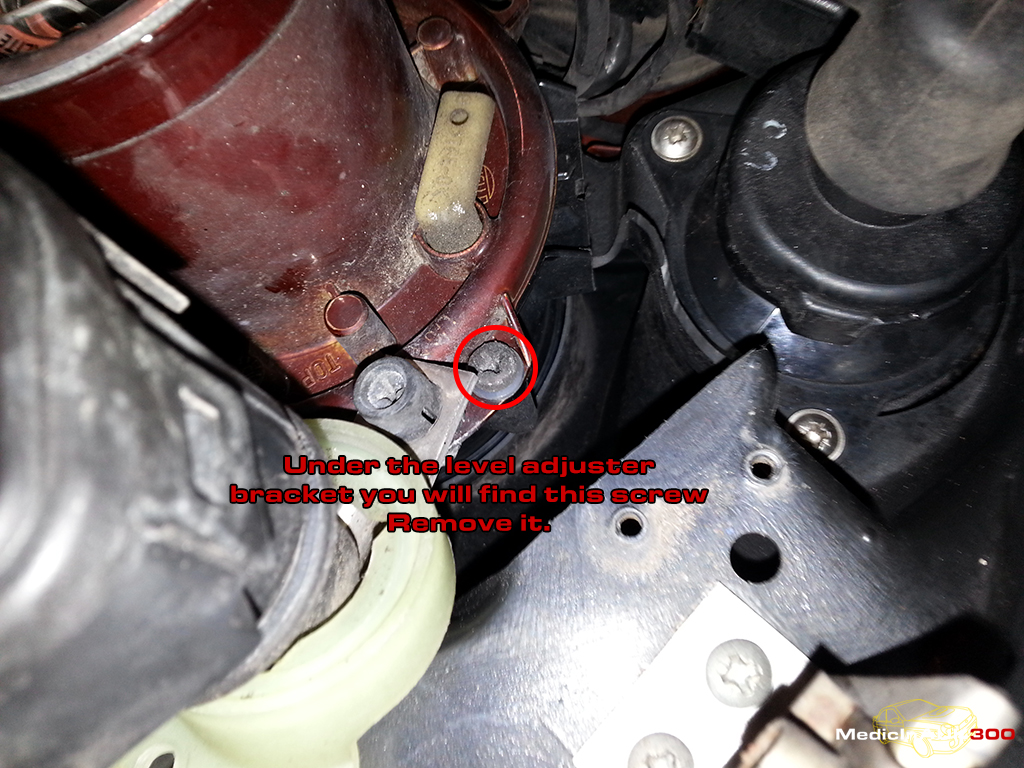
Carefully rotate the motor out of the way to reveal a screw under the little stainless plate that connect the assembly to the motor:
Now look around the rim and you will see two other screws, One here:
and one here:
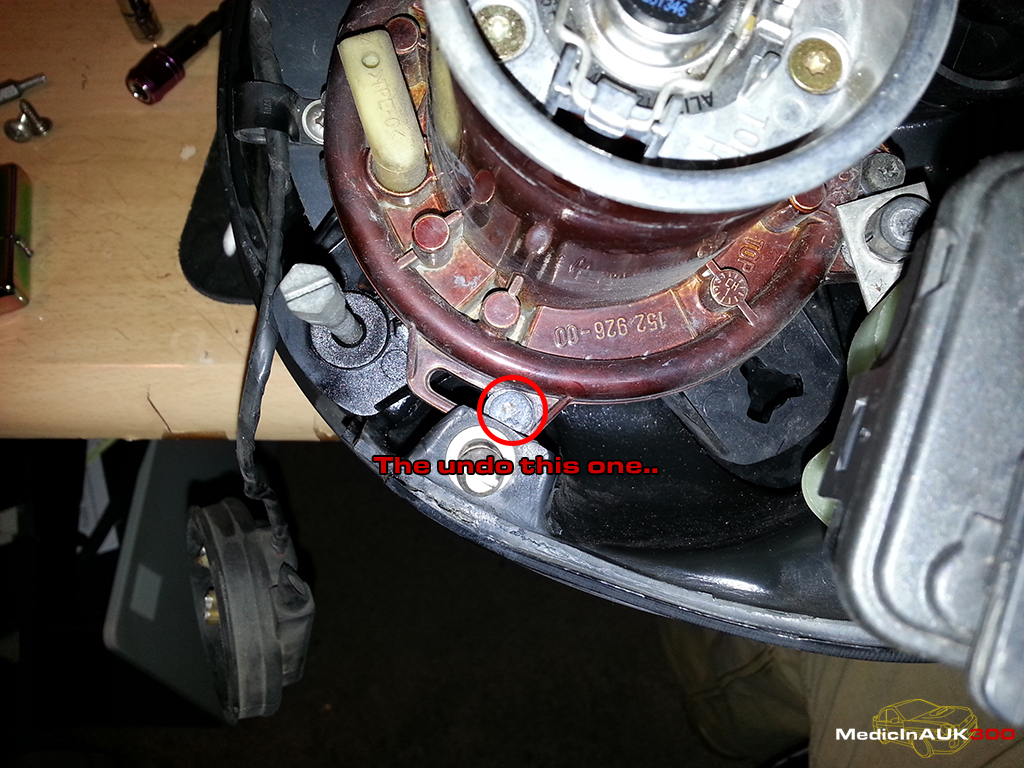
You may need to apply a very small amount of WD40 etc to free these. Mine were not too bad but expect some resistance and be careful!
Gently wiggle the red part of the lamp and separate it from the black part to reveal the inside of the dipped beam light assembly.
Pretty manky in there. Using a clean, dry microfibre cloth. Clean the inside of the lens and also the reflective rim just inside the glass.
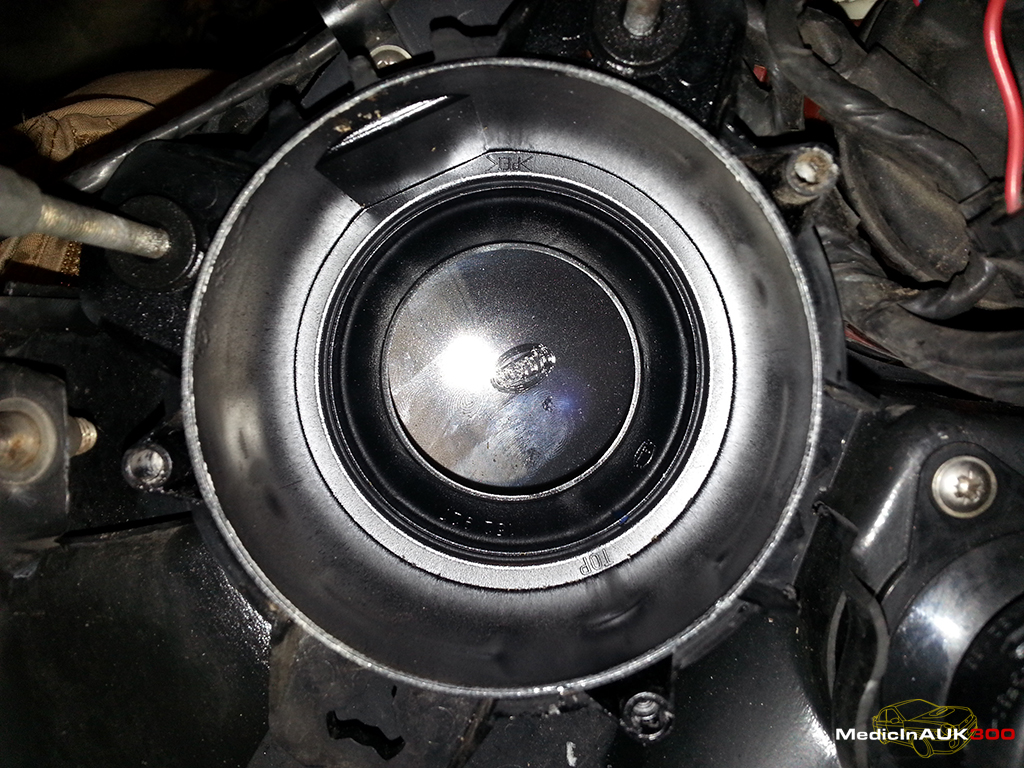
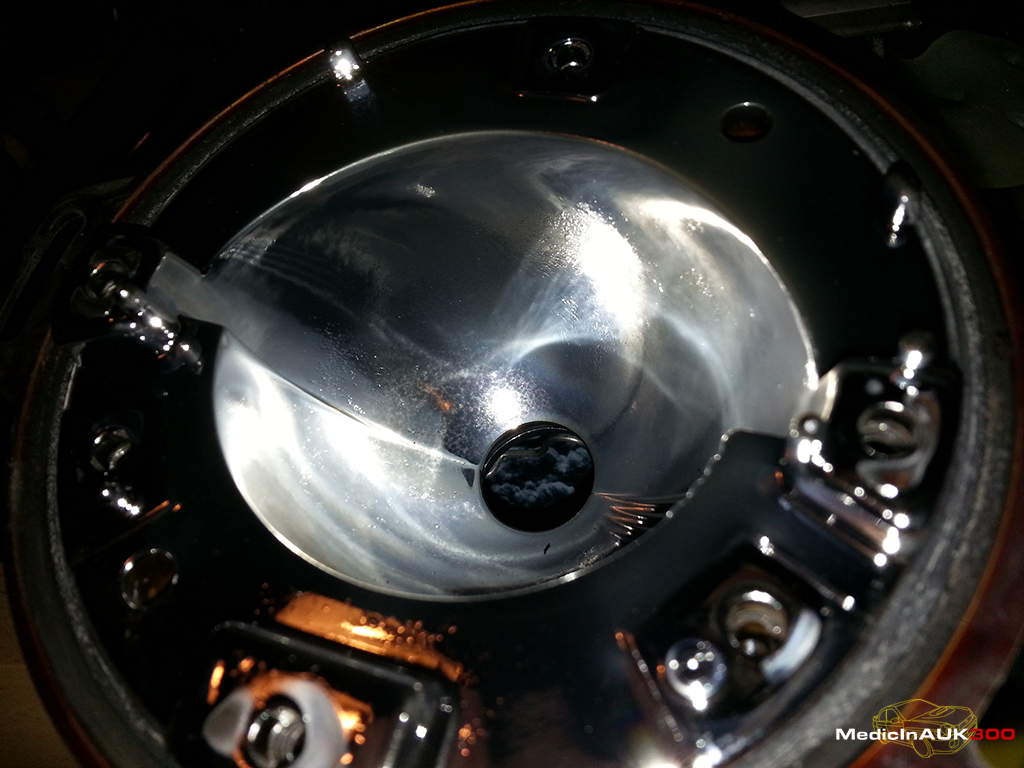
Now looking at the actual reflector assembly:
This was absolutely hanging, looked like condensation but was just residue from years of use and varying exposure to the elements.
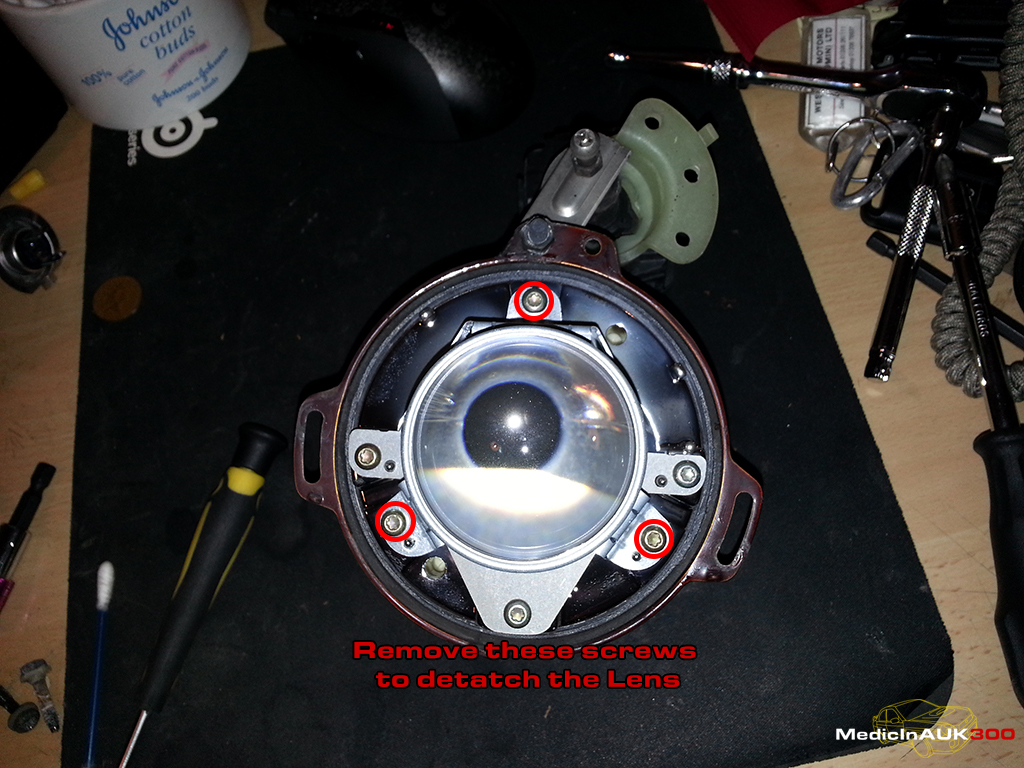
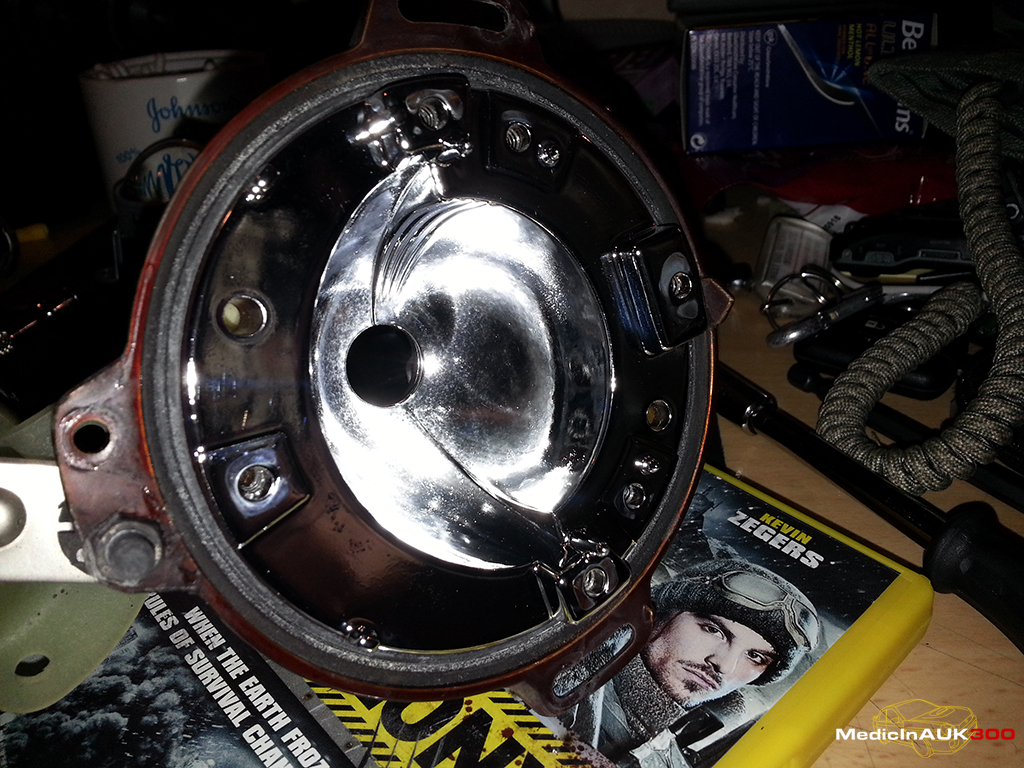
Now to remove the actual reflector lens:
Undo the screws marked in red, gently undo these are we do not want to crack/trash any threads. Make sure you use a correct fitting screwdriver and BE GENTLE!
This was really cloudy, and was difficult to see through let along light my way:
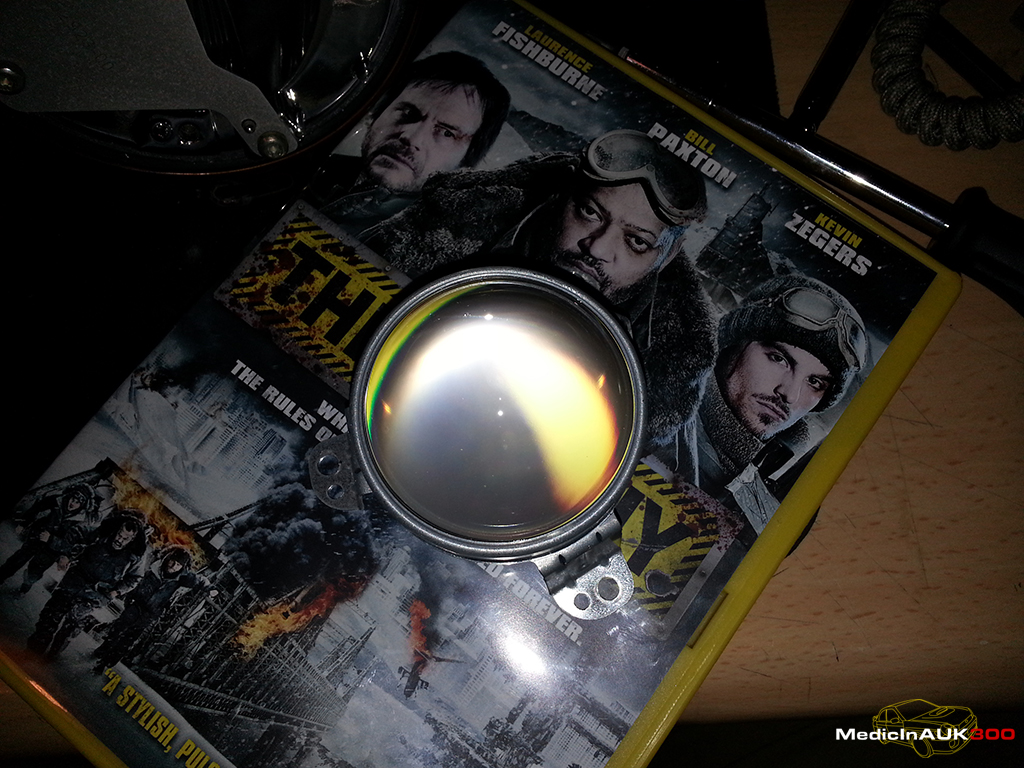
This is held into it's frame by a round spring at the rear of the lens. As with any optic, try not to handle the glass too much.
Using again our trusty, clean and dry microfibre cloth. Clean both the back and the front of the optic, ensuring you leave no finger prints, smudges or smears.
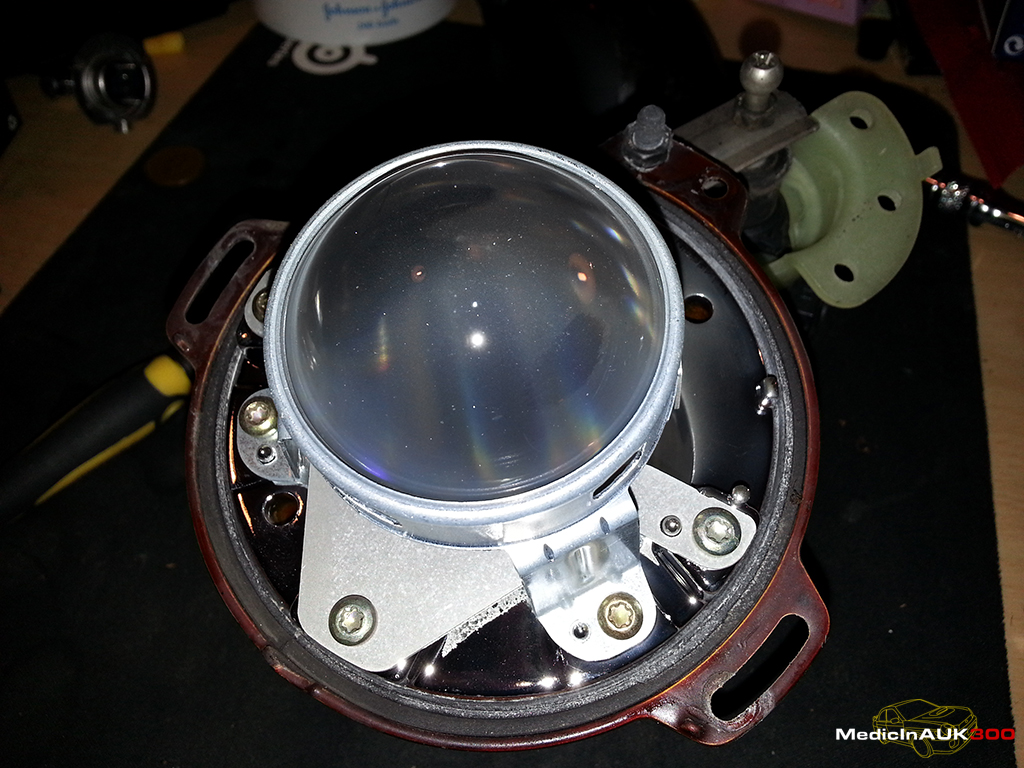
You should have something like this once cleaned:
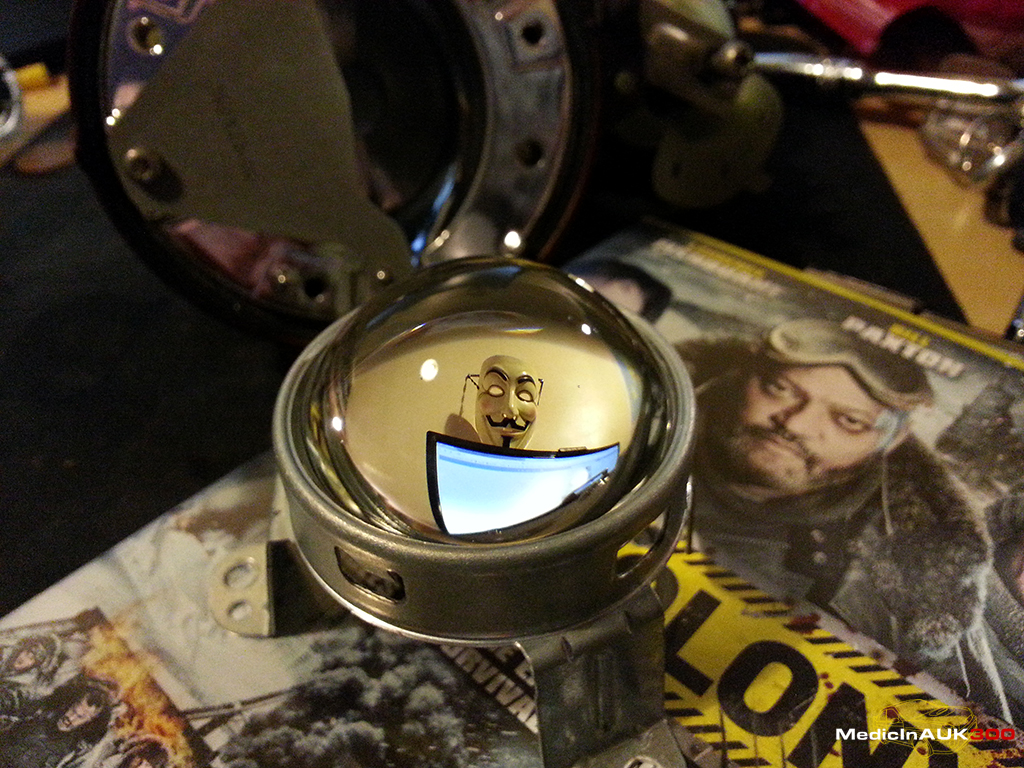
Perfectly clean
Now to the front lens element, here you can see the beam mask. This is the bit that gives you the line cut-off in your light beam. A requirement for projector lamps. Remove the screws mark in red:
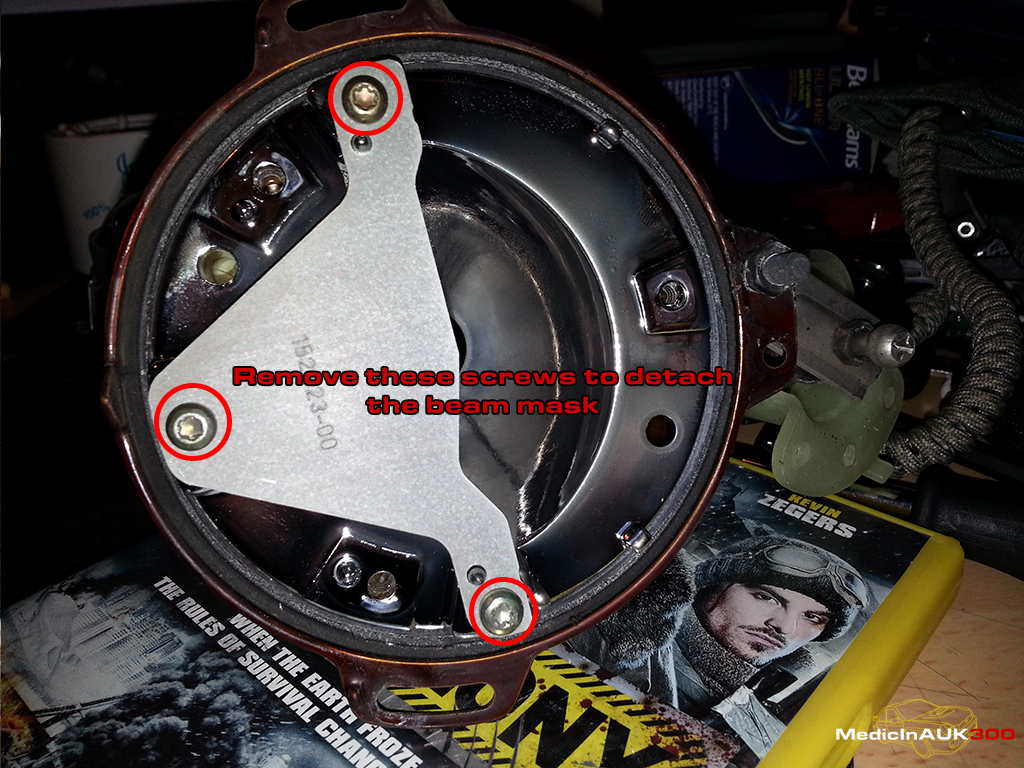
Make a note of how it is fitted, part number stamped on the visible side when screwed down.
Again, a very dirty reflector that seriously needs a clean:
And after it has been cleaned:
Looks a little better
Now it's time to put everything back together in the reverse order. Making note of how it correctly goes together. DON'T FORGET THE BEAM MASK AND MAKE SURE ITS FITTED CORRECTLY
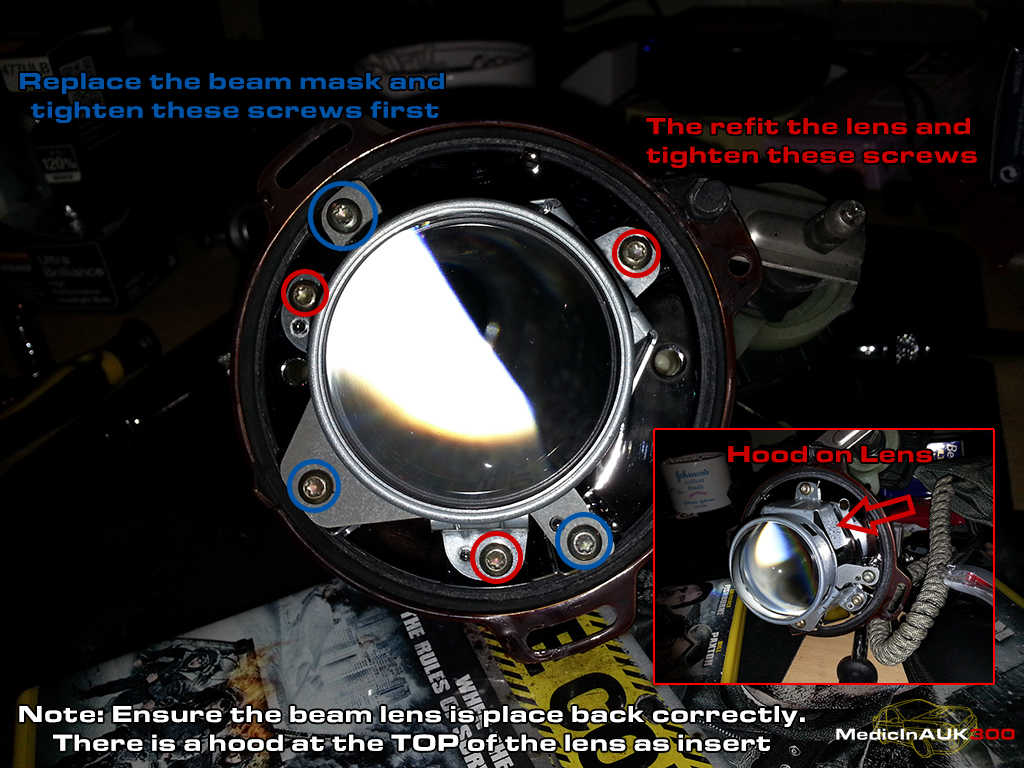
Note the orientation of the projector lens, it has a built in hood at the top and must be fitted the correct way up.
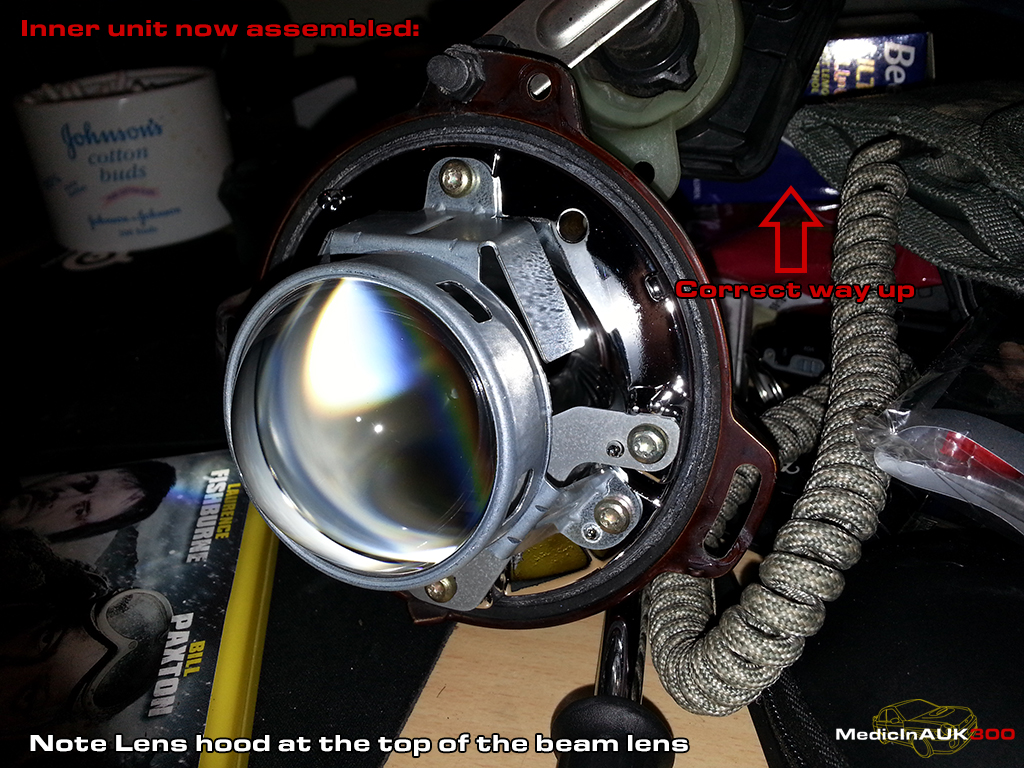
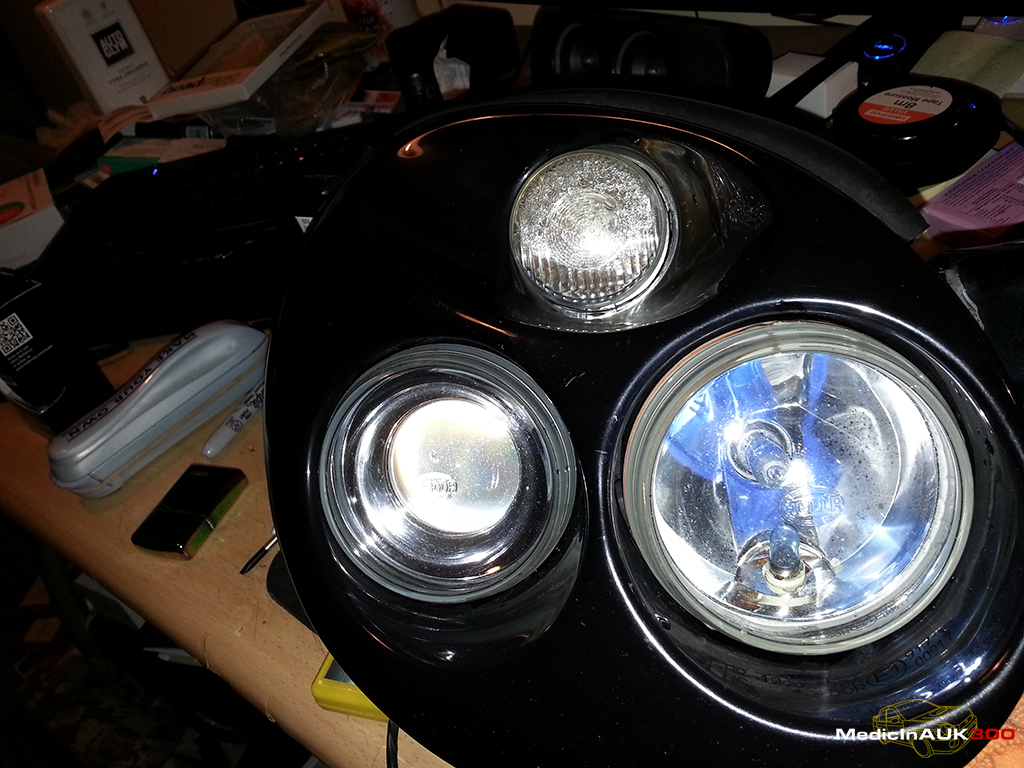
Inner assembly all back together and looking shiny
And back in the main headlight housing:
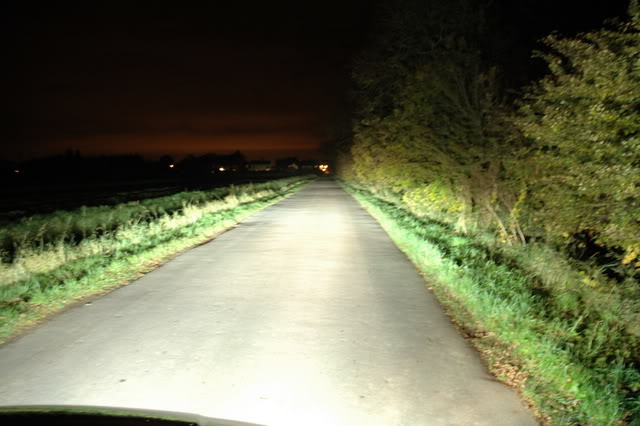
Final result tbf was bloody mind blowing! I kid you not. The beam is now sharp and not scattered everywhere. Equally as good as the projector lights on my wife's Nissan Qashqai. Just need to get the realigned to ensure they are both legal and effective.
Next step is a HID kit that will be fitted later this week. Hopefully they will be okay and should work fine with the projector headlights. (Hoping not to open the entire After market HID discussion here by the way )
)
Anyway, hope this helps those of you that have these Prodrive headlights. Probably one of the best things I have done. Can see how they would have looked from new.
Please feel free to ask any questions and sorry for the image heavy thread but it seemed to best way to illustrate this little job.
By the way, currently using Halford Ultra Brilliance bulbs (+120%) in the dipped lights and Halfords Extreme Brilliance bulbs in the main beam. Bloody good bulbs and currently on offer with Buy One/Get One free.
Anyway, hope this thread is okay and will be useful to someone.
Decided enough was enough. So off they came for a bloody good clean. I have not worked or stripped anything like these down before and couldn't find anything on the interwebz that would help, apart from lots of people moaning about how crap they were
On close inspection I think I have found the problem! Nothing but many years of crap build up on the inside of the glass and lenses.
See below for how I went about rectifying crap light from otherwise really nice headlights.
It all started with this:
Grimy, dull dipped beam lights.
Once the headlights are removed you will greeted by what looks to be a tangled mess:
Don't worry though, you only need to unplug the bulb wires once you have carefully removed the rubber boot.
Now, look for the level adjustment motor, pictured below:
On the drivers side there are two screws, on the passenger side there are three. Procedure is the same for either side with the exception of the extra screw. Remove these and the motor will be lose.
Carefully rotate the motor out of the way to reveal a screw under the little stainless plate that connect the assembly to the motor:
Now look around the rim and you will see two other screws, One here:
and one here:
You may need to apply a very small amount of WD40 etc to free these. Mine were not too bad but expect some resistance and be careful!
Gently wiggle the red part of the lamp and separate it from the black part to reveal the inside of the dipped beam light assembly.
Pretty manky in there. Using a clean, dry microfibre cloth. Clean the inside of the lens and also the reflective rim just inside the glass.
Now looking at the actual reflector assembly:
This was absolutely hanging, looked like condensation but was just residue from years of use and varying exposure to the elements.
Now to remove the actual reflector lens:
Undo the screws marked in red, gently undo these are we do not want to crack/trash any threads. Make sure you use a correct fitting screwdriver and BE GENTLE!
This was really cloudy, and was difficult to see through let along light my way:
This is held into it's frame by a round spring at the rear of the lens. As with any optic, try not to handle the glass too much.
Using again our trusty, clean and dry microfibre cloth. Clean both the back and the front of the optic, ensuring you leave no finger prints, smudges or smears.
You should have something like this once cleaned:
Perfectly clean
Now to the front lens element, here you can see the beam mask. This is the bit that gives you the line cut-off in your light beam. A requirement for projector lamps. Remove the screws mark in red:
Make a note of how it is fitted, part number stamped on the visible side when screwed down.
Again, a very dirty reflector that seriously needs a clean:
And after it has been cleaned:
Looks a little better
Now it's time to put everything back together in the reverse order. Making note of how it correctly goes together. DON'T FORGET THE BEAM MASK AND MAKE SURE ITS FITTED CORRECTLY
Note the orientation of the projector lens, it has a built in hood at the top and must be fitted the correct way up.
Inner assembly all back together and looking shiny
And back in the main headlight housing:
Final result tbf was bloody mind blowing! I kid you not. The beam is now sharp and not scattered everywhere. Equally as good as the projector lights on my wife's Nissan Qashqai. Just need to get the realigned to ensure they are both legal and effective.
Next step is a HID kit that will be fitted later this week. Hopefully they will be okay and should work fine with the projector headlights. (Hoping not to open the entire After market HID discussion here by the way
)Anyway, hope this helps those of you that have these Prodrive headlights. Probably one of the best things I have done. Can see how they would have looked from new.
Please feel free to ask any questions and sorry for the image heavy thread but it seemed to best way to illustrate this little job.
By the way, currently using Halford Ultra Brilliance bulbs (+120%) in the dipped lights and Halfords Extreme Brilliance bulbs in the main beam. Bloody good bulbs and currently on offer with Buy One/Get One free.
Anyway, hope this thread is okay and will be useful to someone.


Interesting.
Two points: I'm NOT sure you'll get an HID to fit behind that lens. Let us know if you do.
Second, the main beams look pretty grotty too.......how about splitting those and cleaning the lenses? Splitting can be done after placing in an oven.
Two points: I'm NOT sure you'll get an HID to fit behind that lens. Let us know if you do.
Second, the main beams look pretty grotty too.......how about splitting those and cleaning the lenses? Splitting can be done after placing in an oven.
Scooby Regular
Joined: Dec 2013
Posts: 677
Likes: 48
From: Torpoint
Alcazar , has a good point , but is it misty inside or just pitted outside ?
You will have problems polishing the crud out of the pitted surface out of the front side. I found using tooth paste worked ok (hey divers do it) But no matter what I did , after 100k miles of tailgating the lens is pitted from stones and the beam is diffused badly by this. I ended up just buying new 2 new OEM lenses , it made a whole load of difference Looks like new. but cost me 450 Euro.
Then again I had to get the LH drive version for Germany T�V anyway.
Last edited by Linksfahrer; Feb 5, 2014 at 07:27 PM. Reason: SP
They are not too bad tbf, look much worse in the photo lol but agree that the pitting is a bit of a pain.
HID's fit too , in the process of fitting them and man what a difference. Will update with pictures shortly. No hassle what so ever to fit into these Prodrive lights either. Only using HID on the 'dipped' beam as it's a projector lamp, I would use them in the normal reflector side of things as it can be a mare for other road users. Any way images up shortly
HID's fit too
, in the process of fitting them and man what a difference. Will update with pictures shortly. No hassle what so ever to fit into these Prodrive lights either. Only using HID on the 'dipped' beam as it's a projector lamp, I would use them in the normal reflector side of things as it can be a mare for other road users. Any way images up shortly
Scooby Regular
Joined: Oct 2012
Posts: 489
Likes: 0
From: Beds / Cambs border
Luckily I inherited HIDs with my recent bug sti purchase and I can confirm they are (in my opinion) easily as good as the blob eye headlights if not better, I have no problems navigating unlit B roads without the main beam on constantly. I would thoroughly recommend them.
Will post some pics of the install and also the beam pattern when I get home buddy. Safe to say that the beam pattern is the same but so much brighter. I now have lights I feel are safe and effective. Will post pics up later
Trending Topics
Limited on what I can do on my phone but here's the ebay item number of the kit I got:
251358120743
Perhaps some at a PC can post a link to the item.
No issues with fitment at all. Will post pics up later of the back of the lights.
251358120743
Perhaps some at a PC can post a link to the item.
No issues with fitment at all. Will post pics up later of the back of the lights.
Scooby Regular
Joined: Sep 2004
Posts: 44
Likes: 0
From: Southampton
Just resurrecting this thread. I have bough the exact same HID kit for my bug eye with the same lights. I have wired them up as per instructions but they are not working properly. The dipped beam (H7) will only come on if you select full or high beam. I am just wondering how you got them to work properly? Did you have to get hold of a H7 wiring harness with relay and connect the ballast straight off the battery? Hope you can help me guys

You'd have been better starting a new thread in electrical, few people look at older threads when resurrected.
Try some Hella 1000FF's on home made brackets...you'll not be far wrong.
And with HID bulbs in:
Although those are genuine 1000ff HID driving lights, the effect is almost the same.
Try some Hella 1000FF's on home made brackets...you'll not be far wrong.
And with HID bulbs in:
Although those are genuine 1000ff HID driving lights, the effect is almost the same.

Thread
Thread Starter
Forum
Replies
Last Post
Scott@ScoobySpares
Full Cars Breaking For Spares
7
Dec 14, 2015 08:16 AM
Mattybr5@MB Developments
Full Cars Breaking For Spares
20
Oct 22, 2015 06:12 AM

