
diy red dash and dials

hey guy's
been hankering after the red sti interior bits for while, but there silly money so decided to hve go myself, the pics dont do it justice, but i did take a big risk doing it, so dont blame me if you copy and it goes wrong...
first the centre dash bit, remove the surround and then take the dials out,
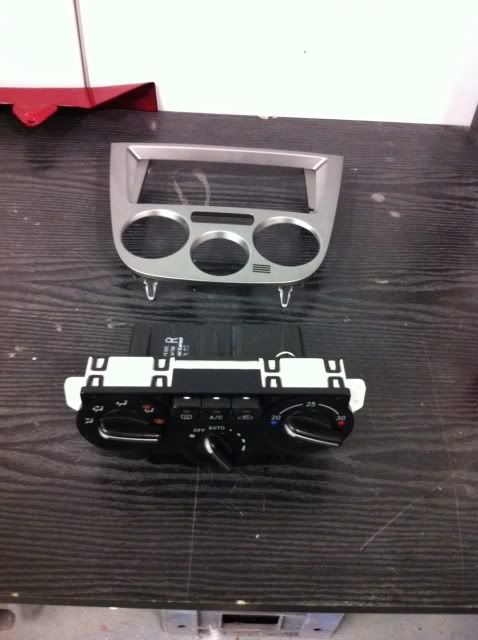
then split them and use red paint to cover the back of the dials, remove the green covers off the bulbs too
then build back up.
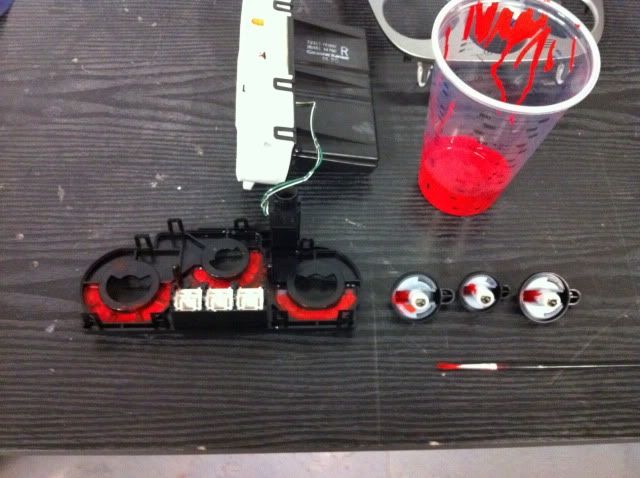
next the clocks, remove from the dash and split them, taking the needles off is nerve racking and i though i needed new clocks at one point, lol
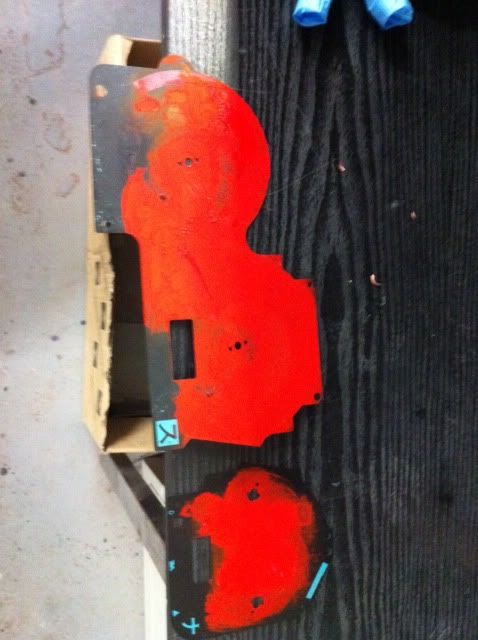
once split you need to remove the backing of the dials, its basiclly green then covered with black, i did this with thinners, i tested a piece first, this is were it could of gone wrong,

then i covered with red paint, and again got rid of the green bulb covers,
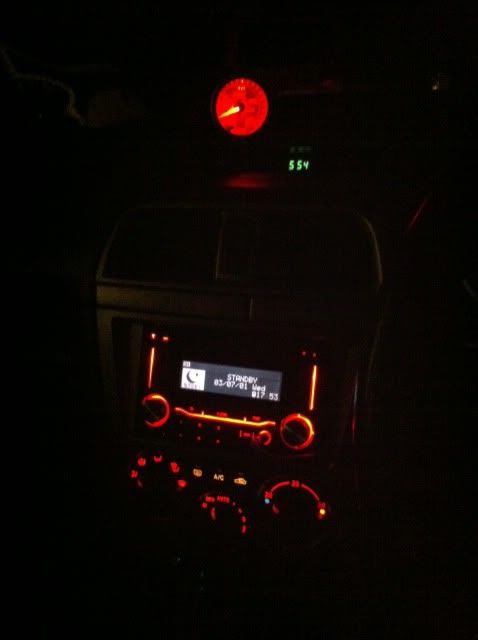
build back up without the glass on the clocks then use a satnav to set the speed correct, you need to remeber where you fuel was too.
once happy build it back up to finish, i need to do the lower buttons for the fogs, but i can sort that at a later date.

like i say pics are pants but in the flesh its very pleasing, plus i can change the colour of my radio and boost gauge
jake
been hankering after the red sti interior bits for while, but there silly money so decided to hve go myself, the pics dont do it justice, but i did take a big risk doing it, so dont blame me if you copy and it goes wrong...
first the centre dash bit, remove the surround and then take the dials out,
then split them and use red paint to cover the back of the dials, remove the green covers off the bulbs too
then build back up.
next the clocks, remove from the dash and split them, taking the needles off is nerve racking and i though i needed new clocks at one point, lol
once split you need to remove the backing of the dials, its basiclly green then covered with black, i did this with thinners, i tested a piece first, this is were it could of gone wrong,
then i covered with red paint, and again got rid of the green bulb covers,
build back up without the glass on the clocks then use a satnav to set the speed correct, you need to remeber where you fuel was too.
once happy build it back up to finish, i need to do the lower buttons for the fogs, but i can sort that at a later date.
like i say pics are pants but in the flesh its very pleasing, plus i can change the colour of my radio and boost gauge
jake
Scooby Senior
iTrader: (51)
Joined: Nov 2005
Posts: 20,491
Likes: 2
From: Wherever I park my car, that's my home
Looks tidy, I feel a copy coming on
I've already put a coat of clear red on my needles and red a 'how to' on NASIOC showing how to sand the green off without removing the dials, white numbers and red needles will match my gauges better
I've already put a coat of clear red on my needles and red a 'how to' on NASIOC showing how to sand the green off without removing the dials, white numbers and red needles will match my gauges better

nice work there jake  gona have a go at mine at some point to match the new defi type speedo i got now but im gona use a colour film which in my trade we use for the lead lights on double glaze units
gona have a go at mine at some point to match the new defi type speedo i got now but im gona use a colour film which in my trade we use for the lead lights on double glaze units

Thread
Thread Starter
Forum
Replies
Last Post
Mattybr5@MB Developments
Full Cars Breaking For Spares
28
Dec 28, 2015 11:07 PM
Mattybr5@MB Developments
Full Cars Breaking For Spares
12
Nov 18, 2015 07:03 AM