3 port subaru oil catch cans


 06 October 2013, 07:47 PM
#304
Scooby Regular
iTrader: (12)
Join Date: Jun 2007
Location: Moved to the Darkside
Posts: 5,034
Likes: 0
Received 0 Likes
on
0 Posts
Thanks buddy, I've read it a few times now but wondered how/if people have returned to sump with this catch can due to the fitment issue, as in the hole on the bottom and having to mount it differently. Also might have to put a tap on the return to sump feed as it's not a daily driver but doesn't get used often, it also gets used on track so would like to be able to swap between the two.
06 October 2013, 08:10 PM
#306
Scooby Regular
iTrader: (12)
Join Date: Jun 2007
Location: Moved to the Darkside
Posts: 5,034
Likes: 0
Received 0 Likes
on
0 Posts
I want return to sump for when on track, but from what I've read, return to sump is not very good if it's not driven very often but would be ok if it was a daily driver if you get what I mean.
Do you happen to know the thread size for the drain hole?
Do you happen to know the thread size for the drain hole?
06 October 2013, 09:23 PM
#307
Scooby Regular

In the process of installing mine at the mo. Im using the bigger of the breather hoses on the heads. (16mm outlets) The small ones are being blanked off at the heads and black joiner pipe that's bolted to the TMIC removed. My can is going to be mounted on the shelf next to the passenger strut with a metal plate im shaping and going to paint. Bit of a PITA being mounted through the bottom  but i didn't want to drill a bracket into the strut. Ill try to get a couple of pics up when its done.
Slow process though as im trying to do a million other things aswell.
but i didn't want to drill a bracket into the strut. Ill try to get a couple of pics up when its done. Slow process though as im trying to do a million other things aswell.

 16 October 2013, 05:42 PM
#312
Scooby Regular
iTrader: (5)
Join Date: Oct 2012
Location: North Yorkshire / Boston, MA
Posts: 1,907
Likes: 0
Received 1 Like
on
1 Post
Just received mine today, looks stunning - well done Chris and team.
With this having three inputs, does that mean I can do away with the black metal "T" piece which runs the length of my TMIC and simply connect each head breather directly to the can, with the third going from the PCV?
With this having three inputs, does that mean I can do away with the black metal "T" piece which runs the length of my TMIC and simply connect each head breather directly to the can, with the third going from the PCV?
 19 October 2013, 08:23 PM
#315
Scooby Regular
iTrader: (12)
Join Date: Jun 2007
Location: Moved to the Darkside
Posts: 5,034
Likes: 0
Received 0 Likes
on
0 Posts
Thought I might do a bit of a guide as I had to look at a few different ones to get to the point where I would attempt it myself I mostly used Dons guide in the thread linked below.
https://www.scoobynet.com/general-te...n-to-sump.html
So I started collecting bits to fit this last week and took the plunge today
First of all the bits, now I bought a few things that I thought I might need as I wanted to make sure I could finish it if I started so I didn't expect to use everything.
3m silicone hose ID 16mm
http://www.ebay.co.uk/itm/2906769063...84.m1439.l2649
3 straight barbed nylon connectors ID 16mm
http://www.ebay.co.uk/itm/1306469465...84.m1439.l2649
3 90 degree barbed nylon connectors ID 16mm
http://www.ebay.co.uk/itm/1306467088...84.m1439.l2649
3 straight reducer barbed nylon connectors ID 16mm-14mm
http://www.ebay.co.uk/itm/1406919825...84.m1439.l2649
2 alloy blanking plugs
http://www.ebay.co.uk/itm/2906542896...84.m1439.l2649
also a heavy duty bracket from B&Q
http://www.diy.com/nav/fix/nails-scr...-100mm-9281755
M10 x 1.5 allen bolt and nut.
M8 x 1 bolt and nut ( I think).
If I were to order again I would replace one of the the reducers with a 16mm-12mm as the crank case breather was very tight for the 14mm (though I did manage to get it in enough and jubilee clip it), It was the only pipe I didn't measure the ID on
This is for a front mounted intercooler car.
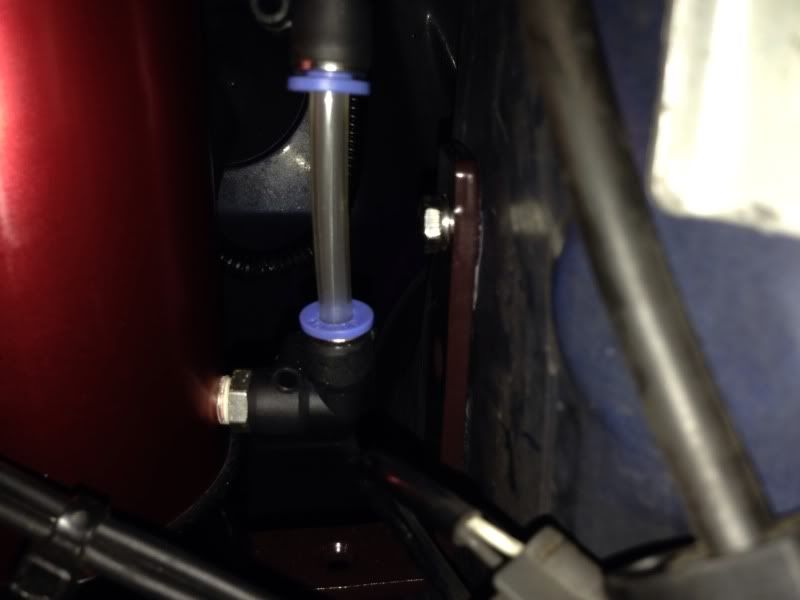
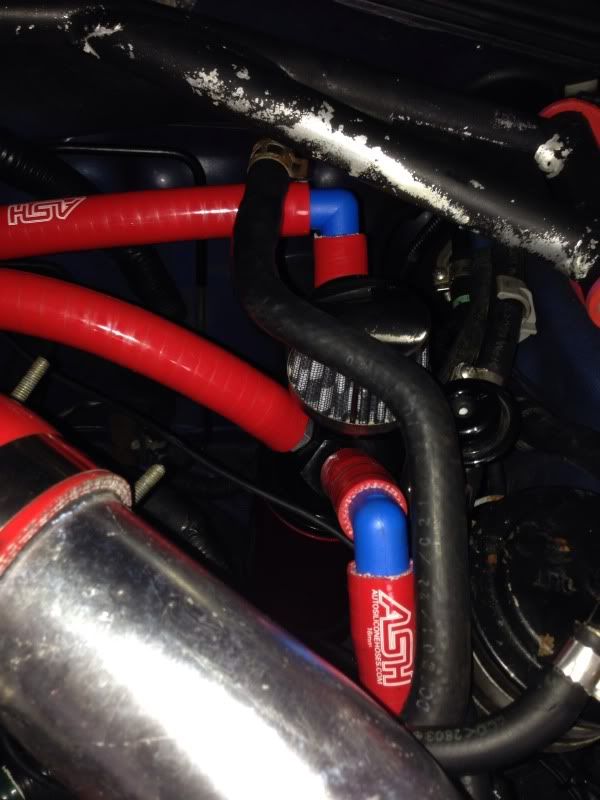
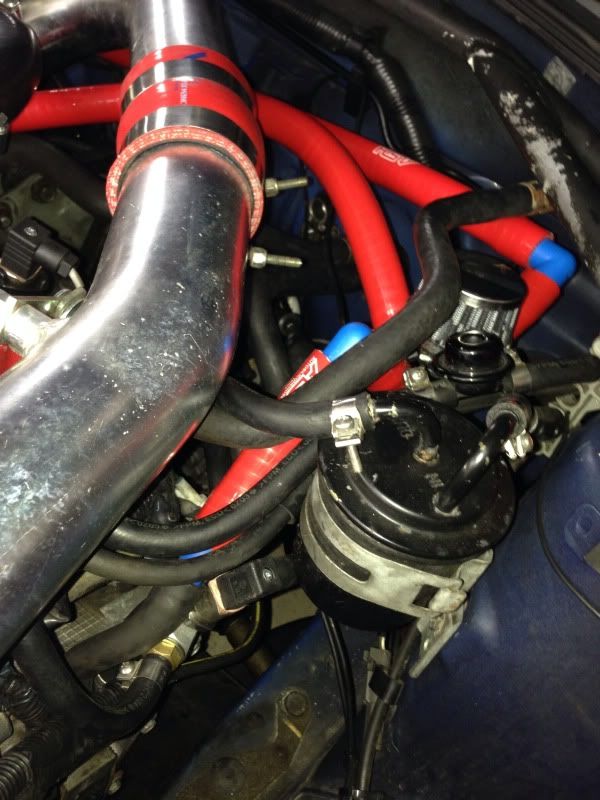
Before I cut any pipes I decided where the can would fit/go. Most people fit it in and around the passenger side strut, as there where a few holes there and two threaded ones at that, that is where I decided it would go. So I fitted the base mount to the bracket with the allen bolt and a nut and then fastened it to the strut. I don't have a photo of the base mount on it's own only with the can in place.( When you screw the can in it might take a few goes to start the thread off so that your inlets are facing the right way for fitting)
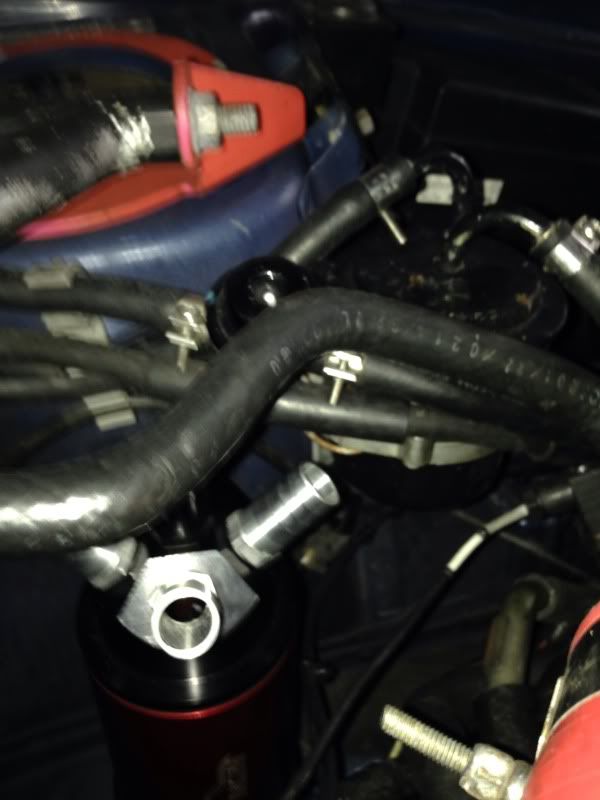
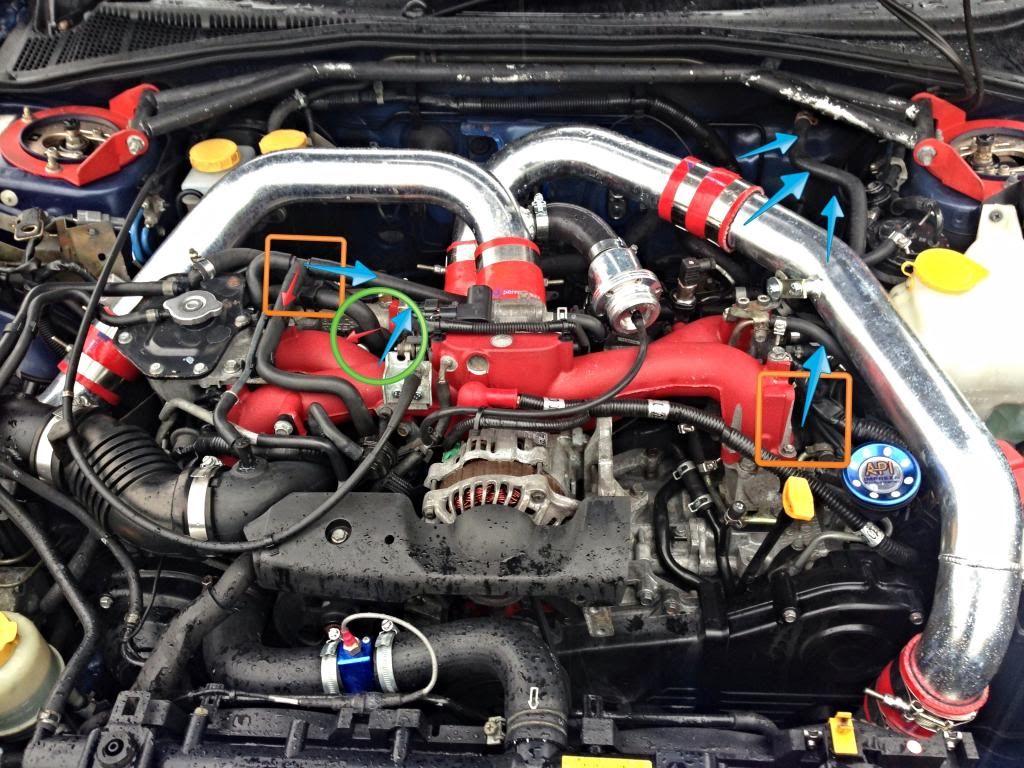
(In the photo with the coloured squares etc it is an older picture and was raining so that isn't fluid on the alternator cover)
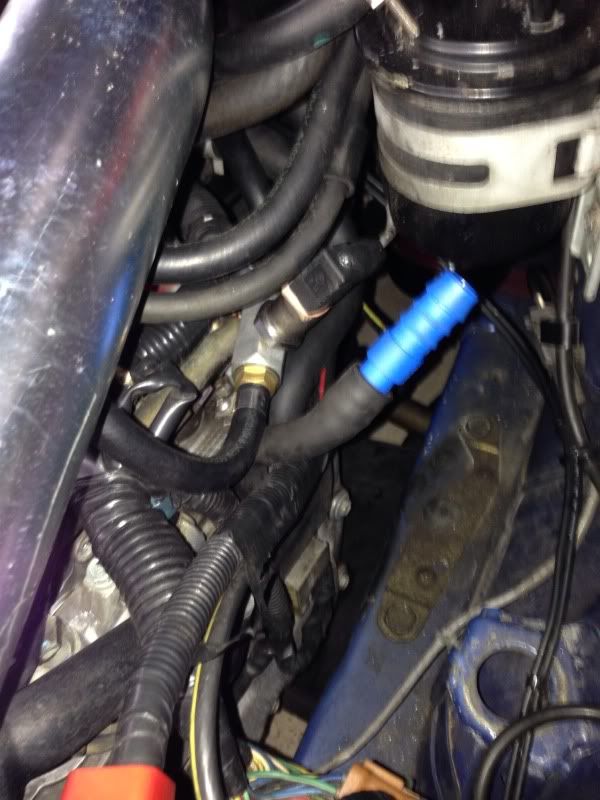
Next the pipework. In the orange squares is where the head breathers are, the right hand side one you can't see so just trace the pipe from the left hand side orange square ( the blue arrow)On my car there was a jointer/connector near the head which I just pulled out and replaced with a 14mm-16mm reducer.
On the left hand side one is a T-piece from when the front mount has been fitted, pull apart and remove the T- piece. Bung the pipe where the red arrow goes with the 13mm bung (I didn't cut the pipe shorter as it can remain in the OE clips), place a 14mm-16mm reducer into the pipe coming from the heads.
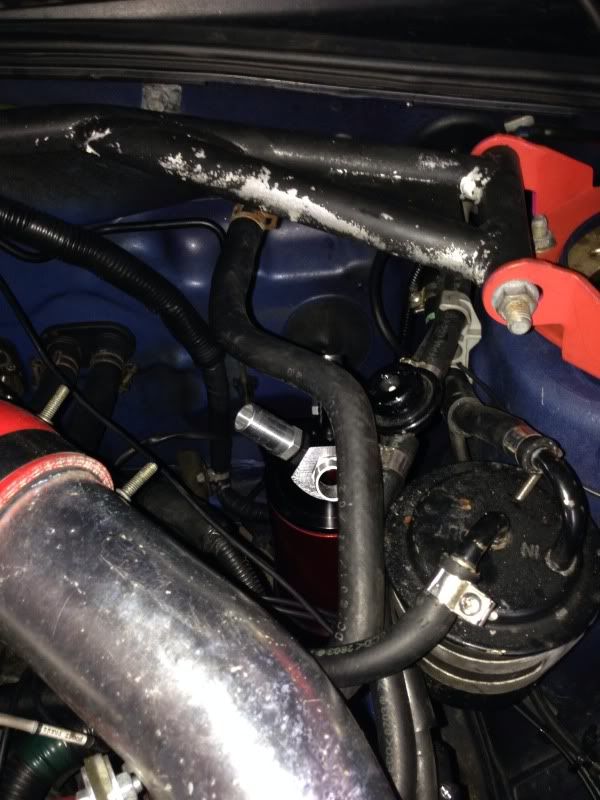
In the green circle is the crank case breather (you can't see it very well in the photo). The pipe comes up from the crank and into the inlet. This is where I could have done with a 12mm-16mm reducer. I pulled this pipe off from both the inlet and crank and then cut it in half, I then bunged one half with the 13mm bung and placed/struggled/swore the 14mm-16mm reducer into the other half. The bunged half goes back on the inlet and the reduced part goes back onto the crank case.
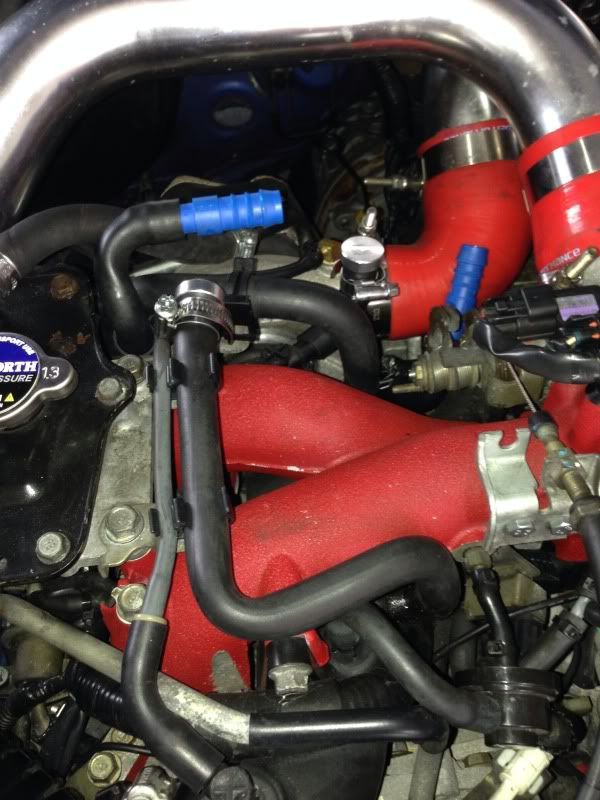
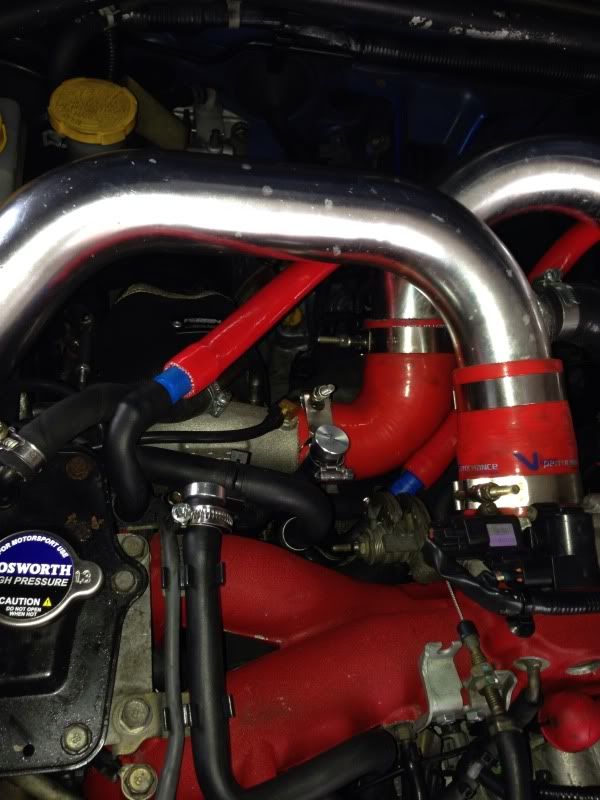
Next is just piping it all up, I put a couple of 90's off the catch can to make it a better/smother fit. You can choose which route you want to to take with your pipes and cut accordingly. I just fitted the filter on the top as designed by Chris for two reasons, 1st because I thought I'd see how it goes as in fumes, 2nd because I needed a smaller 90 as the filter inlet is a fair bit smaller than 16mm and you'd need a 90 to get it to route down underneath the car.
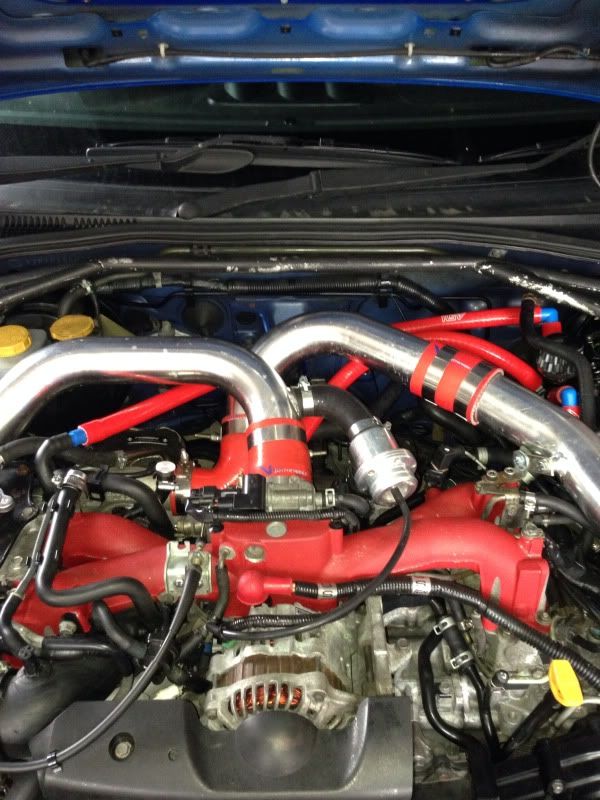
I went out for a good blast and did around 70 miles, when I got home and checked everything it was all good
I only used jubilee clips on the bungs and the crank case breather, because a) I didn't want the bungs falling anywhere they shouldn't and because b) I couldn't get the 14mm-16mm reducer in as far as I would have liked. When you see how easy the OE pipe work comes off you'll see why I haven't bothered with any clips on any of the other pipework which is fairly hard to pull off in comparison.
Hope this might be of some use to someone......anyone
I mostly used Dons guide in the thread linked below.https://www.scoobynet.com/general-te...n-to-sump.html
So I started collecting bits to fit this last week and took the plunge today
First of all the bits, now I bought a few things that I thought I might need as I wanted to make sure I could finish it if I started so I didn't expect to use everything.
3m silicone hose ID 16mm
http://www.ebay.co.uk/itm/2906769063...84.m1439.l2649
3 straight barbed nylon connectors ID 16mm
http://www.ebay.co.uk/itm/1306469465...84.m1439.l2649
3 90 degree barbed nylon connectors ID 16mm
http://www.ebay.co.uk/itm/1306467088...84.m1439.l2649
3 straight reducer barbed nylon connectors ID 16mm-14mm
http://www.ebay.co.uk/itm/1406919825...84.m1439.l2649
2 alloy blanking plugs
http://www.ebay.co.uk/itm/2906542896...84.m1439.l2649
also a heavy duty bracket from B&Q
http://www.diy.com/nav/fix/nails-scr...-100mm-9281755
M10 x 1.5 allen bolt and nut.
M8 x 1 bolt and nut ( I think).
If I were to order again I would replace one of the the reducers with a 16mm-12mm as the crank case breather was very tight for the 14mm (though I did manage to get it in enough and jubilee clip it), It was the only pipe I didn't measure the ID on
This is for a front mounted intercooler car.
Before I cut any pipes I decided where the can would fit/go. Most people fit it in and around the passenger side strut, as there where a few holes there and two threaded ones at that, that is where I decided it would go. So I fitted the base mount to the bracket with the allen bolt and a nut and then fastened it to the strut. I don't have a photo of the base mount on it's own only with the can in place.( When you screw the can in it might take a few goes to start the thread off so that your inlets are facing the right way for fitting)


(In the photo with the coloured squares etc it is an older picture and was raining so that isn't fluid on the alternator cover
)Next the pipework. In the orange squares is where the head breathers are, the right hand side one you can't see so just trace the pipe from the left hand side orange square ( the blue arrow)On my car there was a jointer/connector near the head which I just pulled out and replaced with a 14mm-16mm reducer.
On the left hand side one is a T-piece from when the front mount has been fitted, pull apart and remove the T- piece. Bung the pipe where the red arrow goes with the 13mm bung (I didn't cut the pipe shorter as it can remain in the OE clips), place a 14mm-16mm reducer into the pipe coming from the heads.
In the green circle is the crank case breather (you can't see it very well in the photo). The pipe comes up from the crank and into the inlet. This is where I could have done with a 12mm-16mm reducer. I pulled this pipe off from both the inlet and crank and then cut it in half, I then bunged one half with the 13mm bung and placed/struggled/swore the 14mm-16mm reducer into the other half. The bunged half goes back on the inlet and the reduced part goes back onto the crank case.


Next is just piping it all up, I put a couple of 90's off the catch can to make it a better/smother fit. You can choose which route you want to to take with your pipes and cut accordingly. I just fitted the filter on the top as designed by Chris for two reasons, 1st because I thought I'd see how it goes as in fumes, 2nd because I needed a smaller 90 as the filter inlet is a fair bit smaller than 16mm and you'd need a 90 to get it to route down underneath the car.


I went out for a good blast and did around 70 miles, when I got home and checked everything it was all good
I only used jubilee clips on the bungs and the crank case breather, because a) I didn't want the bungs falling anywhere they shouldn't and because b) I couldn't get the 14mm-16mm reducer in as far as I would have liked. When you see how easy the OE pipe work comes off you'll see why I haven't bothered with any clips on any of the other pipework which is fairly hard to pull off in comparison.
Hope this might be of some use to someone......anyone
Last edited by Aaron1978; 19 October 2013 at 10:08 PM.

 21 October 2013, 08:25 PM
#319
Scooby Regular
iTrader: (5)
Join Date: Oct 2012
Location: North Yorkshire / Boston, MA
Posts: 1,907
Likes: 0
Received 1 Like
on
1 Post
Aaron, great writeup. Collecting bits for my bracket now.
I see my threaded holes on the strut are taken up by something already, looks like A/C piping but I'll be able to remove the bracket for that and slot an 'L' bracket of my own in behind it.
I guess there's nothing to catch cabling wise if I have to drill more holes in my strut? Providing I don't go so far and drill through my coilovers of course
21 October 2013, 09:07 PM
#320
Scooby Regular
iTrader: (12)
Join Date: Jun 2007
Location: Moved to the Darkside
Posts: 5,034
Likes: 0
Received 0 Likes
on
0 Posts
Yeah just your coilovers... oh and brake pipes. I'd take the wheel off as it will be a hundred times easierif you need to drill new holes. My air con has long gone. There is a triangular type plate with a few caps in lower down, looks factory placed and is not used on mine.
. I'd take the wheel off as it will be a hundred times easierif you need to drill new holes. My air con has long gone. There is a triangular type plate with a few caps in lower down, looks factory placed and is not used on mine.
21 October 2013, 09:21 PM
#321
27 October 2013, 05:26 PM
#322
Scooby Regular
iTrader: (12)
Join Date: Jun 2007
Location: Moved to the Darkside
Posts: 5,034
Likes: 0
Received 0 Likes
on
0 Posts
Does anybody know the thread size of the drain plug in the bottom of the can? I've taken it all off and I don't think it's metric and I'm still waiting for Chris to get back to me

Thread
Thread Starter
Forum
Replies
Last Post
JonMc
Subaru Parts
22
06 February 2016 09:50 PM
ATWRX
Full Cars Breaking For Spares
88
01 February 2016 07:28 PM
BHPvstorque
Subaru Parts
10
21 November 2015 04:12 PM