Lets See your STI Spec D's
 01 April 2013, 06:53 PM
#301
Scooby Regular
Thread Starter
There was loads of snow about up on the tops, big walls of snow at the side of the roads where the ploughs had cleared the way, alot of the roads had been shut last weekend because of the snow.
Here are a couple more snaps taken near Millers Dale, just off the A6 not to far from Buxton
 02 April 2013, 06:29 AM
#302

Tidy up of the interior, new psi3, new centre vents and relocated alarm led
http://i5.photobucket.com/albums/y18...ps950c1faf.jpg
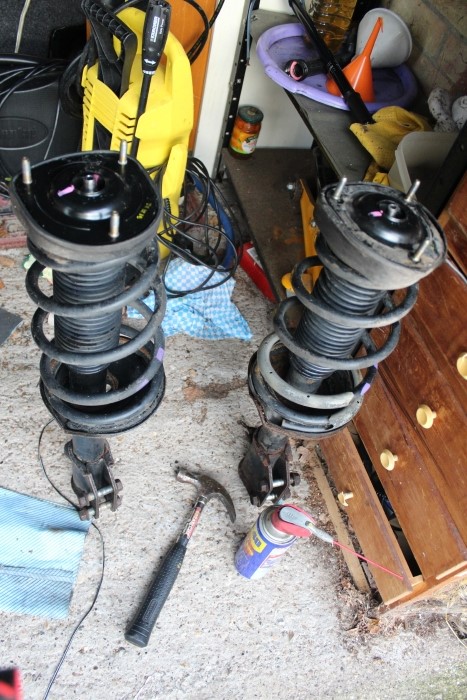
got eibachs fitted yesterday along with shock strip down and regrease, will get few pics today of how it now sits
got a health check also today with JGM just to give it a once over while he is over in N.Ireland for couple of days mapping
http://i5.photobucket.com/albums/y18...ps950c1faf.jpg
got eibachs fitted yesterday along with shock strip down and regrease, will get few pics today of how it now sits
got a health check also today with JGM just to give it a once over while he is over in N.Ireland for couple of days mapping
Last edited by Gambit; 02 April 2013 at 06:35 AM.
02 April 2013, 10:46 AM
#305

Tidy up of the interior, new psi3, new centre vents and relocated alarm led
http://i5.photobucket.com/albums/y18...ps950c1faf.jpg
got eibachs fitted yesterday along with shock strip down and regrease, will get few pics today of how it now sits
got a health check also today with JGM just to give it a once over while he is over in N.Ireland for couple of days mapping
http://i5.photobucket.com/albums/y18...ps950c1faf.jpg
got eibachs fitted yesterday along with shock strip down and regrease, will get few pics today of how it now sits
got a health check also today with JGM just to give it a once over while he is over in N.Ireland for couple of days mapping
Are you running stock shocks? If so did you go the grease nipple insert route? (interested as i'm planning this soonish).
02 April 2013, 11:43 AM
#306
 found out details of who repaired it etc so was worth a punt, and all works 100% so far
its new in that it replaced this one lol
http://i5.photobucket.com/albums/y18...ps29cf93d3.jpg
no i didnt go down the grease nipple route, tho i had the grease nipples there for it, but my mechanic mate stripped them all down and decided against it, he said that the waxy grease is just the problem and once cleaned out & repacked with decent grease they wont be a problem, so we'll see how it pans out. i used the thickest grease i could find which was carlube aquaslip - marine grade stuff
saying that my mate said getting the shocks dismantled was a complete ballache, 2 of the 4 the retaining nuts for the inserts were just impossible to get off, and he had to cut 2 of the nuts off - then had another mare trying to find replacement nuts as they are an odd thread.
so id say if you are going to dismantle the shocks, buy 4 new retaining nuts for the bottom of the shock insert just incase
quick pic of how it now sits. prob drop a hair more over the coming weeks also
before
http://i5.photobucket.com/albums/y18...ps8e635ad9.jpg
after
http://i5.photobucket.com/albums/y18...ps79f09022.jpg
main thing is it drives 10x better
Last edited by Gambit; 02 April 2013 at 11:46 AM.
02 April 2013, 12:02 PM
#307
o id say if you are going to dismantle the shocks, buy 4 new retaining nuts for the bottom of the shock insert just incase
I've heard the bottom nuts are a potential ****... I've got another car to use (if you can call a Smart car that!) so I can at least take the shocks off, soak them in penetrating fluid overnight and do the whole thing over the course of a weekend (or longer). Might just get some spare nuts in stock tho now you mention it
 Need to find what size though (14mm?).
Were the fronts waxing a buggered too? I was planning just doing the rears due to the clunk.
02 April 2013, 05:25 PM
#308
Scooby Regular
iTrader: (7)
Join Date: Jun 2010
Location: Rugby
Posts: 798
Likes: 0
Received 0 Likes
on
0 Posts
Im pretty sure the bottom strut nuts are M8 as I had to replace mine when I rebuilt the shocks on my old Spec-D. I had some new nuts in stock so they must have been a pretty std size as I don't carry any unusual sizes.
I would recommend cutting the nut of if it doesn't move at first attempt. I span the shock shaft a few too many times and rounded out the locating hole in the shock body, ended up drilling and tapping the end of the shaft so I could fit a locking bolt/nut ( pic below ) to hold the shaft steady whilst tightening the new nut.
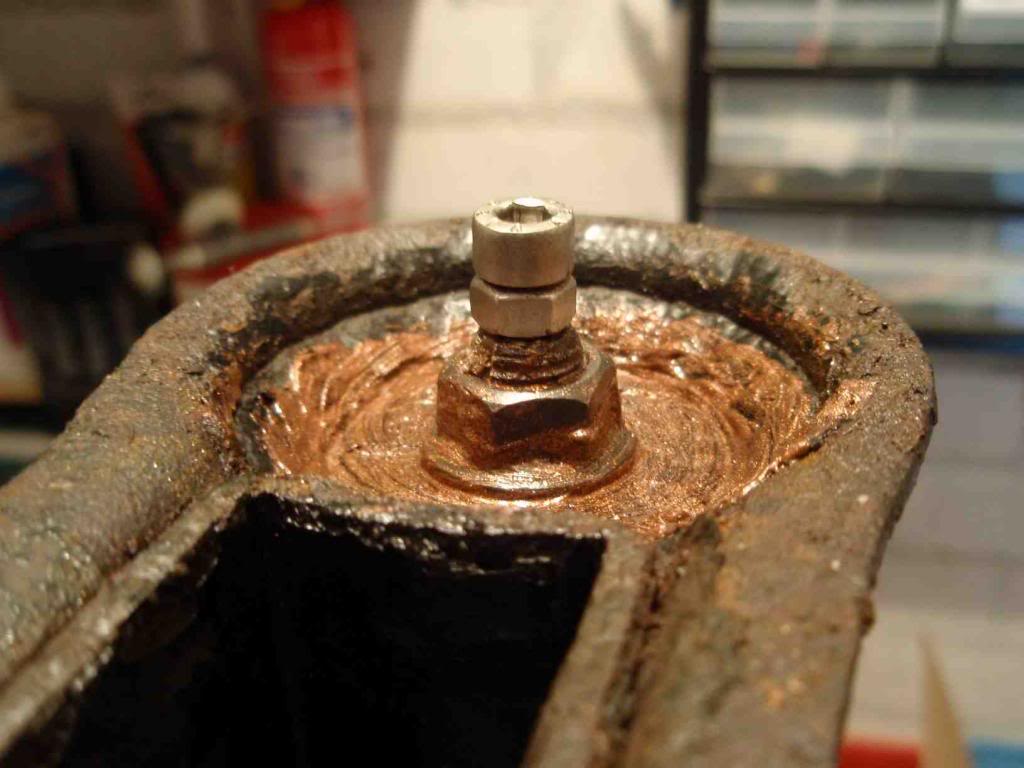
I would recommend cutting the nut of if it doesn't move at first attempt. I span the shock shaft a few too many times and rounded out the locating hole in the shock body, ended up drilling and tapping the end of the shaft so I could fit a locking bolt/nut ( pic below ) to hold the shaft steady whilst tightening the new nut.
02 April 2013, 08:23 PM
#310
Scooby Regular
iTrader: (7)
Join Date: Jun 2010
Location: Rugby
Posts: 798
Likes: 0
Received 0 Likes
on
0 Posts
No didn't use an impact gun, just hand tools, the nut was very tight and as I lent on it to undo it the squared hole in the shock body just rounded out. So in the end I had to cut the nut and then make the lock bolt/nut setup. If I was doing some again, I would try the nut and if it didn't go with gentle trying then I'd cut the nut off.
TBH, that bottom nut was the worst part of the whole job and would have been so much quicker to dremel the nut off, clean up the threads and fit a new nut.
I'm sure that after reading all this your struts will come apart easy as anything sod's law isn't it
TBH, that bottom nut was the worst part of the whole job and would have been so much quicker to dremel the nut off, clean up the threads and fit a new nut.
I'm sure that after reading all this your struts will come apart easy as anything
sod's law isn't it
02 April 2013, 09:02 PM
#311
 lets hope you are right. look out for my future utube video of "crazy dude spins strut through garage door with impact gun"
Gambit - Did ur mechanic guy use an impact gun do u know? This vid seems to suggest a sharp short blast would work best but being American i bet it had a whole lot less crud on it before!
 02 April 2013, 09:48 PM
#313
Scooby Regular

Join Date: Aug 2004
Location: Berkshire
Posts: 948
Likes: 0
Received 0 Likes
on
0 Posts
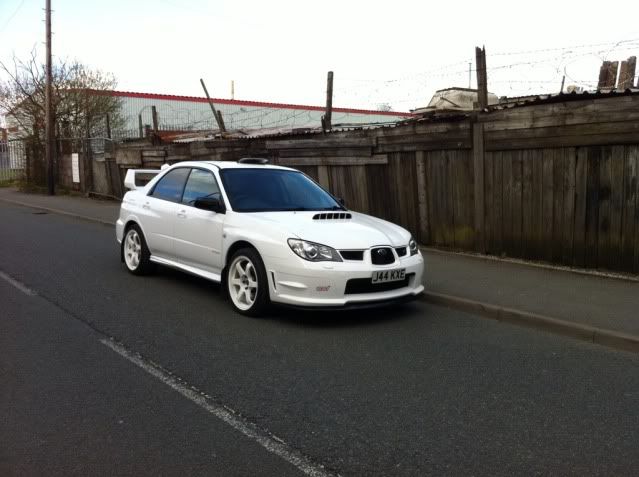
I borrowed my mum's Spec-D for a trip up to North Wales last week, had a brilliant time! Perfect car for the conditions, especially on the Pirelli Sottozeros.
Here's a few pictures:


Here's a few pictures:
02 April 2013, 10:05 PM
#314
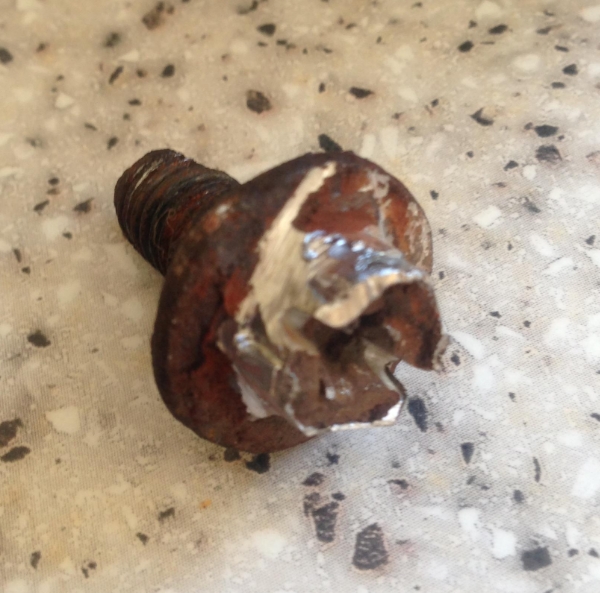
Threads cleaned up, wire brushed, soaked in penetrating oil, hand tools, impact gun, heat, cut - you name it he tried it.
7yrs worth of road grime/salt/corrosion etc
7yrs worth of road grime/salt/corrosion etc
Nice pics there phelpsa! A stock looking Spec-d in its natural environment... always a pleasent thing to see IMO.
 28 April 2013, 07:34 PM
#317
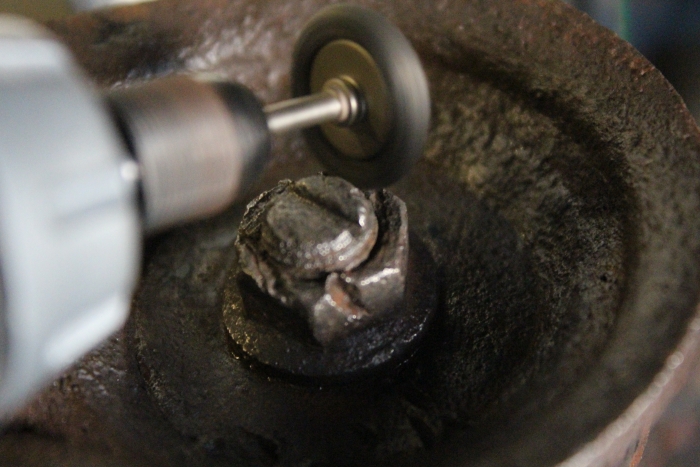
Not a whole lot happening in the land of Spec-D's (apart from Jake turning white of course!).
Diff oil changed this weekend and problem with a flickering Rear Diff Temp light sorted along with it. The car was telling me my Diff was too hot when i drove from cold (ehh?!). Seems to have been a somewhat rusty earth under connector (sigh of relief at �150 for the sensor!).
Of course as always the car fourght me....
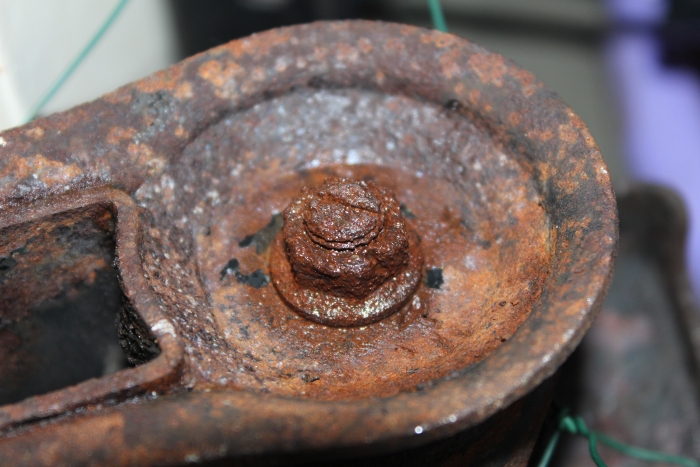
... Seems the previous owner rounded this rear diffuser bolt a treat for me so i had to get medievil on it! Thank gawd for my newly aquired Draper nut removal tool... cheap and affective!
Why can nothing be simple with my car!
28 April 2013, 08:07 PM
#318
Scooby Regular

Join Date: Mar 2013
Location: Nottingham M-SOC.com
Posts: 48
Likes: 0
Received 0 Likes
on
0 Posts
A quick update from me as I hate typing on an iPad..
Recently declared mine off the road as I'm now going to forge the engine this summer as the head gaskets are slowly on the way out. Noticed Dewey that you've had yours done by api? Spoke to Simon there last week about prices. What's your opinion of there work and service?
Great pics above by the way. Some keen photographers on here
For the record, looked at when my car was registered. 30/11/06.
Where does that put mine on the list?
28 April 2013, 09:04 PM
#319
Sensible decision Stealth... PM sent with full breakdown on the great service I got from API. David, Simon & Tom all great guys to deal with.
(discount on next service for bigging you up API David when u read this? ).
Seriously though its the place to go and you get a car back that you can 100% confident with.
(discount on next service for bigging you up API David when u read this?
).Seriously though its the place to go and you get a car back that you can 100% confident with.
28 April 2013, 11:59 PM
#320
Not been doing much to mine, sorted the eibach spring clunk, had to sheath the top and bottom coils on front springs.
Also have a fuel pump to fit and picked up a genuine fuel filter also off ebay for 20 delivered bargain!
Heres a pic of it with its stable mate which i got out of the garage for first time since sept
http://i5.photobucket.com/albums/y18...ps288ca06c.jpg
Also have a fuel pump to fit and picked up a genuine fuel filter also off ebay for 20 delivered bargain!
Heres a pic of it with its stable mate which i got out of the garage for first time since sept
http://i5.photobucket.com/albums/y18...ps288ca06c.jpg
01 May 2013, 12:23 AM
#321
Nice 16v stable mate there Gambit!
I tried my hand with an 8v years back.... it spent more time off road than on road of course. 'Unfinished project' i think the ad would have said
Golfs like that are a damn site cheaper tinkering on a MK2 than a scoob though that is for sure!
I tried my hand with an 8v years back.... it spent more time off road than on road of course. 'Unfinished project' i think the ad would have said
Golfs like that are a damn site cheaper tinkering on a MK2 than a scoob though that is for sure!
01 May 2013, 02:22 PM
#322
Scooby Regular
Join Date: Mar 2013
Location: Nottingham M-SOC.com
Posts: 48
Likes: 0
Received 0 Likes
on
0 Posts
Sensible decision Stealth... PM sent with full breakdown on the great service I got from API. David, Simon & Tom all great guys to deal with.
(discount on next service for bigging you up API David when u read this? ).
Seriously though its the place to go and you get a car back that you can 100% confident with.
(discount on next service for bigging you up API David when u read this?
).Seriously though its the place to go and you get a car back that you can 100% confident with.
When I start the strip in June I'll post some picks up of engine in bits lol.
01 May 2013, 08:05 PM
#323
Scooby Regular
Thread Starter
Well after a month back on the road and nearly 400 miles covered its nice to be back behind the wheel of the spec d.
I'll be booking it in at auto technica in Buxton next week in Buxton for its service and I'm going to get the coilovers raised a little too. Then after that I need to find a decent bodyshop in the Manchester area as there are a couple of small dinks and scratches here and there that I need to get sorted out. Can anyone recommend me anyone. :-)
I'll be booking it in at auto technica in Buxton next week in Buxton for its service and I'm going to get the coilovers raised a little too. Then after that I need to find a decent bodyshop in the Manchester area as there are a couple of small dinks and scratches here and there that I need to get sorted out. Can anyone recommend me anyone. :-)
Last edited by WarrenSTI; 01 May 2013 at 08:18 PM.

 03 May 2013, 11:25 PM
#326
Well day one of rear suspension knocking resolution and all has gone better than i thought it might.
19mm nuts were a bastad and my electric impact gun couldn't get in the space. Still got them out eventually!
Struts are out....
Rear right (knocking) looks awful compared to rear left. Given the lack of a dust cover on the rear left I'm pretty sure its been replaced.
Rear right water drain channel was totally blocked...
Compared to rear left....
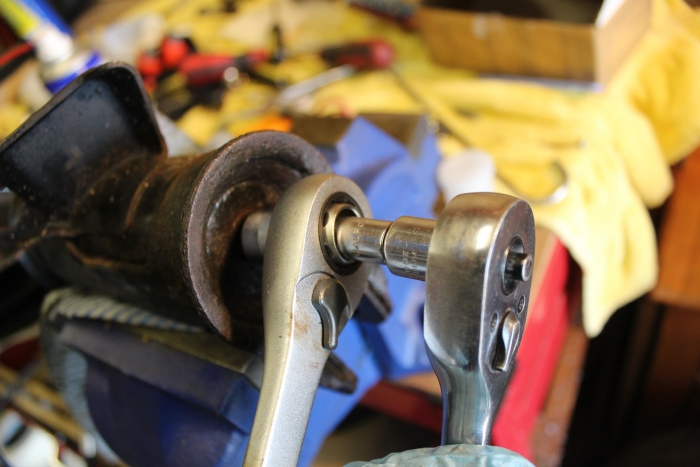
Top nut on both sides came loose easily (when in the car) mostly thanks to my cheap but bloody handy go-through ratchet set (allowing an allen key to pass through the middle of the ratchet and socket)...

Bottom nut on the rear right is where the issue is going to be (tomorrow)...
After pressure wash... evidence that someone has fourght this nut before!
So tonight i've cleaned it up with wire brush...
Drowned it in WD40...
And left it to soak in the tub!...
So tomorrow is the real test... can an overnight soak make it possible to remove or will i be cutting! I'll know by this time tomorrow!
19mm nuts were a bastad and my electric impact gun couldn't get in the space. Still got them out eventually!
Struts are out....

Rear right (knocking) looks awful compared to rear left. Given the lack of a dust cover on the rear left I'm pretty sure its been replaced.
Rear right water drain channel was totally blocked...

Compared to rear left....

Top nut on both sides came loose easily (when in the car) mostly thanks to my cheap but bloody handy go-through ratchet set (allowing an allen key to pass through the middle of the ratchet and socket)...

Bottom nut on the rear right is where the issue is going to be (tomorrow)...

After pressure wash... evidence that someone has fourght this nut before!

So tonight i've cleaned it up with wire brush...

Drowned it in WD40...

And left it to soak in the tub!...

So tomorrow is the real test... can an overnight soak make it possible to remove or will i be cutting! I'll know by this time tomorrow!
05 May 2013, 12:12 AM
#328
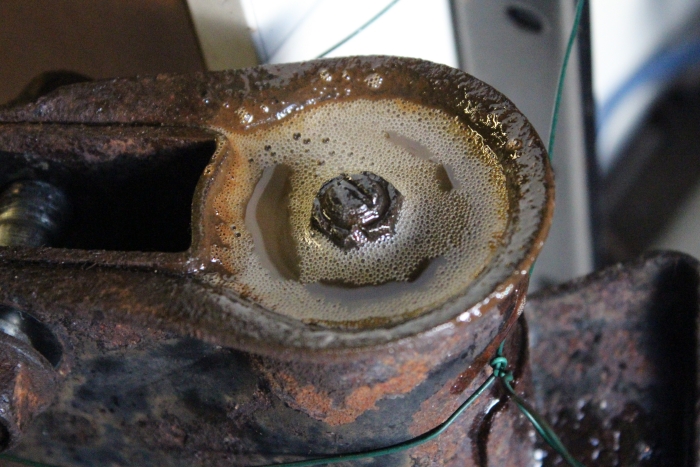
Update on the struts time... interesting developments it seems.
Safe to say I HIGHLY recommend the overnight bath in WD40 when doing this as the potential problem nut came off like butter this morning with no drama at all (much to my extreme delight!).
Notable crud all round the seal...
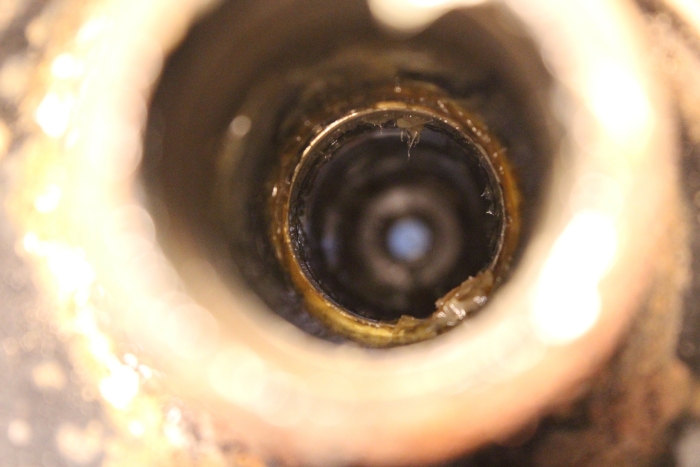
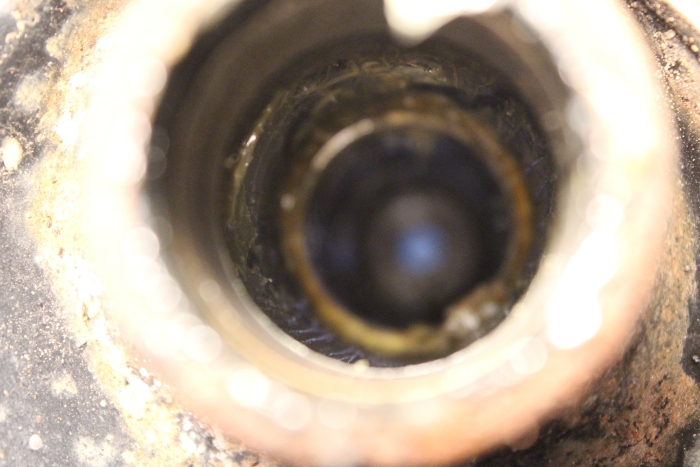
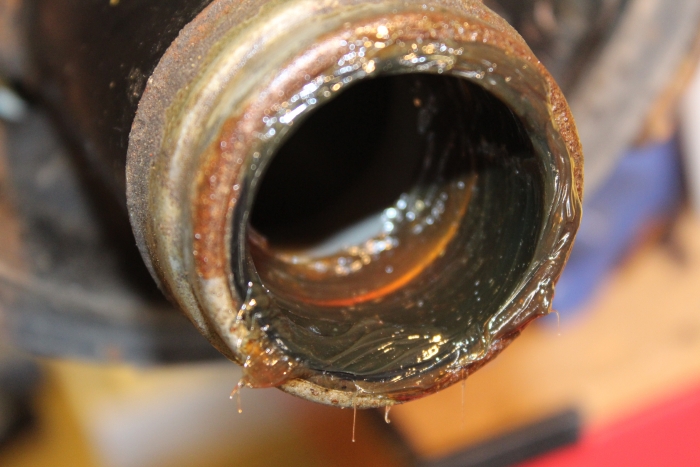
On removal it is clear someone has been in here before... no waxy yellow grease as per standard KYB to be seen just clear grease and fairly soft still...

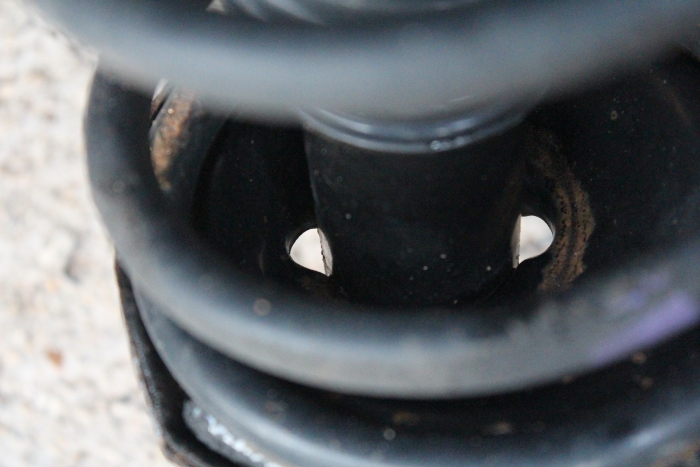
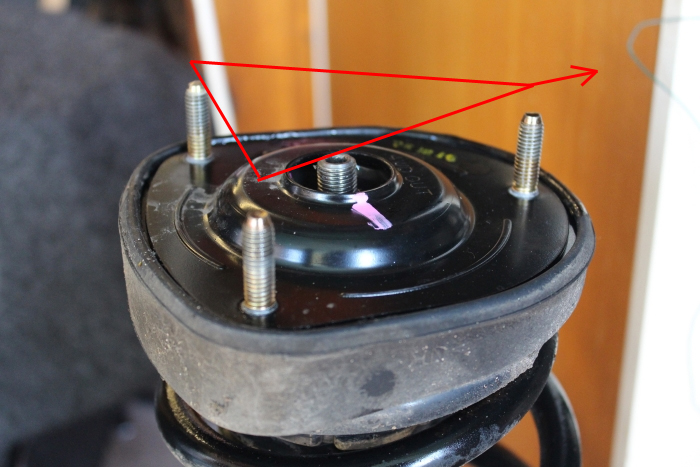
One thing i noticed before i stripped the strut was that the rubber top mount on the knocking side was 90 degrees rotated...
This is the correct fitment. The red arrow indicates the direction of 'OUT toward the wheels. Thick edge of the rubber is along the edge with 2 threads and slopes down to the edge with the single thread which is where '4WD OUT' is indeed stamped into the metal.
Below is how the knocking strut was. Rotated round way too far and out of shape.
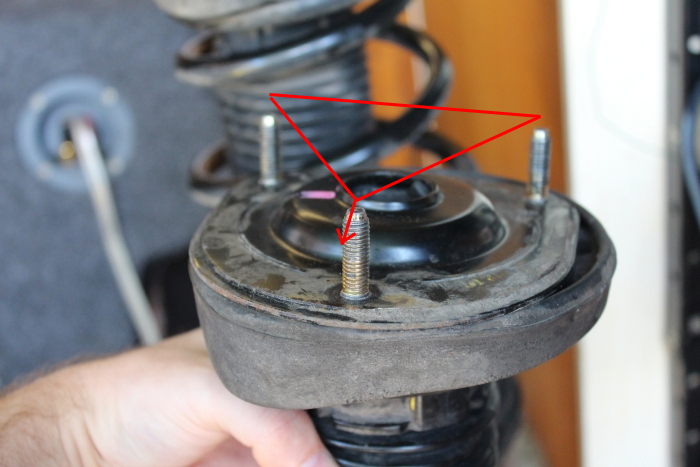
Now how this got that way I have no idea and I can only assume it was a previous re-fitment performed incorrectly. The net result would have meant the spring was not seated properly and 'might' have been the constant clunking rather than the struts? Opinions welcome here!
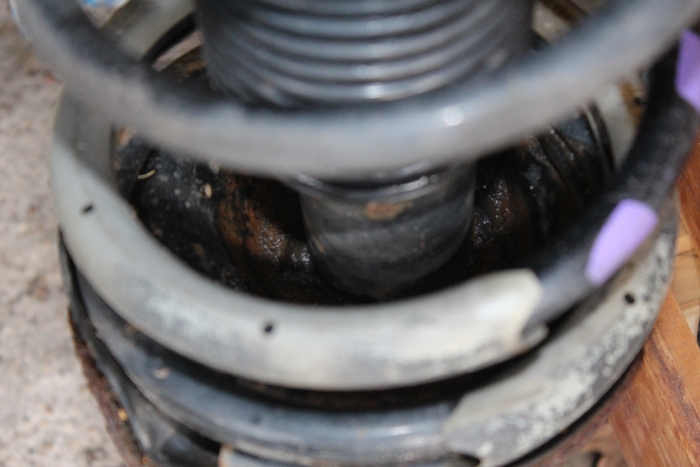
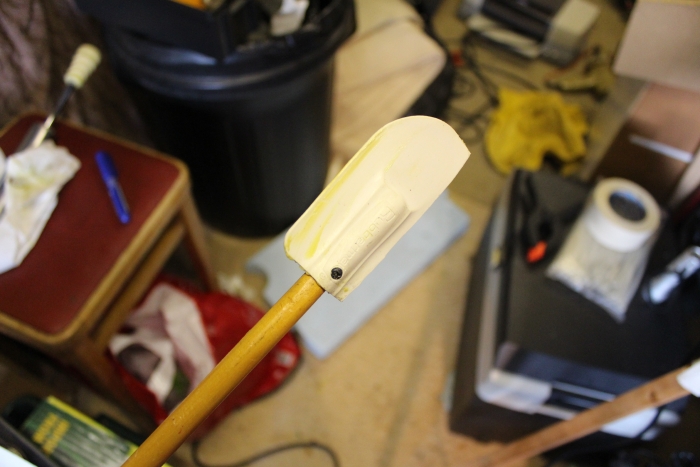
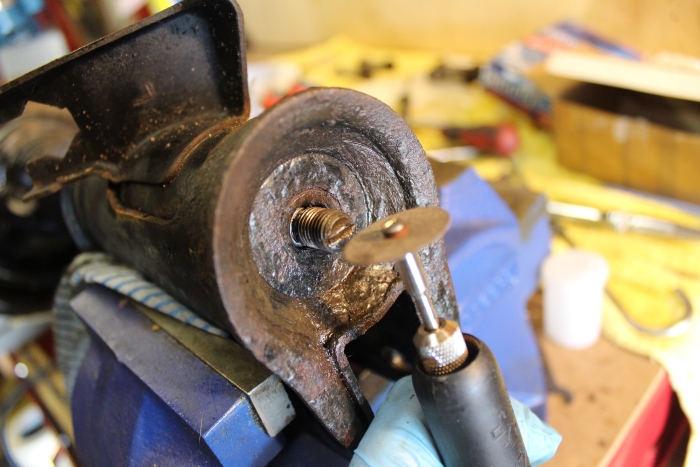
Either way the plan for grease nipples stayed the same... device created for getting out old grease (yes that is an old child pool cue!). I screwed it on so as to avoid losing a spatchula in the heart of the strut case!
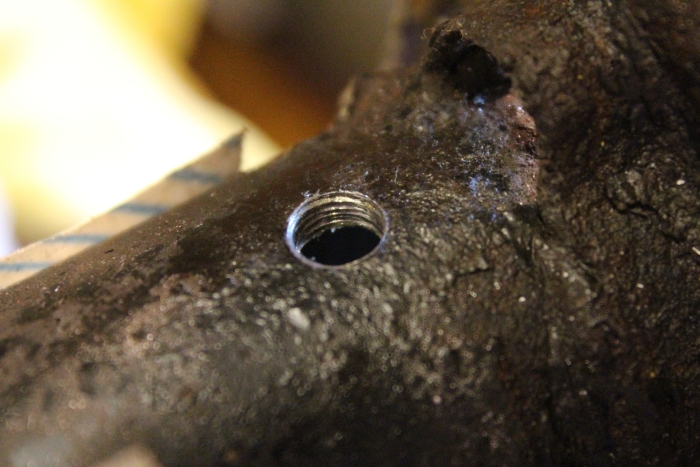
Location of the grease nipple hole is punched...
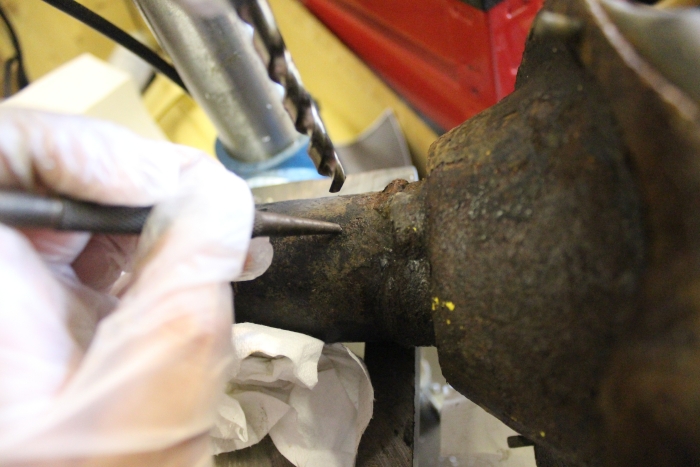
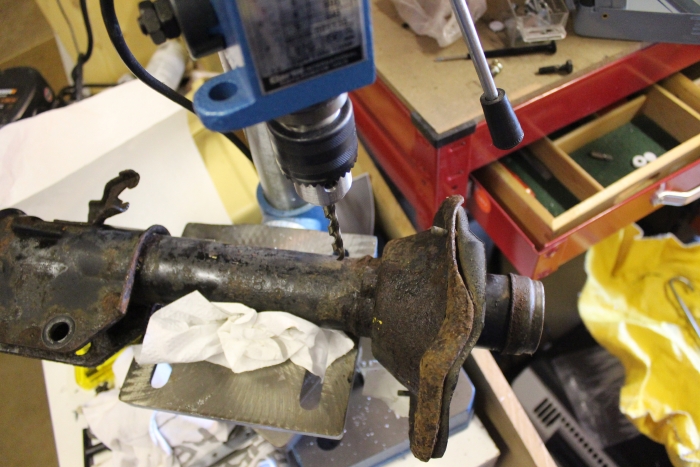
Hole drilled (pillar drill very handy!)...
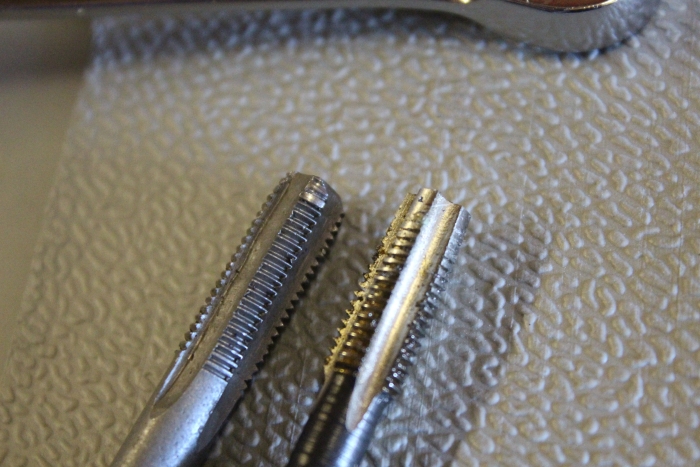
Note to those who (like me) who consider taking a punt on a cheap *** set of Tap/Dies on ebay... the one on the left is one from such a set. It collapsed on itself within one turn. Whole set is only use for cleaning threads and barely does that.
The tap on the right was purchased today and cost about �10 on its own! But it proves that you get what you pay for!
Hole tapped...
Locktite used on the grease nipple to ensure a better seal...
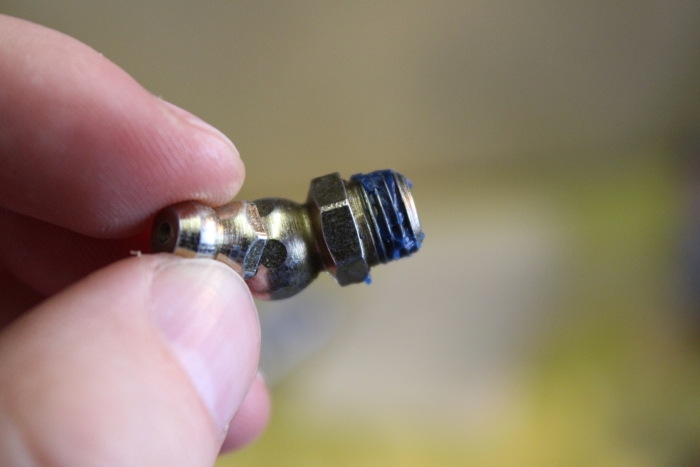
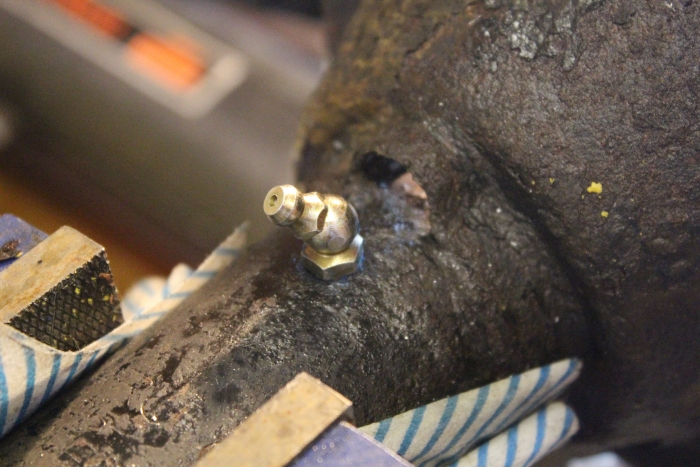
Grease nipple in place...
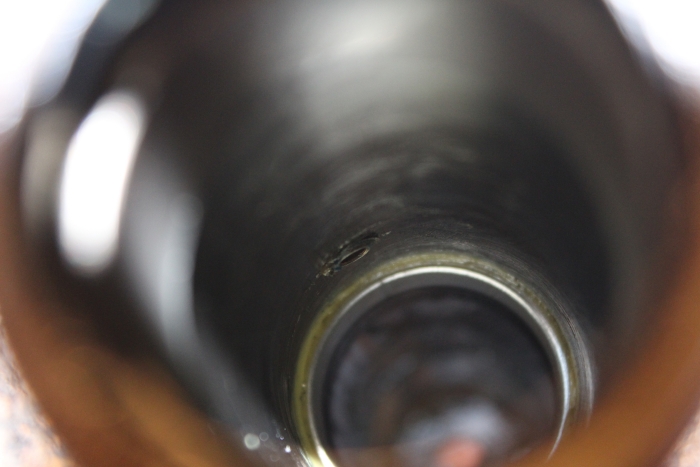
Inside view - cleaned out of metal swarf. I used a magnet pick up tool for most of this and it captured a lot of the really small bits and then devised a self made giant pipe cleaner to get the rest.
After that it was just a smearing of grease round the upper most chamber between rubber top seal and Teflon bush (here)...
After that it was reassemble and tighten the bottom nut.
Then used my pistol grease gun to pack the cavity till it would take no more!
So that was the old one done!
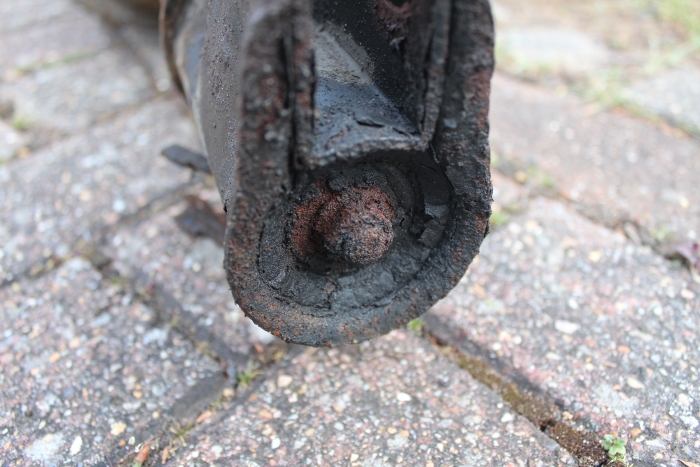
Of course I wasn't going to get off lightly and the newer, non-knocking strut had a 14mm nut that was an **** as the internal groove that stops it all from spinning was already rounded.
So out came Mr Dremel (Black and Decker actually) to make my own flat head slot (yes those with a keen eye can see this photo is AFTER i got the nut off but i forgot to take one before and wasn't going to risk it going back on until job done!)....
This allowed access to use the go-through tool and a flat head attachment on my other ratchet. This sounds easier than it was because the nut undid fine from the start all the way to nearly the end of the thread where it got stuck. That is where i found that the internal groove that stops the assembly from spinning was buggered. Fortunately for me the groove only seemed rounded in the counter clockwise (undo) rotation so i was able to get purchase enough to do the nut backup tight down the thread and then create the flat head slot at the end of the thread where the nut got stuck.
TBH with the horror stories i've heard I was VERY tempted to just stop there as that strut had no knock and could have gone back in the car but perseverance worked out (for a change!).
This strut did have the yellow waxy grease inside it. Most was still perfectly soft but some was hardening up near the top seal which is where the problem starts (so i understand).
Anyway the rest was straight forward and now both rears are done. I'm not going to do the fronts until/if they start to knock. If they do then i will probably replace with coilovers anyway.
Tomorrow it all goes back on the car and we'll see if it works!
Safe to say I HIGHLY recommend the overnight bath in WD40 when doing this as the potential problem nut came off like butter this morning with no drama at all (much to my extreme delight!).
Notable crud all round the seal...

On removal it is clear someone has been in here before... no waxy yellow grease as per standard KYB to be seen just clear grease and fairly soft still...


One thing i noticed before i stripped the strut was that the rubber top mount on the knocking side was 90 degrees rotated...
This is the correct fitment. The red arrow indicates the direction of 'OUT toward the wheels. Thick edge of the rubber is along the edge with 2 threads and slopes down to the edge with the single thread which is where '4WD OUT' is indeed stamped into the metal.

Below is how the knocking strut was. Rotated round way too far and out of shape.

Now how this got that way I have no idea and I can only assume it was a previous re-fitment performed incorrectly. The net result would have meant the spring was not seated properly and 'might' have been the constant clunking rather than the struts? Opinions welcome here!
Either way the plan for grease nipples stayed the same... device created for getting out old grease (yes that is an old child pool cue!). I screwed it on so as to avoid losing a spatchula in the heart of the strut case!

Location of the grease nipple hole is punched...

Hole drilled (pillar drill very handy!)...

Note to those who (like me) who consider taking a punt on a cheap *** set of Tap/Dies on ebay... the one on the left is one from such a set. It collapsed on itself within one turn. Whole set is only use for cleaning threads and barely does that.
The tap on the right was purchased today and cost about �10 on its own! But it proves that you get what you pay for!

Hole tapped...

Locktite used on the grease nipple to ensure a better seal...

Grease nipple in place...

Inside view - cleaned out of metal swarf. I used a magnet pick up tool for most of this and it captured a lot of the really small bits and then devised a self made giant pipe cleaner to get the rest.

After that it was just a smearing of grease round the upper most chamber between rubber top seal and Teflon bush (here)...

After that it was reassemble and tighten the bottom nut.
Then used my pistol grease gun to pack the cavity till it would take no more!
So that was the old one done!
Of course I wasn't going to get off lightly and the newer, non-knocking strut had a 14mm nut that was an **** as the internal groove that stops it all from spinning was already rounded.
So out came Mr Dremel (Black and Decker actually) to make my own flat head slot (yes those with a keen eye can see this photo is AFTER i got the nut off but i forgot to take one before and wasn't going to risk it going back on until job done!)....

This allowed access to use the go-through tool and a flat head attachment on my other ratchet. This sounds easier than it was because the nut undid fine from the start all the way to nearly the end of the thread where it got stuck. That is where i found that the internal groove that stops the assembly from spinning was buggered. Fortunately for me the groove only seemed rounded in the counter clockwise (undo) rotation so i was able to get purchase enough to do the nut backup tight down the thread and then create the flat head slot at the end of the thread where the nut got stuck.
TBH with the horror stories i've heard I was VERY tempted to just stop there as that strut had no knock and could have gone back in the car but perseverance worked out (for a change!).

This strut did have the yellow waxy grease inside it. Most was still perfectly soft but some was hardening up near the top seal which is where the problem starts (so i understand).
Anyway the rest was straight forward and now both rears are done. I'm not going to do the fronts until/if they start to knock. If they do then i will probably replace with coilovers anyway.
Tomorrow it all goes back on the car and we'll see if it works!
06 May 2013, 04:30 PM
#329
Well the grease nipple fix seems to have worked a treat. No major issues replacing the struts except being a tool and putting the rear seats back in and THEN remembering the 12mm nuts at the top would need re-tightening when the car was on the ground!
I was so pleased with my efforts (and the sun!) that I embarked on project number 2 of the long weekend... Removing the flyeye film and splitting/painting the lights properly! Further pics to follow...

I was so pleased with my efforts (and the sun!) that I embarked on project number 2 of the long weekend... Removing the flyeye film and splitting/painting the lights properly! Further pics to follow...
 06 May 2013, 08:37 PM
#330
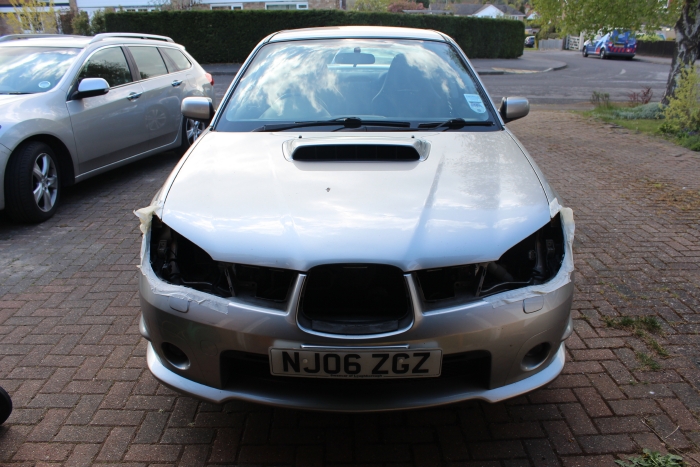
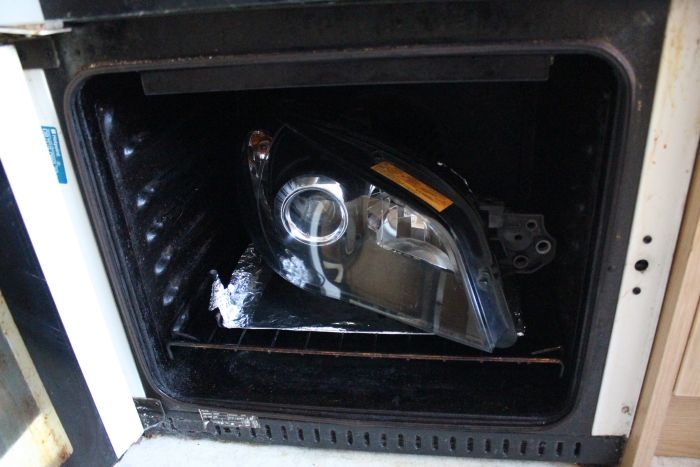
So as many know, extracting the lights with the bumper on is doable but a bit of an ****. On my car the grill clips were super tight and there is little to no room to get screwdrivers or pliers in there to help pinch them. They do come free with a solid tug but it took a lot more force than I felt comfortable exerting on plastic (hence the masking tape in the earlier pic). Still, after a fight they came out followed shortly after by the lights.
After that it was pretty much the same operation as it was on my 2003 Blob (except the �800+ replacement cost should it go wrong!). I removed the ballast unit and wrapped tin foil round the delicate bits to reflect the heat away from them (same principle as stopping a big turkey burning!). I gave each light 9 mins at 110c which made them come apart smoothly but with enough effort to know i hadn't over cooked the plastic.
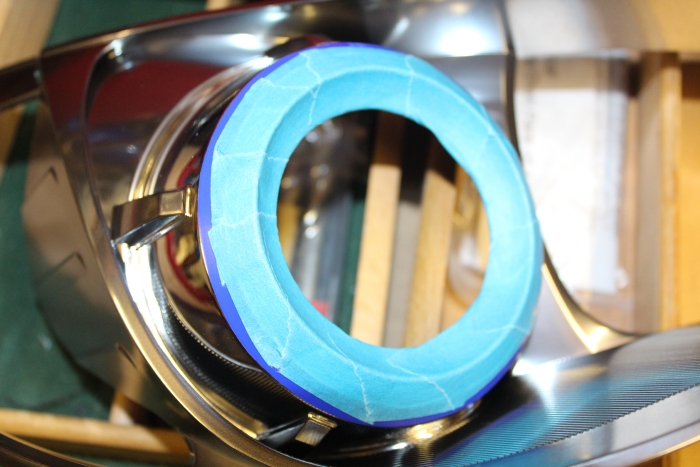
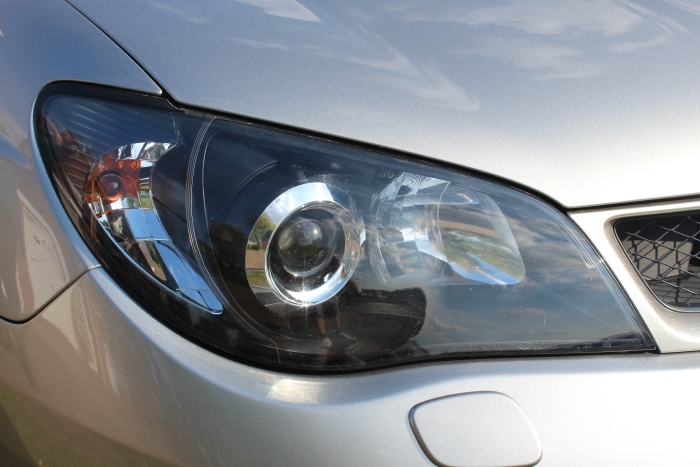
I've played with photoshop on this and personally i think the chrome rings look best if the bulk is black but the ring itself is kept chrome. I invested in good quality 3m flexible vinyl masking tape (the dark blue in the pic below). This made masking the edge of the ring really easy and gave the light blue tape (also 3m stuff direct from their site) something to cling to...
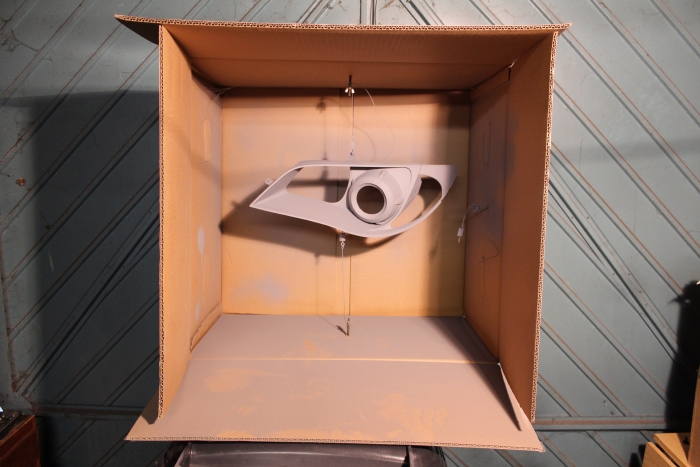
Diy spray booth... could do with buying a cheap vac to use as an extractor but worked well enough for this...
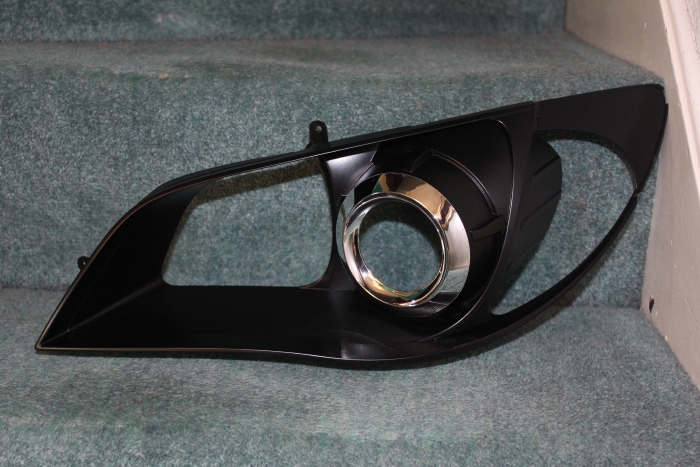
A few coats of primer with 'wet & dry' sand downs between each and then satin black applied...
Another 5 min blast with them gently pressed together got the seals warm enough to bond when pushed gently. Then back on with the ballast unit and screwed together.
Ballast back on, screws done up and into the car. Tested and working! Oh and yes I do need silvertech chromed indicators which i REALLY wish i had rembered before i started because I can see how hard it is to replace the buggers when in the car (if possible at all!). Live and learn as they say.
Then off for a few choice pics (enjoying the lack of noise from the suspension all the way!)...
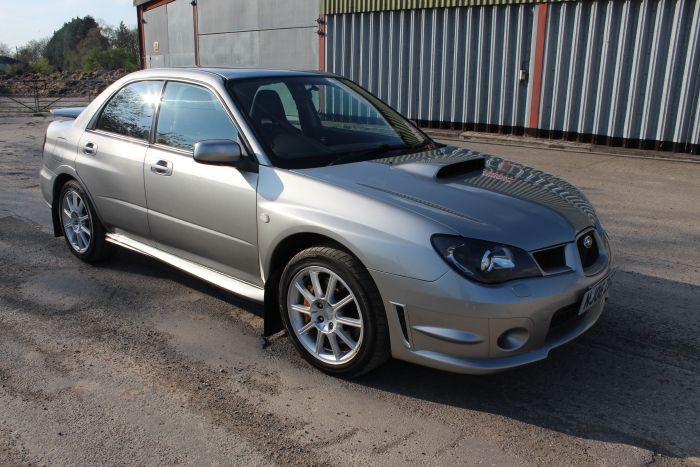
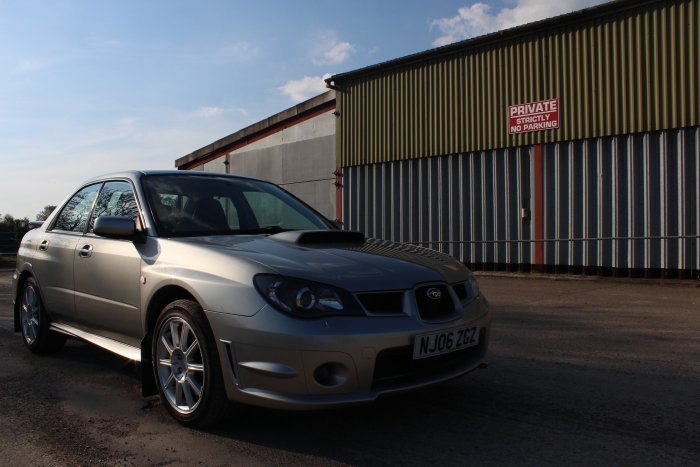

Good weekends work all round if I do say so myself
After that it was pretty much the same operation as it was on my 2003 Blob (except the �800+ replacement cost should it go wrong!). I removed the ballast unit and wrapped tin foil round the delicate bits to reflect the heat away from them (same principle as stopping a big turkey burning!). I gave each light 9 mins at 110c which made them come apart smoothly but with enough effort to know i hadn't over cooked the plastic.
I've played with photoshop on this and personally i think the chrome rings look best if the bulk is black but the ring itself is kept chrome. I invested in good quality 3m flexible vinyl masking tape (the dark blue in the pic below). This made masking the edge of the ring really easy and gave the light blue tape (also 3m stuff direct from their site) something to cling to...

Diy spray booth... could do with buying a cheap vac to use as an extractor but worked well enough for this...

A few coats of primer with 'wet & dry' sand downs between each and then satin black applied...

Another 5 min blast with them gently pressed together got the seals warm enough to bond when pushed gently. Then back on with the ballast unit and screwed together.

Ballast back on, screws done up and into the car. Tested and working! Oh and yes I do need silvertech chromed indicators which i REALLY wish i had rembered before i started because I can see how hard it is to replace the buggers when in the car (if possible at all!).
Live and learn as they say.
Then off for a few choice pics (enjoying the lack of noise from the suspension all the way!)...


Good weekends work all round if I do say so myself