'Budget' DIY Engine Rebuild


 10 October 2008, 07:23 PM
#332
Scooby Regular
Thread Starter

Picking up shims tomorrow, this weekend I'll be building the heads and fitting them. Got the new modine oil cooler on and the new block dowels which got wrecked pulling them out when the decks were skimmed.
 14 October 2008, 05:24 PM
#334
Scooby Regular
Thread Starter
Well, another set back now, the shims after machining were all found that the extreme thinness of them, even though top hats, was too much. They had tiny hairline cracks. So back to plan A - machining the valve tips a little. Time if getting on now - this needs to be ready to fit the engine in a couple of weeks and it needs to get me to Wales for the rally in early December!
 23 October 2008, 08:30 PM
#340
Scooby Regular
Thread Starter
Super setback time. The top hats started cracking once they were down close to 1mm, so onto Plan B which was back to machining the valve tips down. This was going OK until my machinist found after doing them that the collets were in the wrong place. I've not had the time to talk properly to him about it, and it's difficult to picture the problem over the phone, so I'll have to go down and look at them tomorrow, but he reckons the easiest way out is a new set of valves. I'm wondering whether it might just need the retainers machining down shorter, but I'll have to think about it.
Going back to the idea of using a new set of V5/6 valves now which are a little shorter, but not sure whether the collet groove is the same distance from the stem tip as on the longer v3/4.
Going back to the idea of using a new set of V5/6 valves now which are a little shorter, but not sure whether the collet groove is the same distance from the stem tip as on the longer v3/4.
24 October 2008, 11:52 PM
#342
Scooby Regular
Thread Starter
No, it's a matter of principle now LOL I will persevere with these heads whatever it takes. After today's chat on the phone with my machinist it has become a bit clearer what the problem is, apart from the top hats cracking up once they were machined down to 1mm thick.
The bottoms of the top hats are touching the collets because the stems have been slightly shortened. Unshimmed, the clearances are now in the 3mm+ range which is much better. So the solution is, I bought a set of 16 blank top hat shims from Piper Cams, 6mm ID, 2.5mm internal depth, 4mm top thickness. These are just 'shallow' enough inside so that they will fit my stem tips without touching the collets and even if they do, the bottoms of them can be machined a little to give more clearance. The top thicknesses will be machined down to the 2.5-3.0mm range to get them to hit the target clearances when everything's assembled.
So it looks like I might have only been set back by a week or so, the shims should arrive Tuesday, I want the heads back and shimmed by Thursday let's say, could still build the engine and get it installed on Saturday...
25 October 2008, 09:29 AM
#343
Scooby Regular
Thread Starter
The other thing is, it's not just me being stubborn about it - these heads owe me a few quid already, I've had them skimmed down to give me exactly the CR I want, had the valves seats cut so they'll be good as new, and ported and polished myself; hence I'm reluctant to scrap them. If I used another pair of castings I'd be back to square one.
25 October 2008, 10:53 PM
#345
Scooby Regular

Join Date: Feb 2003
Location: Zed Ess Won Hay Tee
Posts: 21,611
Likes: 0
Received 0 Likes
on
0 Posts
are you going to have a go at mapping it yourself ? 
just sold my old 2.0 short block today, so my total cost for converting the car to a 2.5 stands me at about �3000, and that includes �1200 labour for a company to actually do the dirty work and fit the short engine for me
although i am running a little td05 and 440`s at the moment, but this is a "budget thread"
cheap 2.5`s FTW!
Last edited by StickyMicky; 26 October 2008 at 11:22 PM.
26 October 2008, 01:11 AM
#346
Scooby Regular
Thread Starter
I've not done the totting up procedure yet. Once it's all working and run in, I'll go back and do the sums and see how much it's all cost me!
 28 October 2008, 12:30 PM
#349
Scooby Regular
Thread Starter

Shims have just arrived, so while they're off being machined -again - I might well start on a few other bits and pieces at home. I've got half the engine bay hardware sitting on my garage floor at the moment, so I'm wondering if there's anything I can prep and fit before the heads go on...inlet manifold, turbo etc?
Last edited by silent running; 28 October 2008 at 12:39 PM.
28 October 2008, 08:02 PM
#350
Scooby Regular

Join Date: Mar 2008
Location: Torbay, Devon
Posts: 566
Likes: 0
Received 0 Likes
on
0 Posts
Erm.... the manifold and turbo all bolt onto the heads  lol
lol
you could take it off the stand and fit the fly wheel and the cluch, after fitting the blanking plugs in the back of the block of course.
Then again you could just do it when you take it off the stand anyway
lolyou could take it off the stand and fit the fly wheel and the cluch, after fitting the blanking plugs in the back of the block of course.
Then again you could just do it when you take it off the stand anyway
28 October 2008, 09:31 PM
#352
Scooby Regular
Thread Starter
LOL yeah I was thinking of painting the manifold while it's sitting there but couldn't remember whether the turbo bracket mounted to the block. So basically there's bugger all I can do until the heads are back really. What a pain in the ****. Oil cooler and sump are already on.
28 October 2008, 09:36 PM
#353
Scooby Regular
Join Date: Mar 2008
Location: Torbay, Devon
Posts: 566
Likes: 0
Received 0 Likes
on
0 Posts
where the up pip meets the turbo there is a bracket that comes off it and bolts onto the head.
In this pic its the flat plate that the turbo sits on half covered by the plant leaf. thats the only place the upipe/headers touch the engine (apart from where they bolt onto the head obverasly)
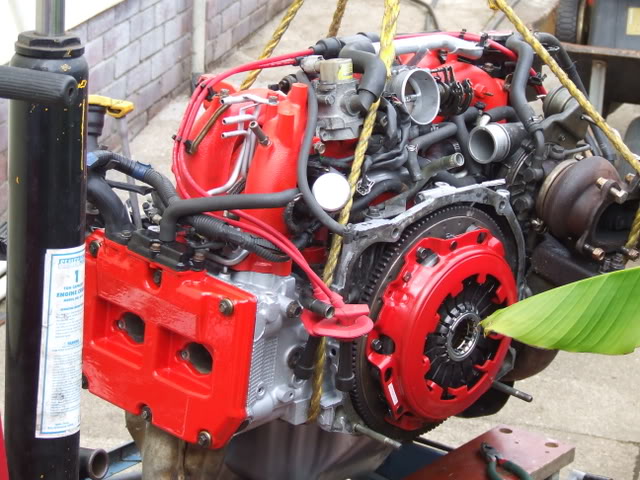
In this pic its the flat plate that the turbo sits on half covered by the plant leaf. thats the only place the upipe/headers touch the engine (apart from where they bolt onto the head obverasly)
29 October 2008, 09:56 AM
#357
Scooby Regular
Thread Starter
Great pics Matt, that's exactly what I need, a photo of the engine ready to drop in.
TBH if it comes in at �1500 I'll be pleased. There's been a lot of additional cost with the swap from WRX1/2 heads to STi3/4. The STi heads I basically built up, ported, polished and had machined from scratch and there've been a few problems along the way to say the least. With the cruddy heads as they were, I could have done it for under a grand. As it is now, basically built as good a spec as (I think) a 2.0 can ever be, it's at least half as much again if not more.
TBH if it comes in at �1500 I'll be pleased. There's been a lot of additional cost with the swap from WRX1/2 heads to STi3/4. The STi heads I basically built up, ported, polished and had machined from scratch and there've been a few problems along the way to say the least. With the cruddy heads as they were, I could have done it for under a grand. As it is now, basically built as good a spec as (I think) a 2.0 can ever be, it's at least half as much again if not more.
29 October 2008, 10:07 AM
#358
Scooby Regular
Join Date: Feb 2003
Location: Zed Ess Won Hay Tee
Posts: 21,611
Likes: 0
Received 0 Likes
on
0 Posts
after looking at matts picture, i have a question
what does everybody else do regards the "damm *******" oil pipe under the turbo when swapping a turbo ?
on my old engine i had managed to fit a tight jubilee clip around the bottom of it so it would not "****ing *******" slide down when refitting turbos, but i have just realised i doubt it has a clip on it now it has the 2.5 bottom end on
29 October 2008, 10:31 AM
#359
Scooby Regular
iTrader: (6)
Join Date: Dec 2005
Location: Nr Grimsby
Posts: 2,641
Likes: 0
Received 0 Likes
on
0 Posts
after looking at matts picture, i have a question
what does everybody else do regards the "damm *******" oil pipe under the turbo when swapping a turbo ?
on my old engine i had managed to fit a tight jubilee clip around the bottom of it so it would not "****ing *******" slide down when refitting turbos, but i have just realised i doubt it has a clip on it now it has the 2.5 bottom end on
what does everybody else do regards the "damm *******" oil pipe under the turbo when swapping a turbo ?
on my old engine i had managed to fit a tight jubilee clip around the bottom of it so it would not "****ing *******" slide down when refitting turbos, but i have just realised i doubt it has a clip on it now it has the 2.5 bottom end on
LOL, persistance is the only way IMHO. Plus i use the OE spring clip.