Notices
ScoobyNet General General Subaru Discussion
Sponsored by:
Sponsored by:

Tip's trick's & advice please

Thread Tools
 
Search this Thread
 
Old 24 December 2016, 11:31 AM
  #31  
96sti
Scooby Regular
Thread Starter
 
96sti's Avatar
 
Join Date: Jan 2014
Location: ashford kent
Posts: 541
Received 21 Likes on 9 Posts
Default

Originally Posted by boosted
function over form
If by you mean power over looks. I have plenty of power and am quite happy at how well it delivers it and the way it handles. So now I'm looking at tidying it up making it look a little smarter under the bonnet bud
Old 07 January 2017, 12:09 PM
  #32  
jody0702
Scooby Regular
 
jody0702's Avatar
 
Join Date: Apr 2008
Location: Devon
Posts: 82
Likes: 0
Received 0 Likes on 0 Posts
Default

Sorry mate not been on for a couple weeks. Am away til 2mrw will take some pics as only got mock up pics at mo and put up 2mrw. Well worth it in my opinion and quite a rewarding job to do. Bit of weight saving too Attachment 21975 that's all but all the hard brake lines inc abs ecu and wiring. Basically You remove the pump and all the lines and proportioning valve, I took out the ecu and wiring and tone rings/sensors etc as an extra. You then use the 2 ports on the master cylinder, 1 for front and 1 for rear. Fronts- run small line from mc to a tee, one to drivers side calliper line and one across bulkhead to passenger side. Rear- bulkhead pipe goes from mc around brake booster and goes thru the bulkhead above where the pedals are which connects to another hose from inside above and to the left of the clutch. This then runs along passenger side of the transmission tunnel to a lever control bias (as I wanted to control the bias and remove the oem proportioning valve) and then to a tee on rear bench then out to either side of bench where they go thru with more bulkhead fittings. Just a line from both of those from underneath round by the fuel tank out to rear calliper line brackets.the pics will make it easy to understand and how it runs. No more dodgy abs kicking in and much better pedal feel
Old 07 January 2017, 08:54 PM
  #33  
96sti
Scooby Regular
Thread Starter
 
96sti's Avatar
 
Join Date: Jan 2014
Location: ashford kent
Posts: 541
Received 21 Likes on 9 Posts
Default

Originally Posted by jody0702
Sorry mate not been on for a couple weeks. Am away til 2mrw will take some pics as only got mock up pics at mo and put up 2mrw. Well worth it in my opinion and quite a rewarding job to do. Bit of weight saving too Attachment 21975 that's all but all the hard brake lines inc abs ecu and wiring. Basically You remove the pump and all the lines and proportioning valve, I took out the ecu and wiring and tone rings/sensors etc as an extra. You then use the 2 ports on the master cylinder, 1 for front and 1 for rear. Fronts- run small line from mc to a tee, one to drivers side calliper line and one across bulkhead to passenger side. Rear- bulkhead pipe goes from mc around brake booster and goes thru the bulkhead above where the pedals are which connects to another hose from inside above and to the left of the clutch. This then runs along passenger side of the transmission tunnel to a lever control bias (as I wanted to control the bias and remove the oem proportioning valve) and then to a tee on rear bench then out to either side of bench where they go thru with more bulkhead fittings. Just a line from both of those from underneath round by the fuel tank out to rear calliper line brackets.the pics will make it easy to understand and how it runs. No more dodgy abs kicking in and much better pedal feel
Ok mate if you can that would be fantastic
Old 13 January 2017, 02:55 PM
  #34  
S3LDM
Scooby Regular
 
S3LDM's Avatar
 
Join Date: Feb 2002
Location: Hunting down door dinger's in south wales..
Posts: 2,485
Likes: 0
Received 2 Likes on 2 Posts
Default

Get some GunK plenty of time, elbow grease & patience less is best


Name:  BB723407-7399-49EE-8FD3-26AC17D25FFC_zpskcrttcvl.jpg
Views: 0
Size:  253.2 KB
Old 13 January 2017, 03:25 PM
  #35  
Cambs_Stuart
Scooby Regular
iTrader: (3)
 
Cambs_Stuart's Avatar
 
Join Date: Sep 2015
Location: Cambridge
Posts: 1,789
Received 3 Likes on 3 Posts
Default

Originally Posted by S3LDM
Get some GunK plenty of time, elbow grease & patience less is best
That looks fantastic. I don't think mine has looked like that since it left the factory...
Old 13 January 2017, 03:39 PM
  #36  
Matty81
Scooby Regular
 
Matty81's Avatar
 
Join Date: Apr 2016
Location: Banned
Posts: 1,752
Likes: 0
Received 18 Likes on 15 Posts
Default

[QUOTE=S3LDM;11910171]Get some GunK plenty of time, elbow grease & patience less is best


Name:  BB723407-7399-49EE-8FD3-26AC17D25FFC_zpskcrttcvl.jpg
Views: 0
Size:  253.2 KB

Cant go wrong with gunk . What did you use mate ? Toothbrush and a steam clean ?. Started mine but haven't got round to finishing it.
Old 13 January 2017, 06:37 PM
  #37  
96sti
Scooby Regular
Thread Starter
 
96sti's Avatar
 
Join Date: Jan 2014
Location: ashford kent
Posts: 541
Received 21 Likes on 9 Posts
Default

Originally Posted by S3LDM
Get some GunK plenty of time, elbow grease & patience less is best


That is very clean. think I'll get some
Old 16 January 2017, 10:05 AM
  #38  
S3LDM
Scooby Regular
 
S3LDM's Avatar
 
Join Date: Feb 2002
Location: Hunting down door dinger's in south wales..
Posts: 2,485
Likes: 0
Received 2 Likes on 2 Posts
Default

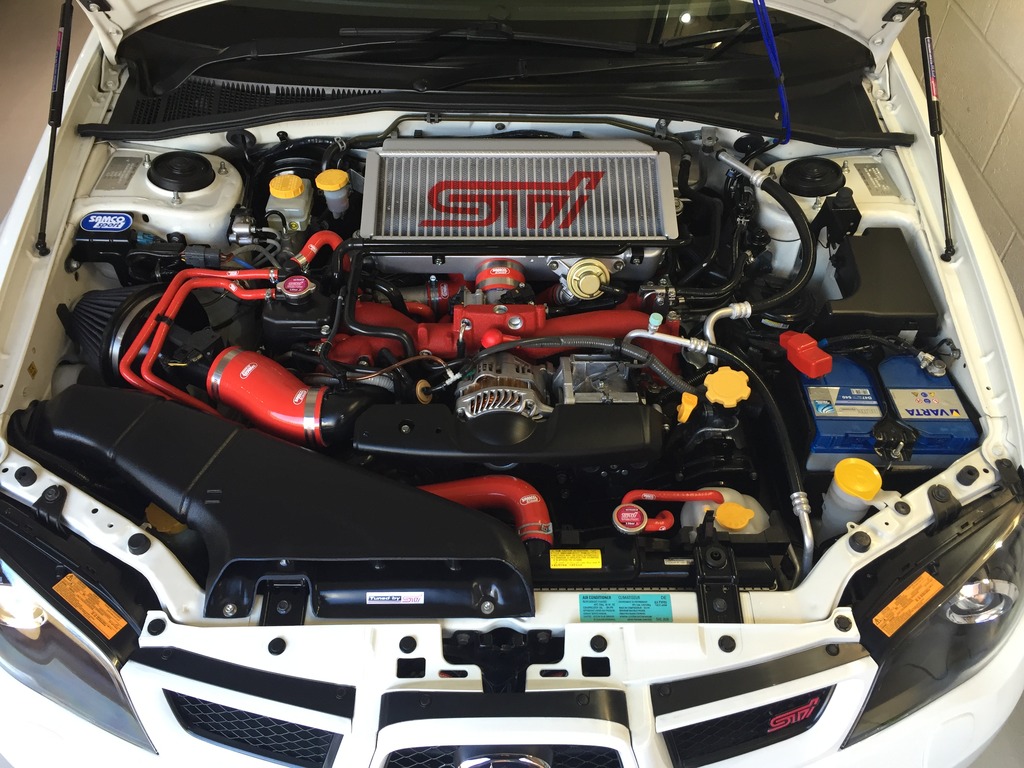
Yes had a selection of brushes from toothbrush size up and a little 2L steamer to aid the process

Removed the air filter, battery, top mount etc. to gain better access
Old 16 January 2017, 10:06 AM
  #39  
S3LDM
Scooby Regular
 
S3LDM's Avatar
 
Join Date: Feb 2002
Location: Hunting down door dinger's in south wales..
Posts: 2,485
Likes: 0
Received 2 Likes on 2 Posts
Default

Originally Posted by Cambs_Stuart
That looks fantastic. I don't think mine has looked like that since it left the factory...
Cheer buddy
Old 17 January 2017, 10:18 PM
  #40  
jody0702
Scooby Regular
 
jody0702's Avatar
 
Join Date: Apr 2008
Location: Devon
Posts: 82
Likes: 0
Received 0 Likes on 0 Posts
Default

Originally Posted by 96sti
Ok mate if you can that would be fantastic
Here are some of the pics
Attached Thumbnails Click image for larger version

Name:	photo895.jpg
Views:	0
Size:	547.6 KB
ID:	22056   Click image for larger version

Name:	photo342.jpg
Views:	0
Size:	605.2 KB
ID:	22057   Click image for larger version

Name:	photo867.jpg
Views:	0
Size:	552.5 KB
ID:	22058   Click image for larger version

Name:	photo200.jpg
Views:	0
Size:	622.4 KB
ID:	22059   Click image for larger version

Name:	photo518.jpg
Views:	0
Size:	640.5 KB
ID:	22060  

Click image for larger version

Name:	photo565.jpg
Views:	0
Size:	684.0 KB
ID:	22061   Click image for larger version

Name:	photo110.jpg
Views:	0
Size:	563.0 KB
ID:	22062   Click image for larger version

Name:	photo208.jpg
Views:	0
Size:	753.2 KB
ID:	22063   Click image for larger version

Name:	photo13.jpg
Views:	0
Size:	732.8 KB
ID:	22064   Click image for larger version

Name:	photo373.jpg
Views:	0
Size:	862.5 KB
ID:	22065  

Click image for larger version

Name:	photo100.jpg
Views:	0
Size:	1.01 MB
ID:	22066   Click image for larger version

Name:	photo701.jpg
Views:	0
Size:	521.4 KB
ID:	22067   Click image for larger version

Name:	photo728.jpg
Views:	0
Size:	576.7 KB
ID:	22068   Click image for larger version

Name:	photo647.jpg
Views:	0
Size:	578.8 KB
ID:	22069   Click image for larger version

Name:	photo978.jpg
Views:	0
Size:	635.0 KB
ID:	22070  

Click image for larger version

Name:	photo891.jpg
Views:	0
Size:	569.5 KB
ID:	22071   Click image for larger version

Name:	photo542.jpg
Views:	0
Size:	618.6 KB
ID:	22072   Click image for larger version

Name:	photo858.jpg
Views:	0
Size:	786.0 KB
ID:	22073   Click image for larger version

Name:	photo921.jpg
Views:	0
Size:	844.0 KB
ID:	22074   Click image for larger version

Name:	photo517.jpg
Views:	0
Size:	817.8 KB
ID:	22075  

Click image for larger version

Name:	photo918.jpg
Views:	0
Size:	928.3 KB
ID:	22076   Click image for larger version

Name:	photo528.jpg
Views:	0
Size:	867.4 KB
ID:	22077   Click image for larger version

Name:	photo465.jpg
Views:	0
Size:	994.9 KB
ID:	22078   Click image for larger version

Name:	photo18.jpg
Views:	0
Size:	1.13 MB
ID:	22079  
Old 18 January 2017, 08:38 PM
  #41  
96sti
Scooby Regular
Thread Starter
 
96sti's Avatar
 
Join Date: Jan 2014
Location: ashford kent
Posts: 541
Received 21 Likes on 9 Posts
Default

Thanks for the pics mate. How long did it take you?
Old 19 January 2017, 08:01 PM
  #42  
jody0702
Scooby Regular
 
jody0702's Avatar
 
Join Date: Apr 2008
Location: Devon
Posts: 82
Likes: 0
Received 0 Likes on 0 Posts
Default

Originally Posted by 96sti
Thanks for the pics mate. How long did it take you?
Not long, took longer to work out exactly how I wanted it and fixing it all was easy. The hardest part was tightening the bulkhead fittings on the rear bench seat, I needed another pair of hands to hold the hose fittings from the rear calliper lines underneath to where they meet them each side. Some of the fittings looked like they weren't wound in enough but definitely had no leaks and was really happy with the quality


All times are GMT +1. The time now is 07:24 AM.