Prodrive Grp.N. chassis street build
 18 December 2005, 10:28 AM
#1
Scooby Regular
Thread Starter

Join Date: Dec 2002
Posts: 458
Likes: 0
Received 0 Likes
on
0 Posts
Hi all,
Up to post nr. 42 this thread is about my build up of a non-turbo chassis with all STI parts.
From post nr. 42 onwards it's about my Group-N project.
I hope you like.
Aram. 30 Dec 2007
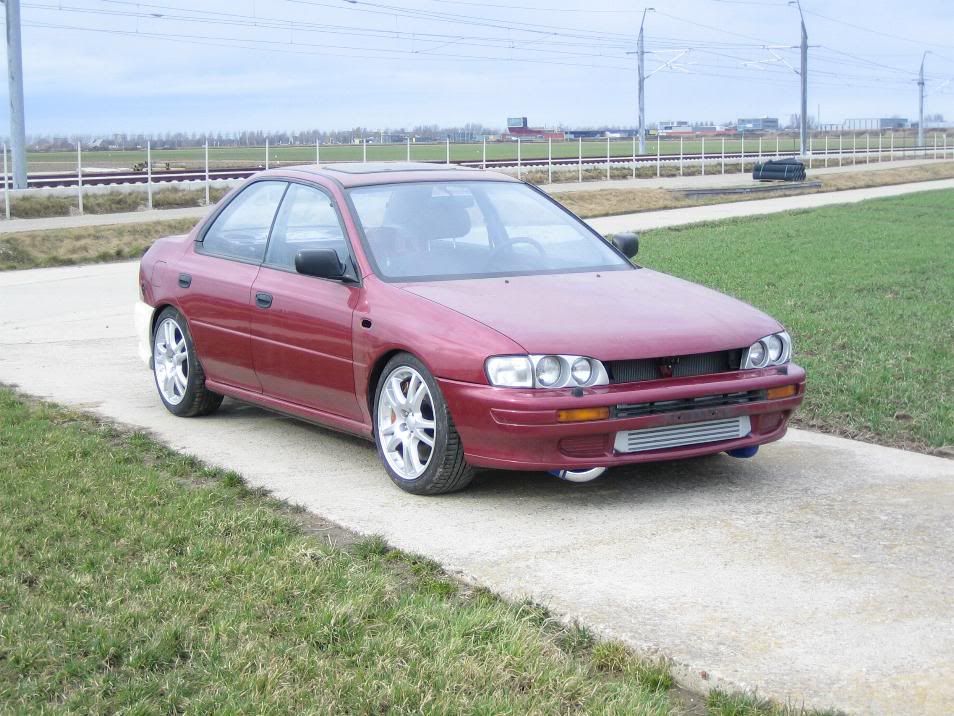
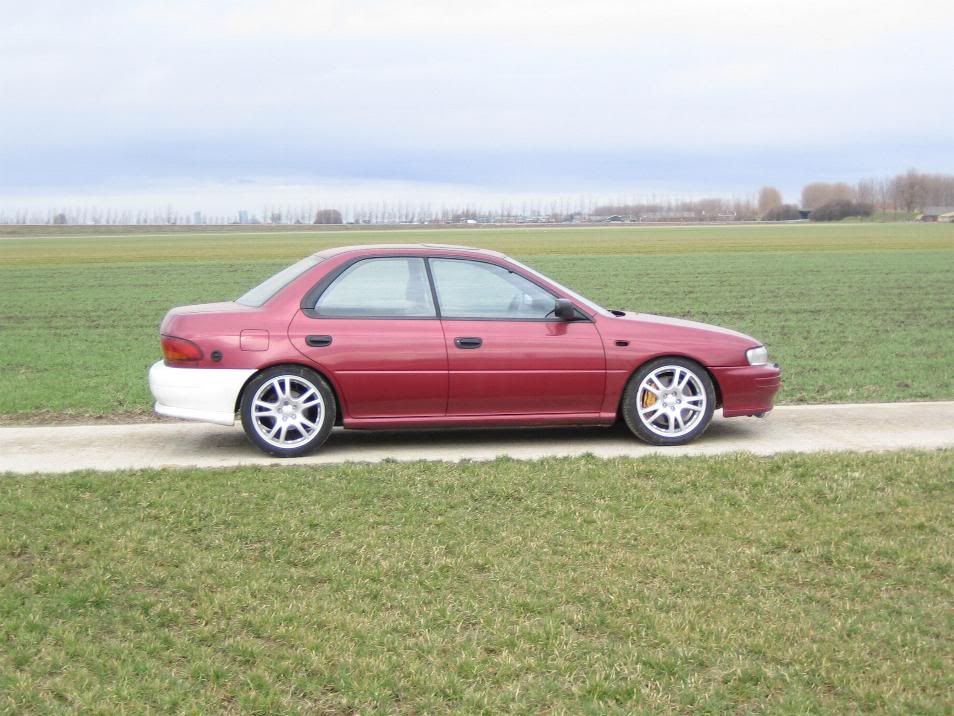
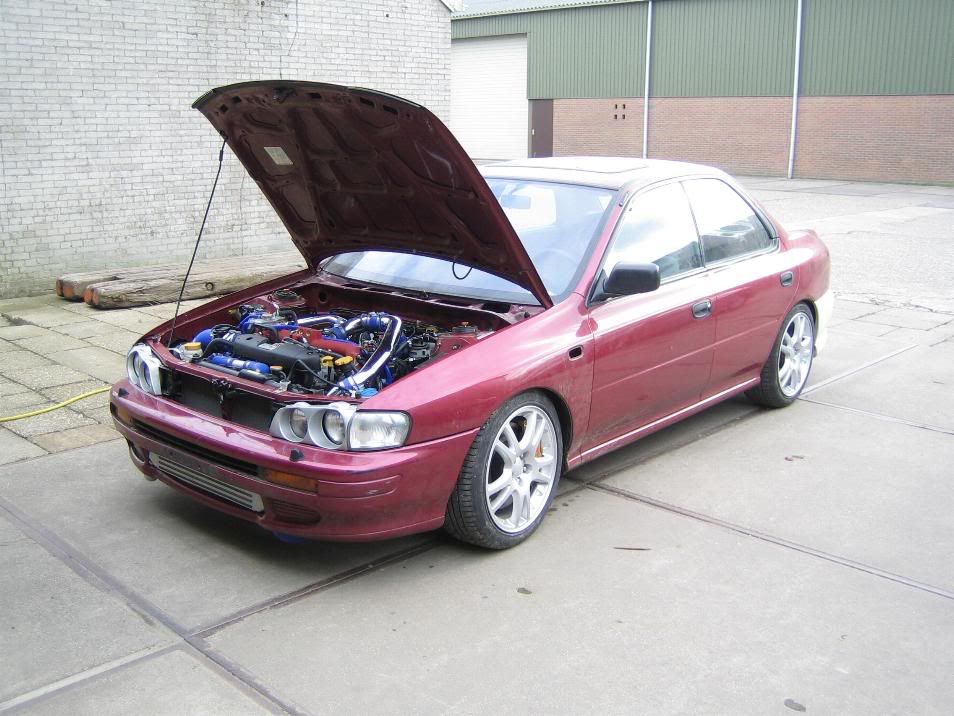
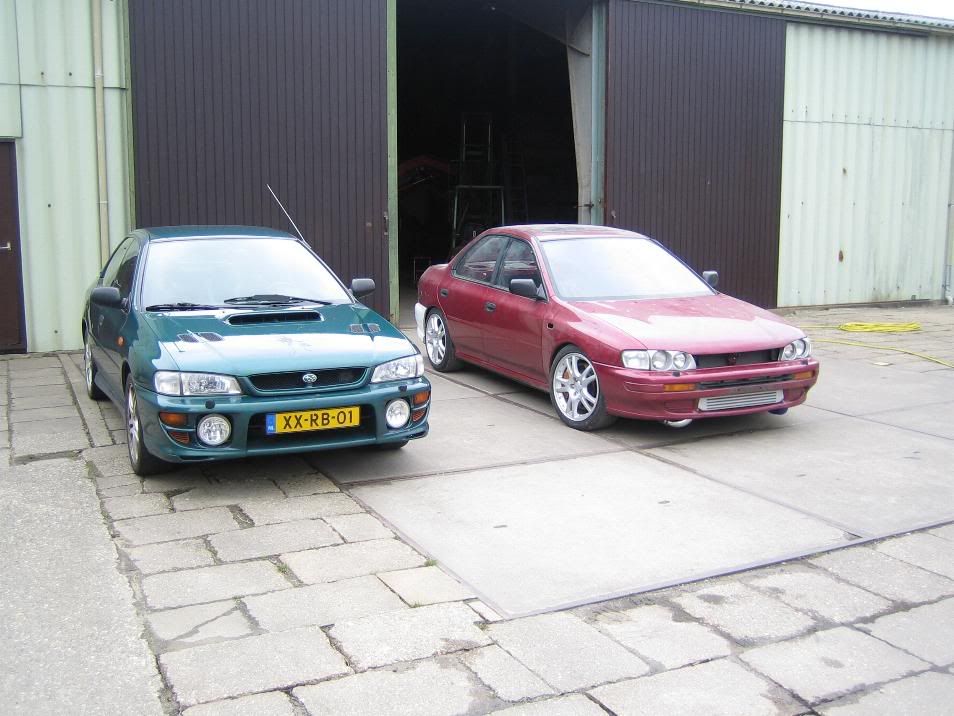
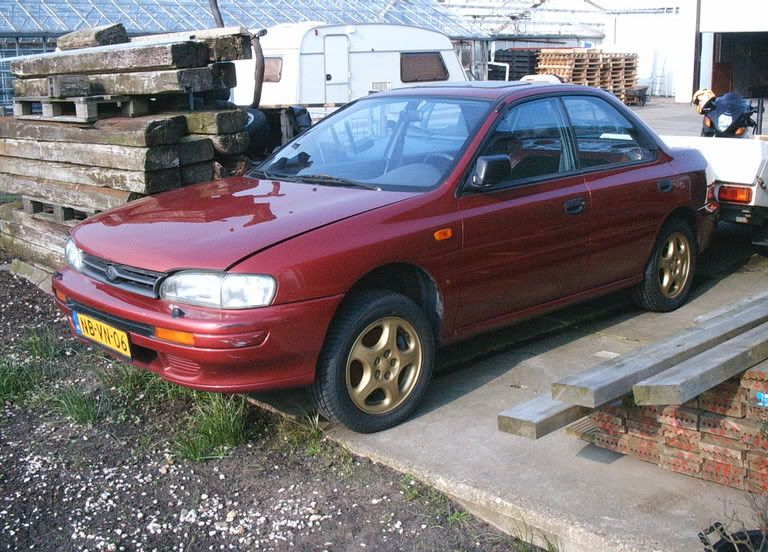
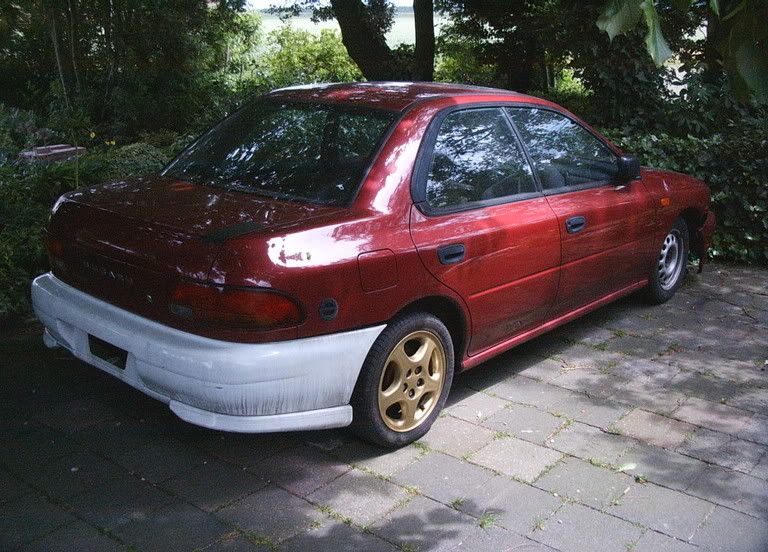
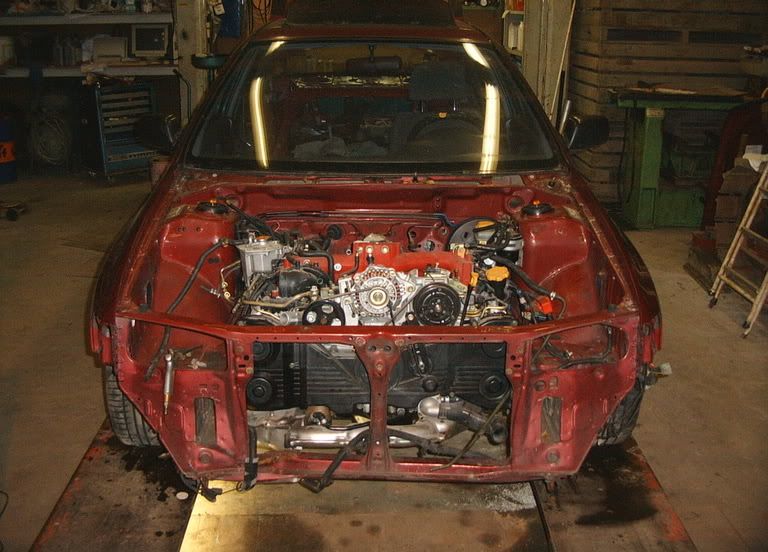
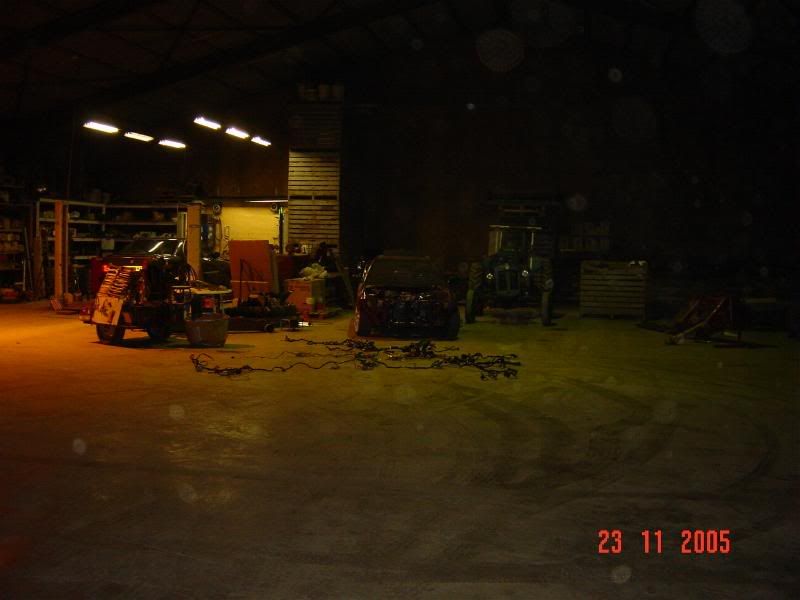
This is my victem, a MY95 Impreza with no engine but AWD.
The plan:
- Make it an as good as possible road/circuit car.
- Make it as light as possibble
- Get a safe 400-450 HP engine.
Making a car lighter could be as expensive as making more HP so i will be doing this pretty simple ---> no interior, alu hood, alu wishbones and things like this.
Parts i have uptill now:
- A MY04 2.5l Forester STI engine inc. turbo, subframe etc. (ex factory test engine)
- USDM Impreza STI loom and ECU ---> LHD already (also ex factory)
- Forester 5 speed gearbox with oilcooling.
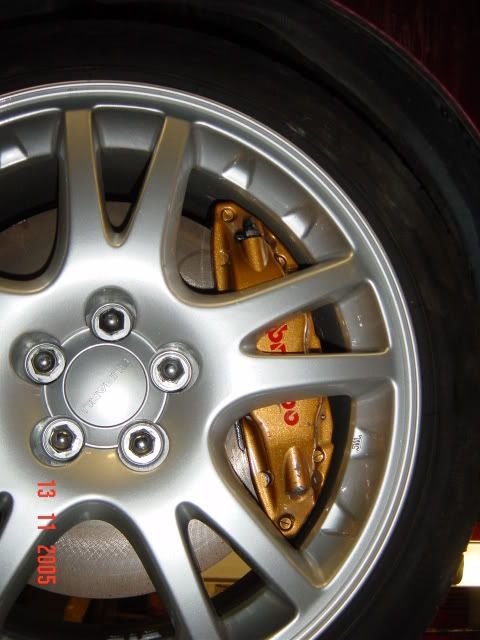
- STI Brembo's
- 22B grille
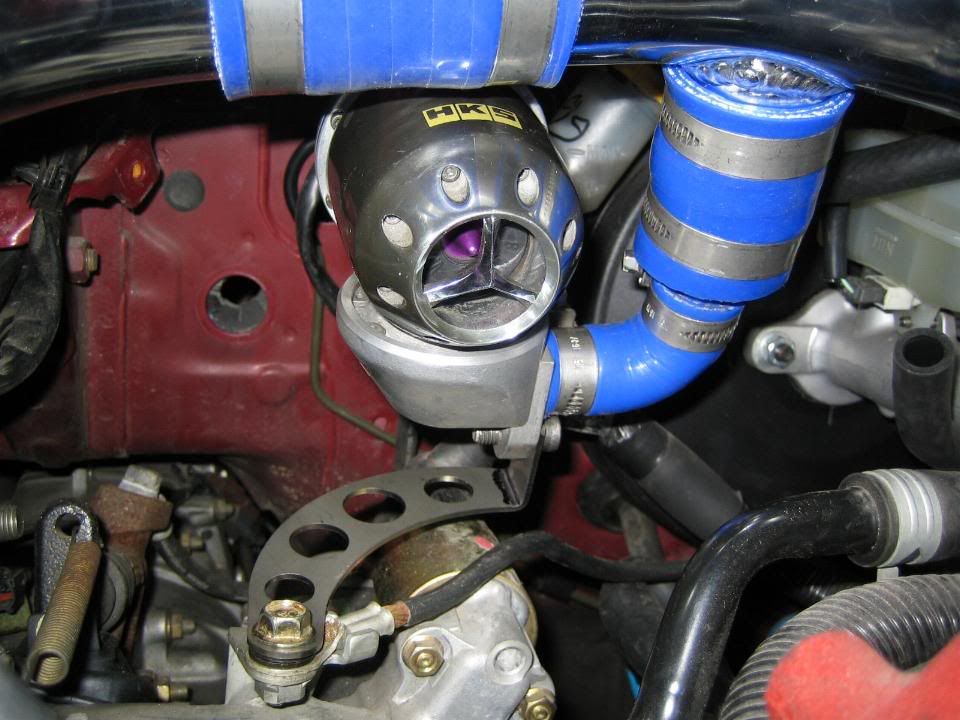
- HKS blow-off valve
- STI 17" wheels in silver
- Walbro 255 feulpump
- AVC-R
- FMIC APS
- STI clutch set
- 4.111 reardiff with LSD
- STI alu hood
- MY99 bumper with integrated STI6 lip (they are welded together now making it one big bumper)
- group N suspension rubbers
- group N topmounts
wannahaves:
- STI 6 speed
- Cage and additional body welding.
- Different color
- Whiteline stabi stuff
- and more things to come when i think of them
This is the car from which the engine comes from, this is factory grounds.

Up to post nr. 42 this thread is about my build up of a non-turbo chassis with all STI parts.
From post nr. 42 onwards it's about my Group-N project.
I hope you like.
Aram. 30 Dec 2007
This is my victem, a MY95 Impreza with no engine but AWD.
The plan:
- Make it an as good as possible road/circuit car.
- Make it as light as possibble
- Get a safe 400-450 HP engine.
Making a car lighter could be as expensive as making more HP so i will be doing this pretty simple ---> no interior, alu hood, alu wishbones and things like this.
Parts i have uptill now:
- A MY04 2.5l Forester STI engine inc. turbo, subframe etc. (ex factory test engine)
- USDM Impreza STI loom and ECU ---> LHD already
(also ex factory)- Forester 5 speed gearbox with oilcooling.
- STI Brembo's
- 22B grille
- HKS blow-off valve
- STI 17" wheels in silver
- Walbro 255 feulpump
- AVC-R
- FMIC APS
- STI clutch set
- 4.111 reardiff with LSD
- STI alu hood
- MY99 bumper with integrated STI6 lip (they are welded together now making it one big bumper
)- group N suspension rubbers
- group N topmounts
wannahaves:
- STI 6 speed
- Cage and additional body welding.
- Different color
- Whiteline stabi stuff
- and more things to come when i think of them
This is the car from which the engine comes from, this is factory grounds.
Last edited by Aram; 29 December 2007 at 11:37 PM.
 18 December 2005, 10:29 AM
#2
Scooby Regular
Thread Starter
Join Date: Dec 2002
Posts: 458
Likes: 0
Received 0 Likes
on
0 Posts
After standing still for almost a year i finaly got round to starting on my hobbycar 6 weeks ago!
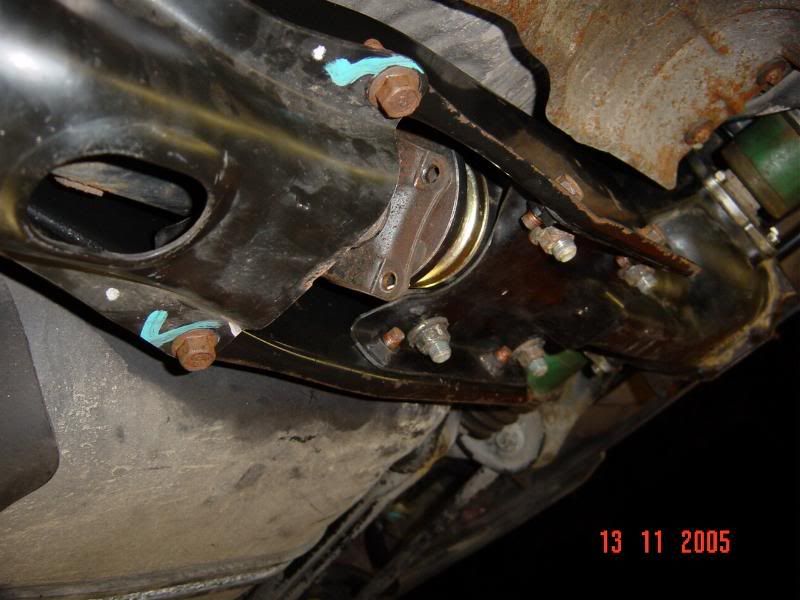
First thing i did was changing the rear-suspension, because the original was rusted and worn out.
Luckily i managed to get my greedy pawns on a STI 5 suspension, which included rear subframe and arms, hubs, handbrake wires, MY99 brakes and some new group N rally bushes.
So on a friday afternoon i pulled out the old STI bushes and pushed in the new Group N's, that night all was fitted back under the car again.
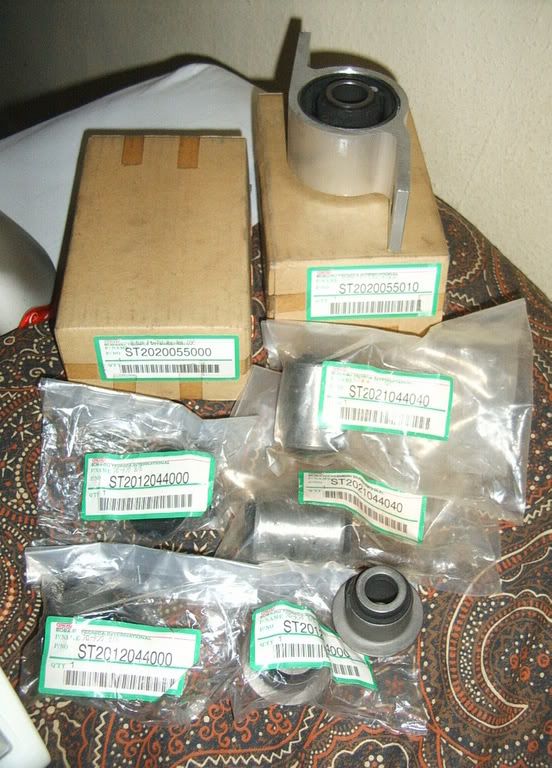
New suspension:
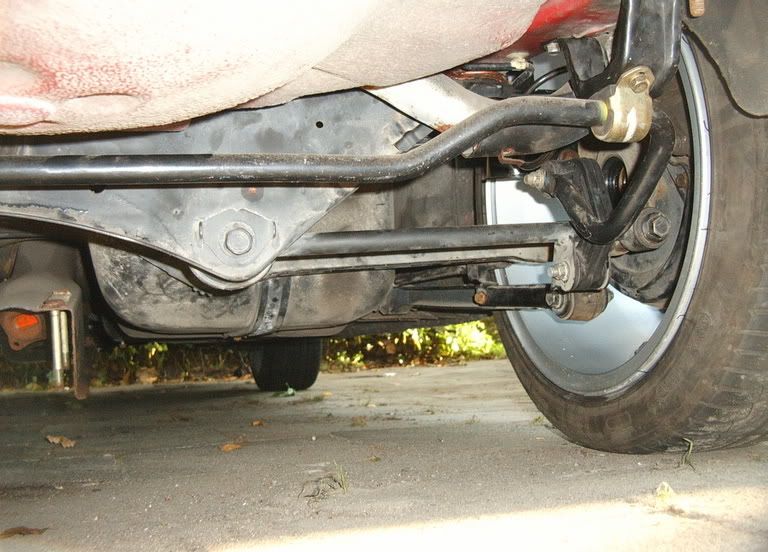
STI group N rally bushes, 4x for the rear subframe, rest is for the front suspension:
That Saturday i spent putting the MY04 front suspension under the car.
I changed the RHD steering collumn and fitted the good old MY95 LHD one back, 9 years difference and it fits one on one, gotta love those Japs
I kept the original MY95 brake booster, it is said it has more feel than the later twin membran versions.
Saturday evening the front suspension wasfinished!! yay !!
That Sunday i fitted the steeringwheel (try that one on your own ) and also put the brakebooster back into the engine bay.
I'm going to repaint the car later, i havent got the cash for it atm plus i'll need to do some plumbing when fitting the FMIC and such.
And yeah, i'm to lazy to clean the car up, it's a rallycar, it's supposed to be dirty .
.
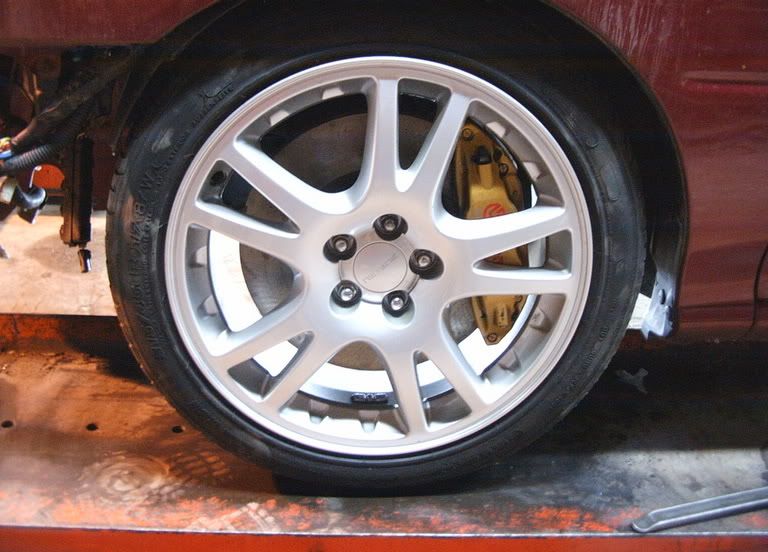
I did not get the attachment bolts with my Brembo's, but i thought i could use the ones from the 2-pots---not!!
So i had to order 4 new ones because those japs don't use regular thread.
Anyway the week after ihad some very expensive bolts and fitted Brembo's.
Fat *******!! hehehe:
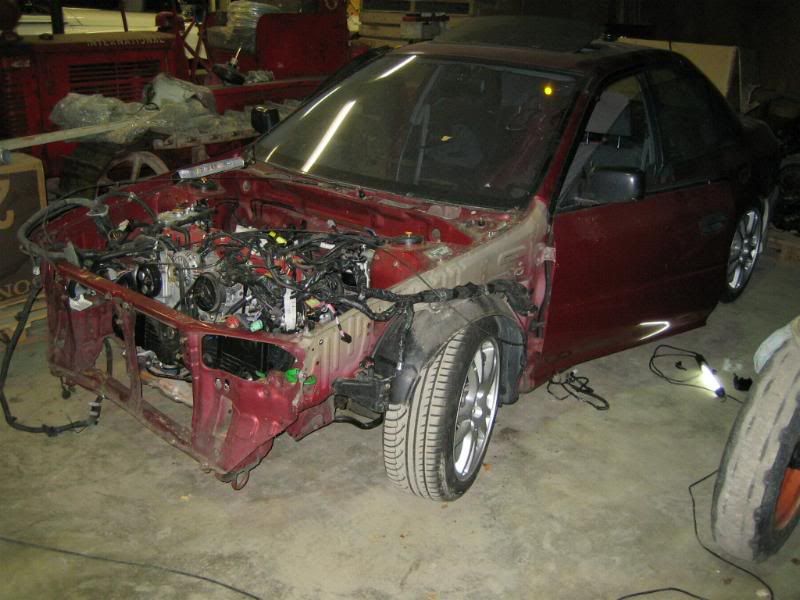
Meanwhile on a lazy Sunday afternoon i fitted the engine with gearbox attached to it, also very nice to do on your own
So using strings attached to the forklift handles i finaly got that job done with fitting the driveshafts as "highlight"
Costing me some cuts and a bleu nail, but hey anything goes for the hobby right .
.

I needed an 4.111 reardiff to go with the gearbox, but they are very hard to find.
I got one in the end without a LSD diff, but the rear driveshaft didnt fit.
So today i fitted that LSD, and tommorow i will be fitting it to my car.
I sold the VF39 turbo and now I'm looking for a suitable GT30.
Looks like it is going to standard non-turbo looks for a while, real sleeper style
First thing i did was changing the rear-suspension, because the original was rusted and worn out.
Luckily i managed to get my greedy pawns on a STI 5 suspension, which included rear subframe and arms, hubs, handbrake wires, MY99 brakes and some new group N rally bushes.
So on a friday afternoon i pulled out the old STI bushes and pushed in the new Group N's, that night all was fitted back under the car again
.New suspension:
STI group N rally bushes, 4x for the rear subframe, rest is for the front suspension:
That Saturday i spent putting the MY04 front suspension under the car.
I changed the RHD steering collumn and fitted the good old MY95 LHD one back, 9 years difference and it fits one on one, gotta love those Japs
I kept the original MY95 brake booster, it is said it has more feel than the later twin membran versions.
Saturday evening the front suspension wasfinished!! yay !!
That Sunday i fitted the steeringwheel (try that one on your own
) and also put the brakebooster back into the engine bay.I'm going to repaint the car later, i havent got the cash for it atm plus i'll need to do some plumbing when fitting the FMIC and such.
And yeah, i'm to lazy to clean the car up, it's a rallycar, it's supposed to be dirty
.I did not get the attachment bolts with my Brembo's, but i thought i could use the ones from the 2-pots---not!!
So i had to order 4 new ones because those japs don't use regular thread.
Anyway the week after ihad some very expensive bolts and fitted Brembo's
.Fat *******!! hehehe:
Meanwhile on a lazy Sunday afternoon i fitted the engine with gearbox attached to it, also very nice to do on your own
So using strings attached to the forklift handles i finaly got that job done with fitting the driveshafts as "highlight"
Costing me some cuts and a bleu nail, but hey anything goes for the hobby right
.I needed an 4.111 reardiff to go with the gearbox, but they are very hard to find.
I got one in the end without a LSD diff, but the rear driveshaft didnt fit.
So today i fitted that LSD, and tommorow i will be fitting it to my car.
I sold the VF39 turbo and now I'm looking for a suitable GT30.
Looks like it is going to standard non-turbo looks for a while, real sleeper style
Last edited by Aram; 18 December 2005 at 12:00 PM.
18 December 2005, 11:59 AM
#3
Scooby Regular
Thread Starter
Join Date: Dec 2002
Posts: 458
Likes: 0
Received 0 Likes
on
0 Posts
The rear diff is fixed o the car atm, also a bit of a bugger to do on your own .
After a visit to the local Scooby-guru I went home a bit depressed.
There could be a bit of a problem in my loom, it is called CANbus (Controlled Area Network), never heard of it until then.
It seems to be some internal network in modern cars that make it easier for manufacturers to build looms, and it lets parts communicate with each other internally.
I�ve heard it is a 2 wire system (twisted pair) thru which you can send different signals for the separate parts, each part having its own signal. ( Hope I�m saying this correct?)
Anyway, if some parts are missing, like a rear lights, the CANbus control centre notices and tells the ecu to let the dreaded Check Engine light flash up.
And I wasn�t intending on using a lot of stuff from the forester.
Major prob then.
A pair of boxes that could pose the CANbus problem:
My idea was to use the STI loom not only for the engine wiring but also the dash, I could have chosen to take the engine loom and make it fit on the original car loom which would be easier in the end probably.
Reason for this was the fact that I have an electronic throttle body on the engine which I wanted to keep.
Two reasons for this, I did not know if the ECU would throw a fit if I changed the body for a mechanical one, and I wanted to be the first GC8 body with Drive by Wire in Holland, as this system is first being sold on the new MY06 cars over here.
For the DBW system I needed a gas pedal with a sensor that monitors the motion of the pedal itself.
So it needs a connector for it, which, needless to say, wasn�t on my MY95 loom.
I also didn�t have the wiring diagrams for the engine and looms so I couldn�t make one either, so I opted for changing all the dash wiring also .
Nice Christmas feel pic of the car with STI loom in front, unfortunately a very mall pic:
So after my depressive chat with the guru I had to find out if that system was actually present in the loom and if so, if there was a way to fool it into thinking everything was attached.
After asking on bulletin boards around the world I noticed there wasn�t much knowledge on this subject around.
I did get some reaction here and there on the global working of the system but not on Subaru in particular.
There was a guy on a Dutch board that knew quite a bit about it and he told me there had to be a twisted pair cable running from the diagnostic connector.
I checked and there wasn�t any TP cable on my connector!!!
So I was stressing for weeks over nothing in the end, and wrote this whole story for nothing also�
So for something totally different�
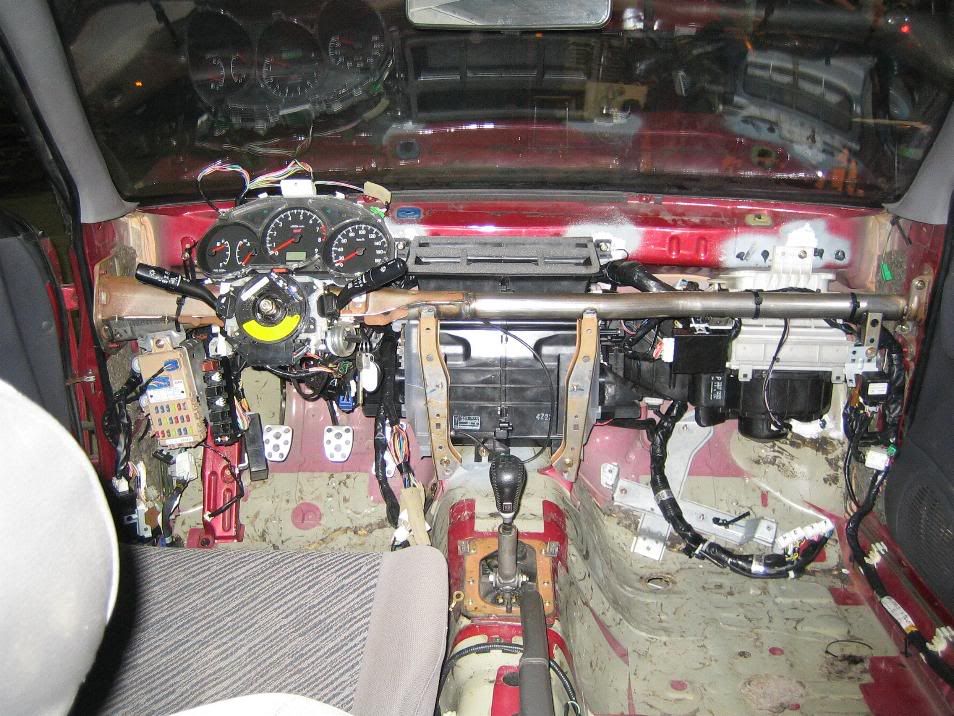
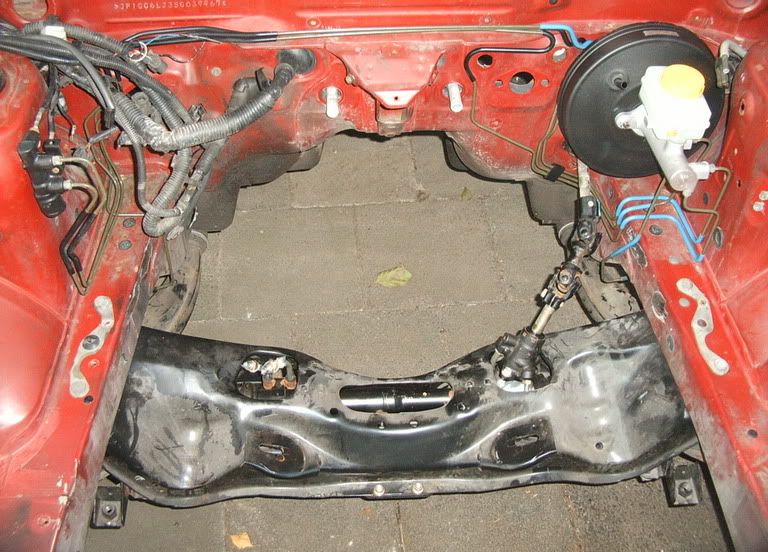
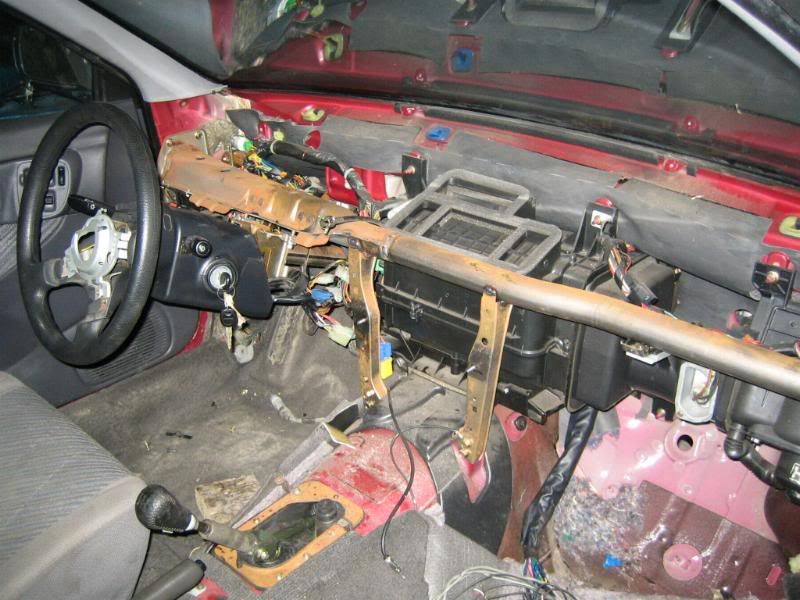
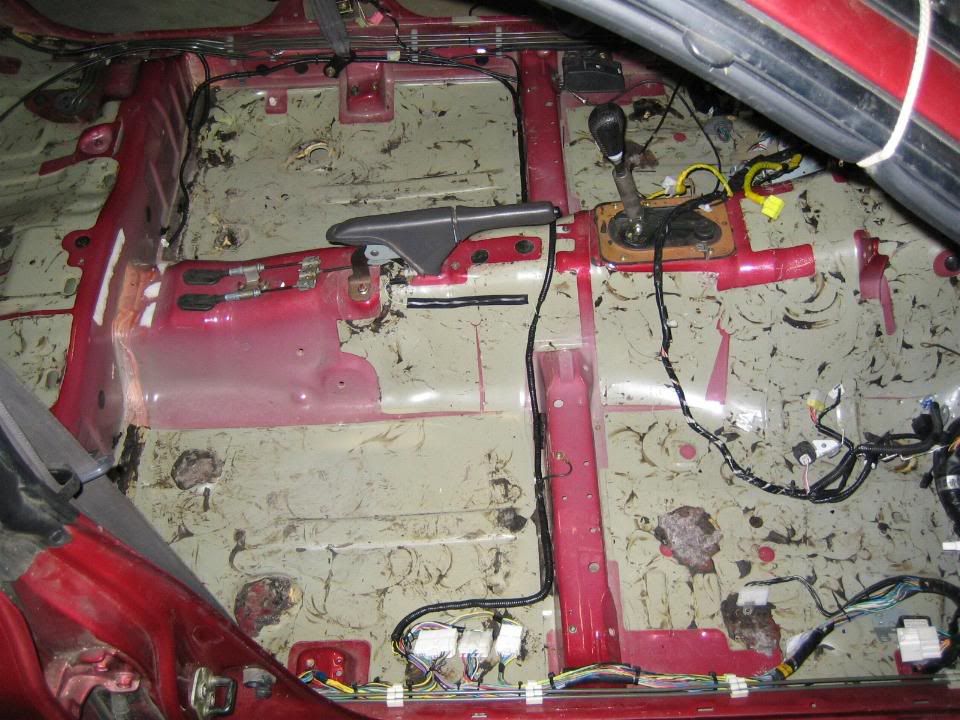
I had my dash removed and also the heater and old loom was going out.
So it was nice and clean in the car �..until I put the STI loom in, then it was a mess again.
Car after removing dash:
The loom fitted surprisingly well for RHD loom�.even the big knot of wire near the steering wheel was on the correct side! (left)
Aram happy..
So after a few days another friend with a lot of Scooby knowledge came by and told me I did not have the Forester loom but one from an Impreza!
The company I bought the engine and stuff from had imported only parts from one LHD car, a USDM Impreza STI.
So he swapped the looms probably, which was good for me!!
And it explained a lot about the loom fitting so nice off course.
Off course it couldn�t be all good without raising questions; did the USDM STI have drive by wire????
Asking on NASIOC they said the STI had DWB from 2003 onwards over there, so that was a good thing.
I went and picked up a gas pedal with sensor, and indeed there was a connector present!!! YYEEEHAAAA!!
So for the first time since I�d heared of CANbus I was seeing things positive again.
Car with STI loom in it.

I hobbyed the gas pedal in the car immediately:
.After a visit to the local Scooby-guru I went home a bit depressed.
There could be a bit of a problem in my loom, it is called CANbus (Controlled Area Network), never heard of it until then.
It seems to be some internal network in modern cars that make it easier for manufacturers to build looms, and it lets parts communicate with each other internally.
I�ve heard it is a 2 wire system (twisted pair) thru which you can send different signals for the separate parts, each part having its own signal. ( Hope I�m saying this correct?)
Anyway, if some parts are missing, like a rear lights, the CANbus control centre notices and tells the ecu to let the dreaded Check Engine light flash up.
And I wasn�t intending on using a lot of stuff from the forester.
Major prob then.
A pair of boxes that could pose the CANbus problem:
My idea was to use the STI loom not only for the engine wiring but also the dash, I could have chosen to take the engine loom and make it fit on the original car loom which would be easier in the end probably.
Reason for this was the fact that I have an electronic throttle body on the engine which I wanted to keep.
Two reasons for this, I did not know if the ECU would throw a fit if I changed the body for a mechanical one, and I wanted to be the first GC8 body with Drive by Wire in Holland, as this system is first being sold on the new MY06 cars over here.
For the DBW system I needed a gas pedal with a sensor that monitors the motion of the pedal itself.
So it needs a connector for it, which, needless to say, wasn�t on my MY95 loom.
I also didn�t have the wiring diagrams for the engine and looms so I couldn�t make one either, so I opted for changing all the dash wiring also .
Nice Christmas feel pic of the car with STI loom in front, unfortunately a very mall pic:
So after my depressive chat with the guru I had to find out if that system was actually present in the loom and if so, if there was a way to fool it into thinking everything was attached.
After asking on bulletin boards around the world I noticed there wasn�t much knowledge on this subject around.
I did get some reaction here and there on the global working of the system but not on Subaru in particular.
There was a guy on a Dutch board that knew quite a bit about it and he told me there had to be a twisted pair cable running from the diagnostic connector.
I checked and there wasn�t any TP cable on my connector!!!
So I was stressing for weeks over nothing in the end, and wrote this whole story for nothing also�
So for something totally different�
I had my dash removed and also the heater and old loom was going out.
So it was nice and clean in the car �..until I put the STI loom in, then it was a mess again.
Car after removing dash:
The loom fitted surprisingly well for RHD loom�.even the big knot of wire near the steering wheel was on the correct side! (left)
Aram happy..
So after a few days another friend with a lot of Scooby knowledge came by and told me I did not have the Forester loom but one from an Impreza!
The company I bought the engine and stuff from had imported only parts from one LHD car, a USDM Impreza STI.
So he swapped the looms probably, which was good for me!!
And it explained a lot about the loom fitting so nice off course.
Off course it couldn�t be all good without raising questions; did the USDM STI have drive by wire????
Asking on NASIOC they said the STI had DWB from 2003 onwards over there, so that was a good thing.
I went and picked up a gas pedal with sensor, and indeed there was a connector present!!! YYEEEHAAAA!!
So for the first time since I�d heared of CANbus I was seeing things positive again.
Car with STI loom in it.
I hobbyed the gas pedal in the car immediately:
18 December 2005, 11:59 AM
#4
Scooby Regular
Thread Starter
Join Date: Dec 2002
Posts: 458
Likes: 0
Received 0 Likes
on
0 Posts
After that I made a hole in the engine compartment because the loom dictated it
De connectors didn�t fit the GL fuse box so picked up the original one.
But the cables ran under a lot of tension once fitted and I didn�t like that.
So off came the tape from the loom and I retaped it again and it was nice and stress less after that
All I need is something to put over the edges of the hole so the wires won�t cut on it.
The battery doesn�t fit in the original position anymore, but the plan had always been to relocate it to the back off the car for better weight distribution.
Partially stripped loom:
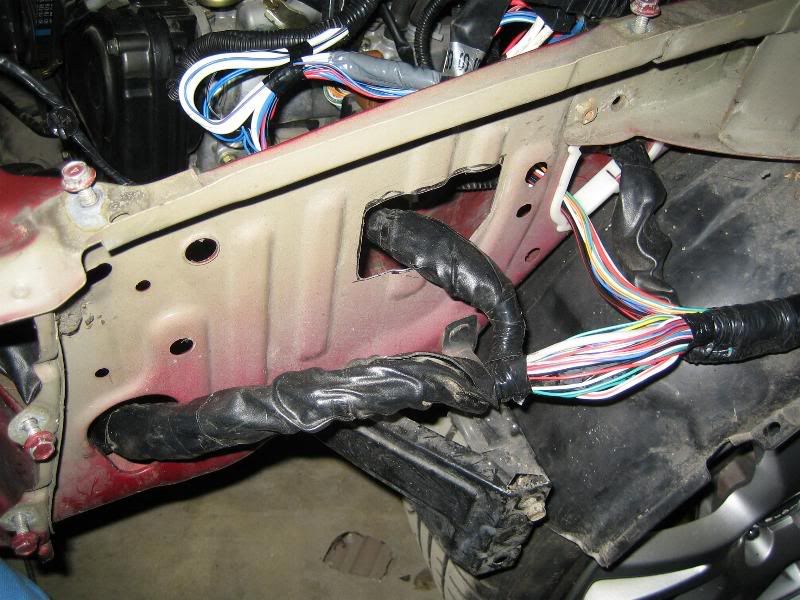
After retaping:
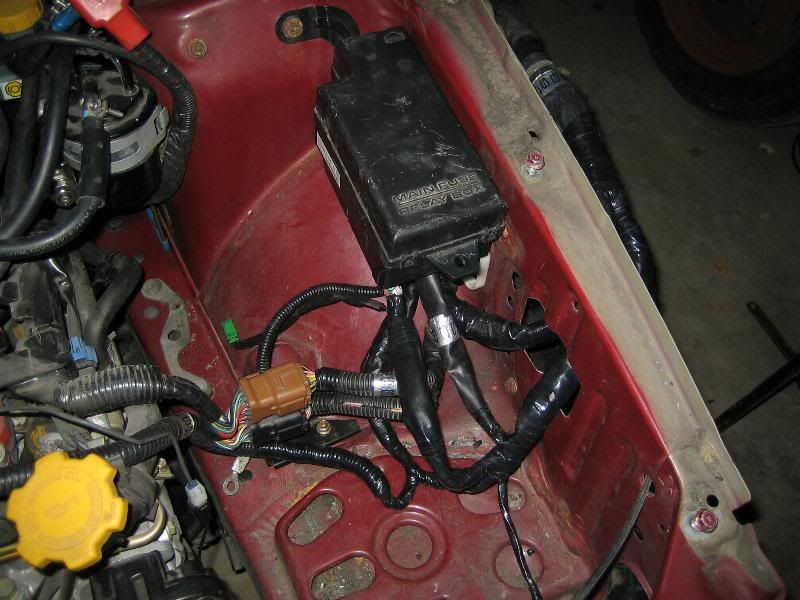
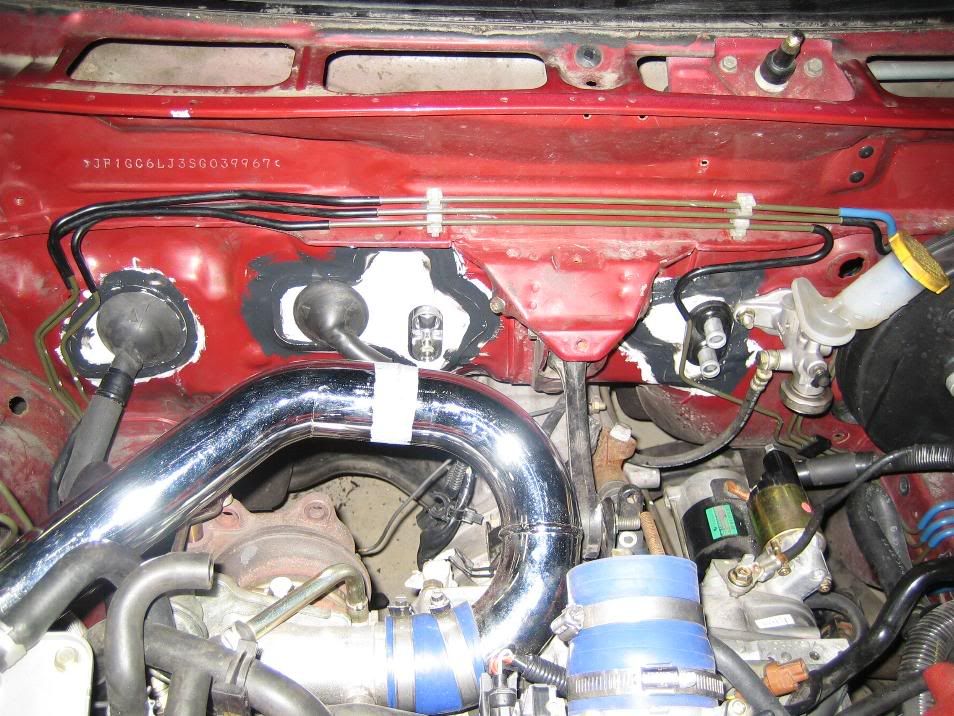
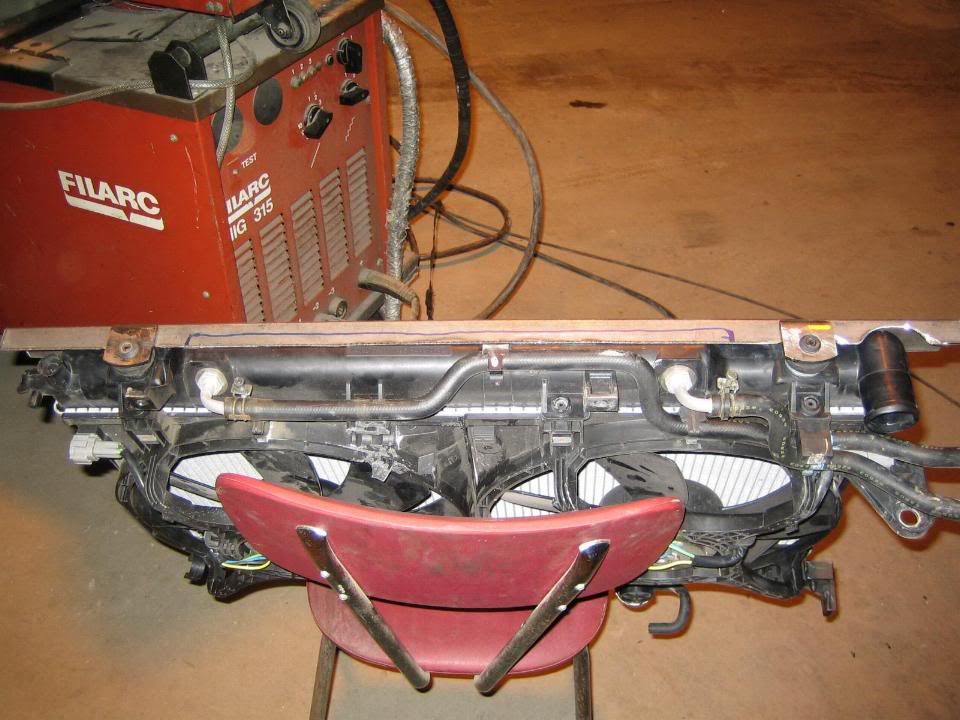
Next step was fitting the radiator.
I have a nice MY04 Legacy radiator with built in oil cooler which was handy for my gearbox, which has an oil cooler on it.
Unfortunately there was a dent in the lower crossbeam of the car, probably someone reversed a towing hook into the car at one point in its life.
So out came the trusted forklift again and I put the car on its parking brake and put big lugs in front of all 4 wheels.
The crossbeam never knew what hit it.
So the dent was�..well not gone but the bean was straight enough to try and fit the radiator in.
The fixing points of the radiator are higher on a non-turbo car it seems, the radiator was sticking out and it was too deep also nearly touching the engine with its fans.
So unfortunately the poor beam will have to take another beating or will be removed entirely, being replaced by another beam that will let the radiator go deeper and more to the front of the car.
So that�s to be continued�.
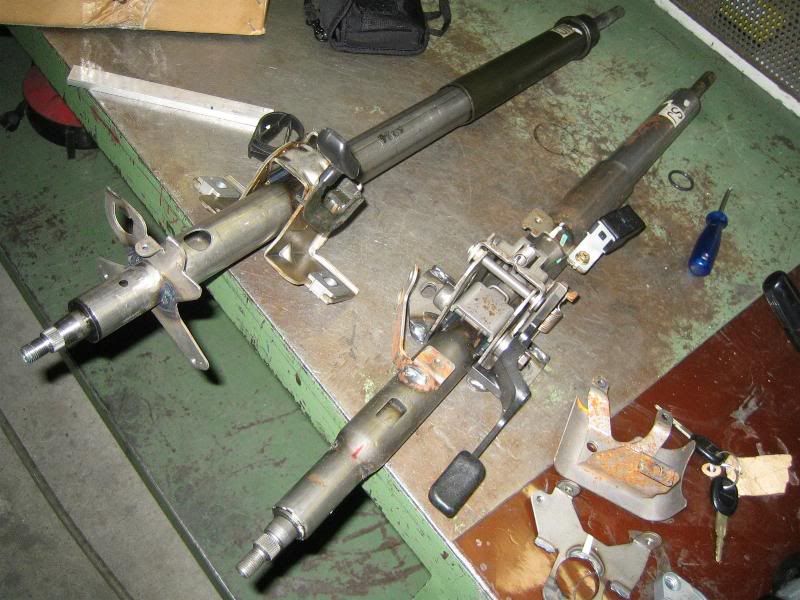
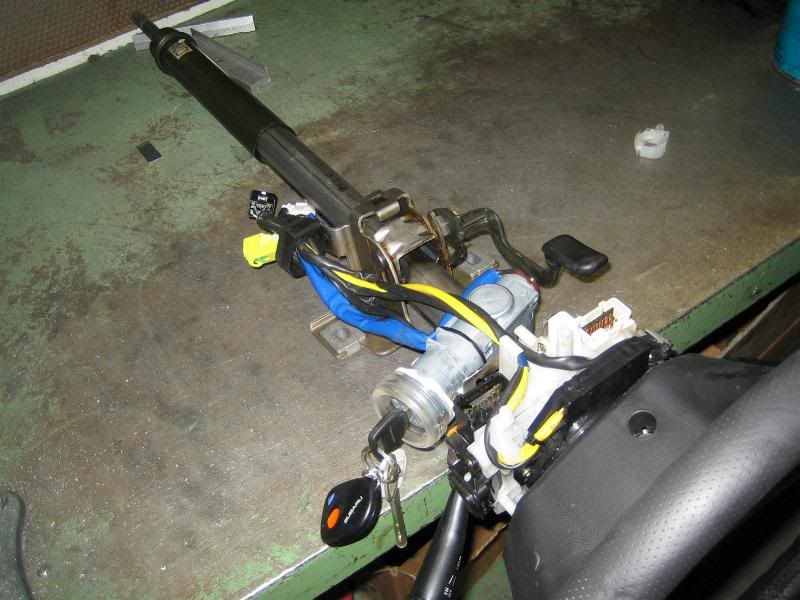
Last thing I�ve done is making the steering column fit.
I had the original STI wheel with keys, but it didn�t fit the steering house.
So I thought I�d swap the electronics and viola!
But it wasn�t going to be that easy.
The contact was fitted with �break� bolts so they had to drilled out.
Also the attach plate for the controls were different to each other on both wheels, so they had to be cut off and re-welded, well only one actually the other was scrap.
Also the gaps of the steering lock were different to each other, one being round the other square, so I had machine the STI round.
Anyway I did that this week, and it fits perfectly now.
No probs with the start security and all the connectors are plug&play.
Both steering columns next to each other, on the left the MY95 one with the STI attachment plate already welded to it.
Right some stuff and the GL keys:
Steer with all STI electronics attached:
So everything is going smoothly again except for the money flow as I spent my budget of this month already�
PS:
I�m Dutch so there are probably a lot of grammar mistakes around, pm me the major ones pls, so I know for next time.
Greets
Aram
De connectors didn�t fit the GL fuse box so picked up the original one.
But the cables ran under a lot of tension once fitted and I didn�t like that.
So off came the tape from the loom and I retaped it again and it was nice and stress less after that
All I need is something to put over the edges of the hole so the wires won�t cut on it.
The battery doesn�t fit in the original position anymore, but the plan had always been to relocate it to the back off the car for better weight distribution.
Partially stripped loom:
After retaping:
Next step was fitting the radiator.
I have a nice MY04 Legacy radiator with built in oil cooler which was handy for my gearbox, which has an oil cooler on it.
Unfortunately there was a dent in the lower crossbeam of the car, probably someone reversed a towing hook into the car at one point in its life.
So out came the trusted forklift again and I put the car on its parking brake and put big lugs in front of all 4 wheels.
The crossbeam never knew what hit it
.So the dent was�..well not gone but the bean was straight enough to try and fit the radiator in.
The fixing points of the radiator are higher on a non-turbo car it seems, the radiator was sticking out and it was too deep also nearly touching the engine with its fans.
So unfortunately the poor beam will have to take another beating or will be removed entirely, being replaced by another beam that will let the radiator go deeper and more to the front of the car.
So that�s to be continued�.
Last thing I�ve done is making the steering column fit.
I had the original STI wheel with keys, but it didn�t fit the steering house.
So I thought I�d swap the electronics and viola!
But it wasn�t going to be that easy.
The contact was fitted with �break� bolts so they had to drilled out.
Also the attach plate for the controls were different to each other on both wheels, so they had to be cut off and re-welded, well only one actually the other was scrap.
Also the gaps of the steering lock were different to each other, one being round the other square, so I had machine the STI round.
Anyway I did that this week, and it fits perfectly now.
No probs with the start security and all the connectors are plug&play
. Both steering columns next to each other, on the left the MY95 one with the STI attachment plate already welded to it.
Right some stuff and the GL keys:
Steer with all STI electronics attached:
So everything is going smoothly again except for the money flow as I spent my budget of this month already�
PS:
I�m Dutch so there are probably a lot of grammar mistakes around, pm me the major ones pls, so I know for next time
.Greets
Aram
 18 December 2005, 12:09 PM
#6
Scooby Regular
Thread Starter
Join Date: Dec 2002
Posts: 458
Likes: 0
Received 0 Likes
on
0 Posts
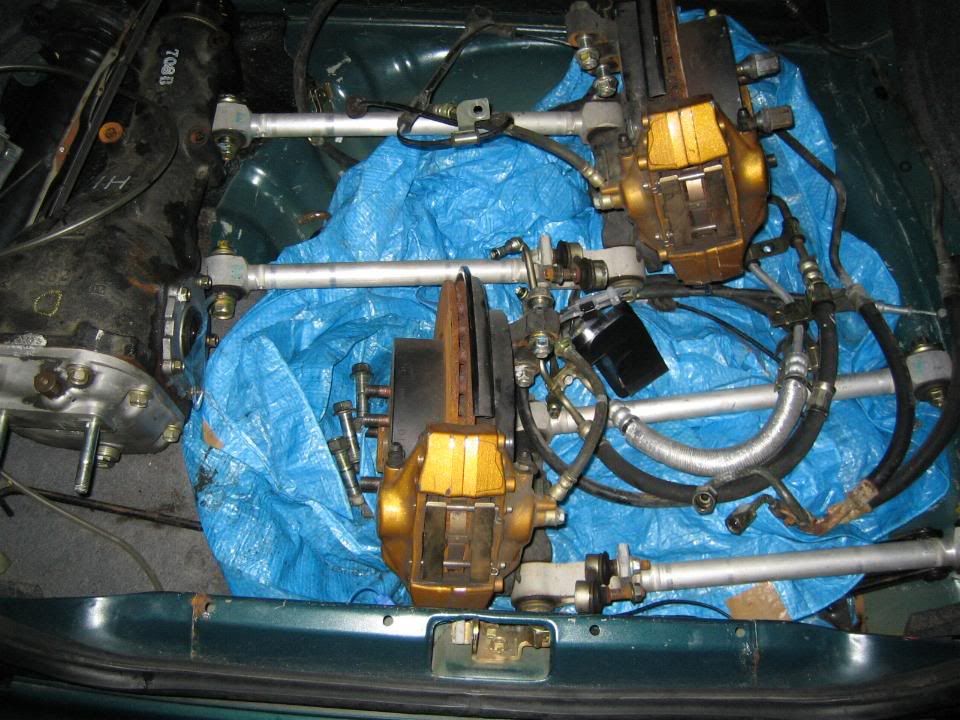
The brakes are big to what is standard on turbo, that is what i meant by that .
The current system is:
STI front calipers
Standard MY99 turbo rear calipers (want to change those to Legacy B4 later)
Stainless steel hoses
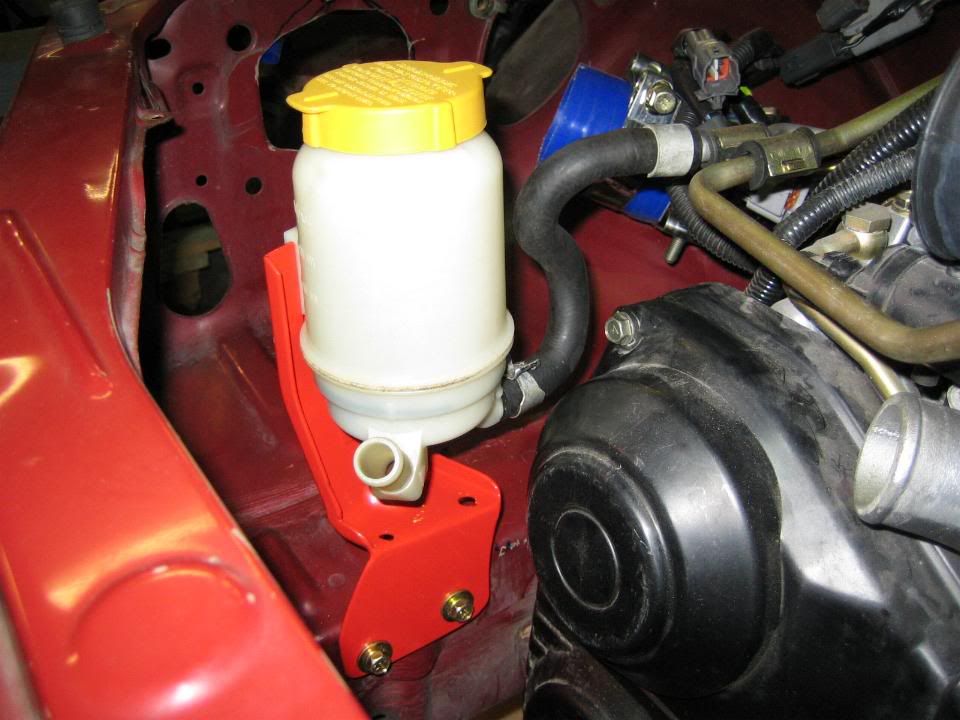
I did keep the original MY95 GL brakebooster, it is single membran and according to a friend of mine has better feel then later types.
And i have my own design brake bracket on it, to minimize firewall flex in the pedal.
No idea how this set-up is going to turn out, first the engine has to run.
.The current system is:
STI front calipers
Standard MY99 turbo rear calipers (want to change those to Legacy B4 later)
Stainless steel hoses
I did keep the original MY95 GL brakebooster, it is single membran and according to a friend of mine has better feel then later types.
And i have my own design brake bracket on it, to minimize firewall flex in the pedal.
No idea how this set-up is going to turn out, first the engine has to run.
18 December 2005, 12:12 PM
#7
Scooby Regular
Thread Starter
Join Date: Dec 2002
Posts: 458
Likes: 0
Received 0 Likes
on
0 Posts
My plans are to get the engine running as soon as possible.
I will put a TD04 on it for now, because a GT30 will need custom built up and downpipe which i will create later, first it has to run.
The APS FMIC will be put on but that should not be to much trouble.
greets
I will put a TD04 on it for now, because a GT30 will need custom built up and downpipe which i will create later, first it has to run.
The APS FMIC will be put on but that should not be to much trouble.
greets
Trending Topics
11 January 2006, 12:43 PM
#9
Scooby Regular

Join Date: Sep 2001
Location: Kingston ( Surrey, not Jamaica )
Posts: 4,670
Likes: 0
Received 0 Likes
on
0 Posts
Originally Posted by Bartop
Sorry to hijack but am *very* interested if any bits are left over from that Fsti - whereabouts is it and is there much left of it ?
I already asked
11 January 2006, 12:53 PM
#10
Scooby Regular

Join Date: Nov 2004
Posts: 2,317
Likes: 0
Received 0 Likes
on
0 Posts
*busted*
Might have guessed the vultures would have been all over it !
Wonder if the black dash and heater controls have gone
Would also have loved to get the struts and springs as well
Might have guessed the vultures would have been all over it !
Wonder if the black dash and heater controls have gone
Would also have loved to get the struts and springs as well
11 January 2006, 06:15 PM
#11
dinges:
First, your english is great and compared to some threads on here bloody great...
This is a good project, please keep the pics coming as well as the text.
Will you totally gut the car of ALL excess?
Graham
First, your english is great and compared to some threads on here bloody great...
This is a good project, please keep the pics coming as well as the text.
Will you totally gut the car of ALL excess?
Graham
13 January 2006, 08:29 PM
#12
Scooby Regular
Thread Starter
Join Date: Dec 2002
Posts: 458
Likes: 0
Received 0 Likes
on
0 Posts
Hi Bart,
These are the last parts of the Forester i could find:
And they are MINE!!
The rest of the car is gone I'm afraid.
I hope they fit although i think the Alu arms are too long, i do have the Forester subframe somewhere but i have no idea if that will fit under the GL.
Before i fit the parts i need to get hold of an 6 speed gearbox, so they will be kicking about in the barn for a while i guess.
greets
These are the last parts of the Forester i could find:
And they are MINE!!
The rest of the car is gone I'm afraid.
I hope they fit although i think the Alu arms are too long, i do have the Forester subframe somewhere but i have no idea if that will fit under the GL.
Before i fit the parts i need to get hold of an 6 speed gearbox, so they will be kicking about in the barn for a while i guess
.greets
13 January 2006, 08:41 PM
#13
Scooby Regular
Thread Starter
Join Date: Dec 2002
Posts: 458
Likes: 0
Received 0 Likes
on
0 Posts
Hi Graham,
My name is Aram, pleased to meet you.
I have been following your thread with great interest as I have got the AST suspension aswel.
I got 35/35 on a friends advice but i fear that's way too soft now .
.
But i've never driven the car so i wouldnt know.
I have done some work on the car already and it's near the point that i can fire it up for the first time, although money is keeping me away from it as yet.
I will do a write up pretty soon but it's alot of work for me to translate it.
My goal is to make the car pretty light, so it's no interior and light parts all around.
On the other hand, moist will be a problem when removing everthing from the interior and visability is a pretty vital part of driving the car so airco might be installed to dry up the air in the car.
And a cage will be fitted for chassis rigidness (???) so that will add weight also.
So it will be a compromise i guess.
But first the car has to run properly and i must make the heater and lights work etc.
greets
My name is Aram, pleased to meet you
.I have been following your thread with great interest as I have got the AST suspension aswel.
I got 35/35 on a friends advice but i fear that's way too soft now
.But i've never driven the car so i wouldnt know
.I have done some work on the car already and it's near the point that i can fire it up for the first time, although money is keeping me away from it as yet.
I will do a write up pretty soon but it's alot of work for me to translate it.
My goal is to make the car pretty light, so it's no interior and light parts all around.
On the other hand, moist will be a problem when removing everthing from the interior and visability is a pretty vital part of driving the car so airco might be installed to dry up the air in the car.
And a cage will be fitted for chassis rigidness (???) so that will add weight also.
So it will be a compromise i guess.
But first the car has to run properly and i must make the heater and lights work etc.
greets
 17 January 2006, 12:43 PM
#15
IMHO:
35 35 is WAY too soft unless it's gravel you are on.
50/40 is a nice road/racer rate, but 60/50 is magic on a smoothish track/road.
'My' new AST's will be 60/50. I like the race car feel on the road but mine is a weekend racer only.
Key is matching the damping rate to the spring.
Graham.
35 35 is WAY too soft unless it's gravel you are on.
50/40 is a nice road/racer rate, but 60/50 is magic on a smoothish track/road.
'My' new AST's will be 60/50. I like the race car feel on the road but mine is a weekend racer only.
Key is matching the damping rate to the spring.
Graham.
17 January 2006, 04:47 PM
#16
Scooby Regular
Thread Starter
Join Date: Dec 2002
Posts: 458
Likes: 0
Received 0 Likes
on
0 Posts
Yeah, i guess i will need to replace them.
My setup will be for fast road use and the occasional trackday, Nurburgring most likely.
But the springs are brandnew so i might be able to make a deal with AST.
greets
My setup will be for fast road use and the occasional trackday, Nurburgring most likely.
But the springs are brandnew so i might be able to make a deal with AST.
greets

 05 March 2006, 06:41 PM
#21
Scooby Regular
Thread Starter
Join Date: Dec 2002
Posts: 458
Likes: 0
Received 0 Likes
on
0 Posts
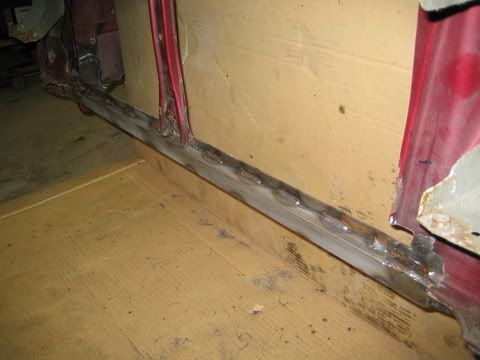
Another update:
The radiator didnt fit too well so i decided there had to be done something about it, and then some.
The bottom beam was too high and too far inwards, the radiator was sticking out and the fans were rubbing the belts.
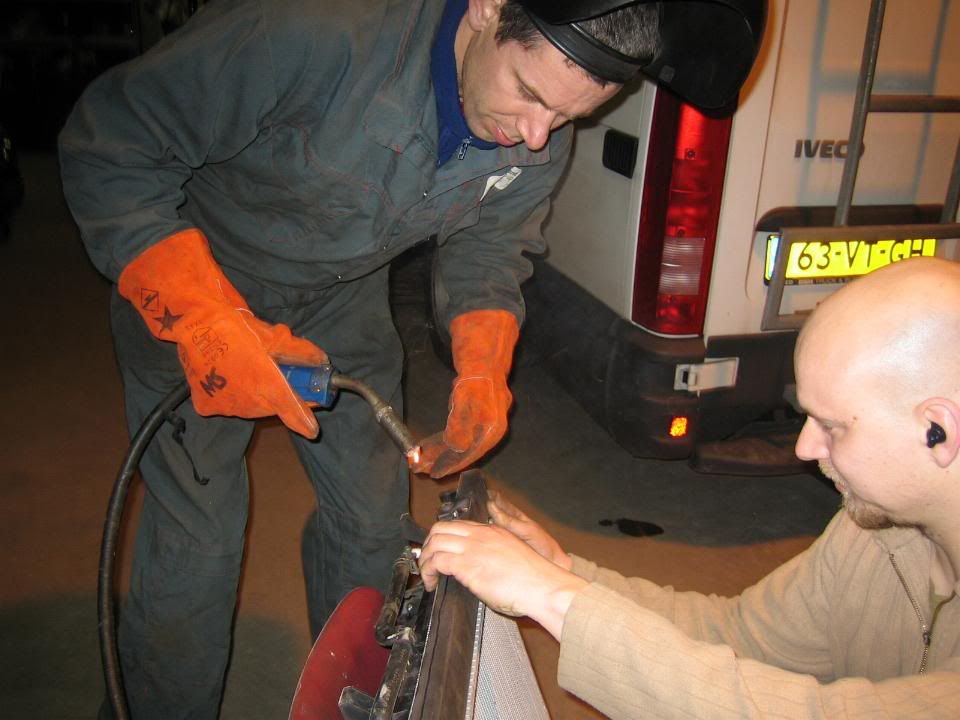
So i asked the help of some fellow Scooby nutheads to help me on this one.
I can weld but i cannot set the welding machine to the correct settings, so they helped me out.
The plan:
Cut out the beam, weld in another, simple.
Beam = goner:
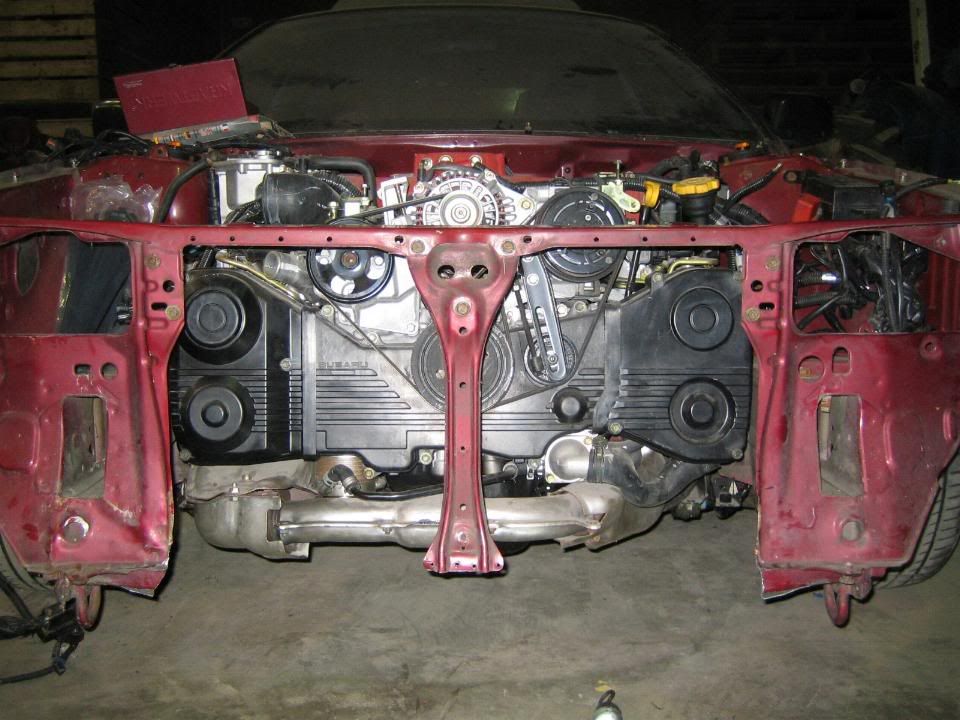
After some f**kin around we got the mounting points correct :
Fellow Scooby fan doing his thing :
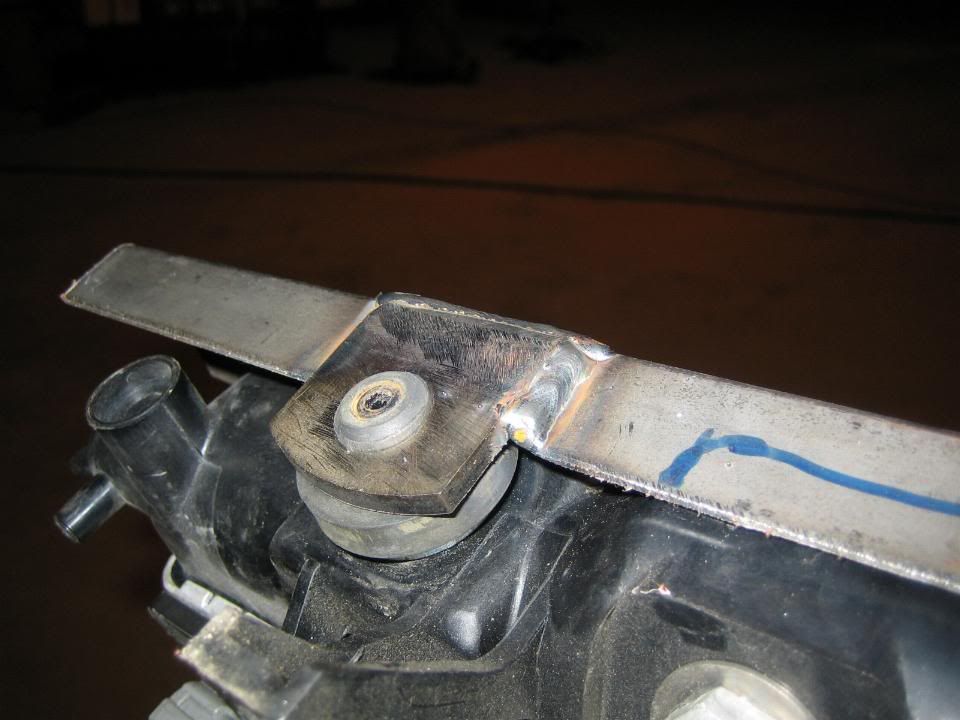
And it's in!!!!:
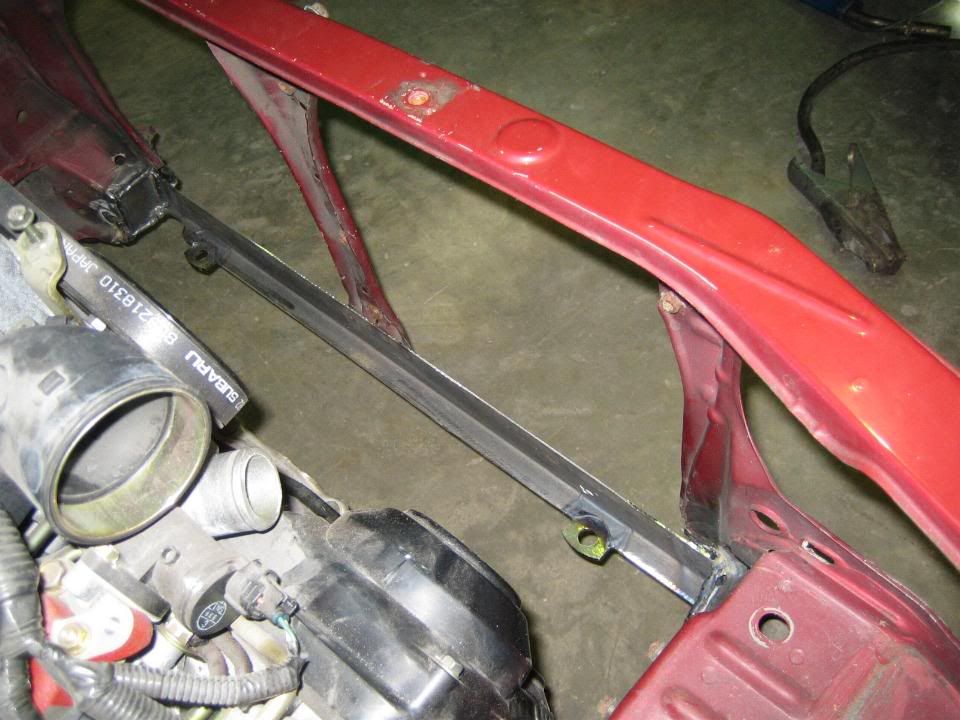
With the radiator in it's place:
I'm going to weld in an extra small beam for extra ridgi...ridgit..ehh...stiffness.
But i now have a good clearance between the fans and the pulley's/belts, so i'm pretty pleased.
After this i put on a TD04 turbo for the time beeing until the GT30 comes along.
No pics there, not very interesting either is it
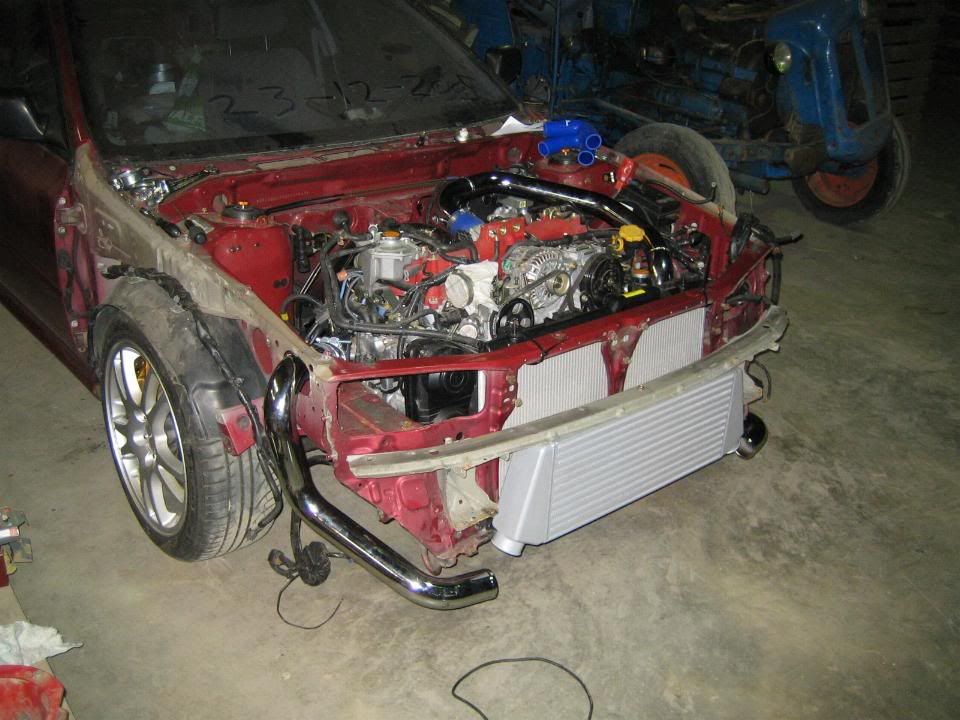
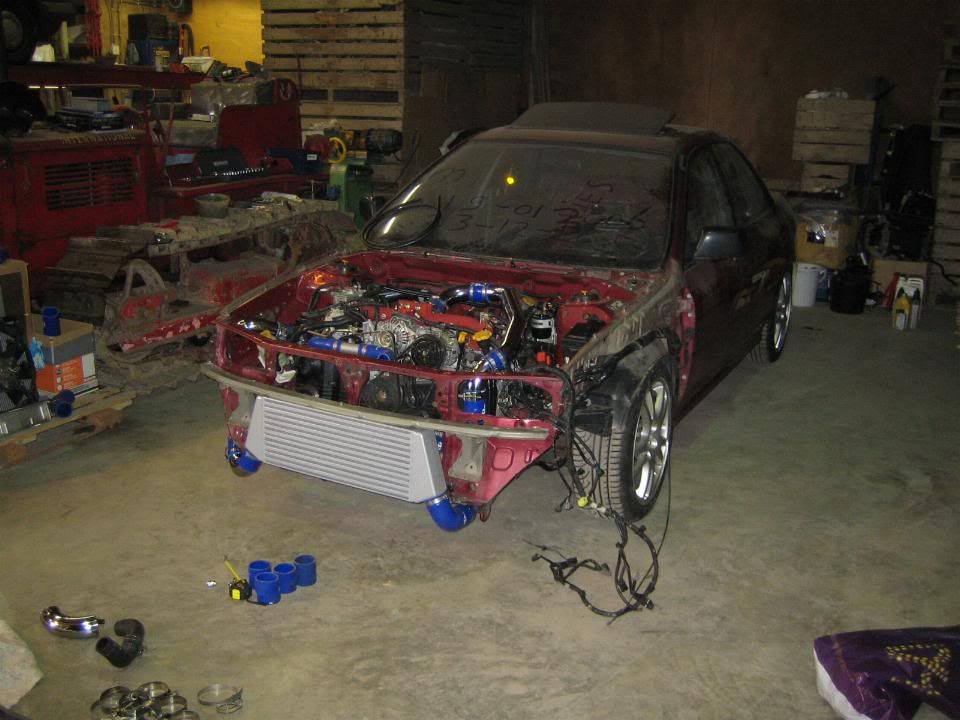
Then i began work on the FMIC.
I have bought a APS core and some Hybrid piping.
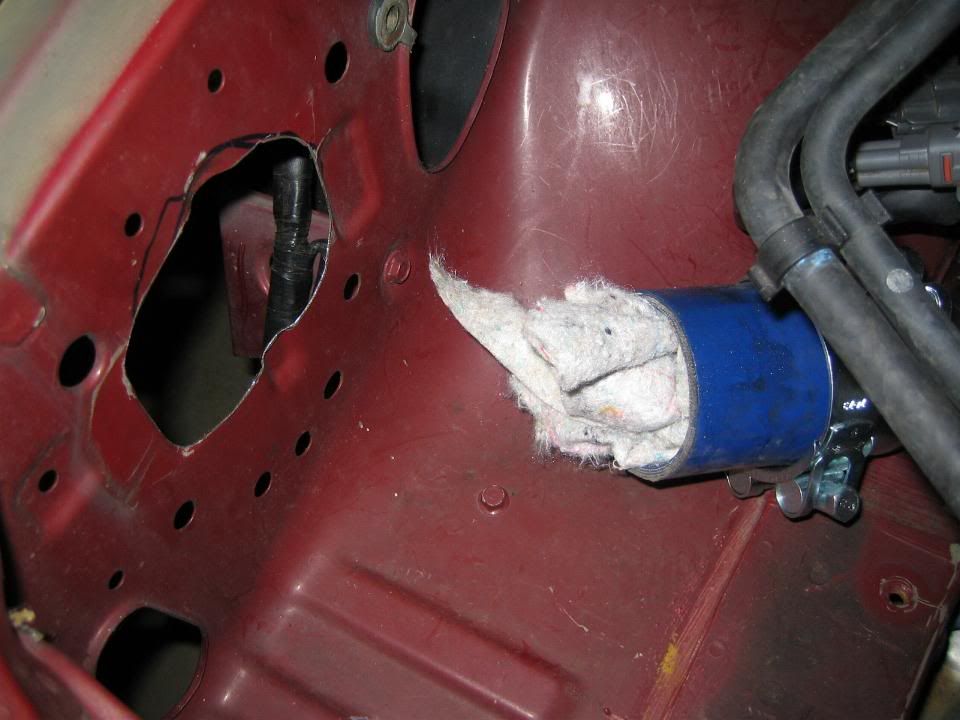
I had to cut a hole in the poor GL again to letthe pipe get through.
So i cut it in:
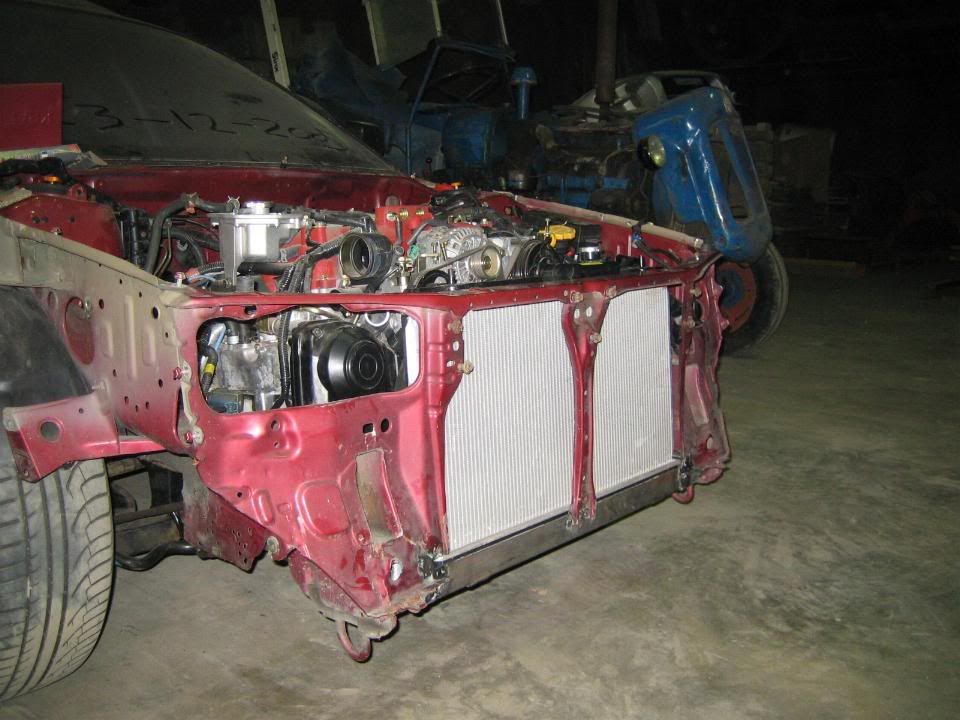
After that i installed the bumperbeam and put the core on, that fitted pretty wel:
I shortened the tube near the turbo to let the bend start a bit earlier so it won't rub agauinst the connector of the dbw.
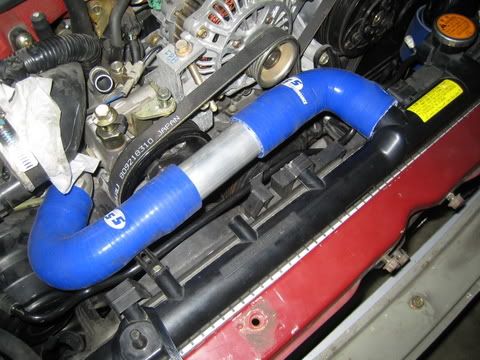
The Fmic tubes didn't fit as i wanted to so hacked them up they ran stressless through the engine bay, luckily i happen to know the importer of sFS silcone hoses in Holland and he supplied me with lots of hoses to patch everything up nicely.
Later i wil make it a front entry unit then i wil make a mockup and have it made out of one tube, for now this will do nicely.
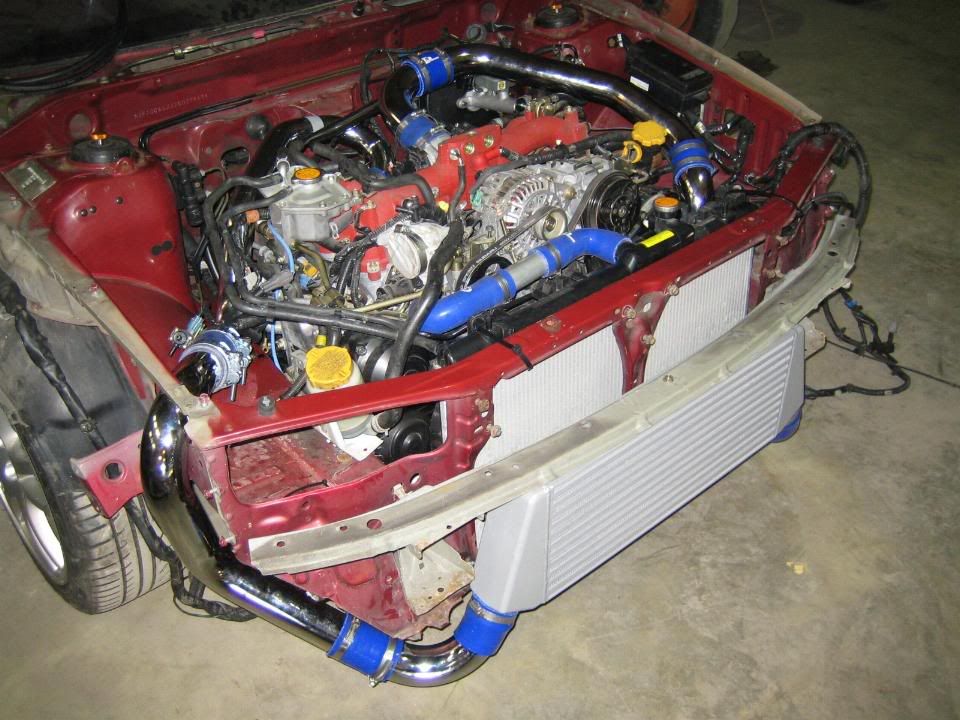
Some hoses for the radiator
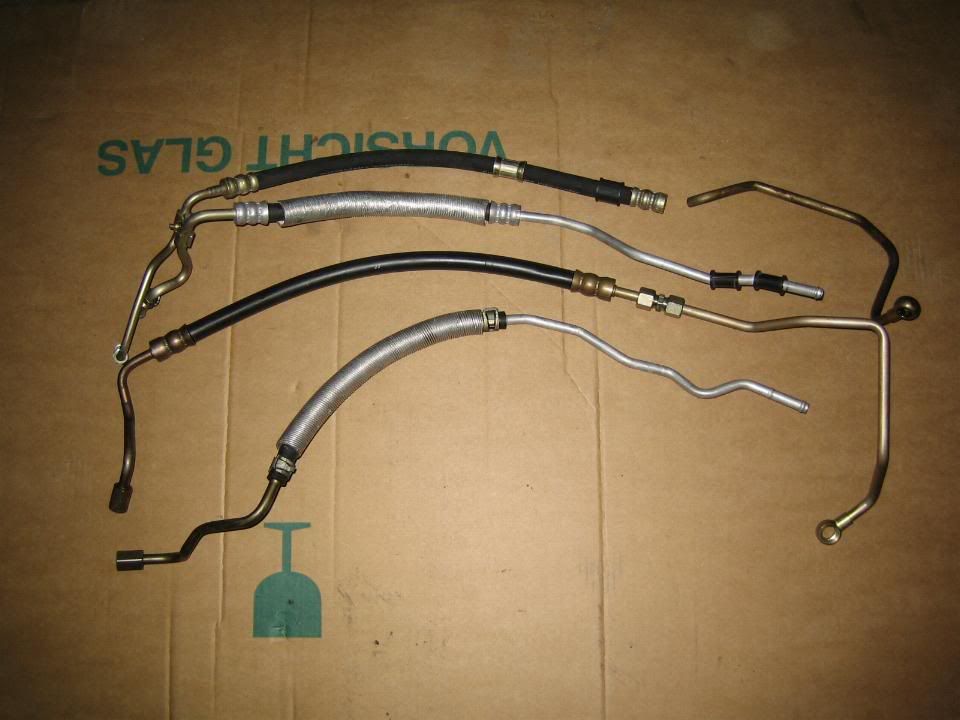
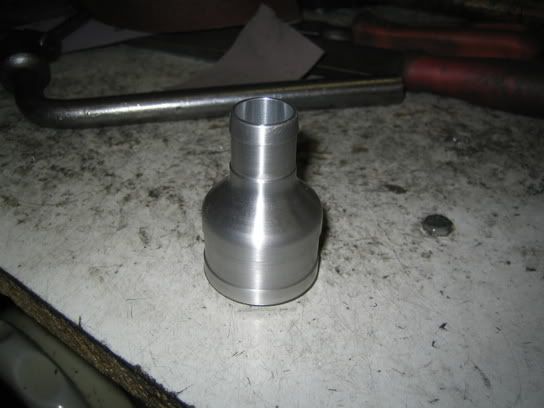
Next isseu was the powersteering hoses that were RHD.
It would not fit my LHD steering house so had to find a solution, they are hard to find and when i did it was still not plug&play.
So i cut the good parts out and fitted them togheter with a nipple, no idea what the english word for this fitting is
Here are all the parts togheter with the correct parts fitted together:
The radiator didnt fit too well so i decided there had to be done something about it, and then some
.The bottom beam was too high and too far inwards, the radiator was sticking out and the fans were rubbing the belts.
So i asked the help of some fellow Scooby nutheads to help me on this one.
I can weld but i cannot set the welding machine to the correct settings, so they helped me out
.The plan:
Cut out the beam, weld in another, simple
.Beam = goner:
After some f**kin around we got the mounting points correct :
Fellow Scooby fan doing his thing
:And it's in!!!!:
With the radiator in it's place:
I'm going to weld in an extra small beam for extra ridgi...ridgit..ehh...stiffness.
But i now have a good clearance between the fans and the pulley's/belts, so i'm pretty pleased
.After this i put on a TD04 turbo for the time beeing until the GT30 comes along.
No pics there, not very interesting either is it
Then i began work on the FMIC.
I have bought a APS core and some Hybrid piping.
I had to cut a hole in the poor GL again to letthe pipe get through.
So i cut it in:
After that i installed the bumperbeam and put the core on, that fitted pretty wel:
I shortened the tube near the turbo to let the bend start a bit earlier so it won't rub agauinst the connector of the dbw.
The Fmic tubes didn't fit as i wanted to so hacked them up they ran stressless through the engine bay, luckily i happen to know the importer of sFS silcone hoses in Holland and he supplied me with lots of hoses to patch everything up nicely.
Later i wil make it a front entry unit then i wil make a mockup and have it made out of one tube, for now this will do nicely.
Some hoses for the radiator
Next isseu was the powersteering hoses that were RHD.
It would not fit my LHD steering house so had to find a solution, they are hard to find and when i did it was still not plug&play.
So i cut the good parts out and fitted them togheter with a nipple, no idea what the english word for this fitting is
Here are all the parts togheter with the correct parts fitted together:
05 March 2006, 07:09 PM
#22
Scooby Regular
Thread Starter
Join Date: Dec 2002
Posts: 458
Likes: 0
Received 0 Likes
on
0 Posts
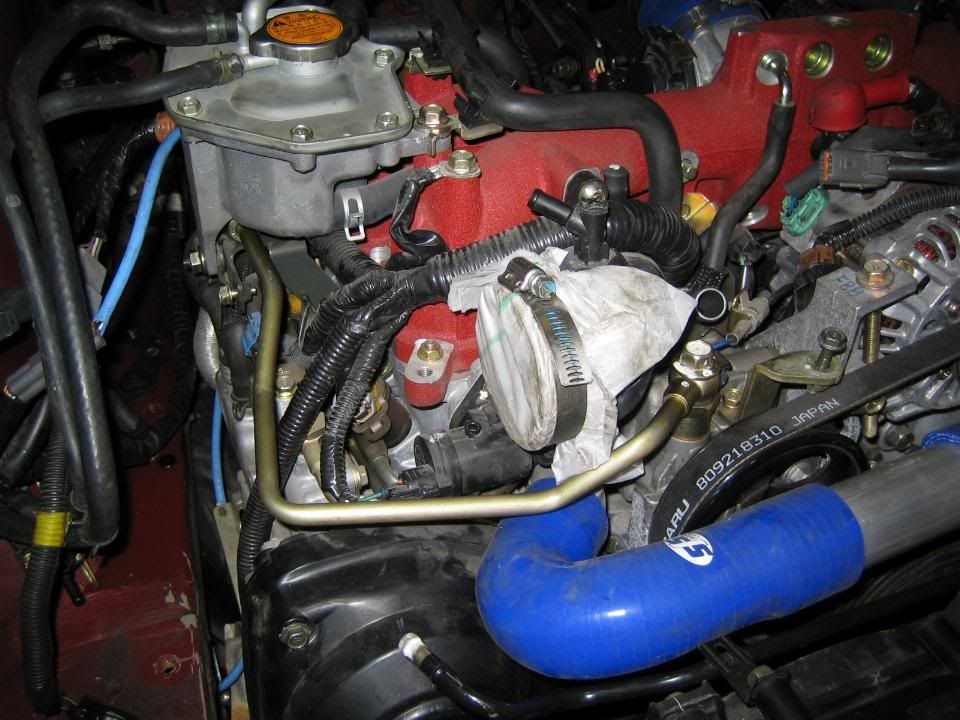
There was a solution required for the airfilter because of the FMIC.
I had a alu plate cut out for me and machined a bit of tube myself, then had a friend weld it together, look pretty good if i say so myself.
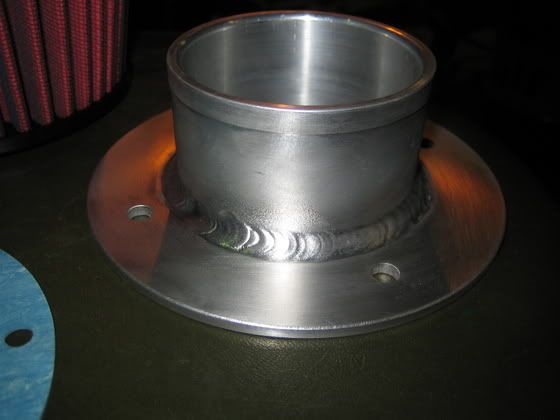

To get a bit more rigidity in the frontbeam i had made berfore i decided to weld another small tube to it for extra stifness:
After that i made some random brackets:
For fixing the powersteering reservior:
I needed a part to fix the dumpvalve to the FMIC pipe, which i machined, and a bracket to the engine for minimizing the swinging around the engine bay :
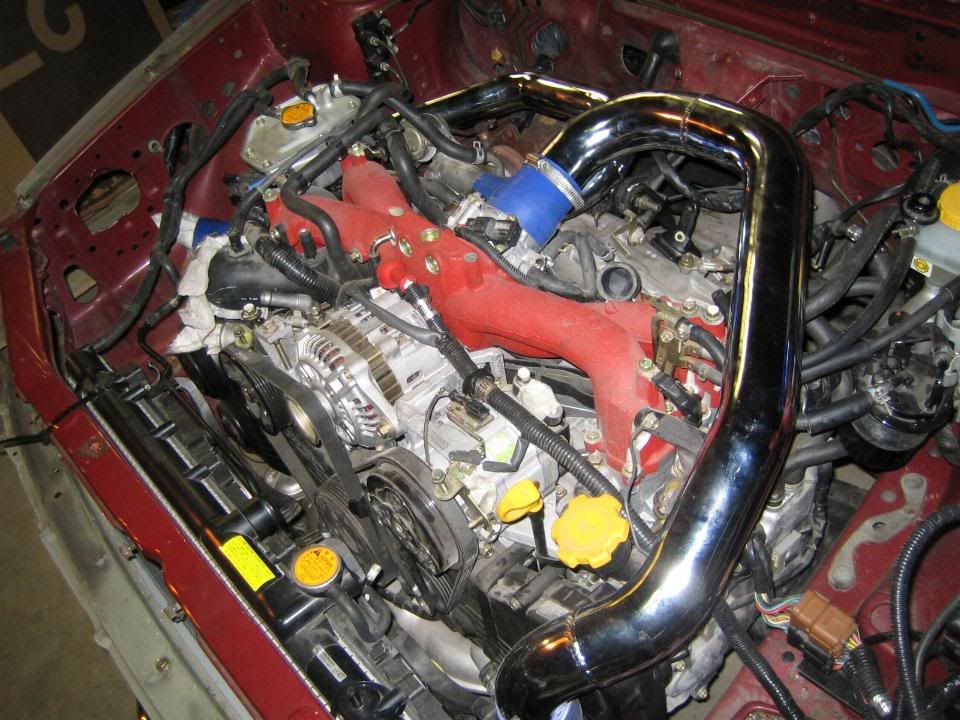
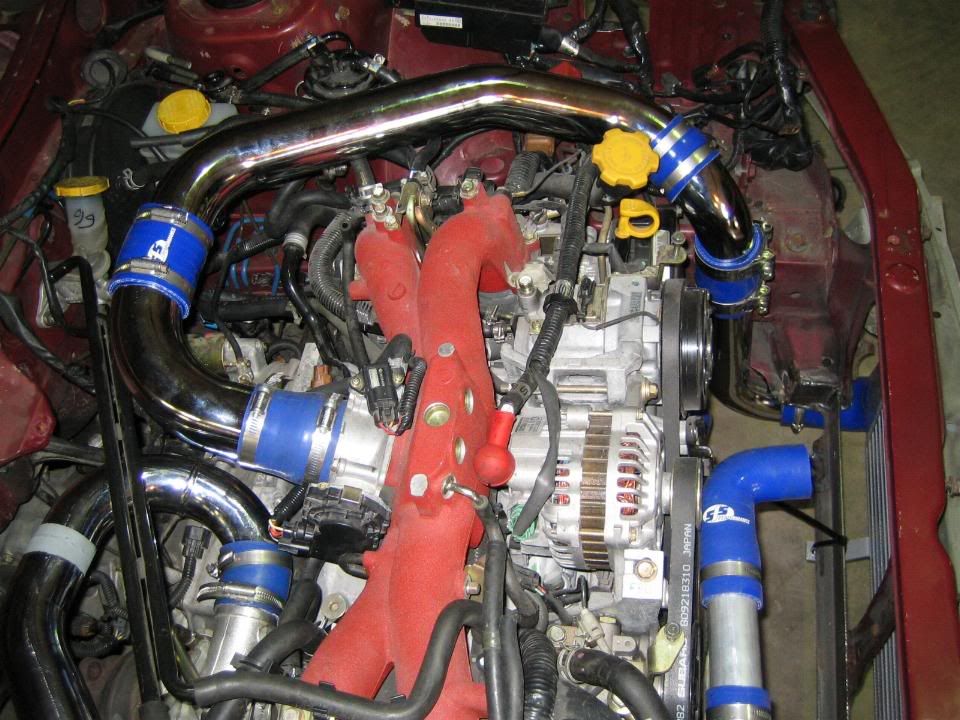
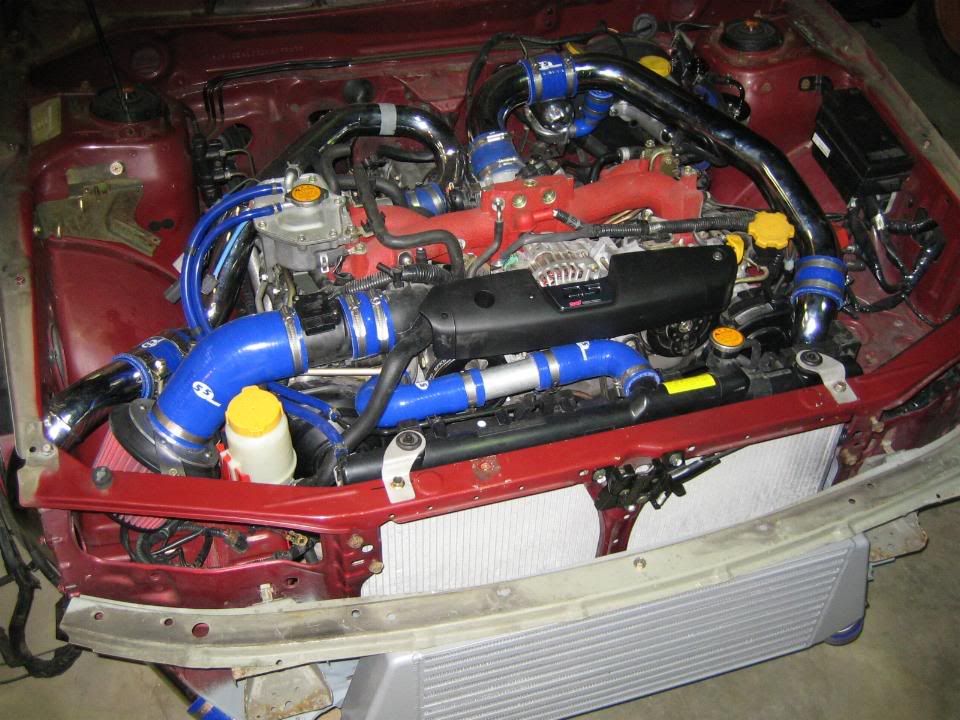
Here is a general overview of the enginebay including the airfilter in it's place.
And some more home made brackets for the radiotor and filter:
I removed the tarplates from the car also, made it a cool 10 kilo lighter.
I also swapped the loom part that runs from the dash to the rear cutting out all airbag cables in the proces.
Taped it back in again and put some protective hoses around it for security:
I decided that i wanted to put the MY04 heaterbox into the car before starting it, and putting the dashloom in place.
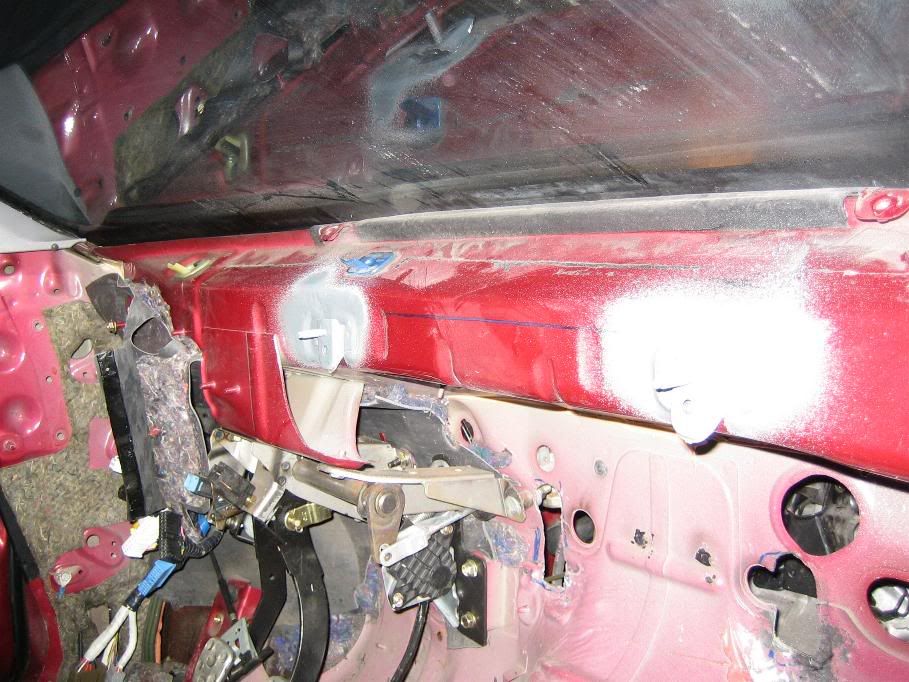
Nothing matched up so i had to drill holes in the firewall and move all attachment points.
After a Saturday messing around with two helpfull friend it was in place.
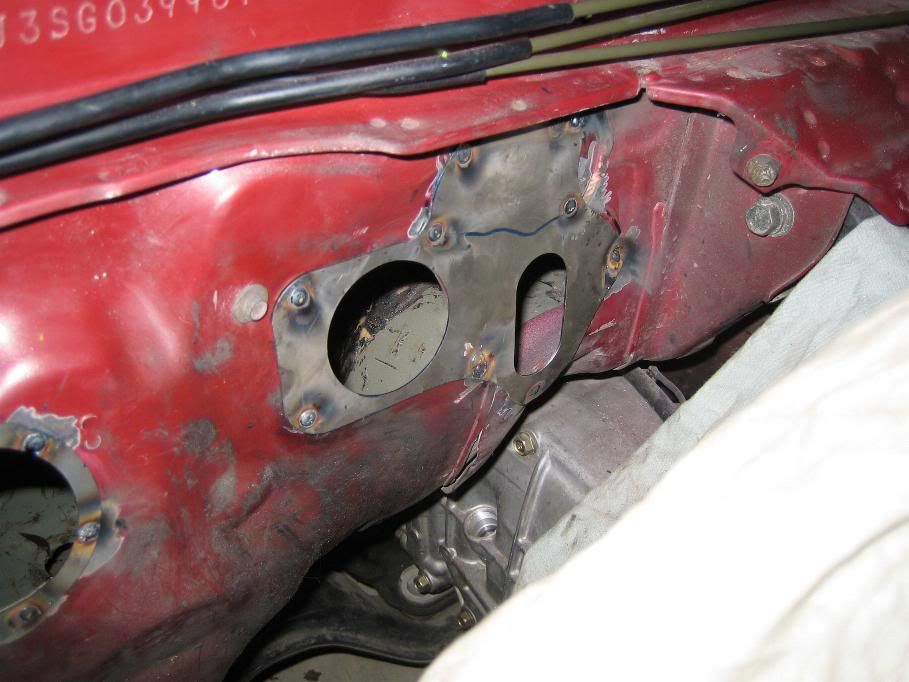
Lastly i wanted some nice lasercut plates to finish the thing off, so it will look it came oput of the factory this way.
Plus they will cover up the unwanted holes in the firewall too.
Holes in the firewall and attachment points moved:
Heaterbox is in!!!
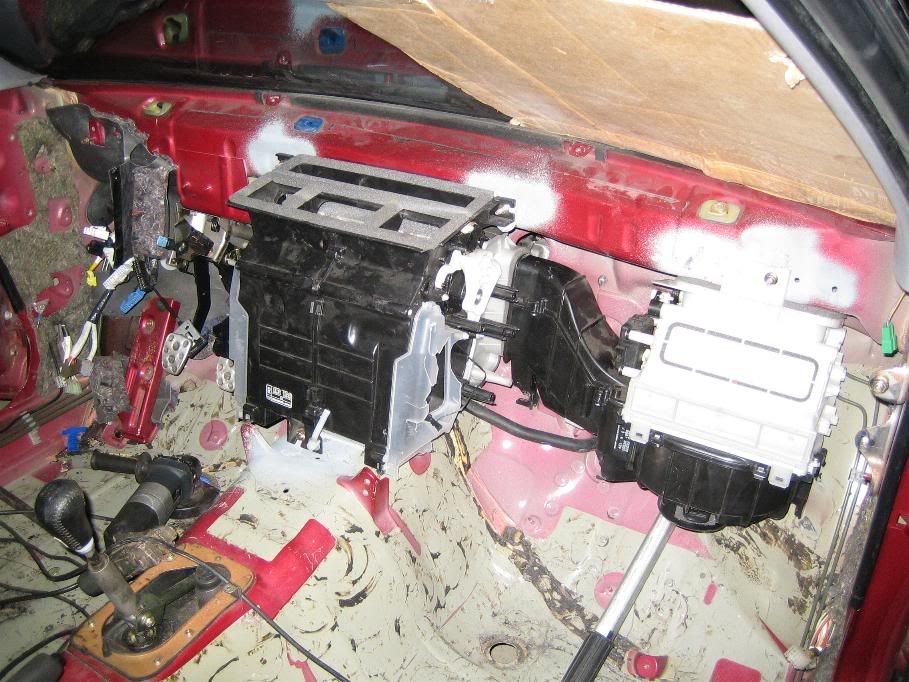
One of the 3 lasercut plates welded in place:
This is how the car is now, next week i will treat the plates with epoxy and kit to make it look original.
After that i'm giong to put the loom in it's final place.
Then i can hopefully start the engine
greets
I had a alu plate cut out for me and machined a bit of tube myself, then had a friend weld it together, look pretty good if i say so myself
.To get a bit more rigidity in the frontbeam i had made berfore i decided to weld another small tube to it for extra stifness:
After that i made some random brackets:
For fixing the powersteering reservior:
I needed a part to fix the dumpvalve to the FMIC pipe, which i machined, and a bracket to the engine for minimizing the swinging around the engine bay
:Here is a general overview of the enginebay including the airfilter in it's place.
And some more home made brackets for the radiotor and filter:
I removed the tarplates from the car also, made it a cool 10 kilo lighter
.I also swapped the loom part that runs from the dash to the rear cutting out all airbag cables in the proces.
Taped it back in again and put some protective hoses around it for security:
I decided that i wanted to put the MY04 heaterbox into the car before starting it, and putting the dashloom in place.
Nothing matched up so i had to drill holes in the firewall and move all attachment points.
After a Saturday messing around with two helpfull friend it was in place
.Lastly i wanted some nice lasercut plates to finish the thing off, so it will look it came oput of the factory this way.
Plus they will cover up the unwanted holes in the firewall too
.Holes in the firewall and attachment points moved:
Heaterbox is in!!!
One of the 3 lasercut plates welded in place:
This is how the car is now, next week i will treat the plates with epoxy and kit to make it look original.
After that i'm giong to put the loom in it's final place.
Then i can hopefully start the engine
greets
07 March 2006, 09:44 PM
#25
Scooby Regular

WOW!! 
I would love to do something like this...but its waaaaaaaaaaaay beyond my capabilities. Can't wait to see the end result!!
Top work mate and if you hadnt mentioned you were Dutch, I would have thought you were british.. as someone has said, you construct your sentances a lot better than many people on here, including me!?
Cheers,
Grant
 25 March 2006, 09:39 PM
#27
Scooby Regular
Thread Starter
Join Date: Dec 2002
Posts: 458
Likes: 0
Received 0 Likes
on
0 Posts
Last monday i started the engine for the first time!!!
I had prob with the startermotor not giving any sign of life.
But the feulpump etc was working fine.
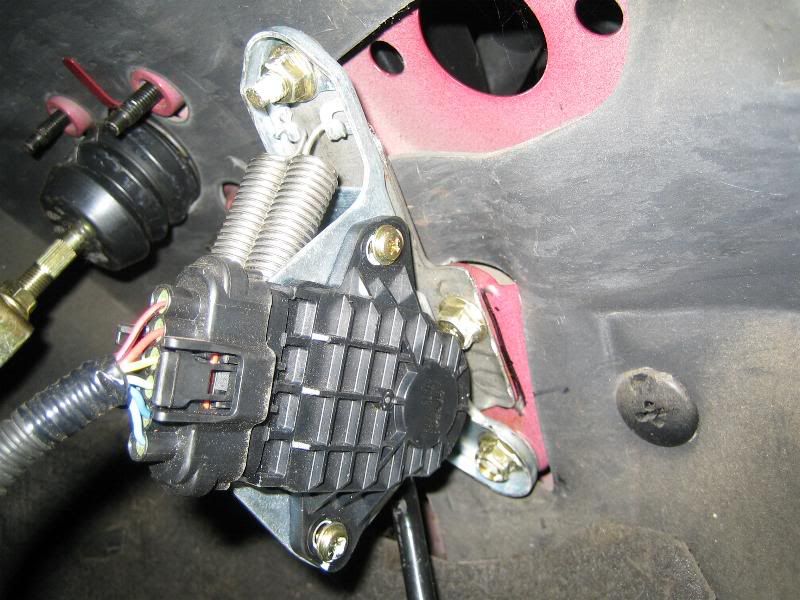
So i checked the wirediagrams and noticed a clutch sensor somewhere in there.
I have a USDM loom, and the US spec has a built in safety feature.
You have to engage the clutchpedal before you can start the engine, to prevent a bunnyhop.
Luckily i had all the original pedals and found that right sensor.
So i clicked it in and presto!!
Put the engine on oilpressure first and then i put the spark plugs back in and it started first time round!!!
YEEEHAAA!!!!
Fixed the fenders today and reworked the bumper to fit.
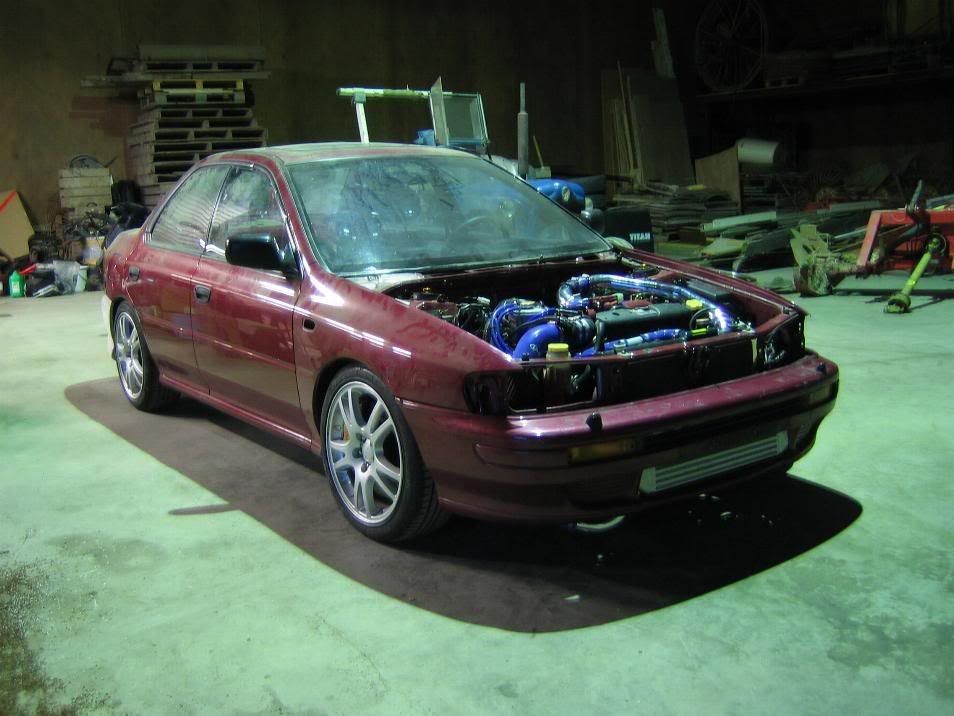
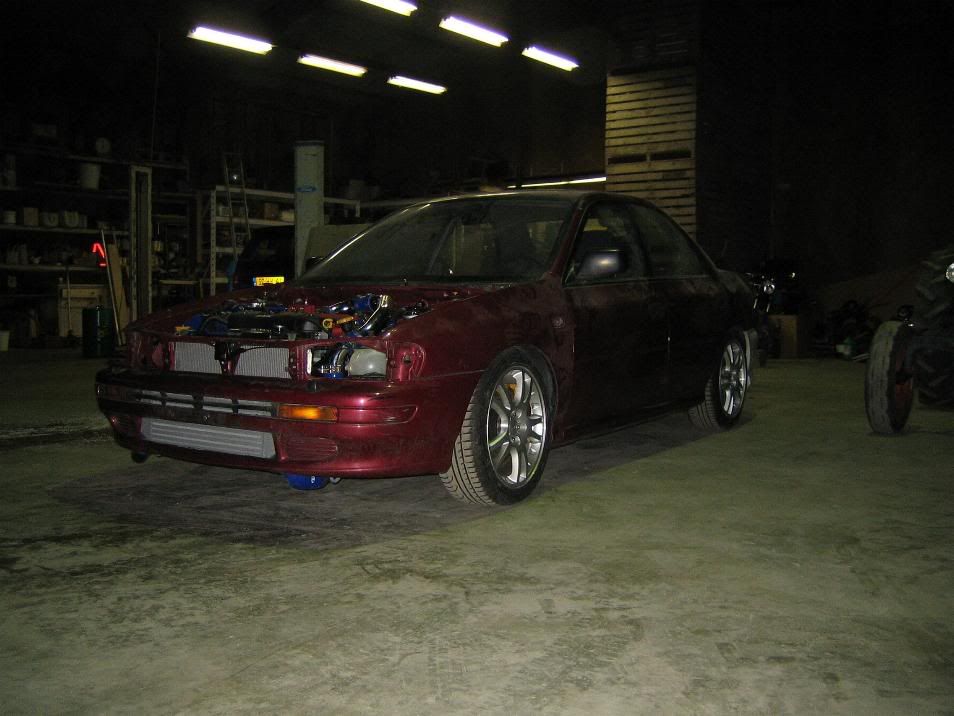
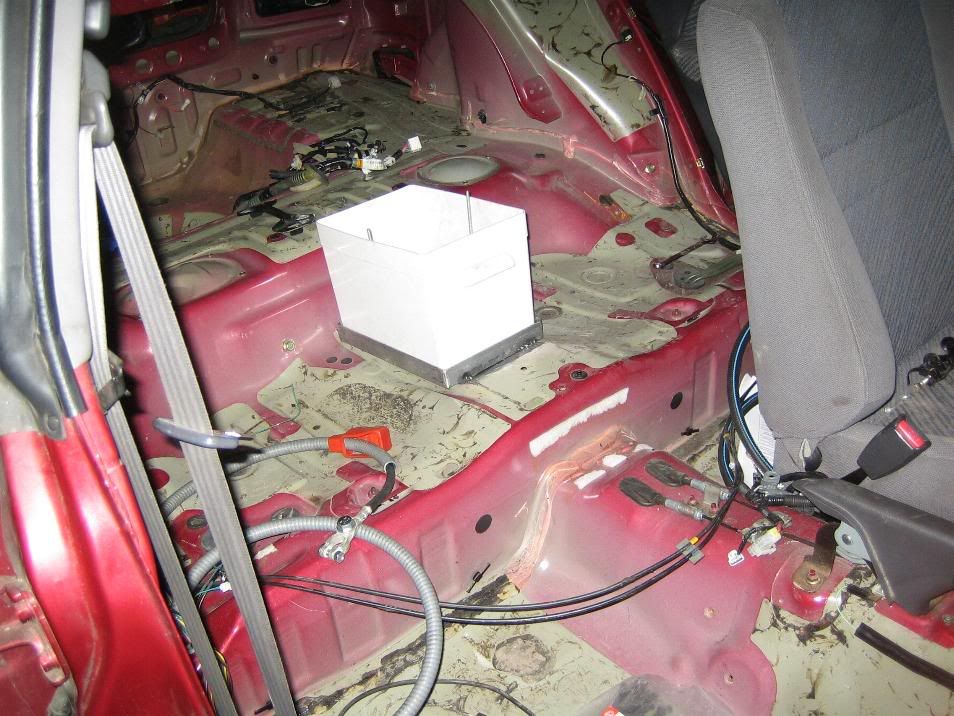
Also found a spot for the battery in the interior
I had prob with the startermotor not giving any sign of life.
But the feulpump etc was working fine.
So i checked the wirediagrams and noticed a clutch sensor somewhere in there.
I have a USDM loom, and the US spec has a built in safety feature.
You have to engage the clutchpedal before you can start the engine, to prevent a bunnyhop.
Luckily i had all the original pedals and found that right sensor.
So i clicked it in and presto!!
Put the engine on oilpressure first and then i put the spark plugs back in and it started first time round!!!
YEEEHAAA!!!!
Fixed the fenders today and reworked the bumper to fit.
Also found a spot for the battery in the interior