Oil Change Guide
 17 March 2010, 01:20 AM
#1
I hope some of you will find this useful.
If I miss anything - please post and I'll update the guide.
This is only a document of what I did and I take no responsibility for any damage you do to your vehicle as a result of following these instructions!
If in doubt, let a garage do it for you!
Right, so here's what you'll need:
- A socket set
- Axle Stands
- Jack / Trolley Jack
- Wheel chocks
- New Subaru Oil Filter and crush washer
- 4.5 Litres of Good quality engine Oil, Silkolene / Millers etc. Probably 10W40 or 10W50 for the UK (taken from a post by Sharkman in drivetrain forum)
- Optional - Oil filter grips and torque wrench
I bought the oil, filter and washer from Scoobyparts for just under �60.
I also bought a new magnetic oil drain plug from Motorsport Developments (as advertised on Scoobynet) but this is obviously an optional extra.
Some members use a flushing additive (e.g. Wurths (thanks Scooby Hoo)) added to a warm engine, allowed to tick over for at least 15-20 minutes prior to the old oil being drained.
Other members (Mick & Splitpin) don't advocate use of this due to the contaminants the flush may loosen and leave floating around in the engine bay. For this reason, I'm leaving this as a personal preference - I didn't use it for my oil change.
To start, ideally you want the car on a flat surface.
Note that I didn't have that luxury; mine was on a slope facing downhill.
Chock the rear wheels..(note that if the car's on the flat you would probably want the chocks behind the wheels not in front; in this case they're in front of the wheels because my car was facing downhill)
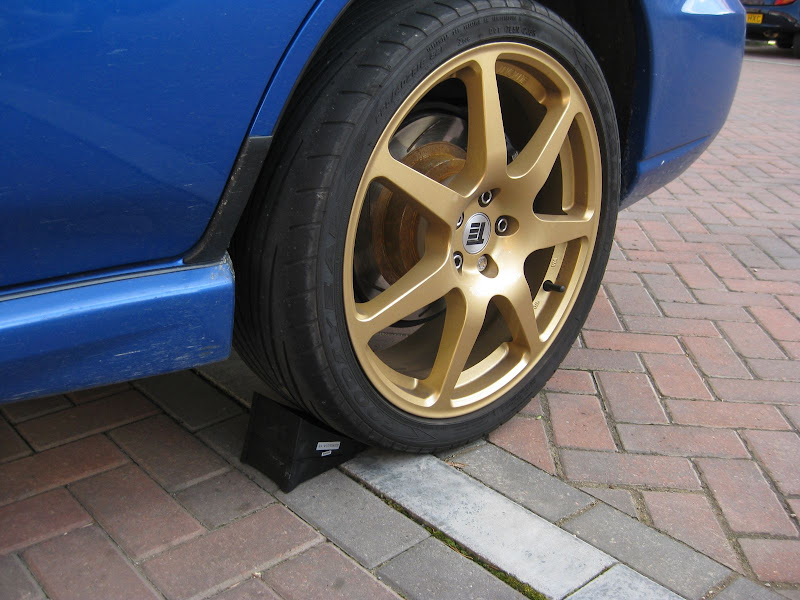
...then jack up the front of the car and support on axle stands:

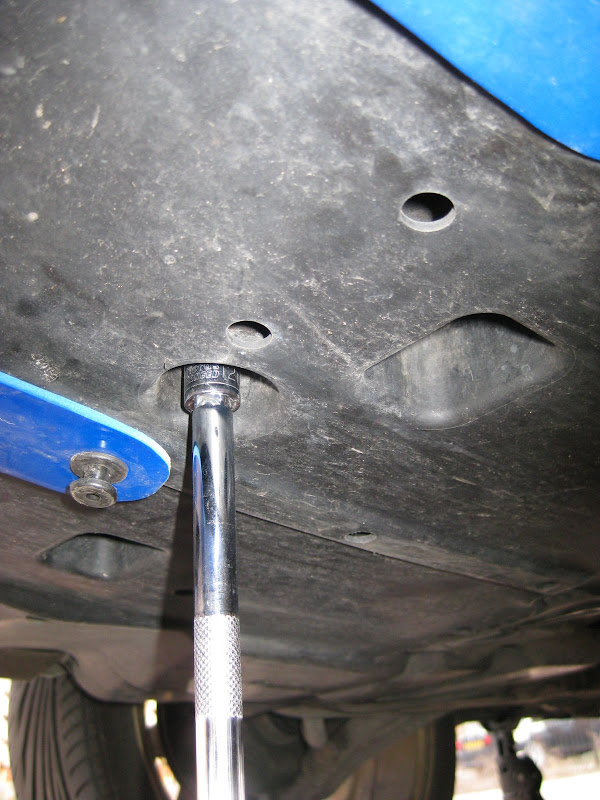
Using a 12mm socket, remove the 5 bolts for the plastic cover that sits underneath the engine, and then the 2 plastic plugs on either wheel arch. Your car may have more plastic plugs than mine; I imagine they disappear over the years! Unfortunately, whilst the plastic cover incorporates a cover to remove the oil drain plug, it doesn't include a cover to remove the filter!!


If you're really fussy you can also use this time to note / replace any other missing plastic clips.
You should now have access to the oil drain plug and filter.
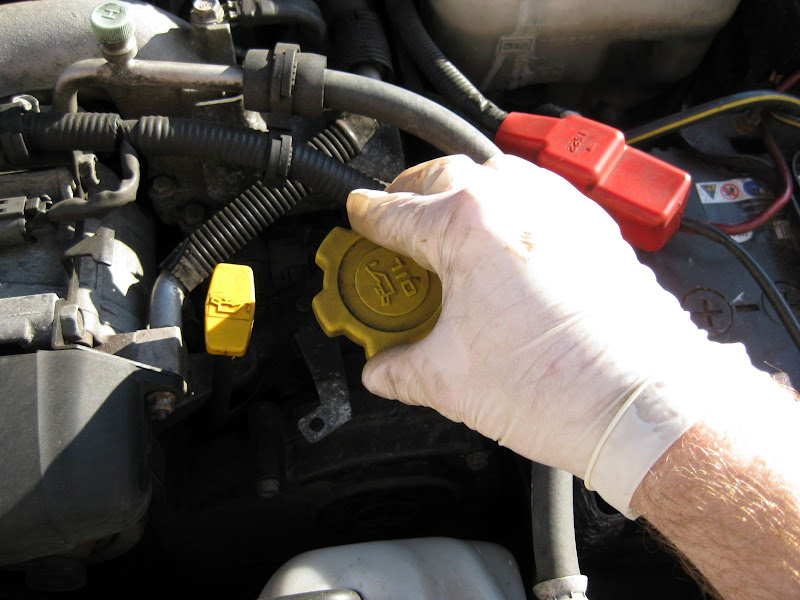
The next step is to remove the oil filler cap to allow quicker drainage; so
unscrew it and place it somewhere safe.
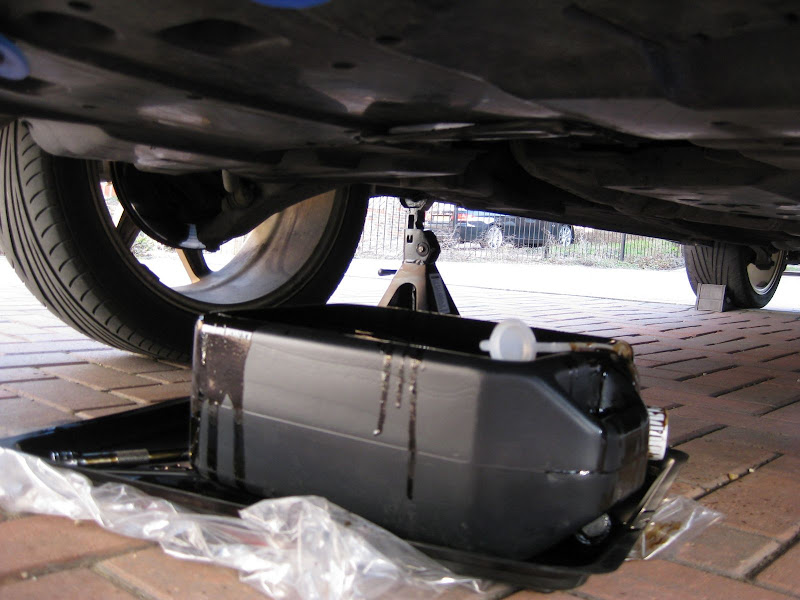
Now place your oil tray / catch under the car (Edit - I've since bought a larger oil pan which made life much easier!)
If you have some plastic sheeting or anything else to catch any spilt oil, get it into place now. I used a tray and an oil change can from Halfrauds for about �10 in total but you can probably buy better - still managed to have a
few accidental spills! Toolstation or similar do decent oil pans for less than a fiver.
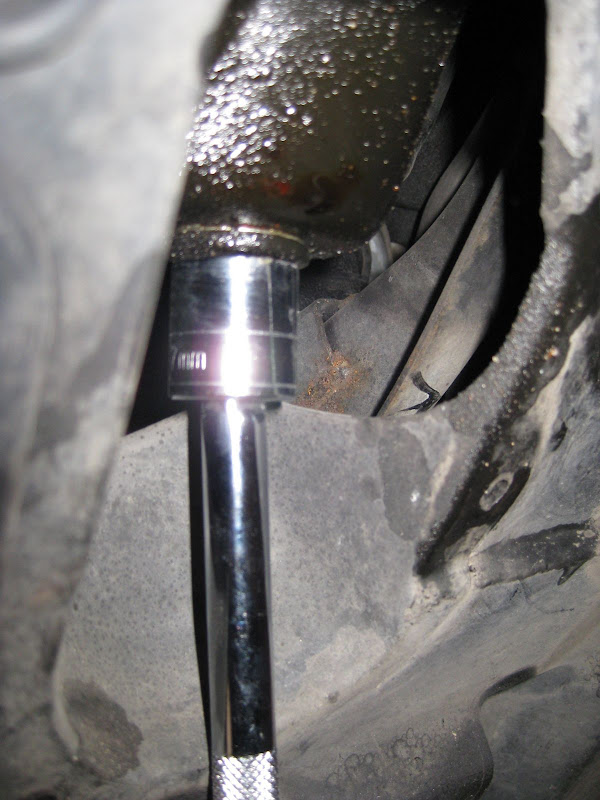
Once it's in place, it's time for the oil drain plug to come out.
Using a 17mm socket, remove the plug carefully and try and withdraw it by hand rather than dropping it into the tray if you're planning to re-use it.

Now just let the oil drain out....
Once this has finished, you may need to reposition the catch tray slightly below the oil filter as this will have to come off next.
If you're lucky you'll be able to undo the filter by hand. If not, it's time for the oil filter removal grips (or if you don't have any you'll have to bang a screwdriver through it (carefully!) to loosen it).
I had to use the grips to get mine off.

Once loose, unscrew the filter by hand and remove, positioning the tray to catch the oil that will drip out.


Once the oil finishes dripping out, it's time to replace the drain plug (or use the new one if you go for a magnetic item).
Take the new crush washer, and place it over the plug with the thinner edge facing the sump as shown:
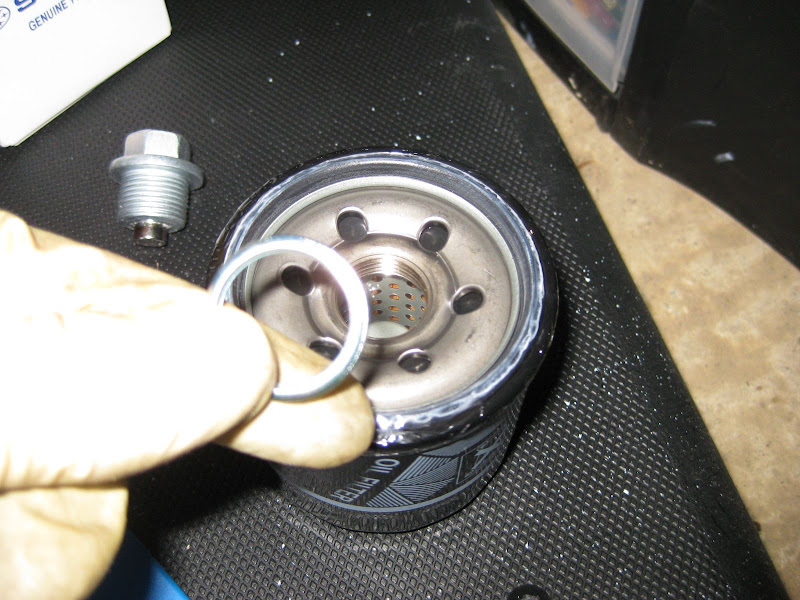

Then replace the plug in the sump; be careful not to overtighten - the fit should be tight but not thread snapping tight!
OR If you have a torque wrench, tighten the plug to 44Nm (Thanks Mick )
)

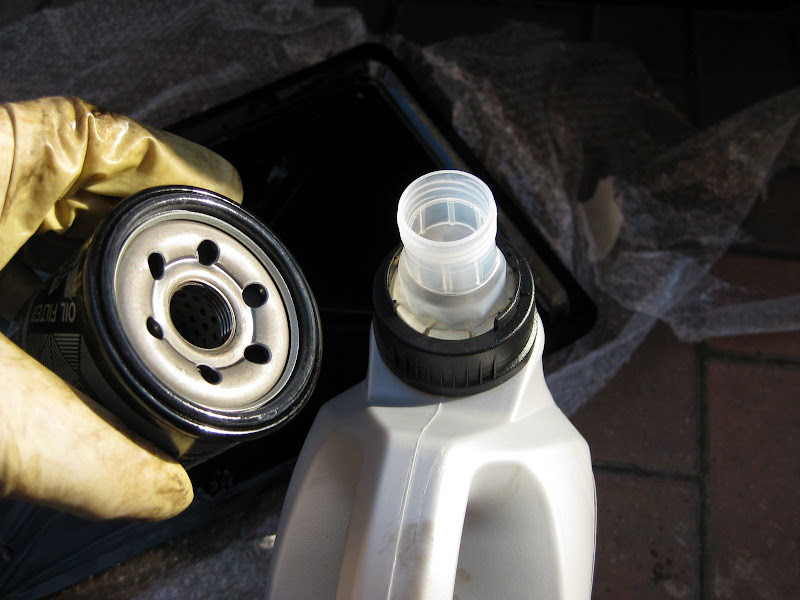
Next, fit the new filter. Take your Subaru filter and remove the plastic packaging...

...smear the new filter's seal with some new oil, then top the filter full of the oil you're using.
Note that the filter will take more oil than you may expect it to, so top it up, wait for it to be absorbed, and then keep topping up it stops bubbling and the level remains constant.
I seem to recall it took between 4-5 top ups before it was finally "full".

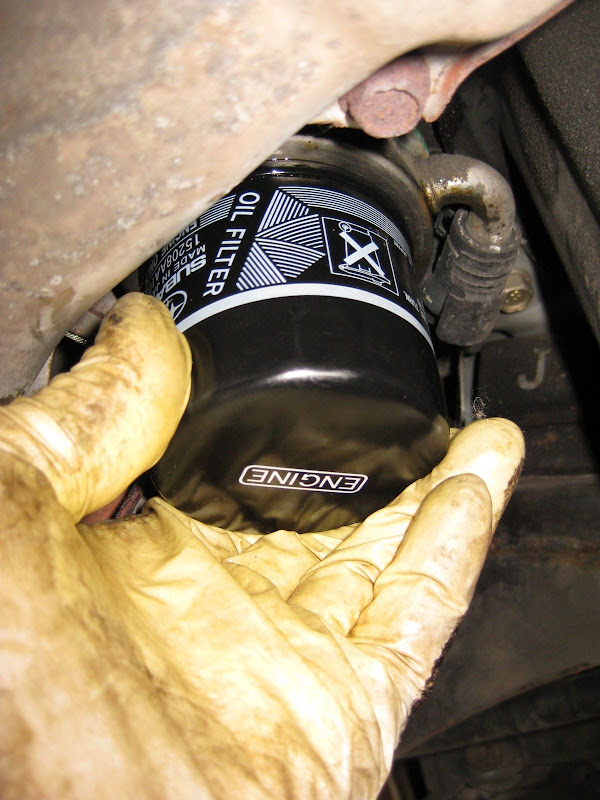
...then screw it into place by hand. Tighten as much as you can go BY HAND.
This should be sufficient to fit the filter.
Now it's just a case of refilling the engine with oil:

I added 3 litres and then left it to settle for 10 minutes before running the engine for 2 minutes, leaving for another 10 and then topping up as per the dipstick. The official filling capacity (according to Graham Goode Racing) is 4.5 litres.
You should then reach under the alternator and undo the crank sensor, shown here (it's fairly simple to spot and access):
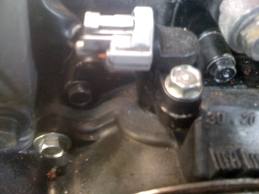
If you have difficulty reaching it you can unbolt the alternator etc but I had no issues.
Once you've topped up the oil and disconnected the sensor, crank the engine until the oil warning light goes out (cheers Simon AKA Jolly Green Monster).
The engine warning light will probably come on too but once you've restarted the car 3 times it will go out without the need to remove the fault code with a reader (thanks to Splitpin for this info).
Once you're happy that there are no leaks, clear all your tools, replace the oil filler cap, refit the engine cover (if you want - or bin it if you're not fussed) and then get the car back on the ground and take it for a test drive.
Providing there are no leaks when you get back you should be done.
If I miss anything - please post and I'll update the guide.
This is only a document of what I did and I take no responsibility for any damage you do to your vehicle as a result of following these instructions!
If in doubt, let a garage do it for you!
Right, so here's what you'll need:
- A socket set
- Axle Stands
- Jack / Trolley Jack
- Wheel chocks
- New Subaru Oil Filter and crush washer
- 4.5 Litres of Good quality engine Oil, Silkolene / Millers etc. Probably 10W40 or 10W50 for the UK (taken from a post by Sharkman in drivetrain forum)
- Optional - Oil filter grips and torque wrench
I bought the oil, filter and washer from Scoobyparts for just under �60.
I also bought a new magnetic oil drain plug from Motorsport Developments (as advertised on Scoobynet) but this is obviously an optional extra.
Some members use a flushing additive (e.g. Wurths (thanks Scooby Hoo)) added to a warm engine, allowed to tick over for at least 15-20 minutes prior to the old oil being drained.
Other members (Mick & Splitpin) don't advocate use of this due to the contaminants the flush may loosen and leave floating around in the engine bay. For this reason, I'm leaving this as a personal preference - I didn't use it for my oil change.
To start, ideally you want the car on a flat surface.
Note that I didn't have that luxury; mine was on a slope facing downhill.
Chock the rear wheels..(note that if the car's on the flat you would probably want the chocks behind the wheels not in front; in this case they're in front of the wheels because my car was facing downhill)
...then jack up the front of the car and support on axle stands:
Using a 12mm socket, remove the 5 bolts for the plastic cover that sits underneath the engine, and then the 2 plastic plugs on either wheel arch. Your car may have more plastic plugs than mine; I imagine they disappear over the years! Unfortunately, whilst the plastic cover incorporates a cover to remove the oil drain plug, it doesn't include a cover to remove the filter!!
If you're really fussy you can also use this time to note / replace any other missing plastic clips.
You should now have access to the oil drain plug and filter.
The next step is to remove the oil filler cap to allow quicker drainage; so
unscrew it and place it somewhere safe.
Now place your oil tray / catch under the car (Edit - I've since bought a larger oil pan which made life much easier!)
If you have some plastic sheeting or anything else to catch any spilt oil, get it into place now. I used a tray and an oil change can from Halfrauds for about �10 in total but you can probably buy better - still managed to have a
few accidental spills! Toolstation or similar do decent oil pans for less than a fiver.
Once it's in place, it's time for the oil drain plug to come out.
Using a 17mm socket, remove the plug carefully and try and withdraw it by hand rather than dropping it into the tray if you're planning to re-use it.
Now just let the oil drain out....
Once this has finished, you may need to reposition the catch tray slightly below the oil filter as this will have to come off next.
If you're lucky you'll be able to undo the filter by hand. If not, it's time for the oil filter removal grips (or if you don't have any you'll have to bang a screwdriver through it (carefully!) to loosen it).
I had to use the grips to get mine off.
Once loose, unscrew the filter by hand and remove, positioning the tray to catch the oil that will drip out.
Once the oil finishes dripping out, it's time to replace the drain plug (or use the new one if you go for a magnetic item).
Take the new crush washer, and place it over the plug with the thinner edge facing the sump as shown:
Then replace the plug in the sump; be careful not to overtighten - the fit should be tight but not thread snapping tight!
OR If you have a torque wrench, tighten the plug to 44Nm (Thanks Mick
)Next, fit the new filter. Take your Subaru filter and remove the plastic packaging...
...smear the new filter's seal with some new oil, then top the filter full of the oil you're using.
Note that the filter will take more oil than you may expect it to, so top it up, wait for it to be absorbed, and then keep topping up it stops bubbling and the level remains constant.
I seem to recall it took between 4-5 top ups before it was finally "full".
...then screw it into place by hand. Tighten as much as you can go BY HAND.
This should be sufficient to fit the filter.
Now it's just a case of refilling the engine with oil:
I added 3 litres and then left it to settle for 10 minutes before running the engine for 2 minutes, leaving for another 10 and then topping up as per the dipstick. The official filling capacity (according to Graham Goode Racing) is 4.5 litres.
You should then reach under the alternator and undo the crank sensor, shown here (it's fairly simple to spot and access):
If you have difficulty reaching it you can unbolt the alternator etc but I had no issues.
Once you've topped up the oil and disconnected the sensor, crank the engine until the oil warning light goes out (cheers Simon AKA Jolly Green Monster
).The engine warning light will probably come on too but once you've restarted the car 3 times it will go out without the need to remove the fault code with a reader (thanks to Splitpin for this info).
Once you're happy that there are no leaks, clear all your tools, replace the oil filler cap, refit the engine cover (if you want - or bin it if you're not fussed) and then get the car back on the ground and take it for a test drive.
Providing there are no leaks when you get back you should be done.
Last edited by MrNoisy; 27 February 2012 at 01:25 PM. Reason: Updated with more helpful material

 17 March 2010, 05:15 AM
#3
Scooby Regular

Join Date: Jan 2006
Posts: 3,695
Likes: 0
Received 0 Likes
on
0 Posts
Hmmmm, good attempt, but incomplete. Dude, without wanting to sound too disparaging, this is a subject that has been covered plenty times before, both more completely and succinctly than this. Was there really a need to have another go?
It works as far as it goes but I'm not sure where you think the crank position sensor is. It couldn't be much easier to locate and disconnect - are you sure you're looking in the right place (i.e. underneath the alternator, just behind the timing belt cover)?
You've also forgotten about/failed to mention filling the new filter up with oil prior to fitting it. That's a pretty major omission - and it's difficult to understand how you can be around here as long as you've been and not have heard about it!
17 March 2010, 09:32 AM
#4
Scooby Regular
iTrader: (2)
Join Date: Jul 2005
Location: maidstone kent
Posts: 283
Likes: 0
Received 0 Likes
on
0 Posts
It works as far as it goes but I'm not sure where you think the crank position sensor is. It couldn't be much easier to locate and disconnect - are you sure you're looking in the right place (i.e. underneath the alternator, just behind the timing belt cover)?
You've also forgotten about/failed to mention filling the new filter up with oil prior to fitting it. That's a pretty major omission - and it's difficult to understand how you can be around here as long as you've been and not have heard about it!
Disconnection the CP sensor is a personal preference and dosnt really need to be documented.
Also I can clearly see he mentions filling up the filter, so look again. and his posted was edited before you wrote yours so thats not an excuse.
17 March 2010, 11:11 AM
#5
Scooby Regular
iTrader: (5)

Join Date: Sep 2005
Location: St Albans, Hertfordshire
Posts: 158
Likes: 0
Received 0 Likes
on
0 Posts
Good job with the pics.
Another tip from me...don't try it on a windy day, when the flow slows down it blows all over the frickin place, I learnt the hard way.
Another tip from me...don't try it on a windy day, when the flow slows down it blows all over the frickin place, I learnt the hard way.
18 March 2010, 08:22 AM
#6
Hmmmm, good attempt, but incomplete. Dude, without wanting to sound too disparaging, this is a subject that has been covered plenty times before, both more completely and succinctly than this. Was there really a need to have another go?
It works as far as it goes but I'm not sure where you think the crank position sensor is. It couldn't be much easier to locate and disconnect - are you sure you're looking in the right place (i.e. underneath the alternator, just behind the timing belt cover)?
You've also forgotten about/failed to mention filling the new filter up with oil prior to fitting it. That's a pretty major omission - and it's difficult to understand how you can be around here as long as you've been and not have heard about it!
It works as far as it goes but I'm not sure where you think the crank position sensor is. It couldn't be much easier to locate and disconnect - are you sure you're looking in the right place (i.e. underneath the alternator, just behind the timing belt cover)?
You've also forgotten about/failed to mention filling the new filter up with oil prior to fitting it. That's a pretty major omission - and it's difficult to understand how you can be around here as long as you've been and not have heard about it!
perhaps you could offer some assistance in fleshing it out to your higher standard instead??
And btw I did mention filling the filter with oil if u read it; there's even a pic of the filter with the oil can; sorry, I didn't take the pic whilst pouring it!
The crank sensor - I could see it, but the area appeared too cramped to me to get my fingers in and disconnect it. How do u do it without removing other parts?
Last edited by MrNoisy; 18 March 2010 at 08:25 AM.
18 March 2010, 08:53 AM
#7

Well I think you done OK Bugeye_Scoob.
I also like to use a GOOD quality flushing additive added to a warm engine, which is allowed to tick over for at least 15-20 minutes prior to the old oil being drained.
Just need you to do a write up on "Changing the gearbox and diff oils"
Surprised that you weren't criticized for using the "WRONG" oil ??????? LOL
Trending Topics
18 March 2010, 11:36 AM
#8

And btw I did mention filling the filter with oil if u read it; there's even a pic of the filter with the oil can; sorry, I didn't take the pic whilst pouring it!
The crank sensor - I could see it, but the area appeared too cramped to me to get my fingers in and disconnect it. How do u do it without removing other parts?
The crank sensor - I could see it, but the area appeared too cramped to me to get my fingers in and disconnect it. How do u do it without removing other parts?
Access to the crank sensor is made a little easier by unbolting the alt. belt cover and swinging it out of the way.
Well done, mate
JohnD
18 March 2010, 12:13 PM
#9
Well I think you done OK Bugeye_Scoob.
I also like to use a GOOD quality flushing additive added to a warm engine, which is allowed to tick over for at least 15-20 minutes prior to the old oil being drained.
Just need you to do a write up on "Changing the gearbox and diff oils"
Surprised that you weren't criticized for using the "WRONG" oil ??????? LOL
I also like to use a GOOD quality flushing additive added to a warm engine, which is allowed to tick over for at least 15-20 minutes prior to the old oil being drained.
Just need you to do a write up on "Changing the gearbox and diff oils"
Surprised that you weren't criticized for using the "WRONG" oil ??????? LOL
Good attempt at a picture guide to the job. And I saw the 'fill filter' bit although it should be emphasised that it takes a few goes at getting the filter completely filled as the oil soakes from the inner to outer part through the filter material.
Access to the crank sensor is made a little easier by unbolting the alt. belt cover and swinging it out of the way.
Well done, mate
JohnD
Access to the crank sensor is made a little easier by unbolting the alt. belt cover and swinging it out of the way.
Well done, mate
JohnD
Scooby Hoo - care to recommend a flush?
John D - re the filter taking a lot of oil - tell me about it mate - I was amazed how much that little filter soaked up before it was full!
The crank sensor I thought would still be a bugger to get to even if I did unbolt that cover - maybe I just have big hands
 18 March 2010, 03:26 PM
#10
Scooby Regular
Join Date: Jan 2006
Posts: 3,695
Likes: 0
Received 0 Likes
on
0 Posts
And btw I did mention filling the filter with oil if u read it; there's even a pic of the filter with the oil can; sorry, I didn't take the pic whilst pouring it!
As has already been said and you've acknowledged, merely filling the filter up to the top and fitting it immediately, as your photo story suggested, will only result in it being about a quarter full once the medium has absorbed your first pour. As you acknowledge in one of your later posts, it takes a while to properly fill the filter - and in this respect your original write-up doesn't cover it properly.
If I'm doing this the first thing I do, before even touching the car, is to take the new filter out of the packet and put a first pour in it. That way you can go back and top it up a couple of times as you're doing the earlier parts of the job, so that by the time you're ready to put it on, it's well and truly saturated and genuinely full.
The crank sensor - I could see it, but the area appeared too cramped to me to get my fingers in and disconnect it. How do u do it without removing other parts?
Engine flush is a majorly bad idea on these engines and should not be in any way necessary when the oil and filter are changed at appropriate intervals.
Incidentally, while someone joked earlier about you recommending the wrong oil, 10w/60 is too thick for these cars under most circumstances.
18 March 2010, 04:21 PM
#11
I've assisted more than a few people around here, on this subject as well as others. You'll have to ask the mods what threads go in the technical archive and what don't.
Yes, I caught the reference to "topping" the filter the second time I read it. Thing that doesn't help is that it's accompanied by a photo of an empty filter.
As has already been said and you've acknowledged, merely filling the filter up to the top and fitting it immediately, as your photo story suggested, will only result in it being about a quarter full once the medium has absorbed your first pour. As you acknowledge in one of your later posts, it takes a while to properly fill the filter - and in this respect your original write-up doesn't cover it properly.
If I'm doing this the first thing I do, before even touching the car, is to take the new filter out of the packet and put a first pour in it. That way you can go back and top it up a couple of times as you're doing the earlier parts of the job, so that by the time you're ready to put it on, it's well and truly saturated and genuinely full.
There's plenty enough space to reach in and pull it off with your finger and thumb. Unless you have the hands of an England goalkeeper of course.
Engine flush is a majorly bad idea on these engines and should not be in any way necessary when the oil and filter are changed at appropriate intervals.
Incidentally, while someone joked earlier about you recommending the wrong oil, 10w/60 is too thick for these cars under most circumstances.
Thanks for your comments - happy to add them if you let me know where you think it needs updating. That's why I invited everyone to comment in the 1st instance.
The oil thing - fair enough - note I've updated the write up to include a red section to detail that point. I'll see if I can find another pic to complement it.
I honestly could not get my hands in to disconnect that sensor - I reckon I must have fat fingers - it was easily visible but no way could I disconnect it easily without having a better grip on it and the clearance didn't allow for that.
In terms of 10w60, I picked the same oil Greenwood Racing use in their servicing. What would you recommend then? 5w30?
18 March 2010, 05:07 PM
#12
Scooby Regular

Join Date: Nov 2004
Posts: 825
Likes: 0
Received 0 Likes
on
0 Posts
Good guide, thanks for taking the trouble to put it together.
Oil choice is a personal thing, I also use Millers 10 60 but I am running a pretty highly modified 2.5 with forged internals, Millers now do a 10 50 which may be better suited to more standard engines.
This subject has indeed been covered before, I will always remember a guide written many years ago by PS Lewis which involved dancing around the car with little bells on your shoes like morris dancers while the oil drains out.
19 March 2010, 09:51 AM
#14
I would be very interested to know on what information you have based your comment. Perhaps you can post up the link to Subaru's relevant report detailing why it is not recommended.
As you correctly piont out the oil/filters should be changed at the manufactures recommended intervals. Which I'm sure most that read this do to the mile or before.

Subaru also advise that all work should be carried out by your local "Subaru Dealer"
 20 March 2010, 02:41 PM
#15
Scooby Regular

Join Date: May 2009
Posts: 107
Likes: 0
Received 0 Likes
on
0 Posts
Thanks for the guide, Im using this to change my oil on my 03 wrx tomorrow .... just wanted to check the cam sensor i gotta remove is under the alternator and i just unclip it


Thank you
Edit: Sorry for the big photos


Thank you
Edit: Sorry for the big photos
20 March 2010, 03:03 PM
#17
Scooby Regular
iTrader: (40)
Join Date: Sep 2007
Location: Marlow, Bucks.
Posts: 6,106
Likes: 0
Received 0 Likes
on
0 Posts
Cheers bud, nice write up.
Splitpin, if you can see so many errors, why dont YOU write the fricking thing, and while you are at it do one for gearbox and diff oils.
The OP didnt need to take pics at every stage of his oil change, how many on here do for the good of others, so good on him for doing so.
Splitpin, if you can see so many errors, why dont YOU write the fricking thing, and while you are at it do one for gearbox and diff oils.
The OP didnt need to take pics at every stage of his oil change, how many on here do for the good of others, so good on him for doing so.
20 March 2010, 03:40 PM
#18
Scooby Regular
Join Date: Jan 2006
Posts: 3,695
Likes: 0
Received 0 Likes
on
0 Posts
It's worse again for those who don't pull the crank sensor as it means that the first restart will not only occur with the oil system containing a significant quantity of air, it also means that whatever oil's left in the bearings will be compromised by the presence of the flush.
Perhaps you can post up the link to Subaru's relevant report detailing why it is not recommended.
As you correctly piont out the oil/filters should be changed at the manufactures recommended intervals.
Subaru also advise that all work should be carried out by your local "Subaru Dealer"
Having been there and done that, as it were, I'm well aware that part of the reason threads like this have limited value is that they eventually drift off the first page and get forgotten about, until someone else has the bright idea of posting one and the whole process repeats. It therefore follows that, just like this case, others with experience and opinions to add will do so.
20 March 2010, 03:44 PM
#19
Have to agree with Splitpin on the engine flush - it is designed to loosen the tarnish/carbon partical's and suspend it in the oil until it is drained out.
I would not want contaminates circulating around my bearing journals and shells even for a short period of time
If you own a torque wrench, then you can torque the sump drain plug up
to 44Nm with a new washer.
Mick
I would not want contaminates circulating around my bearing journals and shells even for a short period of time
If you own a torque wrench, then you can torque the sump drain plug up
to 44Nm with a new washer.
Mick
20 March 2010, 03:49 PM
#20
Scooby Regular
iTrader: (40)
Join Date: Sep 2007
Location: Marlow, Bucks.
Posts: 6,106
Likes: 0
Received 0 Likes
on
0 Posts
Hold on buddy, you just commented that "You'll have to ask the mods what threads go in the technical archive and what don't. ". If you expect me to extensively rifle through your extensive posting history, then you obviously have more time on your hands than me.
There is a difference between adding to the guide, as others above have and (although you commented you didnt want to sound too disparaging) just being disparaging.
I would appreciate it, as many others would, if you could add to the guide so that it is a full and accurate report. I, being a bit of a biff when it comes to much on my car, would find your experience and knowledge invaluable.
(P.S. I will endeavour to flick through your posts to get some tips, and will add them to my bookmarks.)
 20 March 2010, 04:10 PM
#22
Scooby Regular
Join Date: Jan 2006
Posts: 3,695
Likes: 0
Received 0 Likes
on
0 Posts
If you don't have enough "time on your hands" to check whether criticisms you make of other posters are justified prior to making them, or indeed when the inaccuracy of your criticism is pointed out, keep it to yourself.
There is a difference between adding to the guide, as others above have and (although you commented you didnt want to sound too disparaging) just being disparaging.
I would appreciate it, as many others would, if you could add to the guide so that it is a full and accurate report.
It's entirely up to the OP whether he wants to amend the guide as a result of input from any of us. Not like I can dive in and edit it for him.
20 March 2010, 04:27 PM
#23
Scooby Regular

Join Date: Nov 2006
Location: Manchester
Posts: 471
Likes: 0
Received 0 Likes
on
0 Posts
WoW i cant believe ive just read all these replys to something as simple as an oil and filter change. You guys worry too much.
crank sensor off ? im sure every garage recommends that lol - i have never even replaced the sump washer and or bolt if it aint broke dont fix.
guess lifes to short to worry for me, i like things simple for my simple mind
crank sensor off ? im sure every garage recommends that lol - i have never even replaced the sump washer and or bolt if it aint broke dont fix.
guess lifes to short to worry for me, i like things simple for my simple mind
 22 March 2010, 11:07 AM
#28
WoW i cant believe ive just read all these replys to something as simple as an oil and filter change. You guys worry too much.
crank sensor off ? im sure every garage recommends that lol - i have never even replaced the sump washer and or bolt if it aint broke dont fix.
guess lifes to short to worry for me, i like things simple for my simple mind
crank sensor off ? im sure every garage recommends that lol - i have never even replaced the sump washer and or bolt if it aint broke dont fix.
guess lifes to short to worry for me, i like things simple for my simple mind
Crush washer I believe should be replaced generally to avoid leaks more than anything else.
24 March 2010, 01:01 PM
#29
Scooby Regular
Join Date: May 2009
Posts: 107
Likes: 0
Received 0 Likes
on
0 Posts
Done the oil change (Sunday) .. all is good so far .. the main bit which was anoying was undoing the under tray ... never had any ramps so was a bit awkward! Specially the clips on the back !!!
One thing to mention is that when undoing the Crank Sensor and turning it over ... the ecu throws up a code (engine light comes on) but lucky i had purchased a code reader off ebay which can delete them (it cost me �50 at subaru last time to check and delete a code) !!!
It was quite difficult .. i have long boney fingers lol ... come at it from the right side between the alternator belt
One thing to mention is that when undoing the Crank Sensor and turning it over ... the ecu throws up a code (engine light comes on) but lucky i had purchased a code reader off ebay which can delete them (it cost me �50 at subaru last time to check and delete a code) !!!
Last edited by Mr. WRX; 24 March 2010 at 01:02 PM.
24 March 2010, 01:28 PM
#30
Scooby Regular
Join Date: Jan 2006
Posts: 3,695
Likes: 0
Received 0 Likes
on
0 Posts
Some members (cheers Scooby Hoo) have advised you can use a good quality flushing additive added to a warm engine, allowed to tick over for at least 15-20 minutes prior to the old oil being drained. I didn't do that in this case but it's probably not bad advice - if anyone wants to recommend one I'll stick it in here.