STI V6 Silver New Arrival
 04 January 2013, 01:54 PM
#31
Yeah she run's as sweet as a nut. Will get better photo's today for you. Also with the new alloy's fitted.
Still using her everyday and not a squek wrong.
Im using tesco momentum 99 at the moment as shell was all out of vpower and i was low. Hasnt picked up any knock or limp mode.
So all seem's well
Still using her everyday and not a squek wrong.
Im using tesco momentum 99 at the moment as shell was all out of vpower and i was low. Hasnt picked up any knock or limp mode.
So all seem's well
 06 January 2013, 04:26 PM
#32
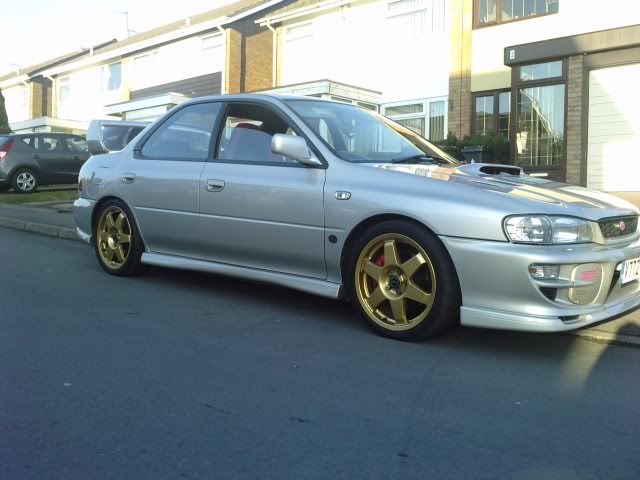
Few picture's with the new alloy's and a wash. Think it personally needs lower a tiny amount with a spitter to complete the stance.


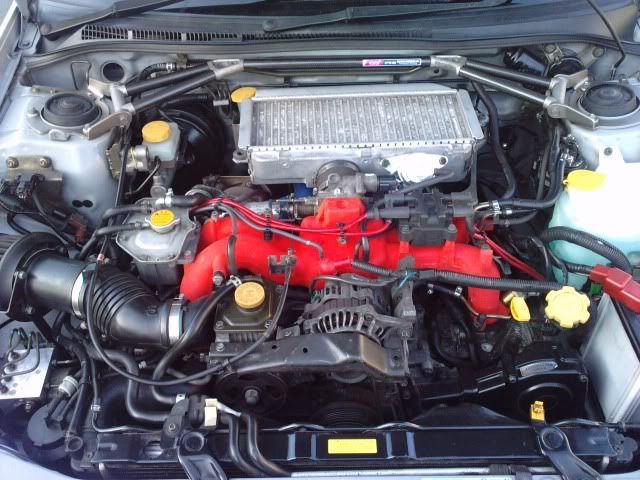
Engine bay pictures:. Note the inlet setup, few guys have asked a few question's about it.


what does everyone think?
Engine bay pictures:. Note the inlet setup, few guys have asked a few question's about it.
what does everyone think?
13 January 2013, 10:53 PM
#33
Oil and filter change booked for Tuesday !! boost.
Arches and roof im getting a quote for to get the little bit of rust bubbling sorted in Inverurie tomorrow.
Few questions for those in the know:
1) 10W 50 Oil for winter or 10 W 40 for cold start protection
2) Best clutch to go for given the above spec for normal use/fast road. No launches or quick shifting.
3) Engine bay cleaning, Cover the alternator,spark plus and coil's,inlet and boost solenoid. What else should i cover up? Degreasing and a scrub followed by a power wash to properly remove any ****? ..or is this a no no?
4) Woud Andy Forest or such like be able to come up and check the map on the car and remap if need be. Originally done by Bob Rawle. Will change to a 3 port boost solenoid and large fuel pump first.
Thanks for everyones time
02 March 2013, 11:28 PM
#34
Well with the standard "Ad-Zest" speakers giving up the ghost in the front and rear shelf at the same time i decided to upgrade
Vibe Space 6 inch components for the front
Vibe Blackair 5 Inch for the rear door's. Needs wiring from the Iso Lead in the headunit to the rear door's plumbing in but that is simple enough.
Vibe Space 6 inch's for the rear parcel shelf.
Separate tweeter's for the front and rear door's. To be wired from the speakers.
Fli 450s 2 channel amp for the frontspeakers or 6*9's(havent decided yet)
Parrot ck3100 LCD for handsfree calls
Fit all this sort of stuff for a living, So easily done and it's a good combination for a good audio set up. Best of all i got it all for free, Stock clearance and "Damages" wink wink.
14 March 2013, 12:50 AM
#35
Oil has been changed, Coolant replaced. Top radiator hose replaced.
fully clay bar'd and polished,sealant and wax applied a few week's ago as well
Bought some EBC redstuff pads, Vibe blackair front 6 inch speakers , vibe blackair rear 6x9's with spacer's.
Yazrb320 gave me these Rallyarmour mudflaps as well. Also receieved the new 3 piece front splitter as well.
Trip to Kintore autobody as well ha given me a quote of undersealing the rear arch's. and also sorting the bit of surface rust that has started to show on the rear arches. �400 all in .
Just chasing up some new front and rear discs and i can finally make a start on the suspension removal and refresh
26 March 2013, 01:25 AM
#36
That's the scoob of the road for a while now. Suspension shall all be coming off.
Progress today so far: Fitted all new speaker's in the front and rear parcel shelf. Just need the spacer's in the rear parcel shelf carpeted and that's the interior done for now.
Wheels removed and checked for buckles and damage but all seem's okay. not the source of the annoying rattle/vibration in the steering wheel when over 45 mph.
Tomorrow ill be removing the front and rear bumpers to check the bars and give them a lick of paint.On the never ending rust hunt. Remove the exhaust as well to give it a polish up.
Thankfully a friend of mine who works as a gearbox repairer is taking the gearbox and rear diff and checking the inside's for damage and replacing the oil's for me ( Millers 75/90 motorsport in the gearbox. 80/90 in the rear differential)
Will get pictures tomorrow. and hopefully so good progress.
26 March 2013, 06:00 PM
#37
Few pictures to update.
Gave the front passenger arch a good clean and degreasing ready for it to be stripped down and painted.
Will be doing one corner at a time. Both the fronts to do.. Ordered 2 new ARB bushes today. Also some clear Schultz to finish off the arches. New discs and pads. Paint and clean the calipers, new brake fluid. Then re-assemble
Also managed to give the rear spolier and bootlid a clean up ( washed, Meguirs paint cleaner,Autoglym super resin polish, Poorboys EXP sealant)
Favourite of the day was giving the engine bay a quick degrease and a power wash.
Removed the cone filter and maf, Blocked the inlet.Covered the alternator all round. Battery terminals covered. Remove the 3 port solenoi assembly ( 3 bolts ) Bagged it all up with the MAF and inlet temp sensor's.Remove the battery
Used meguirs degreaser with a brush and agitated it in. did half the engine bay, power washed. then did the other half.
Ran the engine for 10 minutes to help it dry, then used some protectant on the pipe's to give them a nicer finish. Not the best but happy with the amount of crap that came off.
Engine before cleaning and areas covered or removed:
( i blocked the inlet after this photo)

Afterwards:


Under the passenger front arch:


Alloy cleaned up and tyre dressed. Shows how much the need refurbished!!

And the back end after a bit of spit and polish :P


Gave the front passenger arch a good clean and degreasing ready for it to be stripped down and painted.
Will be doing one corner at a time. Both the fronts to do.. Ordered 2 new ARB bushes today. Also some clear Schultz to finish off the arches. New discs and pads. Paint and clean the calipers, new brake fluid. Then re-assemble
Also managed to give the rear spolier and bootlid a clean up ( washed, Meguirs paint cleaner,Autoglym super resin polish, Poorboys EXP sealant)
Favourite of the day was giving the engine bay a quick degrease and a power wash.
Removed the cone filter and maf, Blocked the inlet.Covered the alternator all round. Battery terminals covered. Remove the 3 port solenoi assembly ( 3 bolts ) Bagged it all up with the MAF and inlet temp sensor's.Remove the battery
Used meguirs degreaser with a brush and agitated it in. did half the engine bay, power washed. then did the other half.
Ran the engine for 10 minutes to help it dry, then used some protectant on the pipe's to give them a nicer finish. Not the best but happy with the amount of crap that came off.
Engine before cleaning and areas covered or removed:
( i blocked the inlet after this photo)
Afterwards:
Under the passenger front arch:
Alloy cleaned up and tyre dressed. Shows how much the need refurbished!!
And the back end after a bit of spit and polish :P
29 March 2013, 02:38 AM
#38
Well bit of bad new's. Front right brake caliper has properly seized on now. Bugger. Was probable the cause of the horrible vibrations when driving above 20 mph. even without touching the brakes.
Looking up a few possible leads as to new brakes.
More bad new's
Was in the right hand lane at a roundabout (Blackburn/Clinterty roundabout) when a gritter came up next to me. As i left the roundabout,so did the gritter. . . .However the smartarse (in the left hand lane) continued all the way round to the right., Completely cutting me off and making me go round the roundabout back round to the first exit. Unfortunately the car got hammerd " Pelted big time" with grit and salt. Bodywork's got scratches all over it now and ding's all along the passenger side. The front bumper is absolute mess. Didnt catch the registration. Really pissed off and getting in touch with the council over this. Really annoyed now, Especially after it got the full detail done
13 May 2013, 12:51 AM
#39
Well thats the scoob finally off the road. Tax sent back for refund, Insurance cancelled ( Never use quote me happy ) :censored: .
Plan is to strip it out the engine bay, underneath , subframes and suspension and build it up as well as i can and uprate were i feel it's best suited.
Its going to take time and the probability of a small increase in power. But the main focus is reliability, looks and handling.
Phase 1: take everything off and label etc and check for obvious damage. Strip the underside back as far as possible for some proper under sealing and protection.
Apart from picking up the brake bits from Duncan, I dont need to splash out much to get the car threw phase 1. Mainly time and a wire wheel to get it threw this. See how she goes. Off to get some WD40, Freeze spray,spray grease and various wire wheels and seam sealer tomorrow. Also some Rust bullet and look around at what's best to go on top of that after 3 layers have been applied


 15 May 2013, 10:28 PM
#41
New front Grooved discs and kevlar pads have arrived (Thanks to Alyn@As Performance and Duncan Stephen of BHP developments) just to collect on Friday
Along with new caliper seal kit and couple of piston's in case they need replaced. Will be getting painted. Hopefully towards the end of the year ill be upgrading to improved caliper and disc combination for both the front and rear.
Next is Oil change (going to stick to Millers 10w50 CFS Motorsport for now) With genuine Subaru black filter and give the sump a clean and a lick of paint.
desperate for a KPH to MPH speedo converter that will have to wait to the end of the month.
All ready for the big day on 7th June
After that it will be in for the full stripdown


 03 June 2013, 11:22 PM
#43
Picked up new front discs and pads ( Grooved/ Vented discs and Kevlar Pads) New spark plugs,oil,genuine filter.
Also picked up a new caliper seal kit and couple new piston's to replace any dicky ones.
Brake fluid and gearbox oil and speedo converter is the last things for this month.
Remap has been delayed till July 11th ( Just gives me more time to get a few bits and bobs done)
Cleaned up the under arches now, Still to get the full underneath stripped down and cleaned up but that can wait for know.
06 June 2013, 12:51 PM
#44
Is it okay to just remove the brake lines from the caliper's and leave them to drain with the brake fluid filler cap removed for a few day's?, then bleed it threw as normal. ( will get pressure bleed at my work when it comes to mot time).
Shall i use brake fluid as lubricant for the caliper piston's when inserting them back in to the caliper. Or a tad of red rubbder grease just as good?
Also found a tiny amount of Oil in the intercooler and pipe's when i removed it. Is this normal?. no more than a tea spoon's worth..
Inlet and air hoses are going away to be copied by SWRD for a silicone hose kit as we speak, sorting with ScoobyWorx.
Apart from that ill leave it as it is, ready for mapping then i can do the rest afterward's and nearer winter time.
On a side Note, anyone doing the mapping day on 11th July, it's �360 plus split travel cost's from Simon@JGM, this is for a classic ECUTEK, full map.
11 June 2013, 02:10 PM
#45
Well finally managed to get all the piston's out, gently pushing them back in at the right angle and just fiddling around with them to limit damage.


One of the piston's. going to replace them all, slight pitting, even though im only needing the calipers to last till winter as then going to Brembo.


One of the piston's. going to replace them all, slight pitting, even though im only needing the calipers to last till winter as then going to Brembo.
 19 November 2013, 05:08 PM
#49
Well had a few hour's today to make a start on the strip down. After its mot the other month that highlighted a few bit's of corrosion that if left, would of been a expensive delay.

Managed in a short space of time to remove a few of the engine bay ancillaries, Tagged them all up. Bolts all accounted for and labelled.
The reason for the strip down:

Also give's me the room to tidy up and replace any of this wiring. Quite a heap of mess and im sure it could be better routed and a better protected.


Plan on keeping the air con, Keeps the OEM feel and you never know we might get a warm day next year.
Next up. Unbolt the turbocharger and the clutch fork and get ready to lift her out.
Shopping list for this "Stage"
1 New Twin Rad Fan
1 Newage STI TMIC
Electrical Conduit Cable
New Silicone Red Rad Hoses
New Silicone Red Boost + Vacuum Hoses
Timing Belt + Kit
Then it's on to stripping this!!

Last edited by quattroowner; 19 November 2013 at 05:14 PM.
19 November 2013, 05:34 PM
#50
Loved my old champagne silver V6 STi.
Did the same, stripped it down and cleaned it up, but when I come to sell it, I struggled big time, ended up selling it with 80k miles on the clock for �3.5k back in 2010, my advice, mint it up and keep it, as there great cars!!!
Did the same, stripped it down and cleaned it up, but when I come to sell it, I struggled big time, ended up selling it with 80k miles on the clock for �3.5k back in 2010, my advice, mint it up and keep it, as there great cars!!!

 22 November 2013, 06:19 PM
#51
Looking very nice . Certainly do not want to sell her that's for sure.. Might just be a keeper
However Another little sesh today.
Got the turbo to down-pipe bolt's all off. Piece of p**s !! Aftermarket bolt's, Did worry me slightly as they weren't extremely tight.
The down-pipe has got a extra bracket welded on, for a extra support that bolt's onto the gearbox. Its a right PITA to get to and ill probable just cut the bracket and make a new one on the rebuild.
Took the passenger side front strut off as well. Quite clean under there.. Will strip the strut's down and get them powder-coated i think along with all subframes,drive shafts,brackets etc etc
Also decided to do away with the Air-con. Dont really need it and it just takes up room. Tried taking the pump off but there must be a hidden bolt as its not moving. Also is it okay to disconnect the air-con pipes at the bulkhead once the system has been de-gassed?? Also is the air con rad bolted in at the bottom or a interference fit. Cant find the bolt's at the bottom to remove it and it's solid!!
Would anyone have a set of wheels and tyres just so i can move her into the bothy in a month or 2?? Just be to borrow for a day.
 13 December 2013, 02:00 PM
#52
Little treat for the scoob considering it's Xmas.

Genuin item's as well .
On a side note, does anyone know the dimension's for bleed nipples for the Prodrive alcon caliper?. Also does anyone know what type of Alcon caliper i have? Looking at a new seal kit for it. Cant find a P/N on them :/
Sorry for the crap pic:


Genuin item's as well .
On a side note, does anyone know the dimension's for bleed nipples for the Prodrive alcon caliper?. Also does anyone know what type of Alcon caliper i have? Looking at a new seal kit for it. Cant find a P/N on them :/
Sorry for the crap pic:
 28 December 2013, 08:11 PM
#53
Few bit's and bob's have been happening recently.
All strut's are off the car and sitting waiting for spring compressor's so i can strip them all down and get them checked/painted/re-assembled.
Emailed Godspeed & As Performance to get some new bleed nipple's, and also new caliper half brake line's made up, new brake pads (Ds500's) and some bell to rotor bolt's. Will hopefully get these bit's going after new year. Rotor's can wait a few month's as after a good clean up the one's i got aint to bad at all.
Removed the inlet manifold so i could get the standard turbo inlet pipe removed, to be replaced by a silicone "SWRD" one. Pig of a job to get it off , Will stick in back on when i manage to get the engine out
Once the engine's removed, Will order a new Exedy Clutch Anti Judder Jobby , along with the flywheel skimmed.
Can anyone enlighten me on part's required and a how to on fitting the parallel fuel mod? Will look at getting a FPR as well to help control the fueling side of thing's
Then its ordering the rather large amount of Gasket's,seal's , injector seal's etc for the rebuild
Once it's all back together im going to get one of these fitted to the car to replace the alarm that's already in it
http://www.clifford.co.uk/ProductPag...rt_510_4X.html
A rather sorry looking engine bay!!

 28 December 2013, 08:23 PM
#54
Scooby Senior
iTrader: (51)
Join Date: Nov 2005
Location: Wherever I park my car, that's my home
Posts: 20,491
Likes: 0
Received 2 Likes
on
2 Posts
I've been looking at the parallel fuel rail mod and from what I can see you need the rails, the FPR, some hose and potentially a new fuel filter if you want AN fittings. If you looking to remove the carbon cannister and the evap circuit you'll also need a rollover valve for the fuel tank. I'm still working on the detail but that's where I'm looking to start
30 December 2013, 11:02 PM
#55
I've been looking at the parallel fuel rail mod and from what I can see you need the rails, the FPR, some hose and potentially a new fuel filter if you want AN fittings. If you looking to remove the carbon cannister and the evap circuit you'll also need a rollover valve for the fuel tank. I'm still working on the detail but that's where I'm looking to start
I've looked a round as well, think im veering towards the An fitting's,fuel lab FPR,new stronger hoses. Looking into the Evap circuit removal, As plan on fitting a oil catch can soon as well.
Thanks for the heads up though, Certainly give's food for thought
16 February 2014, 11:28 PM
#56
Little bit more done today,
Alternator + Bracket cleaned up and finished painting
TMIC Polished up and put back together ready to go on,
Cam Cover's painted up
New Rocket gasket's fitted with a wee blob of HT sealant to help, ( On the downside, managed to snap a cam cover bolt in the drivers side cylinder head!! Cant grip it with a set of pliers either)
New plug's gapped and fitted.
2 Driver's front strut's primed + Painted, Just springs to do.
Will be getting the Alcon's sent away to get refurbished, In worse nick than i thought, Needs the caliper half fluid lines re-tapped and a seized bolt removed. Also needs some chemical metal applied as it's worn threw near 2 of the thread's for the caliper half's.
18 February 2014, 09:49 PM
#57
While i was out today, At dentist's, thought id nip and get some paint to properly (Best of one ability) the inlet fannymold.
Had to strip back the red VHT paint i done before, By **** it makes a dusty mess. After that spent a hour masking up holes + cleaning ready for the primer.
Just used ordinary Hycote red primer (2 coat's) + Volkswagen Flash red ( 3 coats @ 15 mins apart) . Once it's properly dried ill have a look and think about putting lacquer over it. Looks a bit Darker than in the pic's , but it'll do
Tried to do the header tank, however i ran out half way threw. But used the last of the Satin black on the bottom half of the tank, Will probably strip it back and polish the top half up.
Piccy to prove it happened:
 02 March 2014, 10:53 PM
#58
Ordered a fair bit more POR-15 in silver for under neath, along with more wire brushes and a cheap battery charger for the Electrolysis bath. Plenty of silicone hose in various size's for the window washers, vac hoses and some breather hoses. Also placed a order for a Exedy stage 1 organic anti judder all singing all dancing clutch!!. . Should be more than enough for the end result
Picked up some P1 Oz Alloy's again of Ma50ns mate in Newmachar, sound lad, cheers . Ordering some new rubber but im to indecisive as to what to go for, they even fitted on the old Celica quite nicely. Shame 2 of the tyre's are absolutely fubar'd !


Maxxis MAZ-1A's For �280
Falken FL452's OR 453's for about �330
Parada Spec 2's For �380 (215/40R17)
Eagle asymetric F2's For �400 (215/40/R17)
Also put a few more bit's of the engine together, mainly spend most the time taking bolt's out, wire wheel over them, Clean up the thread's with a tap+Die, tiny bit of copper grease then all back together again. Fair few more to do, but hopefully complement the Rally-tech bolt kit nicely enough. Few hoses left to clean and bit's to paint then it's on to the manifold's and cleaning up the underside.

Picked up some P1 Oz Alloy's again of Ma50ns mate in Newmachar, sound lad, cheers . Ordering some new rubber but im to indecisive as to what to go for, they even fitted on the old Celica quite nicely. Shame 2 of the tyre's are absolutely fubar'd !
Maxxis MAZ-1A's For �280
Falken FL452's OR 453's for about �330
Parada Spec 2's For �380 (215/40R17)
Eagle asymetric F2's For �400 (215/40/R17)
Also put a few more bit's of the engine together, mainly spend most the time taking bolt's out, wire wheel over them, Clean up the thread's with a tap+Die, tiny bit of copper grease then all back together again. Fair few more to do, but hopefully complement the Rally-tech bolt kit nicely enough. Few hoses left to clean and bit's to paint then it's on to the manifold's and cleaning up the underside.
Last edited by quattroowner; 02 March 2014 at 10:55 PM.
16 March 2014, 02:52 AM
#59
Picked up some new engine stand mount's from Toolrunner after i lost the last set
Engine all mounted up so i could make a start on the underneath.
Manifold and up pipe off. Bit of a pain in the **** and sacrificed a few tools in the process . However she came of eventually. One of the exhaust studs worked it's way out so will be getting a new one. Sump off as well. Will give it a good blast and clean out at my work along with the wind-age tray and pick up pipe.

Only a tiny bit of sealant found on the oil pick up pipe, sump must of been off before, no metal shaving's or anything so well happy the bottom end is in good health.

Cleaned up all the underside afterwards including the old sealant and oil stain's on the underside with some master cleaner. Came up quite nicely
Picked up some new tyre's as well. Big thanks to "53" for them. They'll quite happily be smeared all over Aberdeen shire roads during the summer. Pretty sure 225/45/R17 will be okay on a classic with standard suspension and normal p1 alloy's??
Only other problem, Split the alternator down so it could be painted, however to move-able support piece's on the "bottom" half are stopping it being put back together. Anyone know how to get these to retract so it can be bolted together again??
Engine all mounted up so i could make a start on the underneath.
Manifold and up pipe off. Bit of a pain in the **** and sacrificed a few tools in the process
. However she came of eventually. One of the exhaust studs worked it's way out so will be getting a new one. Sump off as well. Will give it a good blast and clean out at my work along with the wind-age tray and pick up pipe. 
Only a tiny bit of sealant found on the oil pick up pipe, sump must of been off before, no metal shaving's or anything so well happy the bottom end is in good health.

Cleaned up all the underside afterwards including the old sealant and oil stain's on the underside with some master cleaner. Came up quite nicely
Picked up some new tyre's as well. Big thanks to "53" for them. They'll quite happily be smeared all over Aberdeen shire roads during the summer. Pretty sure 225/45/R17 will be okay on a classic with standard suspension and normal p1 alloy's??
Only other problem, Split the alternator down so it could be painted, however to move-able support piece's on the "bottom" half are stopping it being put back together. Anyone know how to get these to retract so it can be bolted together again??
16 March 2014, 08:37 AM
#60
Scooby Senior
just a note:
I used to have a K&N cone filter on my car like that. Got advised it would be taking in to much warm air from the engine bay. So I swapped back to a ITG panel filter.
Car ran a whole lot better after
I used to have a K&N cone filter on my car like that. Got advised it would be taking in to much warm air from the engine bay. So I swapped back to a ITG panel filter.
Car ran a whole lot better after