
Removal of Cup holder in MY00


IS it a cupholder? Mine, in a '98/9 UK car wasn't, it was just a cover
I got mine out by first removing the dash-top oddment tray, (two screws and PULL like fek forwards, ie, towards YOU).
Once that was out, I could see the two screws holding the cover in place.
Alcazar
I got mine out by first removing the dash-top oddment tray, (two screws and PULL like fek forwards, ie, towards YOU).
Once that was out, I could see the two screws holding the cover in place.
Alcazar


Scooby Regular
Joined: Feb 2006
Posts: 127
Likes: 0
From: Burnley
Originally Posted by jonnie c
Hi Guys,
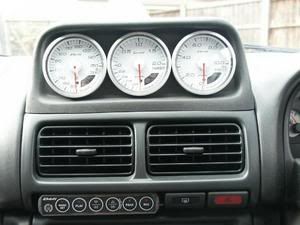
Could someone point me in the direction of removing the cup holder from an MY00 to fit a Defi Controller?
Thanks
Jonnie
Could someone point me in the direction of removing the cup holder from an MY00 to fit a Defi Controller?
Thanks
Jonnie
First of all pull the trim up around the gearstick - just trim plugs, fold this to one side around the gearstick.
Also at the same time pull the trim up around the handbrake, you can then either unplug the m/plug to the electric mirrors or leave it connected and once again fold this to the side.
Then pull the trim off that surrounds the heater, radio and aux buttons this is held on by 6 clips pull firmly but carefully - it may be of an advantage here to remove the radio first to avoid the weight of this pulling down on the facia panel when it is removed. Once again with this off you can either unplug the m/plugs for the dash lamp, the cig lighter, the headlamp washers, the headlamp adjusters, the dimmer switch for the clock or just leave them on and move the panel to the side.
Now in front of you will be the exposed centre console. Remove the two screws at the top L and R of the console, the two screws at the base of the console forward of the gear stick in the centre above the transmission tunnel, the two screws in the rear of the console (Behind where the radio used to be) at the central point, the screw underneath the steering column to the left - this joins the centre console side panel to the panel beneath the steering column and the screw to the bottom right of the glove box, with this the white panel for the heater controls will be visible with 6 screws, remove these just drop the controls down they will suspend themselves off the wiring loom and the heater control cables (Two blue cables) slightly pull downwards on the trim underneath the cup holder and then...
You should be able to see the two screws to either side of the cup holder (Even though these would have also been visible in the first place, and then one elusive screw beneath the cup holder remove all these and the cup unit holder will simply slide on an upward angle out of the dashboard.
Alternatively for a complete removal completely remove the panel underneath the steering wheel two screw one L and one R and 2 plastic clips that just push into the dash trim, and then unplug the two m/plugs for the front and rear fogs as well as completely removing the glove box 6 various screws in and around the glove box and the two side panels that are either side of the centre console, this will then allow full unhindered access to mess to your hearts content with the cup holder and to route any wiring/accessories that you need too.
Just in case (But you should not need to do this) you also require the removal of the top centre glove box on the dashboard, open the cover, remove the two little plastic cover panels to the front left of the glove box, then remove the two screws underneath these panels and then pull firmly but carefully utilising the catch already in the holder as an aid at an upwards angle to completely remove the top glove box - THIS WILL BE VERY TIGHT!
Hope this helps, as I say I think this above procedure is correct but it has been a while since I removed these panels.
Best of luck Mike.N

N.B I f anyone wishes to add/amend/remove parts of this mail to make it 100% correct please feel free, this info is just what I can remember off the top of my head.

Thread
Thread Starter
Forum
Replies
Last Post
Mattybr5@MB Developments
Full Cars Breaking For Spares
12
Nov 18, 2015 07:03 AM