Gauge Fitting Guide. Oil Temperature, Oil Pressure and Boost
 07 May 2011, 09:31 PM
#91
Scooby Newbie

Join Date: Apr 2011
Posts: 17
Likes: 0
Received 0 Likes
on
0 Posts
Main reason for installing a boost gauge was to see whether it would confirm what my ears are hearing - a possible boost leak
More prominent at higher speeds, so lets say in 5th
Driving about 70, as i the turbo begins (2500 - 3000 rpm) to come in i can hear what seems to be a whistling noise.
Will report back what the guage shows after a sprited drive
btw...its a 54 plate wrx ppp
 08 May 2011, 10:12 PM
#92
Scooby Regular
iTrader: (10)
Join Date: Nov 2010
Location: Bristol
Posts: 1,391
Likes: 0
Received 0 Likes
on
0 Posts
Yep, thats the plan.
Main reason for installing a boost gauge was to see whether it would confirm what my ears are hearing - a possible boost leak
More prominent at higher speeds, so lets say in 5th
Driving about 70, as i the turbo begins (2500 - 3000 rpm) to come in i can hear what seems to be a whistling noise.
Will report back what the guage shows after a sprited drive
btw...its a 54 plate wrx ppp
 08 November 2011, 11:03 PM
#94
Scooby Newbie

Join Date: Jan 2011
Location: Brighton
Posts: 3
Likes: 0
Received 0 Likes
on
0 Posts
I've got the same fitting kit for the oil pressure sensor and just wanted to ask.. When I try screwing either the gauge sensor or oem sensor in to their respective holes, they don't seem to get in very far before going tight, like only 1/3 of what I would expect.. This guide says they're tapered, and it does feel more like that than the wrong thread but just wanted to check how tough I should be with the spanner or if this indicates that the fitting is wrong? It's a "Subaru specific kit"..

 15 November 2012, 03:19 PM
#98
Scooby Regular
Will let you know how it goes i.e how quickly the swear box is filled.
 21 December 2012, 12:40 PM
#100
Scooby Regular
From my research I decided to take the Oil Pressure by using the t-piece rather than the sandwich plate. I chose this as I don�t have to drain the oil, and figured it would be an easier/more reliable choice.
Oil Pressure T-Piece (LMA SUB 095/1/300) 1/8BST(block) to 1/8NPT(OP Sender)
First from scoobyparts. However I destroyed the thread quite quick. Second was from Matt Lewis Racing (ebay) who let me collect with a discount as I didn�t want to wait till 5th of jan to get finished.
For the Oil temp, I researched I could take it off a blanking plate above cylinder 3. Read on for more info.
Oil Temp Gauge Adapter LMA SUB 067 M18*1.5(block?) to 1/8NPT(sender unit)
Also available from Scoobyparts.co.uk deamontweaks, and probably Matt Lewis Racing.
Both can be purchased from here �25.99: Scoobyparts Ltd OIL PRESSURE & OIL TEMPERATURE GAUGE FITTING KIT
I bought my Prosport gauges from Rspec www.rspec.co.uk and they explained that the gauges would come with everything required to install using the non-sandwich plate method.
21 December 2012, 12:51 PM
#101
Scooby Regular
iTrader: (3)
Join Date: Dec 2011
Location: Tallinn, Estonia
Posts: 183
Likes: 0
Received 0 Likes
on
0 Posts
Stupid question: do you NEED to have the oil pressure and temperature gauge fitting kit if you are not going with the sandwich plate?
I bought my Prosport gauges from Rspec www.rspec.co.uk and they explained that the gauges would come with everything required to install using the non-sandwich plate method.
I bought my Prosport gauges from Rspec www.rspec.co.uk and they explained that the gauges would come with everything required to install using the non-sandwich plate method.
Rspec do offer that fitting kit, I got one from them together with the gauges and it works fine.
22 December 2012, 01:00 PM
#103
Scooby Regular
Afraid so - you could hook up the oil pressure gauge without the fitting kit if you decided to get rid of the factory warning light but there's nowhere for you to install the oil temperature sensor. You need to replace a plug above the no.3 cylinder with an adapter for the oil temperature sensor.
Rspec do offer that fitting kit, I got one from them together with the gauges and it works fine.
Rspec do offer that fitting kit, I got one from them together with the gauges and it works fine.
22 December 2012, 07:08 PM
#105
Scooby Regular
04 January 2013, 10:36 AM
#106
Scooby Regular
I am now ready to have a go at this guide, so it is time for a second stupid question: how have others fixed up all the electrical connections for their gauges? The OP describes how he tested the wiring loom from the stereo but after the boost gauge fitting section, it is not clear how the oil gauges were wired up. Surely cutting the required wire three times and inserting three choc blocks (one for each gauge) isn't the way to do it?
If anyone has their Prosports installed with different illumination colour for day and night, and has step by step photos of the wiring process, that would be ideal.
If anyone has their Prosports installed with different illumination colour for day and night, and has step by step photos of the wiring process, that would be ideal.
04 January 2013, 11:05 AM
#107
Scooby Regular
iTrader: (3)
Join Date: Dec 2011
Location: Tallinn, Estonia
Posts: 183
Likes: 0
Received 0 Likes
on
0 Posts
OK, I fitted my Prosport gauges to my classic a few months ago so will try to remember what I did. There will be no pictures, though.
I assume you have a tester? I wouldn't start this job without one.
Which Prosport gauges did you go for? Can they be "daisy-chained"? If they can then all you need is power supply to one of the gauges and you can connect the rest of the gauges in series to the first one.
IIRC you need four wires hooked up - battery +, ACC (ignition) +, ground and power to the day/light illumination wire. By the way, on my "halo" series gauges you cannot have different colours for day/night modes, just different brightness levels.
Anyway, arm yourself with the tester and you should be fine. I've found all the necessary wires to splice into in the area of the centre of the dash and here are some pointers.
"Battery +" was easy - I just found a wire in one of the connectors that was always live, I belive it was in the stereo connector.
"ACC +" was the trickiest one. Most of the ones you'll find will not be live when the key is turned into the start position so if, like me, you don't want to see the openning ceremony twice when you start your car, look for the one that is always on, even with the starter on. I've managed to find one in the rear window defroster button connector. Be careful, though, as there are two of those there but one is NOT live when the defroster is on. I belive the correct one is the thicker wire, possibly green in colour. I've made another mistake here - though I'd found a nice ACC+ only to find out that it is not live when the heater fan is on... So in the end I went for the rear defroster button.
Ground - easy, I think I spliced into the stereo connector.
Day/Night switching - I wired mine up to the famous "bright" button. Over here we drive with the headlights on at all times so the "bright" button was the best solution I could find. I actually quite like this, to be honest. If you want yours to dim when you turn the headlights (or rather side lights) on you should just splice into one of the wires for the backlighting of the cetral dash console.
04 January 2013, 05:22 PM
#108
Scooby Regular
Which Prosport gauges did you go for? Can they be "daisy-chained"? If they can then all you need is power supply to one of the gauges and you can connect the rest of the gauges in series to the first one.
IIRC you need four wires hooked up - battery +, ACC (ignition) +, ground and power to the day/light illumination wire.
IIRC you need four wires hooked up - battery +, ACC (ignition) +, ground and power to the day/light illumination wire.
From what you're saying, there should be enough wires that can be accessed from the centre of the dash to wire the gauges in correctly: just use a multimeter, check every wire.
04 January 2013, 06:16 PM
#109
Scooby Regular
iTrader: (3)
Join Date: Dec 2011
Location: Tallinn, Estonia
Posts: 183
Likes: 0
Received 0 Likes
on
0 Posts
Unfortunately I'm not familiar with these series of gauges so you'll have to rely on the installation manual. I certainly would not splice into factory wires three times and if every gauge needs to be powered independently then I'd use some sort of terminal block to keep everything tidy and easy to modify / expand in the future.
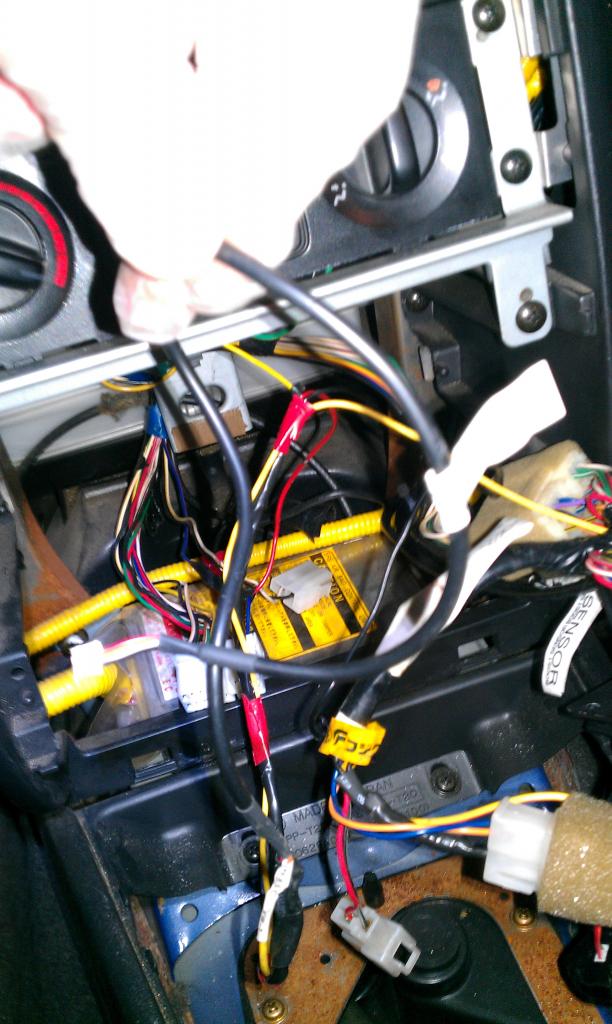
I actually had to disassemle some of the dash today so had a chance to take some picutes of my install. You'll notice that I soldered all of the splices I've made and while it's not as tidy as I'd have liked, it shouldn't be too bad.
The wire I'm holding in my hand is the one for the power supply of the gauges. The red piece of electrical tape is where the wires go to different locations from
Here is where I got my battery + from (audio connector)
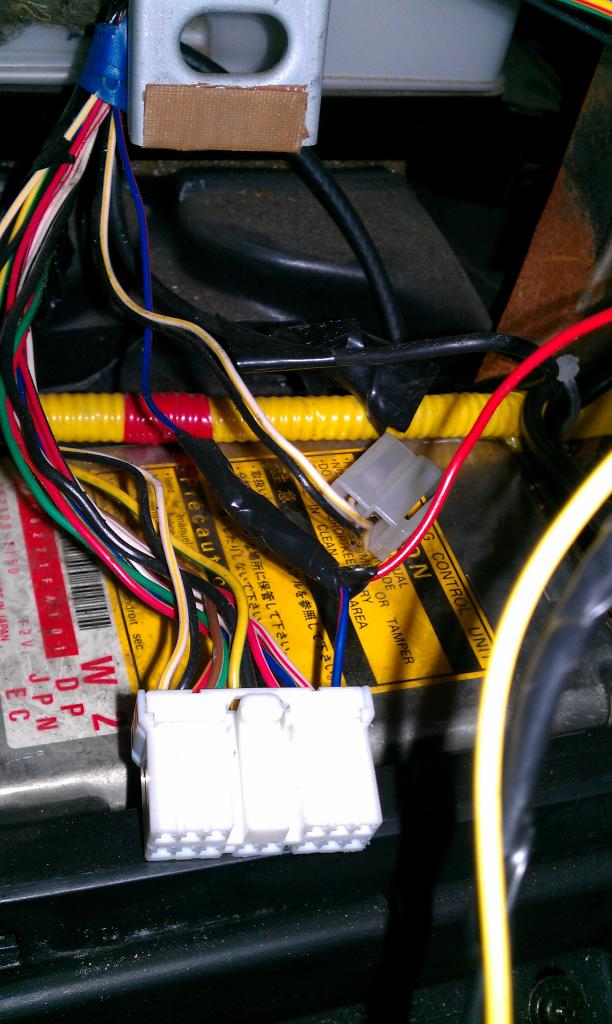
Here's my ground (it's actually in the cigarette lighter circuit)
Here's the splice in the "bright" button wiring for the day/night mode control
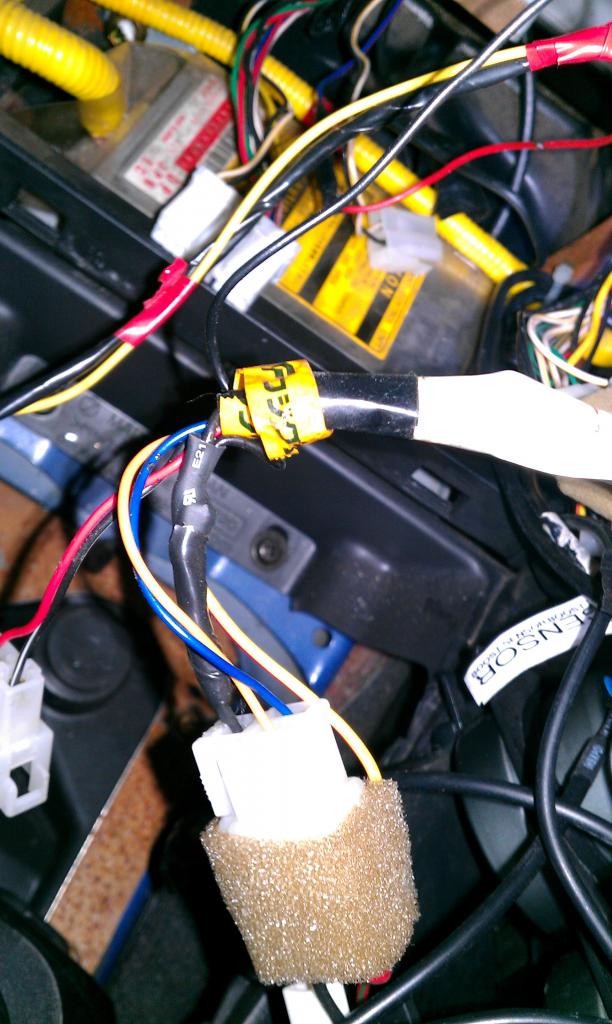
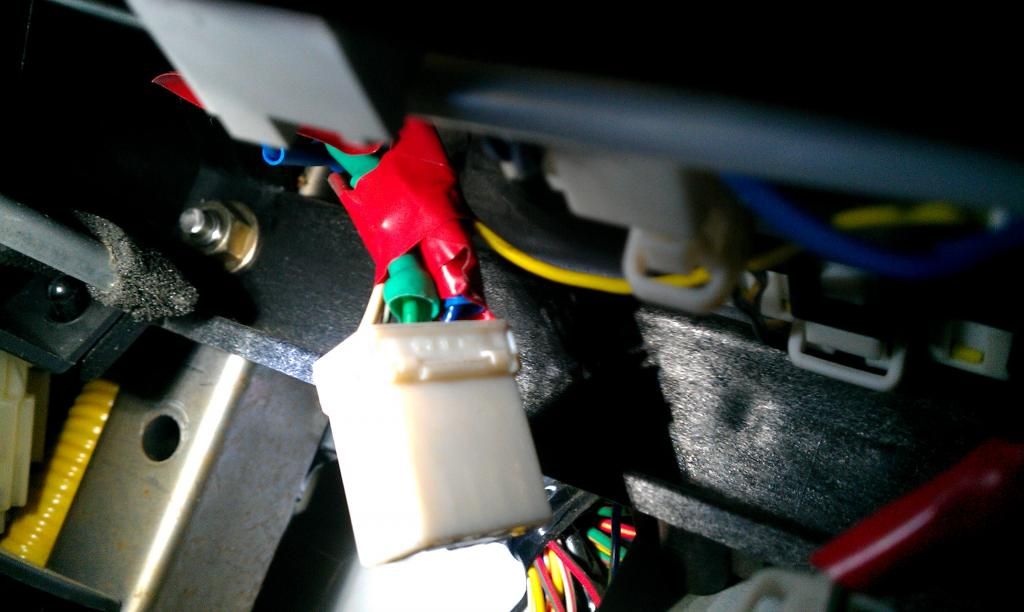
Here's the connector for the rear window defroster button with the splice for the ACC +. Be warned that there is seriously no room there at all, I've had to extend the factory wire to be able to splice into it. Especially fustrating that I had to do this twice (see previous post). If you go for that one, make sure you check that the wire is live with the defroster both on and off. I belive the blue (not green) one is correct but do check.
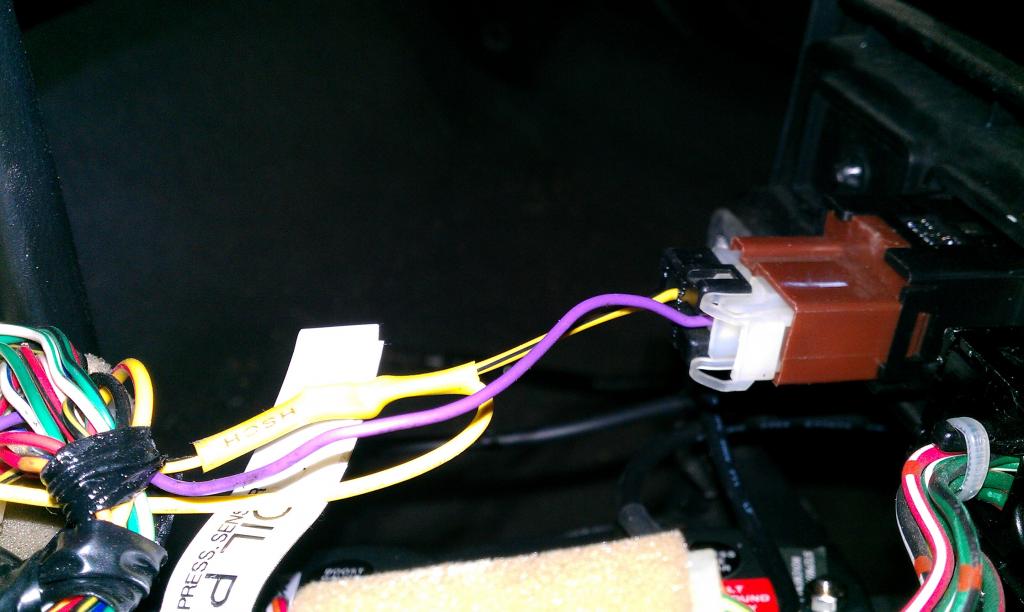
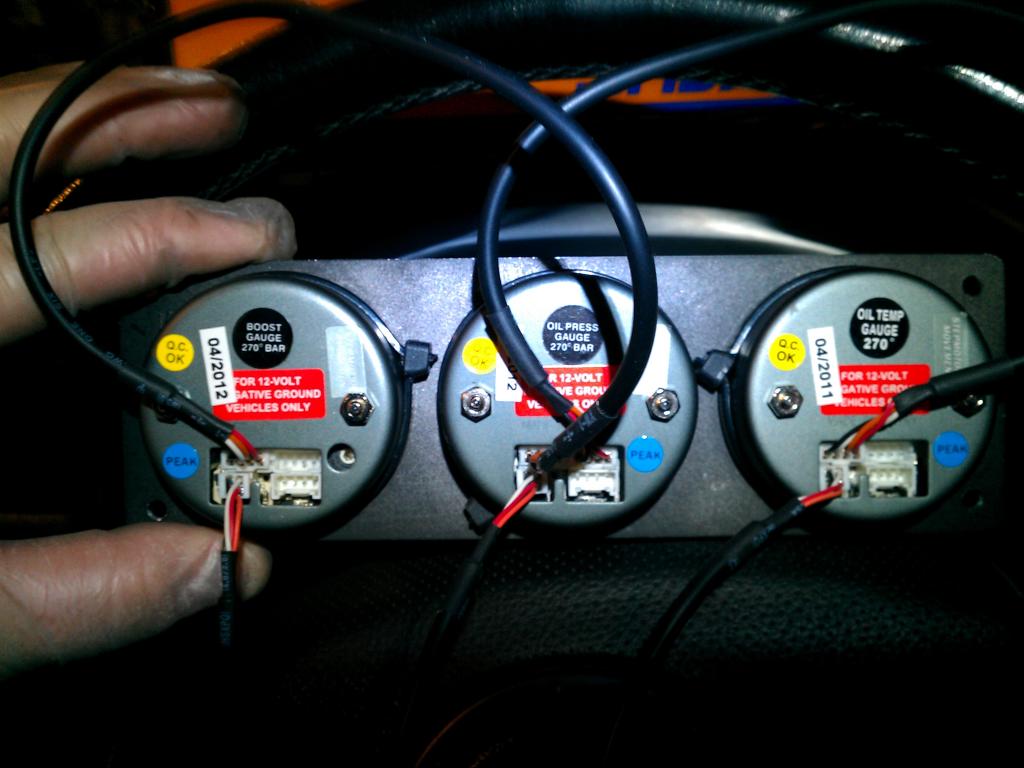
Here's the back of the gauges to illustrate the daisy chain connection - it is probably not applicable for your model though.
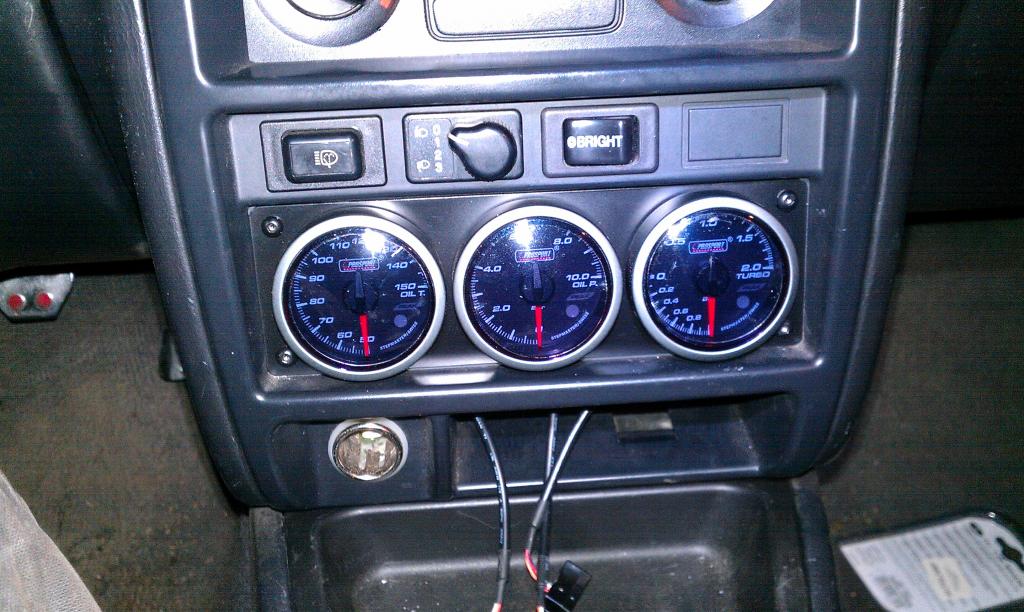
And a pic of an (almost) finished article
Cheers,
Alex
I actually had to disassemle some of the dash today so had a chance to take some picutes of my install. You'll notice that I soldered all of the splices I've made and while it's not as tidy as I'd have liked, it shouldn't be too bad.
The wire I'm holding in my hand is the one for the power supply of the gauges. The red piece of electrical tape is where the wires go to different locations from
Here is where I got my battery + from (audio connector)
Here's my ground (it's actually in the cigarette lighter circuit)
Here's the splice in the "bright" button wiring for the day/night mode control
Here's the connector for the rear window defroster button with the splice for the ACC +. Be warned that there is seriously no room there at all, I've had to extend the factory wire to be able to splice into it. Especially fustrating that I had to do this twice (see previous post). If you go for that one, make sure you check that the wire is live with the defroster both on and off. I belive the blue (not green) one is correct but do check.
Here's the back of the gauges to illustrate the daisy chain connection - it is probably not applicable for your model though.
And a pic of an (almost) finished article
Cheers,
Alex
Last edited by alessio; 04 January 2013 at 06:23 PM.
 06 November 2015, 01:17 PM
#113
Scooby Regular

Join Date: Apr 2012
Location: Manchester
Posts: 51
Likes: 0
Received 0 Likes
on
0 Posts
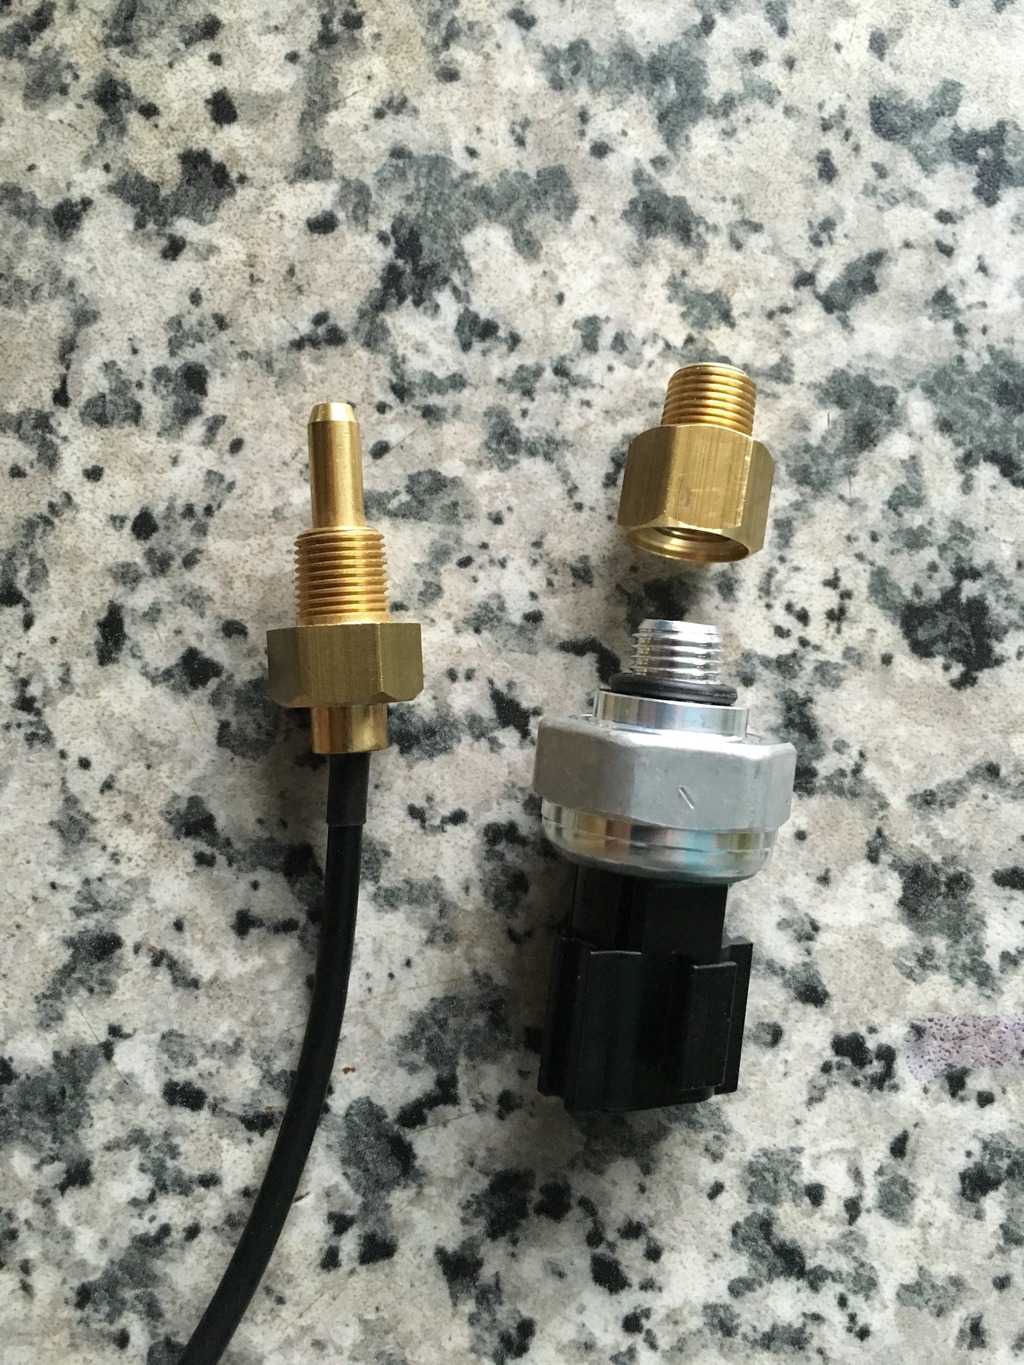
Hi, I know it may be hard to tell, but do you guys think I'll need adapter for oil temp sensor? ( left in the picture)
I'm also about to order this
http://www.ebay.co.uk/itm/SUBARU-IMP.../401019959845?
to fit oil press sensor with OEM press sensor.
these sensors are from ShadowPro gauges
I'm also about to order this
http://www.ebay.co.uk/itm/SUBARU-IMP.../401019959845?
to fit oil press sensor with OEM press sensor.
these sensors are from ShadowPro gauges
 07 November 2015, 11:11 AM
#114
Scooby Regular
iTrader: (2)

Join Date: Mar 2014
Location: Wakefield
Posts: 94
Likes: 0
Received 0 Likes
on
0 Posts
Hi, I know it may be hard to tell, but do you guys think I'll need adapter for oil temp sensor? ( left in the picture)
I'm also about to order this
http://www.ebay.co.uk/itm/SUBARU-IMP.../401019959845?
to fit oil press sensor with OEM press sensor.
these sensors are from ShadowPro gauges
I'm also about to order this
http://www.ebay.co.uk/itm/SUBARU-IMP.../401019959845?
to fit oil press sensor with OEM press sensor.
these sensors are from ShadowPro gauges
07 November 2015, 10:09 PM
#116
Scooby Regular
iTrader: (2)
Join Date: Mar 2014
Location: Wakefield
Posts: 94
Likes: 0
Received 0 Likes
on
0 Posts
I have fitted mine today and used the Scoobyworld kit. All fitted perfectly. If you gonna fit your temp sensor in a bung on 3rd cyl you will need an adapter as the hole is much bigger than the sensor.
07 November 2015, 11:43 PM
#117
Scooby Regular
Join Date: Apr 2012
Location: Manchester
Posts: 51
Likes: 0
Received 0 Likes
on
0 Posts
I also ordered oil temp sender adapter
http://www.ebay.co.uk/itm/1314651600...%3AMEBIDX%3AIT
So I hope this both bits will fit and I can have my gauges working, if not I'll have to wait few more days for scoobyworld kit
http://www.ebay.co.uk/itm/1314651600...%3AMEBIDX%3AIT
So I hope this both bits will fit and I can have my gauges working, if not I'll have to wait few more days for scoobyworld kit
18 November 2015, 07:38 PM
#118
Scooby Regular
iTrader: (1)

Join Date: Aug 2015
Location: north west
Posts: 440
Likes: 0
Received 0 Likes
on
0 Posts
Hi guys, I've got just water temp gauge left to fit as oil press and temp thanks to this guide has been already fitted, my question is do I need to drain whole cooling system to fit adapter into the top radiator hose or just need to take off the hose from radiator let it spill and then just refill the system? Do I need to also bleed to cooling system after that? Thanks
19 November 2015, 11:51 AM
#119
You CANNOT bleed the Scoob cooling system, but the answer to your question is almost the same as your second method above.
If I were doing this, I'd do the same as I did when I did mine: drain out a little from the lower hose, catch and keep unless the coolant is very dirty.......in which case, drain it all and replace.
Remove and cut top hose. Look carefully at the inside, flexing it as you do. I didn't do this step, and mine pinholed within days. when I removed it and looked carefully, the inside walls of the hose looked like someone had slashed them with a razor blade. If they look like that, use a new hose.
Refit hose.
Refilling.
Pull off the rearmost hose from it's connection to the metal header tank on top of the engine, and stuff a funnel in the end of the hose. Remove header tank cap. Fill SLOWLY, from a jug, etc, down the funnel, try not to let it gulp. Once the header tank fills, remove funnel, replace hose and, with header tank cap still off, start engine.
Allow to run until the fans kick in, watch for bubbles, mop up or top up as necessary.
Replace header tank cap, drive round block, leave to cool.
Once cool, remove cap again, check level and adjust. Job's a good'un, and fills from the bottom, so avoids airlocking.
HTH
Last edited by alcazar; 19 November 2015 at 11:53 AM.
12 May 2016, 05:16 PM
#120
Scooby Regular

Sorry to revive a bit of an old/dead thread but I had a quick question regarding gauge fitting and felt it would be best to keep it here rather than open a new thread.
Recently got a couple of Defi gauges with the controller and a third stand-alone oil temp gauge and i was just wondering whether there is any reason you couldn't run both the Oil temp and pressure sensors off the T-piece fitting kit with this plumbed in to either the plug behind the alternator or the one on cyl 3?
Recently got a couple of Defi gauges with the controller and a third stand-alone oil temp gauge and i was just wondering whether there is any reason you couldn't run both the Oil temp and pressure sensors off the T-piece fitting kit with this plumbed in to either the plug behind the alternator or the one on cyl 3?