Gauge Fitting Guide. Oil Temperature, Oil Pressure and Boost
 17 January 2010, 11:22 AM
#31
Scooby Regular
iTrader: (3)

Join Date: Aug 2008
Location: Near Watford
Posts: 339
Likes: 0
Received 0 Likes
on
0 Posts
Thought I would give this thread the bump it deserves - just used the excellent guide to install some prosport gauges in my 2003 WRX this weekend.
Couple of differences and notes in case anyone with a newage is reading this thread:
- Had to take the alternator all the way off to get at the OEM oil pressure switch.
- The crank sensor was in the way of getting the OEM pressure switch so I unplugged it (mentioned in the guide above, but OP couldn't remember why he disconnected it!).
- Unlike the classic, you can see the blanking plate to swap for the oil temp sender on the top of the block if you look down between the throttle body and the intercooler. However, just because you can see it doesn't mean that you can get at any easier!
- To get at the blanking plate I had to remove two breather pipes. They just pull on and off with a bit of wiggling.
- I used the same position rubber grommet to push the wires through into the cabin from the engine bay. However the grommet wasn't covered by brake pipes so it was easy to get at.
- The wiring was easier to sort out on the newage as I used the feed from the clock for the gauges. The back of the clock even labels the wires for you so it's easy to work out which is which.
- Be careful when cutting the wire to the clock. I cut through the whole thing in one go and as it was cutting it must have touched the perm live (blue and red wire) to the ground as I blew a fuse. It's also one of the fuses that the alarm and immobiliser uses (15amp, blue, top right in fuse box) so I couldn't start the engine without changing it (and the alarm starting beeping at me!).
- To get the LED that shows what the alarm is doing out of the surround, you need to push it from behind. It will pop right out but the only way to remove it is to cut the wire. I'm going to drill a hole somewhere in the pod and put it back in next week
- I found that routing the wire up through the dash board brings to wires close to the clutch pedal. Be careful when routing that they don't get tangled.
Hope that little lot helps someone
 17 January 2010, 11:38 AM
#32
Scooby Regular
iTrader: (5)

Join Date: Jul 2007
Location: scotland/england border
Posts: 888
Likes: 0
Received 0 Likes
on
0 Posts
a deep 24mm socket will take off the oil pressure sender under alternator and its 22mm one to fit the new oil temp sender(i lenghtened the wiring on the sender so it was easier to join up to the wire to the gauge)and you will have to take the intercooler off!!!!
Last edited by borderlinechris; 17 January 2010 at 11:39 AM. Reason: added a bit
24 January 2010, 01:28 PM
#33
Scooby Regular
iTrader: (1)

Join Date: Nov 2007
Location: Midlands
Posts: 347
Likes: 0
Received 0 Likes
on
0 Posts
I've been trying to fit my gauges this morning to my 2.5 WRX. Oil pressure was simple and I did that in no time. The temperature one on the other hand has been a right pain.
To get to the plug it involves moving the throttle body as there's not enough room to get to the pipes to remove them. I finally got to the plug and removed it but the new temp sender that I've got has a different thread to the plug I removed so it won't fit. This is the kit I've got Scoobyparts Ltd OIL PRESSURE & OIL TEMPERATURE GAUGE FITTING KIT
I'm a bit gutted as I had to put everything back together and getting the intercooler on and off isn't a fun job.
Has anyone else had any issues with the temperature plug? I'm tempted to get a sandwich plate fitted at my next oil change.
24 January 2010, 01:38 PM
#34
Scooby Regular
iTrader: (2)
Join Date: Mar 2009
Location: underground
Posts: 483
Likes: 0
Received 0 Likes
on
0 Posts
I've been trying to fit my gauges this morning to my 2.5 WRX. Oil pressure was simple and I did that in no time. The temperature one on the other hand has been a right pain.
To get to the plug it involves moving the throttle body as there's not enough room to get to the pipes to remove them. I finally got to the plug and removed it but the new temp sender that I've got has a different thread to the plug I removed so it won't fit. This is the kit I've got Scoobyparts Ltd OIL PRESSURE & OIL TEMPERATURE GAUGE FITTING KIT
I'm a bit gutted as I had to put everything back together and getting the intercooler on and off isn't a fun job.
Has anyone else had any issues with the temperature plug? I'm tempted to get a sandwich plate fitted at my next oil change.
To get to the plug it involves moving the throttle body as there's not enough room to get to the pipes to remove them. I finally got to the plug and removed it but the new temp sender that I've got has a different thread to the plug I removed so it won't fit. This is the kit I've got Scoobyparts Ltd OIL PRESSURE & OIL TEMPERATURE GAUGE FITTING KIT
I'm a bit gutted as I had to put everything back together and getting the intercooler on and off isn't a fun job.
Has anyone else had any issues with the temperature plug? I'm tempted to get a sandwich plate fitted at my next oil change.
24 January 2010, 02:56 PM
#36
Scooby Regular
iTrader: (2)
Join Date: Mar 2009
Location: underground
Posts: 483
Likes: 0
Received 0 Likes
on
0 Posts
........are you sure you took the right 1 out as there is no need to remove the throttle body..........
Last edited by brockalightus; 24 January 2010 at 02:57 PM.
 24 January 2010, 04:55 PM
#38
Scooby Regular
iTrader: (3)
Join Date: Aug 2008
Location: Near Watford
Posts: 339
Likes: 0
Received 0 Likes
on
0 Posts
I suppose the 2.5 engine could be different. I have taken some photos of mine which I'll upload later (once my son is in bed - he's a terror with the computer otherwise!)
24 January 2010, 07:03 PM
#40
Scooby Regular
iTrader: (3)
Join Date: Aug 2008
Location: Near Watford
Posts: 339
Likes: 0
Received 0 Likes
on
0 Posts
Right, have some pictures. It was pretty hard to light the photo but I have a few which should help.
First, the wire from the sensor is the white one in the middle of the picture

Next, the adapter itself. As you can see its a good 15cm lower than the throttle body though to install it I had to take the intercooler off and the breather pipe you can leading from the foreground to the background. Didn't have to do anything with the throttle body.
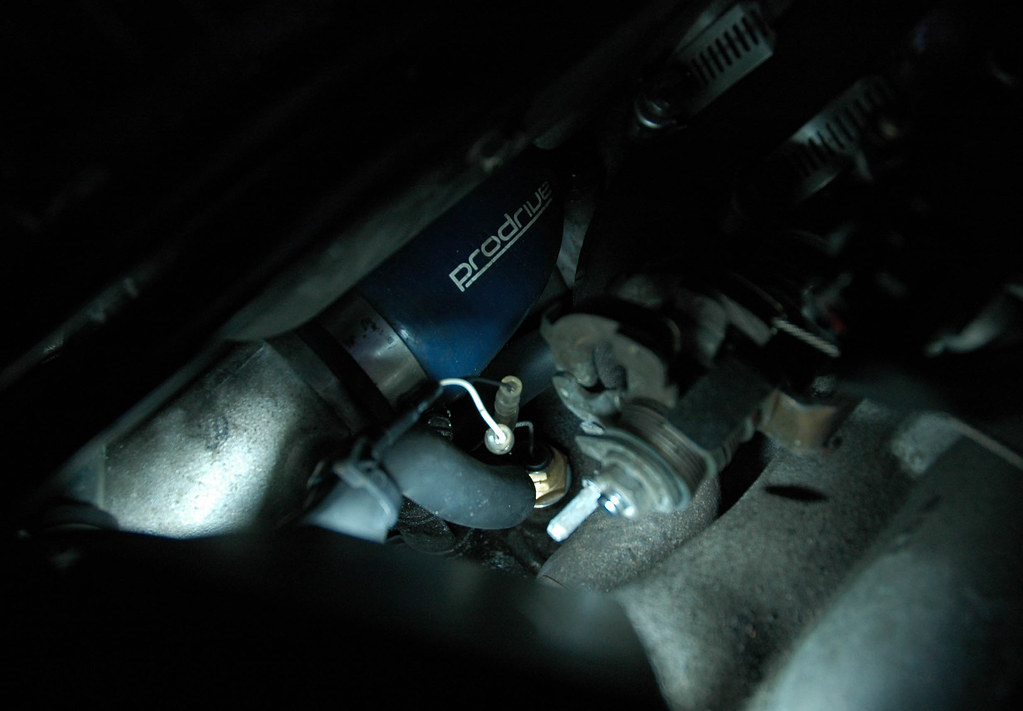
One last image to get a sense of where it is:
http://farm5.static.flickr.com/4009/...dee98734_b.jpg
The new adapter jusy screwed right in, which meant I could screw the temp sensor into the hole
First, the wire from the sensor is the white one in the middle of the picture
Next, the adapter itself. As you can see its a good 15cm lower than the throttle body though to install it I had to take the intercooler off and the breather pipe you can leading from the foreground to the background. Didn't have to do anything with the throttle body.
One last image to get a sense of where it is:
http://farm5.static.flickr.com/4009/...dee98734_b.jpg
The new adapter jusy screwed right in, which meant I could screw the temp sensor into the hole
Last edited by ahar; 24 January 2010 at 07:06 PM.
25 January 2010, 10:47 PM
#41
Scooby Regular
iTrader: (2)

Join Date: Oct 2009
Location: Brum
Posts: 762
Likes: 0
Received 0 Likes
on
0 Posts
Good read im going to be buying these gauges, but i will be using a sandwich plate seems easier just to drop the oil put the sandwich plate on and screw the sensors in, then wire in the car. Rather than doing it the other the way

 28 January 2010, 08:47 PM
#46
Scooby Regular
iTrader: (2)
Join Date: Oct 2009
Location: Brum
Posts: 762
Likes: 0
Received 0 Likes
on
0 Posts
Im never gonna track it or hardly ever gets any abuse really as its my daily just want them so i can monitor whats going on. They seem relativley easy to do just time consuming from what i can see?
29 January 2010, 08:16 AM
#47
Scooby Regular
iTrader: (1)
Join Date: Nov 2007
Location: Midlands
Posts: 347
Likes: 0
Received 0 Likes
on
0 Posts
I now have oil leaking out of it so I need to get it back out and have a look.
Does anyone know what the thread/diameter should be for the plug? I'm hoping the new plug hasn't ruined the threads in the block otherwise I'm buggered.
29 January 2010, 08:20 AM
#48
Scooby Regular
iTrader: (3)
Join Date: Aug 2008
Location: Near Watford
Posts: 339
Likes: 0
Received 0 Likes
on
0 Posts
It was that bung definately. I will get some photos tomorrow.
I now have oil leaking out of it so I need to get it back out and have a look.
Does anyone know what the thread/diameter should be for the plug? I'm hoping the new plug hasn't ruined the threads in the block otherwise I'm buggered.
I now have oil leaking out of it so I need to get it back out and have a look.
Does anyone know what the thread/diameter should be for the plug? I'm hoping the new plug hasn't ruined the threads in the block otherwise I'm buggered.
Can you see whether the oil is leaking from the engine / adapter thread or the adapter temp sensor thread? I had to put some PTFE tape round the temp sensor thread to get it to seal properly (but not the adapter thread)
29 January 2010, 10:55 AM
#49
Scooby Regular
iTrader: (1)
Join Date: Nov 2007
Location: Midlands
Posts: 347
Likes: 0
Received 0 Likes
on
0 Posts
I haven't got the adapter plug in as the threads don't match and it wouldn't screw in. I didn't realise the threads were different till after I tried screwing it in.
I have put the original plug back in dry and without ptfe so I'm going to pull it out and put some liquid gasket as per the OE installation. I'm hoping and preying that I haven't messed the threads up as the only options I see then are helicoil or a new block.
I have put the original plug back in dry and without ptfe so I'm going to pull it out and put some liquid gasket as per the OE installation. I'm hoping and preying that I haven't messed the threads up as the only options I see then are helicoil or a new block.
29 January 2010, 11:38 AM
#50
Scooby Regular
iTrader: (3)
Join Date: Aug 2008
Location: Near Watford
Posts: 339
Likes: 0
Received 0 Likes
on
0 Posts
I haven't got the adapter plug in as the threads don't match and it wouldn't screw in. I didn't realise the threads were different till after I tried screwing it in.
I have put the original plug back in dry and without ptfe so I'm going to pull it out and put some liquid gasket as per the OE installation. I'm hoping and preying that I haven't messed the threads up as the only options I see then are helicoil or a new block.
I have put the original plug back in dry and without ptfe so I'm going to pull it out and put some liquid gasket as per the OE installation. I'm hoping and preying that I haven't messed the threads up as the only options I see then are helicoil or a new block.
Probably teaching you to suck eggs but I seem to remember my OEM plug had some kind of washer on it - I assume that you put thet back with it.
Very odd that the thread was different. They must have sent you the wrong one. Good luck with it - I'm afraid my limited knowledge on this has run out!
05 February 2010, 02:30 PM
#51
Scooby Regular

Join Date: Sep 2007
Location: South Yorkshire
Posts: 55
Likes: 0
Received 0 Likes
on
0 Posts
Excellent info on this thread. My prosport boost and oil pressure turned up today hoping this thread will save some hard earned by self fitting. I have a newage STI MY04 Ive noted the positioning of the wire etc under the bonnet and the hole through bulk head. I intend on A pillar mounting does this create me more problems then it is worth? Is it difficult to get wire to drivers side of dash? And where would be best found to feed the power from?? Help please!
05 February 2010, 07:55 PM
#52
Scooby Regular
iTrader: (5)
Join Date: Jul 2007
Location: scotland/england border
Posts: 888
Likes: 0
Received 0 Likes
on
0 Posts
the wires come thru the bulkhead into the wall just above the pedals,you`ll be looking up from the pedals to see it. you should be able to get them up to the A pillar no prob.
13 February 2010, 06:32 PM
#54
Scooby Regular
iTrader: (2)
Join Date: Mar 2009
Location: underground
Posts: 483
Likes: 0
Received 0 Likes
on
0 Posts
BAT = Battery.....positive...Red wire (constant power)
GND = Ground ...negative....Black wire (ground)
LIG = Lights on/off..........White wire (illumination)
ACC = Ignition...Orange wire (switched power)
Last edited by brockalightus; 13 February 2010 at 06:35 PM.
14 February 2010, 09:08 PM
#55
Scooby Regular
Join Date: Sep 2007
Location: South Yorkshire
Posts: 55
Likes: 0
Received 0 Likes
on
0 Posts
Many thanks Brock.
I not had chance to look yet but will I be best with the wires connected straight into the clock with the original clock wires or get some of the clip adapters that join the wires by piercing the insulation?
I not had chance to look yet but will I be best with the wires connected straight into the clock with the original clock wires or get some of the clip adapters that join the wires by piercing the insulation?
15 February 2010, 12:11 PM
#56
Scooby Regular
iTrader: (2)
Join Date: Mar 2009
Location: underground
Posts: 483
Likes: 0
Received 0 Likes
on
0 Posts
* just keep all the wires the same lenght to the gauges so they start up and close down in sync..
 16 February 2010, 08:59 PM
#57
Scooby Regular
iTrader: (1)
Join Date: Nov 2007
Location: Midlands
Posts: 347
Likes: 0
Received 0 Likes
on
0 Posts
Ooohh, nasty
Probably teaching you to suck eggs but I seem to remember my OEM plug had some kind of washer on it - I assume that you put thet back with it.
Very odd that the thread was different. They must have sent you the wrong one. Good luck with it - I'm afraid my limited knowledge on this has run out!
Probably teaching you to suck eggs but I seem to remember my OEM plug had some kind of washer on it - I assume that you put thet back with it.
Very odd that the thread was different. They must have sent you the wrong one. Good luck with it - I'm afraid my limited knowledge on this has run out!
It's been a couple of weeks now and all seems well but I don't think I'll try messing about with it anymore incase something irreversible happens and I'm completely stuffed. So if anyone wants a set of green gauges and ATI gauge let me know.
20 February 2010, 06:40 PM
#58
Scooby Regular
Join Date: Mar 2009
Location: Farnborough
Posts: 116
Likes: 0
Received 0 Likes
on
0 Posts
hi
sorry for thread hijacking
i've just fitted some prosport gauges similar to the ones your talking about but have 2 questions to ask
(1)should i have the boost gauge vaccum line running from the fuel pressure reg line or from the hose from inlet manifold to turbo and does the sender unit need to be close the vacuum line?the reason i ask is the gauge reading is very slow to react and jerky.i had a mechanical gauge and it was fine.
(2)the oil pressure gauge i have fitted reads in kg's but it reads all or nothing.
any idea's people