RS3 8V: One step at a time
 22 October 2016, 09:53 PM
#31
 )
) I like the detail/time and effort to get that extra power/drag time down etc and what each modification brings to the performance of the car!!!
 23 October 2016, 07:28 PM
#32
Scooby Regular

Thread Starter
Engine Stage 2 Performance Testing
I managed to get back yesterday to Shakespeare Raceway and whilst the day didn�t entirely pan out as I had envisaged, I picked up some very positive performance data.
With poor track conditions, queues, bikes throwing their guts down the track and rain�. I effectively gave up after a couple of runs.
I�ll get this out of the way first�.. I didn�t better my previous 11.80s ET. You�ll see further on it�s not always just about the ET for performance data comparisons.
I always knew I was going to struggle with grip off the start. I was struggling at Stage 1 and with Stage 2 we�re now producing more torque and faster. This was further amplified by the start line prep�.. It was bad. Many other runners (including a few of my friends that turned up) on street tyres were struggling.
To make the situation even worse the organisers then decided to keep gluing the track up throughout the day. We saw them redress the surface 4 times. I suppose with the oil being thrown down by some bikes and cars, they had to do it after cleaning up.
Every time this happens for street tyres it adds drag which makes us slower (my speeds were dropping as were others, as the day progressed). I suspect this was due to all the bikes running yesterday, especially with the track surface temps being quite low as well.
There is nowt you can do though�. It is what it is.
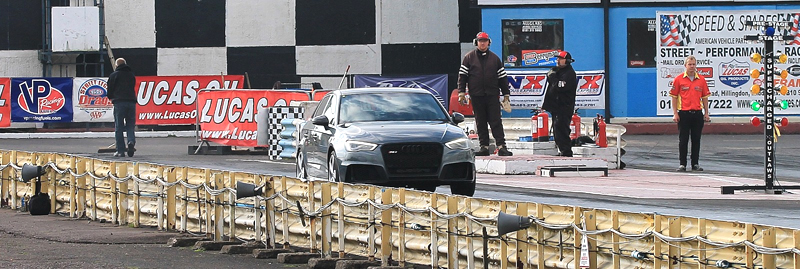
This was the best time achieved yesterday:
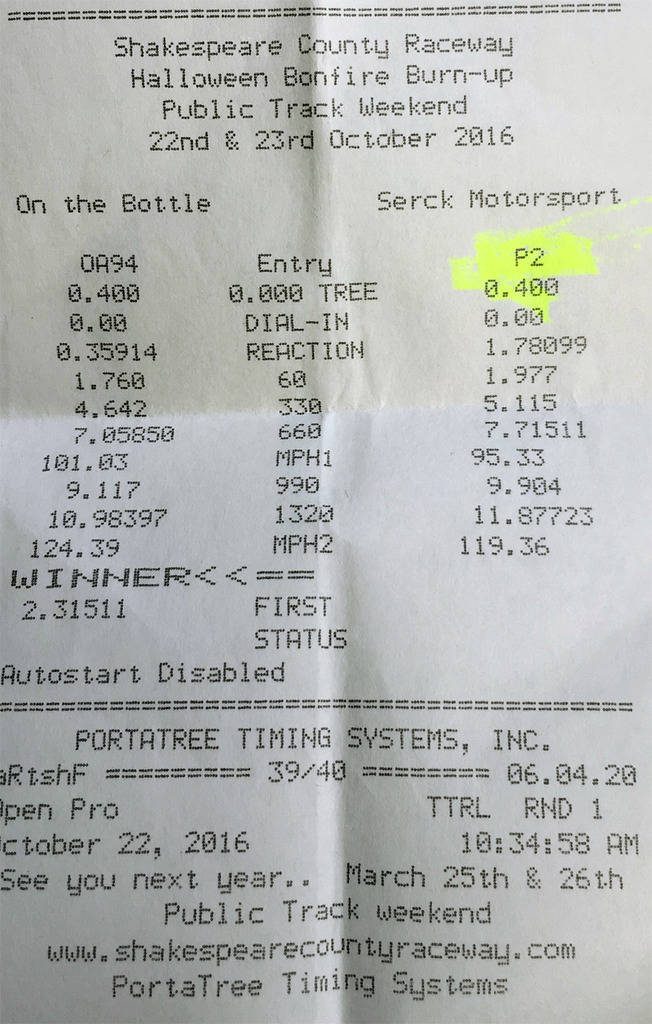
Anyone that knows what they�re looking at may now think �Mmmm� that looks interesting!!�.
60ft
This is one of the key indicators of launch grip.
At Stage 1 when we achieved the 11.80s pass the 60ft was being seen in 1.80s. This run was showing a very poor 1.97s. That�s how bad the launch grip was.
From my past experience any reduction in the 60ft time will see at least the same reduction at the ET.
To get the ET achieved here, with that kind of 60ft is bloody good and alludes to how much more potential the car has in it�s ET times.
Some form of logic dictates that if grip had been sufficient to achieve a 1.80s 60ft, the ET�s could have been 11.7�s and maybe even a very high (11.69) 11.6�s.
1/8m MPH
At Stage 1 we were seeing 92.74mph at this part of the fastest run. On this run at Stage 2 we�re seeing 95.33mph. This is the first indication that Stage 2 (dyno figures to one side) is clearly producing more power. More BHP will see higher trap speeds on a like for like car (as in weight).
1/4m MPH
At Stage 1 we were seeing 116.10mph at this part of the fastest run. On this run at Stage 2 we�re seeing 119.36mph. This again shows that Stage 2 is producing more top end grunt, which is what was shown on the dyno graphs.
To have trap speeds at this level for this stage of tuning on the RS3 8V is extremely good.
So what!?
Apart from the logical theory of the 60ft times and impact this could/should have on the ETs, what does all this MPH increase really mean?
It should mean that the car, after launching, is quicker than Stage 1 in and through the gears. Let�s see if that is the reality�..
All this data is from the same run as above. I�m not picking and choosing!
There is no point me comparing 0-60 against Stage 1, as this is where traction was bad at Stage 2 yesterday. Stage 2 was slower than Stage 1 by 0.23s because of these launch traction issues.
60-100mph in 4.74s
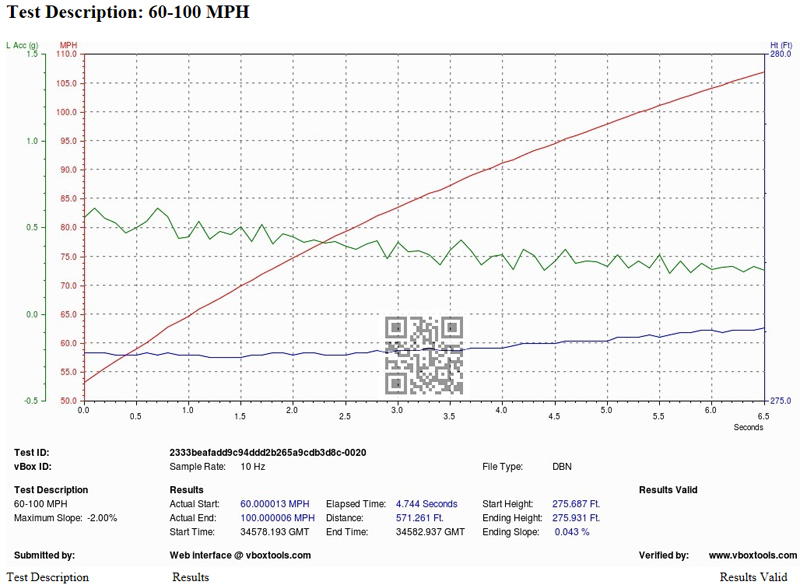
This is 0.34s quicker than Stage 1.
Seeing as this had dropped a fair whack, it would be interesting to see if the 0-100mph was better, even though we knew 0-60mph was worse because of traction issues.
Not bad for a shopping car with some bolt ons and a remap. lol
0-100mph in 8.38s
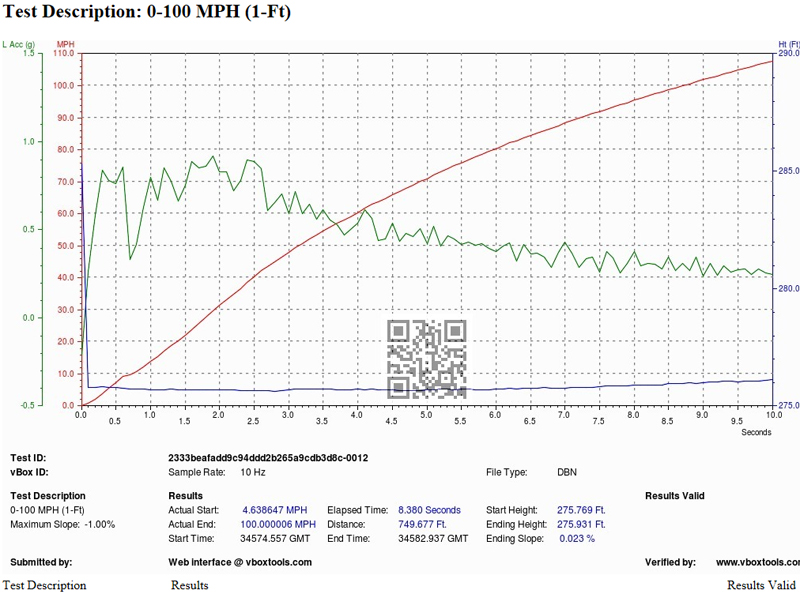
This is 0.11s quicker than Stage 1 even with worse traction at the start (that lost it 0.2s)!!! That starts to tell you how much quicker this car is now.
With better launch traction I would imagine this time could be reduced further by a couple of 10ths.
When VBOX �Verified� graphs do not always tell the TRUE picture
I�ve previously said that comparing figures between a drag strip and road run are, in my opinion, not always comparative. So you need to be wary of this. On road tyres, runs on the strip tend to be slower (especially through and in-gear) than on the public road due to the increased tyre drag on a prepped drag strip surface.
One thing I�ve touched on before is the impact that �slope� (uphill or downhill) can have on acceleration figures. It goes without saying that with all things being equal if you accelerate uphill you�ll be slower, and if you accelerate downhill you�ll be quicker.
Whilst VBOX Verify (as in the charts you�ve seen in my posts), check that the datalog has basic integrity, it also checks for slope %. If the slope is outside of its specified tolerance, it will state the run is �Invalid�. You�ll see that all of my runs are marked up as �Results Valid�.
You would assume that because VBOX Verify has deemed your run as valid that�s all cool and we can compare apples with apples. In a word�.. No.
You can also use a piece of software called �DBScanner�, which actually �corrects� the performance based on the slope that is recorded within the VBOX data. It effectively corrects the figures as if the run was on a flat piece of road.
This is only a calculation and I don�t know what wizardry it uses to do that. Quite a few people all over the world are starting to use this method now, as it is clearly apparent that there are differences and they can be quite considerable�.. VBOX Verified or not.
I have a shedload of VBOX logs from all sorts of cars and owners. I�ve seen variances of up to 0.5s in figures between VBOX verified runs and what they have been corrected to using DBScanner. As in VBOX Verify giving a quicker figure than what DBScanner does.
I can�t emphasise this enough�.. If you compare my data with anyone elses, make sure it�s like for like. Based on the comparison data I have (other tuned RS3�s which has been verified and corrected)�.. This Stage 2 is properly quick.
Of course my data is from a drag strip which is a known entity and UPHILL!
And finally�.
Since my terminals were up as part of Stage 2 benefits and because some of the whatsapp crew have been banging on to me about getting some 100-200kmh times (this appears to be a standard measure of through the gears real world performance - 62 to 124mph), I kept my �foot in� at the end of the drag runs yesterday.
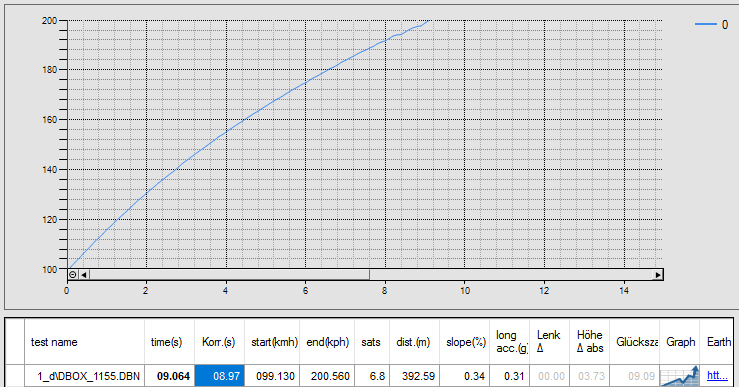
100-200km/h (62-124mph) in 9.34s
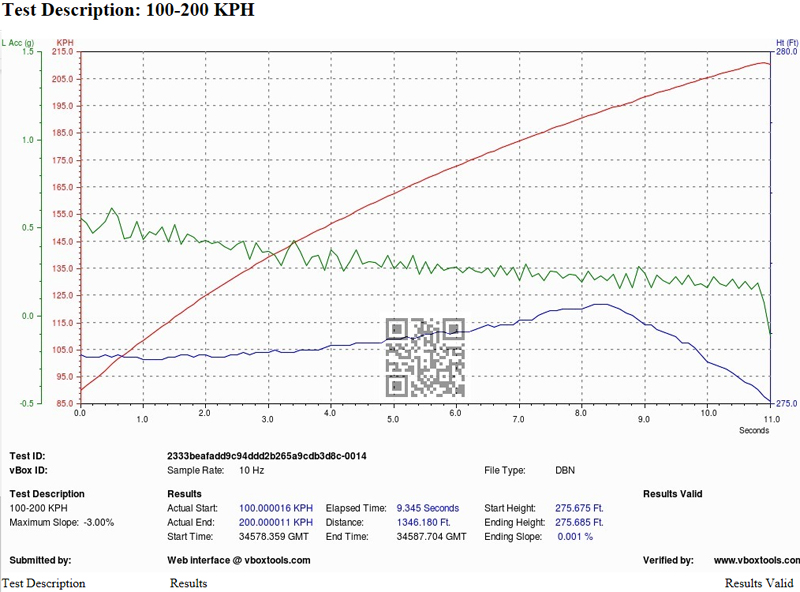
There is a very very slight downhill slope just after the end of the 1/4m at the strip (-1.5ft lol), so the corrected figure via DBScanner gives a figure of 9.35s (see below highlighted).
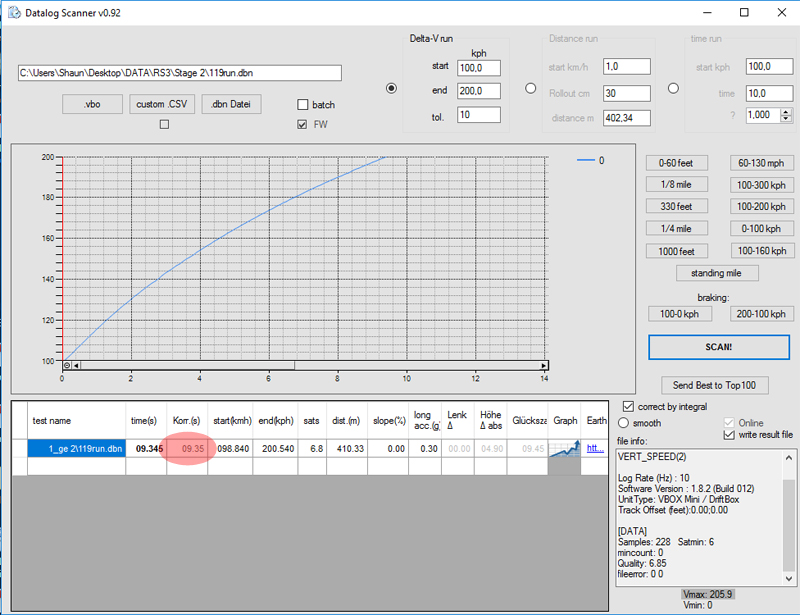
Again, based on the corrected data I have from others���. This time is very quick for this level of tune on the RS3 8V.
Just one LAST thing�.
Although I didn�t manage to achieve the ET I was hoping for yesterday, hopefully all the other data that has been gained shows that Stage 2 has certainly made the car quicker / faster.
I know I keep banging on about traction issues and perhaps some of you will think I�m over egging this�. So here�s some more data to back that up:
This is the 0-60 VBOX graph of the same 1/4m run being used throughout this update. As you can see it�s a poor 3.63s. Lol
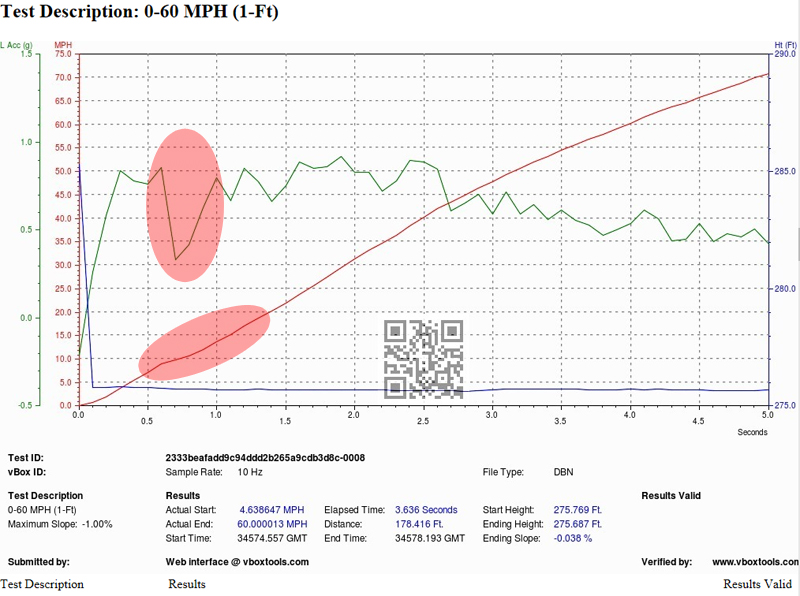
If you look at the parts I have highlighted you can see where the speed has dipped from around 9mph and the G�s fall right off. This was the area I lost the time due to traction issues.
I filmed my runs yesterday in-car and you can actually see what�s going on with the boost and revs during this part of the run.
If you look at the dash when I�m launching you�ll see the TC light come on, then the revs and boost drop and then it picks up. It�s quite obvious that�s going to be impacting my 1/4m times.
I�m not sure whether this is being invoked due to the lack of traction, or whether the car now needs a DSG remap to cope with the extra torque on launch, or whether we need to alter the launch strategy.
We�ll look into this more with Stage 3, but since this is a road car it�s not really an issue to be honest. This does not happen in any other scenario apart from when using Launch Control.
Roll on Stage 3�. We need more sauce!
I managed to get back yesterday to Shakespeare Raceway and whilst the day didn�t entirely pan out as I had envisaged, I picked up some very positive performance data.
With poor track conditions, queues, bikes throwing their guts down the track and rain�. I effectively gave up after a couple of runs.
I�ll get this out of the way first�.. I didn�t better my previous 11.80s ET. You�ll see further on it�s not always just about the ET for performance data comparisons.
I always knew I was going to struggle with grip off the start. I was struggling at Stage 1 and with Stage 2 we�re now producing more torque and faster. This was further amplified by the start line prep�.. It was bad. Many other runners (including a few of my friends that turned up) on street tyres were struggling.
To make the situation even worse the organisers then decided to keep gluing the track up throughout the day. We saw them redress the surface 4 times. I suppose with the oil being thrown down by some bikes and cars, they had to do it after cleaning up.
Every time this happens for street tyres it adds drag which makes us slower (my speeds were dropping as were others, as the day progressed). I suspect this was due to all the bikes running yesterday, especially with the track surface temps being quite low as well.
There is nowt you can do though�. It is what it is.
This was the best time achieved yesterday:
Anyone that knows what they�re looking at may now think �Mmmm� that looks interesting!!�.
60ft
This is one of the key indicators of launch grip.
At Stage 1 when we achieved the 11.80s pass the 60ft was being seen in 1.80s. This run was showing a very poor 1.97s. That�s how bad the launch grip was.
From my past experience any reduction in the 60ft time will see at least the same reduction at the ET.
To get the ET achieved here, with that kind of 60ft is bloody good and alludes to how much more potential the car has in it�s ET times.
Some form of logic dictates that if grip had been sufficient to achieve a 1.80s 60ft, the ET�s could have been 11.7�s and maybe even a very high (11.69) 11.6�s.
1/8m MPH
At Stage 1 we were seeing 92.74mph at this part of the fastest run. On this run at Stage 2 we�re seeing 95.33mph. This is the first indication that Stage 2 (dyno figures to one side) is clearly producing more power. More BHP will see higher trap speeds on a like for like car (as in weight).
1/4m MPH
At Stage 1 we were seeing 116.10mph at this part of the fastest run. On this run at Stage 2 we�re seeing 119.36mph. This again shows that Stage 2 is producing more top end grunt, which is what was shown on the dyno graphs.
To have trap speeds at this level for this stage of tuning on the RS3 8V is extremely good.
So what!?
Apart from the logical theory of the 60ft times and impact this could/should have on the ETs, what does all this MPH increase really mean?
It should mean that the car, after launching, is quicker than Stage 1 in and through the gears. Let�s see if that is the reality�..
All this data is from the same run as above. I�m not picking and choosing!
There is no point me comparing 0-60 against Stage 1, as this is where traction was bad at Stage 2 yesterday. Stage 2 was slower than Stage 1 by 0.23s because of these launch traction issues.
60-100mph in 4.74s
This is 0.34s quicker than Stage 1.
Seeing as this had dropped a fair whack, it would be interesting to see if the 0-100mph was better, even though we knew 0-60mph was worse because of traction issues.
Not bad for a shopping car with some bolt ons and a remap. lol
0-100mph in 8.38s
This is 0.11s quicker than Stage 1 even with worse traction at the start (that lost it 0.2s)!!! That starts to tell you how much quicker this car is now.
With better launch traction I would imagine this time could be reduced further by a couple of 10ths.
When VBOX �Verified� graphs do not always tell the TRUE picture
I�ve previously said that comparing figures between a drag strip and road run are, in my opinion, not always comparative. So you need to be wary of this. On road tyres, runs on the strip tend to be slower (especially through and in-gear) than on the public road due to the increased tyre drag on a prepped drag strip surface.
One thing I�ve touched on before is the impact that �slope� (uphill or downhill) can have on acceleration figures. It goes without saying that with all things being equal if you accelerate uphill you�ll be slower, and if you accelerate downhill you�ll be quicker.
Whilst VBOX Verify (as in the charts you�ve seen in my posts), check that the datalog has basic integrity, it also checks for slope %. If the slope is outside of its specified tolerance, it will state the run is �Invalid�. You�ll see that all of my runs are marked up as �Results Valid�.
You would assume that because VBOX Verify has deemed your run as valid that�s all cool and we can compare apples with apples. In a word�.. No.
You can also use a piece of software called �DBScanner�, which actually �corrects� the performance based on the slope that is recorded within the VBOX data. It effectively corrects the figures as if the run was on a flat piece of road.
This is only a calculation and I don�t know what wizardry it uses to do that. Quite a few people all over the world are starting to use this method now, as it is clearly apparent that there are differences and they can be quite considerable�.. VBOX Verified or not.
I have a shedload of VBOX logs from all sorts of cars and owners. I�ve seen variances of up to 0.5s in figures between VBOX verified runs and what they have been corrected to using DBScanner. As in VBOX Verify giving a quicker figure than what DBScanner does.
I can�t emphasise this enough�.. If you compare my data with anyone elses, make sure it�s like for like. Based on the comparison data I have (other tuned RS3�s which has been verified and corrected)�.. This Stage 2 is properly quick.
Of course my data is from a drag strip which is a known entity and UPHILL!
And finally�.
Since my terminals were up as part of Stage 2 benefits and because some of the whatsapp crew have been banging on to me about getting some 100-200kmh times (this appears to be a standard measure of through the gears real world performance - 62 to 124mph), I kept my �foot in� at the end of the drag runs yesterday.
100-200km/h (62-124mph) in 9.34s
There is a very very slight downhill slope just after the end of the 1/4m at the strip (-1.5ft lol), so the corrected figure via DBScanner gives a figure of 9.35s (see below highlighted).
Again, based on the corrected data I have from others���. This time is very quick for this level of tune on the RS3 8V.
Just one LAST thing�.
Although I didn�t manage to achieve the ET I was hoping for yesterday, hopefully all the other data that has been gained shows that Stage 2 has certainly made the car quicker / faster.
I know I keep banging on about traction issues and perhaps some of you will think I�m over egging this�. So here�s some more data to back that up:
This is the 0-60 VBOX graph of the same 1/4m run being used throughout this update. As you can see it�s a poor 3.63s. Lol
If you look at the parts I have highlighted you can see where the speed has dipped from around 9mph and the G�s fall right off. This was the area I lost the time due to traction issues.
I filmed my runs yesterday in-car and you can actually see what�s going on with the boost and revs during this part of the run.
If you look at the dash when I�m launching you�ll see the TC light come on, then the revs and boost drop and then it picks up. It�s quite obvious that�s going to be impacting my 1/4m times.
I�m not sure whether this is being invoked due to the lack of traction, or whether the car now needs a DSG remap to cope with the extra torque on launch, or whether we need to alter the launch strategy.
We�ll look into this more with Stage 3, but since this is a road car it�s not really an issue to be honest. This does not happen in any other scenario apart from when using Launch Control.
Roll on Stage 3�. We need more sauce!
23 October 2016, 07:31 PM
#33
Scooby Regular
Thread Starter
Scoobyboy,

Juggers,
Not one single bit mate. Subaru has stood still and everyone else has moved on. Getting older I also look for other things in cars that were not important to me before and vice versa tbh.
Steve,
You're a long time dead and money is for spending.
Juggers,
Not one single bit mate. Subaru has stood still and everyone else has moved on. Getting older I also look for other things in cars that were not important to me before and vice versa tbh.
Steve,
You're a long time dead and money is for spending.

 24 October 2016, 10:31 PM
#35
 the joys of getting older.
25 October 2016, 09:41 PM
the joys of getting older.
25 October 2016, 09:41 PM
#37
Scooby Regular
Thread Starter
13 December 2016, 08:22 PM
#39
Scooby Regular
Thread Starter
Dogbone Insert and Exhaust Valve Mods
Whilst this isn�t anything earth shattering, last week I made some further mods to the RS3.
Let�s be honest, it�s probably time for a bit more rice anyway!
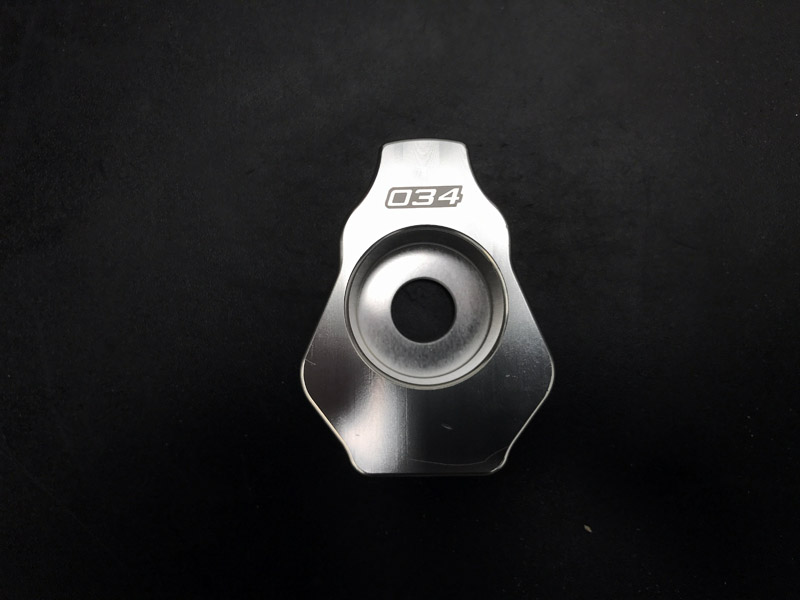
034Motorsport Billet Dogbone Mount Insert
Quite a few people have fitted one of these and some say it�s a �must have� mod on the 8V RS3. Like most things available in the tuning world, I was quite sceptical, but for the sake of �45 I thought I�d give it a punt.
The idea behind this insert is that it stiffens the mounting off the bottom of the gearbox (and engine) with the front subframe.
The marketed benefits of this state it will make gear shifting crisper, reduce wheel hop / axle tramp on launches and provide a more connected driving experience. All sounds very good in black and white terms! Let�s see what it really does�.
These do look a really nice quality item, and for something so simple to look at, you�d be forgiven for thinking how can this actually do anything worthwhile.

It states in the fitting instructions sheet that it takes between 30-45 mins to fit. More like 10 mins! It really is easy and quick.
This is the mount that we need to put this new insert into.
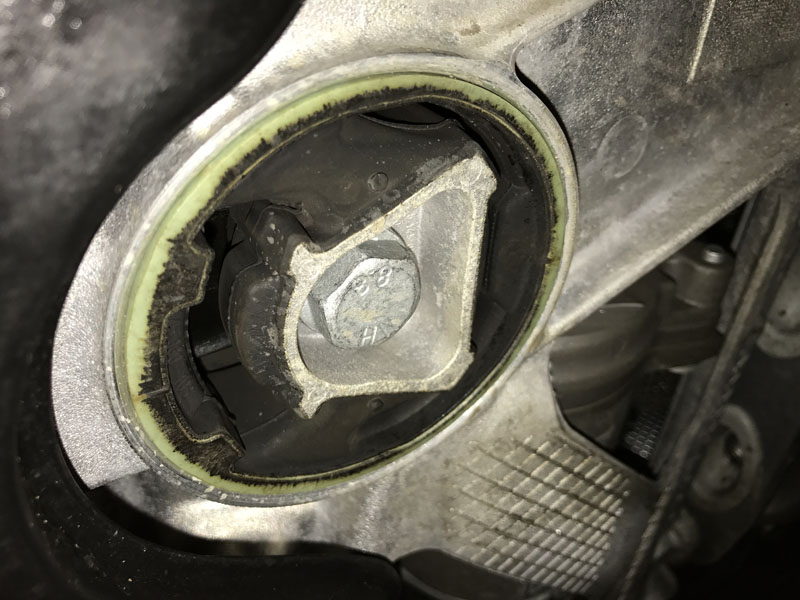
All you do is unscrew the bolt, push the insert in and screw the bolt back in. It�s really just that!
We put some grease around it, copper slipped the bolt and marked the bolt against the insert (just so we can see if the bolt moves due to vibration). You don�t need to do any of this though.
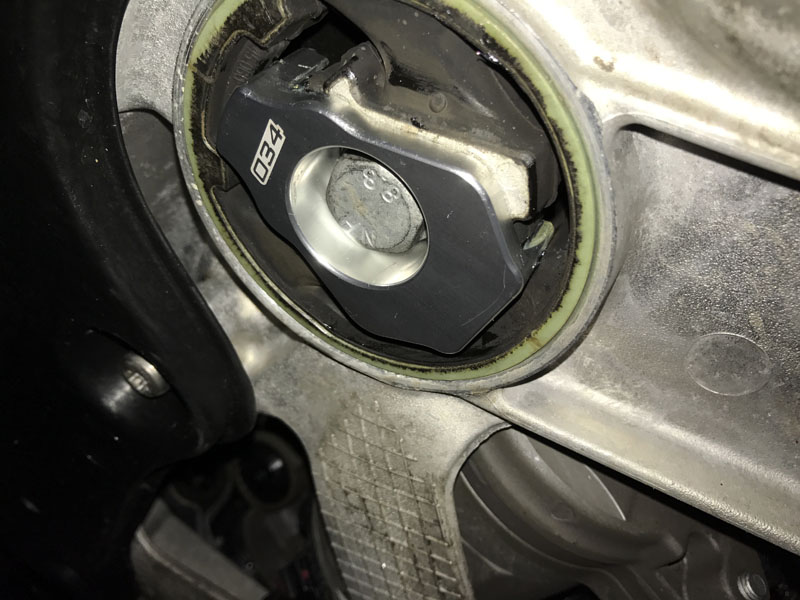
Simple!
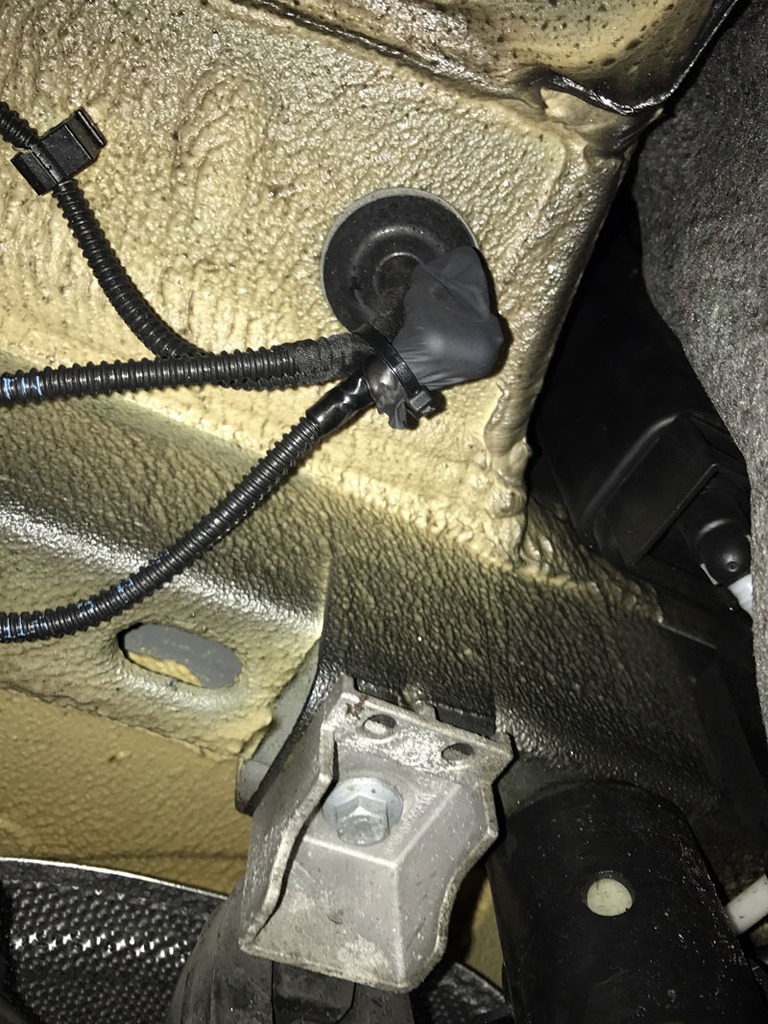
Exhaust Valve Mod
The next mod that I�ve been threatening to do for ages is to remove the valves on the exhaust backbox so they stay open all the time.
Since the valves on the RS3 open and close dependant upon gear and revs, maybe even throttle position with revs (as well as the obvious drive mode select) and certainly with cold start, I wanted to see what it was like with the valves effectively jammed open�. All the time!
The easiest way to do this is to start the car up and ensure the valves are open, then pull the plug on each of the valves. This way they will remain open regardless of what the ECU thinks it�s doing to control them. This will throw a code with VCDS but it doesn�t cause any issue.
I did try pulling the valves off whilst on my back without the car being up in the air�.. It was more or less impossible for me to get my arms and hands around that space. Your mileage may vary though.
Much easier to do it on a ramp to be honest�� it takes seconds to unplug.
The valves are literally on top of each exit pipe from the backbox.
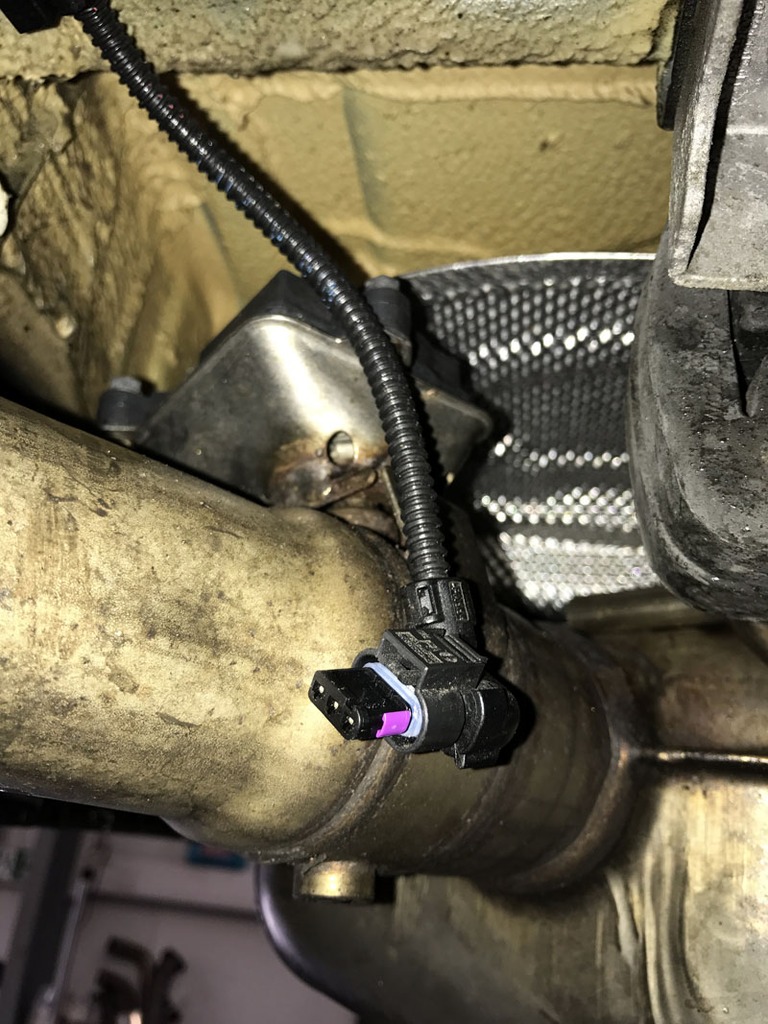
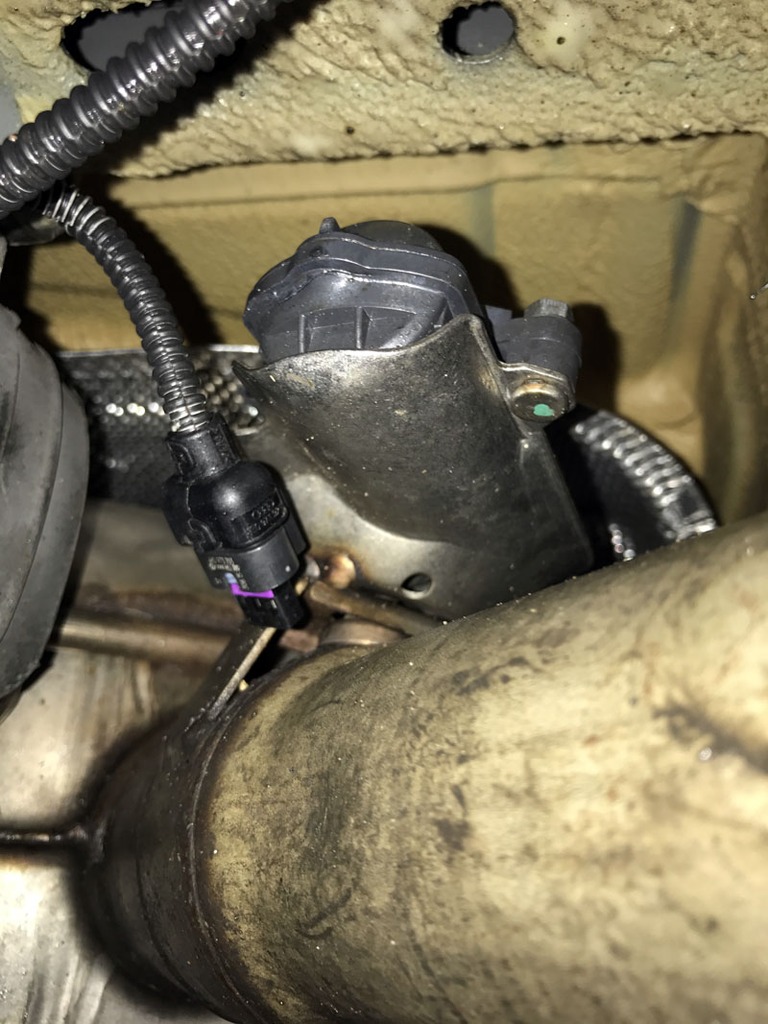
Instead of just leaving the plugs dangling and to protect them, you really need to tie them out of the way and ensure the loom ends are covered. We just zipped tied them up and covered the ends with a finger from a latex glove.
So�. what�s the difference?
I�m not entirely convinced this isn�t the full �placebo�, but the front end of the RS3 does feel a bit more solid. Not like earth shatteringly different, but certainly different.
I haven�t felt any compliance issues yet, but�.. I have a resonance issue when in Sports gearbox mode at idle. I�ve always had a slight rattle in headlining where the pano roof controls are. Only ever evident with music on and shedload of bass. In Sports gearbox mode now on idle, I now hear a vibration in this same area. Never had that before and if I drop it to Dynamic gearbox mode at idle (revs drop) and the noise goes. I doubt if the exhaust valve mod has caused this, as it shouldn�t make any difference at idle.
I haven�t done a launch yet so I�m not sure if it�s helped with my wheel hop issues.
Can�t say I feel any difference with gear shifting if I�m being honest. My car always felt tight on shifts.
The exhaust��.
Mmmmm�.. It�s pretty anti social now! lol
You�ll either love it or hate it with the valves open all the time�.. For the time being I�m loving it.
One downside is a drone on cruise, which it didn�t have before as the valves would normally close at this point.
Just see these mods a stocking filler for xmas!!!
Whilst this isn�t anything earth shattering, last week I made some further mods to the RS3.
Let�s be honest, it�s probably time for a bit more rice anyway!
034Motorsport Billet Dogbone Mount Insert
Quite a few people have fitted one of these and some say it�s a �must have� mod on the 8V RS3. Like most things available in the tuning world, I was quite sceptical, but for the sake of �45 I thought I�d give it a punt.
The idea behind this insert is that it stiffens the mounting off the bottom of the gearbox (and engine) with the front subframe.
The marketed benefits of this state it will make gear shifting crisper, reduce wheel hop / axle tramp on launches and provide a more connected driving experience. All sounds very good in black and white terms! Let�s see what it really does�.
These do look a really nice quality item, and for something so simple to look at, you�d be forgiven for thinking how can this actually do anything worthwhile.
It states in the fitting instructions sheet that it takes between 30-45 mins to fit. More like 10 mins! It really is easy and quick.
This is the mount that we need to put this new insert into.
All you do is unscrew the bolt, push the insert in and screw the bolt back in. It�s really just that!
We put some grease around it, copper slipped the bolt and marked the bolt against the insert (just so we can see if the bolt moves due to vibration). You don�t need to do any of this though.
Simple!
Exhaust Valve Mod
The next mod that I�ve been threatening to do for ages is to remove the valves on the exhaust backbox so they stay open all the time.
Since the valves on the RS3 open and close dependant upon gear and revs, maybe even throttle position with revs (as well as the obvious drive mode select) and certainly with cold start, I wanted to see what it was like with the valves effectively jammed open�. All the time!
The easiest way to do this is to start the car up and ensure the valves are open, then pull the plug on each of the valves. This way they will remain open regardless of what the ECU thinks it�s doing to control them. This will throw a code with VCDS but it doesn�t cause any issue.
I did try pulling the valves off whilst on my back without the car being up in the air�.. It was more or less impossible for me to get my arms and hands around that space. Your mileage may vary though.
Much easier to do it on a ramp to be honest�� it takes seconds to unplug.
The valves are literally on top of each exit pipe from the backbox.
Instead of just leaving the plugs dangling and to protect them, you really need to tie them out of the way and ensure the loom ends are covered. We just zipped tied them up and covered the ends with a finger from a latex glove.
So�. what�s the difference?
I�m not entirely convinced this isn�t the full �placebo�, but the front end of the RS3 does feel a bit more solid. Not like earth shatteringly different, but certainly different.
I haven�t felt any compliance issues yet, but�.. I have a resonance issue when in Sports gearbox mode at idle. I�ve always had a slight rattle in headlining where the pano roof controls are. Only ever evident with music on and shedload of bass. In Sports gearbox mode now on idle, I now hear a vibration in this same area. Never had that before and if I drop it to Dynamic gearbox mode at idle (revs drop) and the noise goes. I doubt if the exhaust valve mod has caused this, as it shouldn�t make any difference at idle.
I haven�t done a launch yet so I�m not sure if it�s helped with my wheel hop issues.
Can�t say I feel any difference with gear shifting if I�m being honest. My car always felt tight on shifts.
The exhaust��.
Mmmmm�.. It�s pretty anti social now! lol
You�ll either love it or hate it with the valves open all the time�.. For the time being I�m loving it.
One downside is a drone on cruise, which it didn�t have before as the valves would normally close at this point.
Just see these mods a stocking filler for xmas!!!
04 February 2017, 12:55 AM
#40
Scooby Senior
Styling Mods
So before we delve into the performance side of things I thought I would make a start with completing a few subtle styling mods.
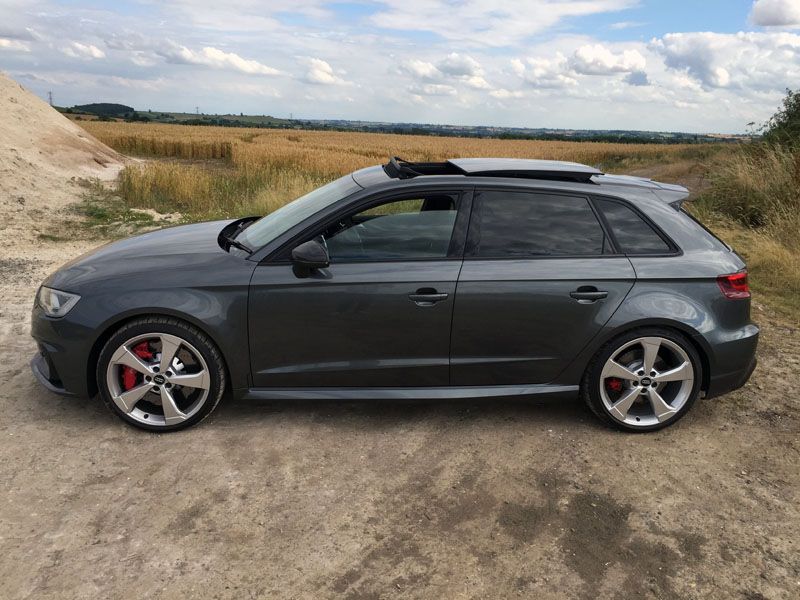
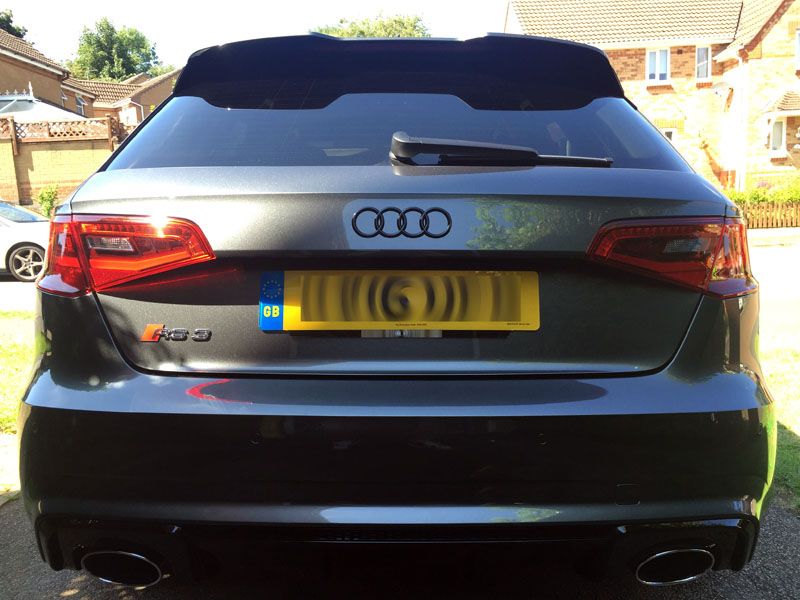
Whilst we all know what an 8V RS3 looks like, here are a few pictures of mine as I picked it up from Audi.
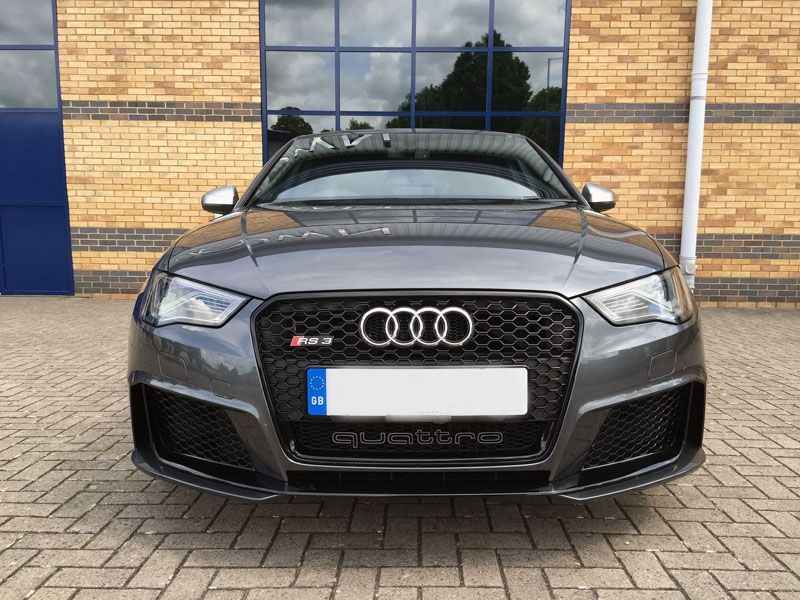
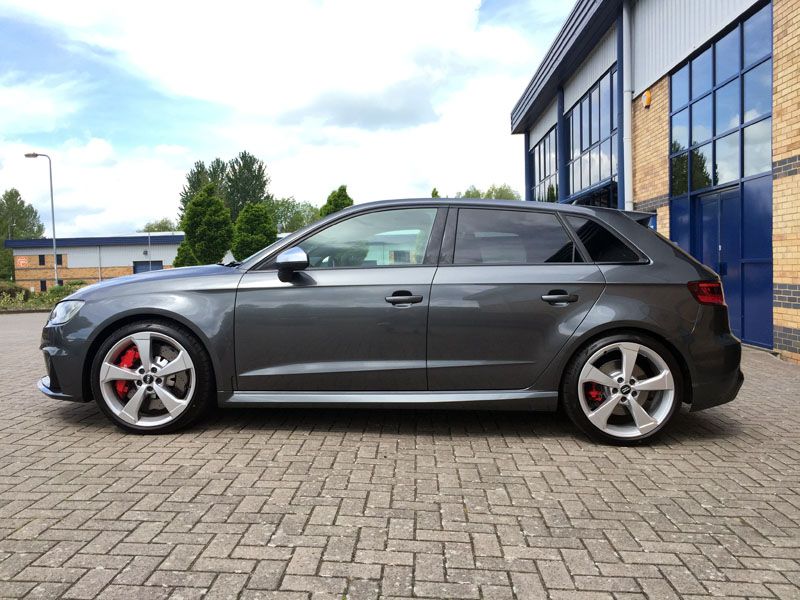
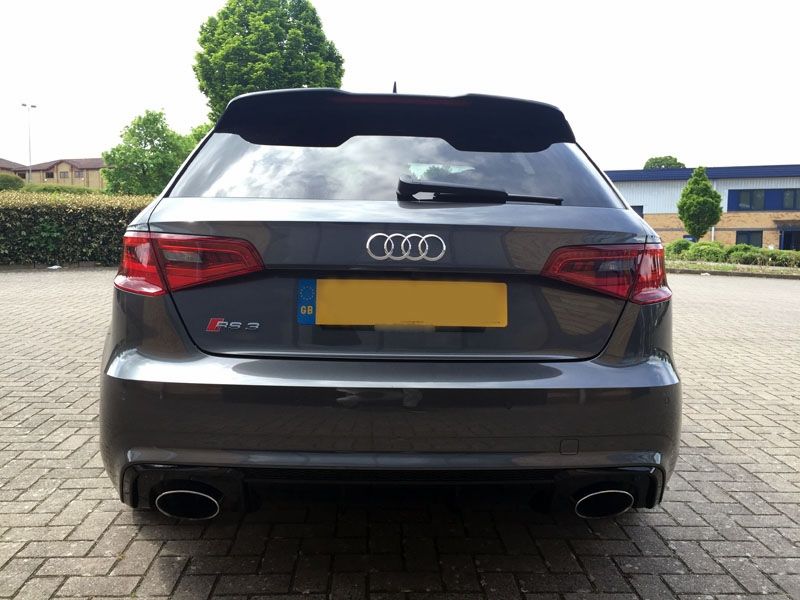
Obviously beauty is in the eye of the beholder, and the RS3 styling takes a bit of a battering from some. In my eyes (well� I do wear glasses!) the RS3 (as with the rest of the RS range, R8 to one side) is pretty much a Q car. Understated, but does what it needs to from a performance perspective.
Based on the previous performance cars I�ve owned the RS3 is quite understated�. but I like that. It�s a change for me and quite a pleasant one. However, I thought I would add a few minor changes�.. perhaps not to everyone�s taste but they are what they are.
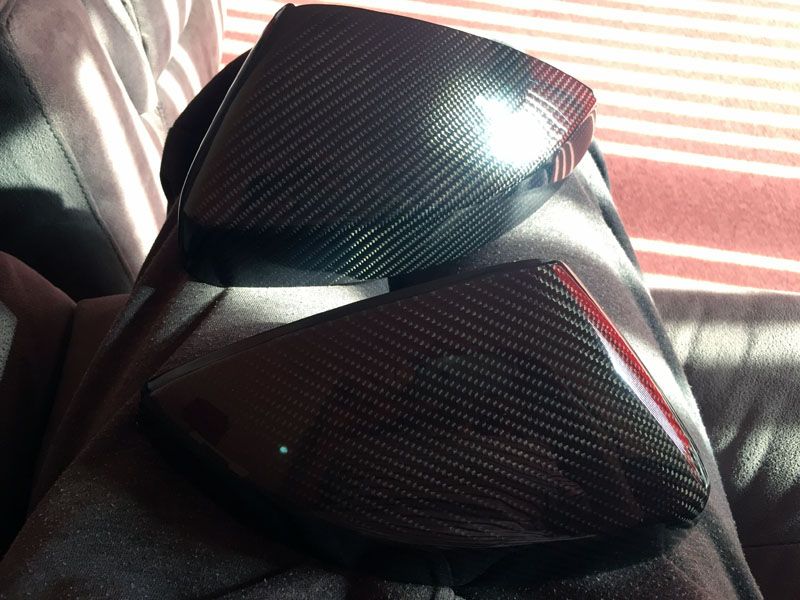
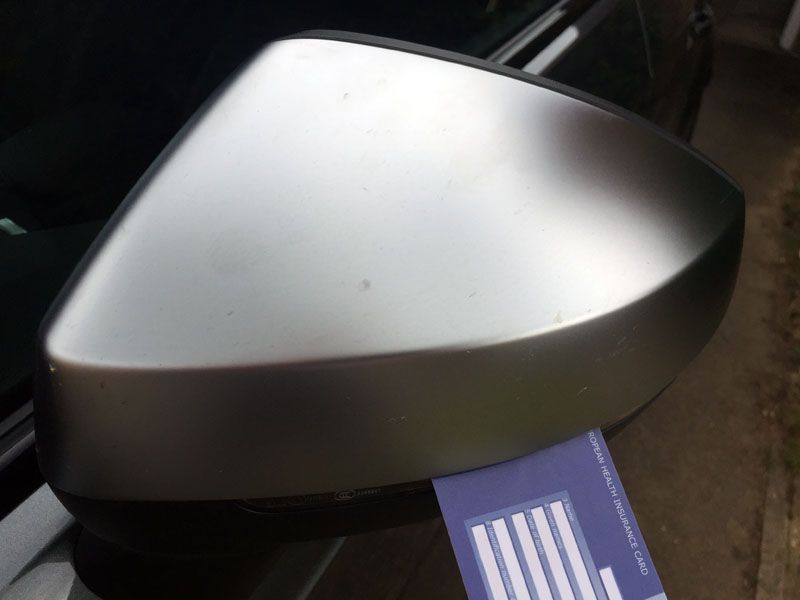
Wing Mirrors
As you can see from the pictures above, my car originally came with the standard matt silver wing mirror covers. I wanted to change these to either black or carbon. Yes, I appreciate there were other options for different colours from Audi, but this car was dealer stock, so I made do with what I had.
I managed to get some carbon ones off eBay for �100, which was cheap, but they used OEM covers and had carbon fibre layered on. I thought for �100 it was worth a punt. After a speedy delivery they turned up. The quality was very good�. I was impressed.
I had heard conflicting stories as to how you could remove the outer covers, with and without taking the whole assembly apart. After a thought process upon receiving the new ones, and seeing where all the lugs were located, I decided to have a go at removing the OEM covers WITHOUT taking the assembly apart.
The way to do this is by inserting a credit card (or equivalent) where you see in the picture below.
Once you�ve pushed the card in far enough, you�ll see that the clip in that area will release.
If you then move the card to the right of the picture, you will start to release further clips. You then need to move the card all the way to the left. Once done, you should notice the right hand side starting to come away from the mirror assembly. You can then move the card up that vertical side to further release the cover. Finally give the assembly on the right hand side a slight pull and it should really start to open up.
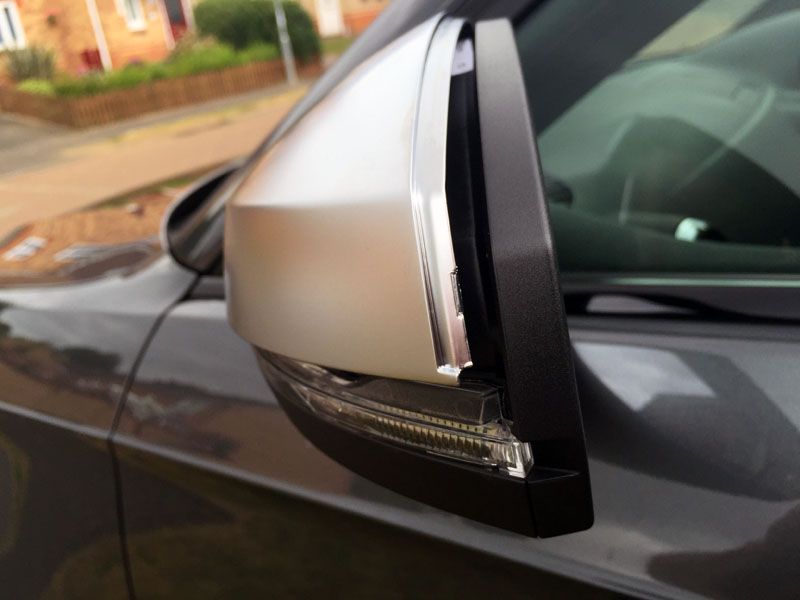
Now comes the bit where you need to be careful, but slightly forceful at the same time.
Whatever you do, do not pull the cover up. There is a horizontal clip at the left hand side (closest to the car), which will break off if you try to pull the cover up and off. You need to pull the cover into you from the front, gently but with a short / sharp action. It will just come off if you do this and all the clips will be retained.
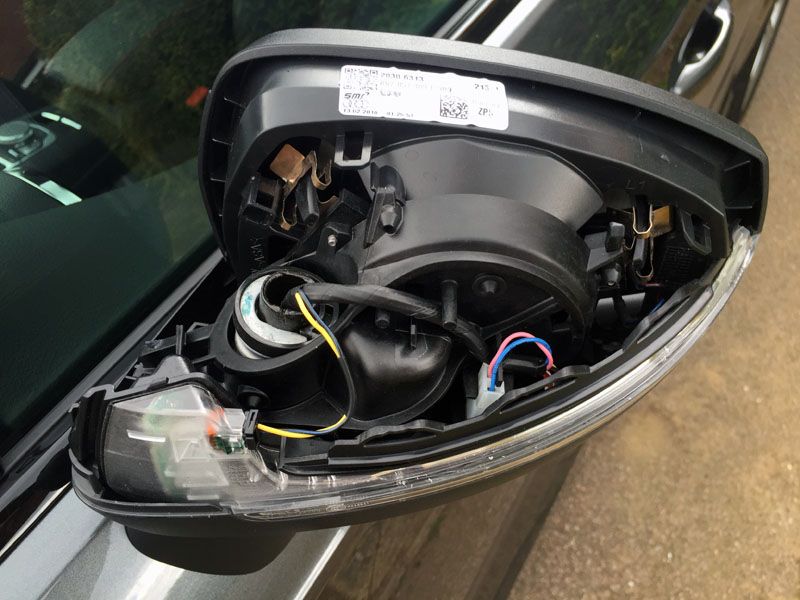
Once the cover is off you�ll be left with the assembly behind the cover�� and no broken clips (if you do it correctly).
The first mirror took me about 10 minutes as I was doing everything carefully to find my way around each clip. The second mirror took me about 2 minutes. I didn�t break a clip on either OEM cover.
The next bit is really easy�.. you just push the new cover on, exactly how you removed the OEM cover. It clips straight back into place.

As I said, quality is top notch and for a �100 they were very good value.
They have the desired effect, especially with the car being Daytona�.. Looks quite stealth with black trim.
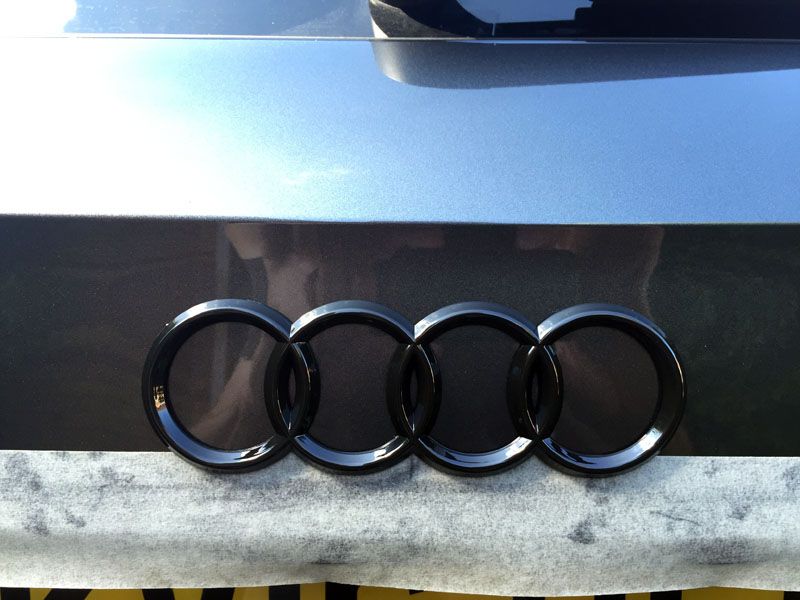
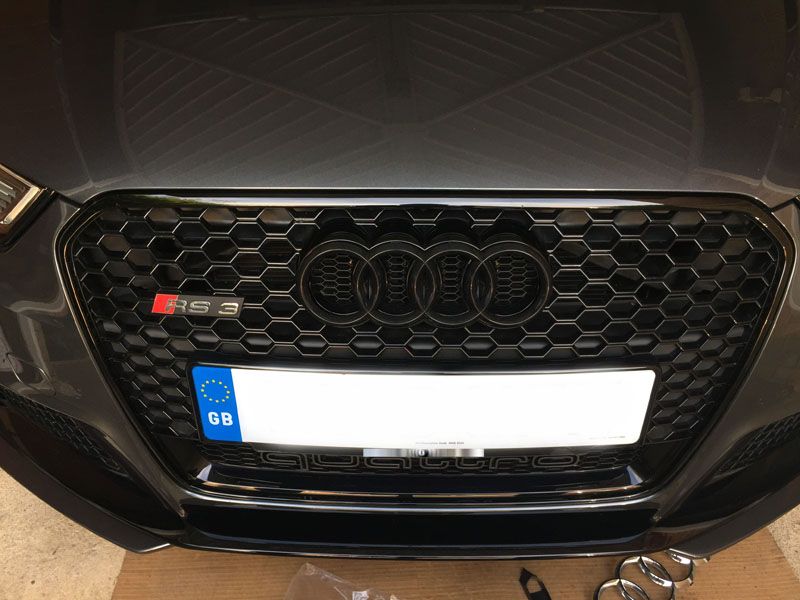
Audi Rings
You might start to see a pattern as to where I�ll be going with this car�. external styling wise.
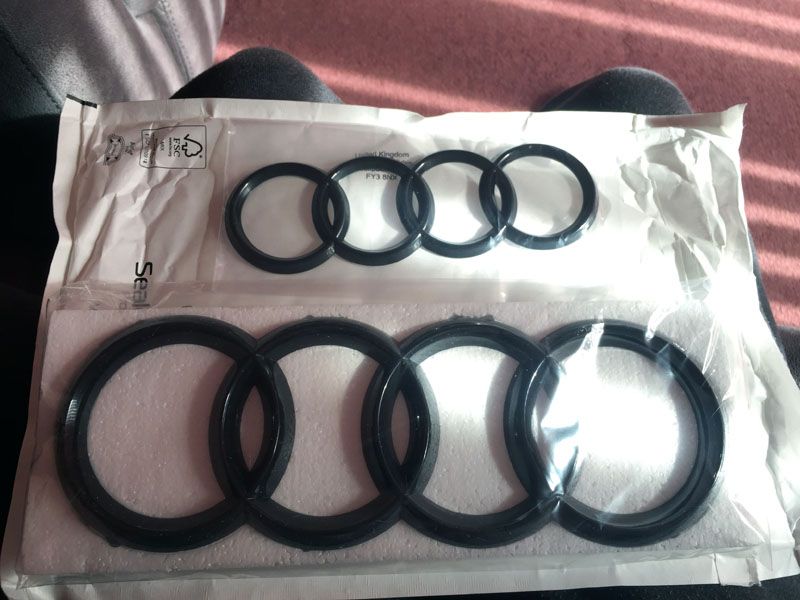
Next up was to replace the front and rear Audi rings with a black ring set. Now, I could have tried the plasti-kote method, but I decided to opt for replacement badge sets.
Again, eBay can be your friend here. I bought this set for just under �20 for the front and rear. You need to be careful ordering the correct front badge, as I understand the 8V badges are slightly bigger than the previous cars. You may also (if you�re eagle eyed) notice the smaller rear rings are slightly smaller than the OEM ones. This isn�t an issue, but there is a difference�. just so you�re aware.
Rear Rings
I started off with replacing the rear ring set.
These are bonded on to the boot lid with adhesive, so using a hairdryer (the Mrs� not mine as I haven't any hair!) I heated the rear badge, and then slid a credit card (same trick as with the mirror covers) between the badge and the boot lid skin to break the seal.
Making sure you keep applying heat, keep repeating this process around the whole badge. I wouldn�t recommend you start to pull the badge off straight away�. you�ll probably end up snapping it. Just take your time.
Once you�ve removed the badge you will still be left with residue from the glue.
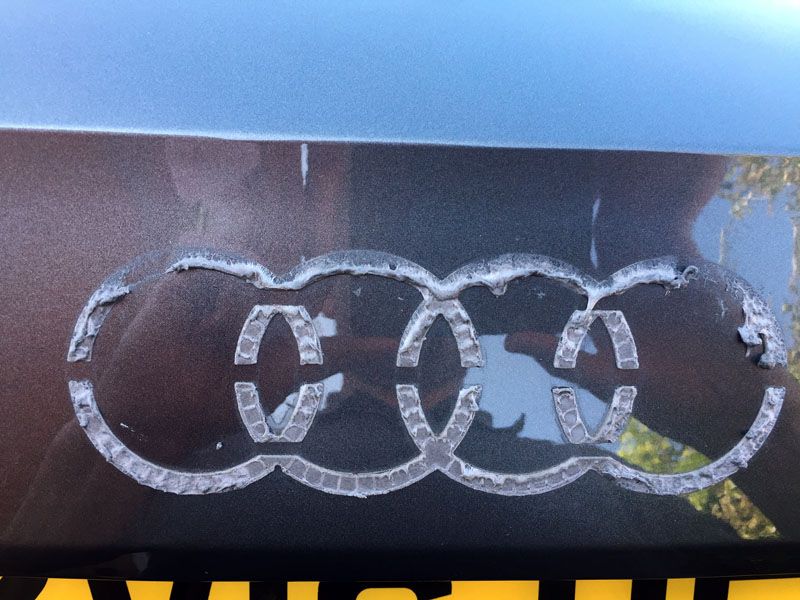
At this point I continued to apply heat and pulled off further what I could.
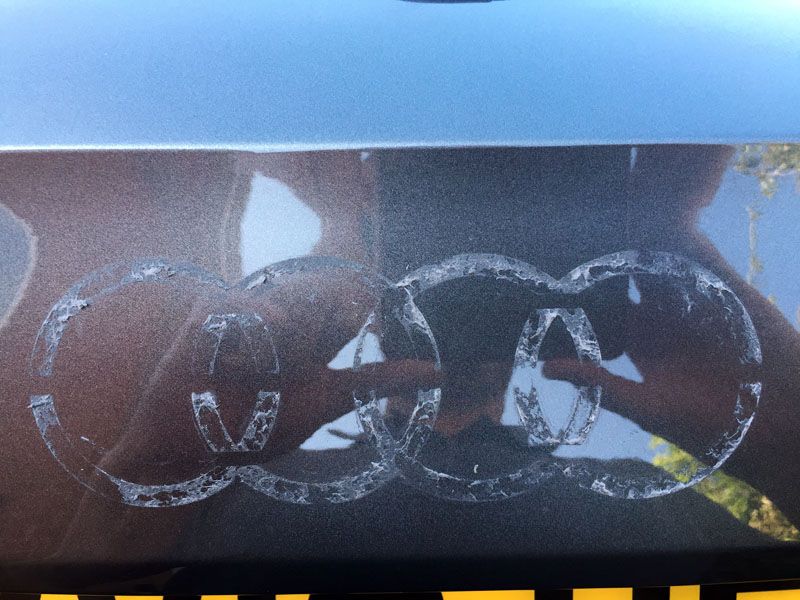
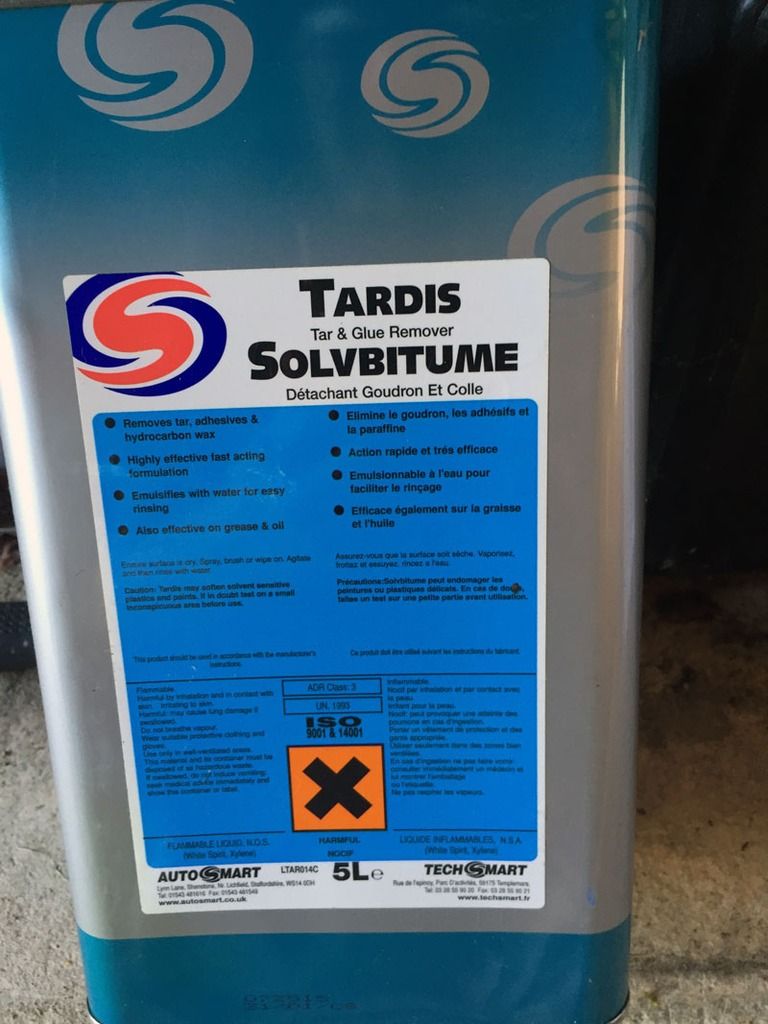
With the last bits of glue left I then turned to using some glue / tar remover (TARDIS). I�ve used this for many years to remove tar from the sides of cars and glue from vinyl car stickers. This emulsifies with water, so is really easy to rinse off. You don�t want any wax or cutting agents left on the panel prior to putting your new badge on.
After liberally applying TARDIS and cleaning / rinsing the panel, it was all clear / clean and ready for the new badge.
To ensure I put the new badge on square I measured and placed a masking tape line (with a centre position) on the boot lid and offered up the new badge before final fitment.
After I was happy with the positioning I then stuck the new badge on, peeling off the backing to the new adhesive layer on the new badge. Personally I always gently heat the adhesive�. not too much, but just enough to help the bonding process.
Front Rings
Next up was the front ring set. Again I had heard conflicting stories about removing these. Some saying you needed to remove the front bumper, others saying you can reach down from the top and get to the clips and one other I saw said you could remove from the front. I chose the latter!
In my opinion I would not advise you try to remove the rings from the front (without taking the bumper off) unless you have suitable trim tools, spudgers etc. You�ll either risk snapping the oem badge or damaging the badge grill surrounds.
Using a trim tool start from the bottom. With your new badge as a guide, you�ll see exactly where the securing tabs are and this is where you need to feed the trim tool in to push the tabs back.
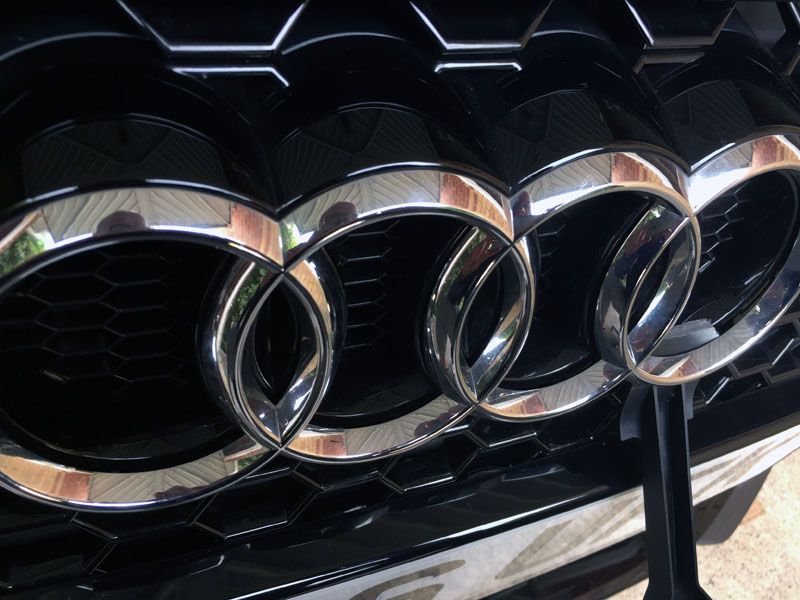
As you pop the bottom clips you�ll see the badge coming away from the grill.
Once you�ve released the bottom and lower side / centre side clips, then move to the top clips.
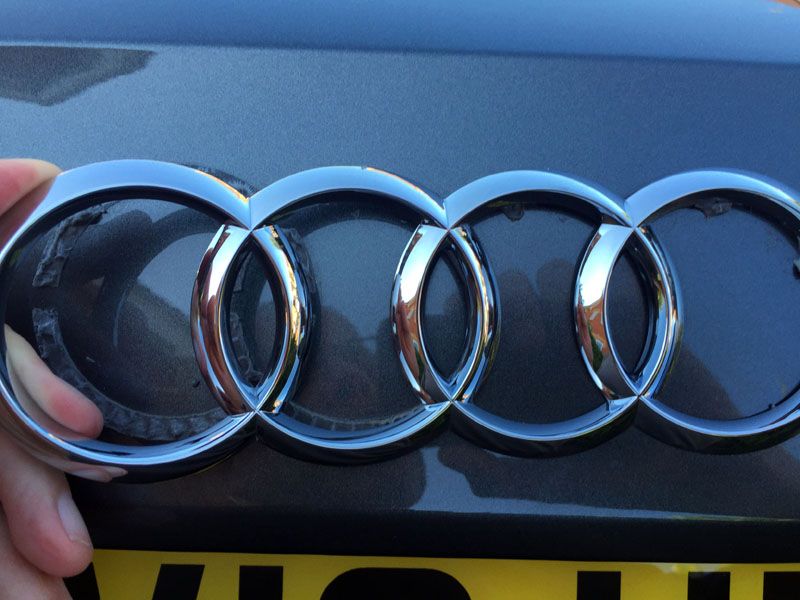
This is the first time I�ve done this and it only took me around 10 minutes. Just to prove I never broke any clips, here is the underside of the OEM badge. There was zero damage to the badge / grill surround either.
Once removed you�ll be faced with the grill ring mount, which will need a minor clean up prior to fitting the new ring set.
Mounting the new ring set is easy. Just push it on ensuring all the clips are engaged correctly.
Much like the mirrors, I really like the look of the all black trim set. Makes it look stealth, but also aggressive�. not everyone�s cup of tea I�m sure.
So for the time being that�s the first round of styling mods. I�m planning to do a few more things, but I�ll discuss this as and when I get to do them.
So before we delve into the performance side of things I thought I would make a start with completing a few subtle styling mods.
Whilst we all know what an 8V RS3 looks like, here are a few pictures of mine as I picked it up from Audi.


Obviously beauty is in the eye of the beholder, and the RS3 styling takes a bit of a battering from some. In my eyes (well� I do wear glasses!) the RS3 (as with the rest of the RS range, R8 to one side) is pretty much a Q car. Understated, but does what it needs to from a performance perspective.
Based on the previous performance cars I�ve owned the RS3 is quite understated�. but I like that. It�s a change for me and quite a pleasant one. However, I thought I would add a few minor changes�.. perhaps not to everyone�s taste but they are what they are.
Wing Mirrors
As you can see from the pictures above, my car originally came with the standard matt silver wing mirror covers. I wanted to change these to either black or carbon. Yes, I appreciate there were other options for different colours from Audi, but this car was dealer stock, so I made do with what I had.
I managed to get some carbon ones off eBay for �100, which was cheap, but they used OEM covers and had carbon fibre layered on. I thought for �100 it was worth a punt. After a speedy delivery they turned up. The quality was very good�. I was impressed.

I had heard conflicting stories as to how you could remove the outer covers, with and without taking the whole assembly apart. After a thought process upon receiving the new ones, and seeing where all the lugs were located, I decided to have a go at removing the OEM covers WITHOUT taking the assembly apart.
The way to do this is by inserting a credit card (or equivalent) where you see in the picture below.

Once you�ve pushed the card in far enough, you�ll see that the clip in that area will release.
If you then move the card to the right of the picture, you will start to release further clips. You then need to move the card all the way to the left. Once done, you should notice the right hand side starting to come away from the mirror assembly. You can then move the card up that vertical side to further release the cover. Finally give the assembly on the right hand side a slight pull and it should really start to open up.

Now comes the bit where you need to be careful, but slightly forceful at the same time.
Whatever you do, do not pull the cover up. There is a horizontal clip at the left hand side (closest to the car), which will break off if you try to pull the cover up and off. You need to pull the cover into you from the front, gently but with a short / sharp action. It will just come off if you do this and all the clips will be retained.
Once the cover is off you�ll be left with the assembly behind the cover�� and no broken clips (if you do it correctly).

The first mirror took me about 10 minutes as I was doing everything carefully to find my way around each clip. The second mirror took me about 2 minutes. I didn�t break a clip on either OEM cover.
The next bit is really easy�.. you just push the new cover on, exactly how you removed the OEM cover. It clips straight back into place.

As I said, quality is top notch and for a �100 they were very good value.
They have the desired effect, especially with the car being Daytona�.. Looks quite stealth with black trim.

Audi Rings
You might start to see a pattern as to where I�ll be going with this car�. external styling wise.
Next up was to replace the front and rear Audi rings with a black ring set. Now, I could have tried the plasti-kote method, but I decided to opt for replacement badge sets.
Again, eBay can be your friend here. I bought this set for just under �20 for the front and rear. You need to be careful ordering the correct front badge, as I understand the 8V badges are slightly bigger than the previous cars. You may also (if you�re eagle eyed) notice the smaller rear rings are slightly smaller than the OEM ones. This isn�t an issue, but there is a difference�. just so you�re aware.

Rear Rings
I started off with replacing the rear ring set.
These are bonded on to the boot lid with adhesive, so using a hairdryer (the Mrs� not mine as I haven't any hair!) I heated the rear badge, and then slid a credit card (same trick as with the mirror covers) between the badge and the boot lid skin to break the seal.


Making sure you keep applying heat, keep repeating this process around the whole badge. I wouldn�t recommend you start to pull the badge off straight away�. you�ll probably end up snapping it. Just take your time.
Once you�ve removed the badge you will still be left with residue from the glue.

At this point I continued to apply heat and pulled off further what I could.

With the last bits of glue left I then turned to using some glue / tar remover (TARDIS). I�ve used this for many years to remove tar from the sides of cars and glue from vinyl car stickers. This emulsifies with water, so is really easy to rinse off. You don�t want any wax or cutting agents left on the panel prior to putting your new badge on.

After liberally applying TARDIS and cleaning / rinsing the panel, it was all clear / clean and ready for the new badge.

To ensure I put the new badge on square I measured and placed a masking tape line (with a centre position) on the boot lid and offered up the new badge before final fitment.

After I was happy with the positioning I then stuck the new badge on, peeling off the backing to the new adhesive layer on the new badge. Personally I always gently heat the adhesive�. not too much, but just enough to help the bonding process.

Front Rings
Next up was the front ring set. Again I had heard conflicting stories about removing these. Some saying you needed to remove the front bumper, others saying you can reach down from the top and get to the clips and one other I saw said you could remove from the front. I chose the latter!
In my opinion I would not advise you try to remove the rings from the front (without taking the bumper off) unless you have suitable trim tools, spudgers etc. You�ll either risk snapping the oem badge or damaging the badge grill surrounds.
Using a trim tool start from the bottom. With your new badge as a guide, you�ll see exactly where the securing tabs are and this is where you need to feed the trim tool in to push the tabs back.

As you pop the bottom clips you�ll see the badge coming away from the grill.

Once you�ve released the bottom and lower side / centre side clips, then move to the top clips.

This is the first time I�ve done this and it only took me around 10 minutes. Just to prove I never broke any clips, here is the underside of the OEM badge. There was zero damage to the badge / grill surround either.

Once removed you�ll be faced with the grill ring mount, which will need a minor clean up prior to fitting the new ring set.

Mounting the new ring set is easy. Just push it on ensuring all the clips are engaged correctly.
Much like the mirrors, I really like the look of the all black trim set. Makes it look stealth, but also aggressive�. not everyone�s cup of tea I�m sure.


So for the time being that�s the first round of styling mods. I�m planning to do a few more things, but I�ll discuss this as and when I get to do them.
 08 February 2017, 05:58 PM
#44
Scooby Senior
 26 March 2017, 09:16 AM
#46
Scooby Regular
Thread Starter
Hopefully this will be the last substantial update for Stage 2, prior to me getting stuck into the Stage 3 development.
As you probably appreciate I like to �tell a story� when key events have taken place�. This update will certainly be no different. lol
So, since Stage 2 has been in place I have put the car under the microscope on several occasions with drag runs, dyno runs and vbox data. Whilst the the car has certainly achieved some impressive performance measures, I was always looking to gain much improved drag strip data.
Last year I had issues with launch traction but the car showed a lot of promise with the trap speeds it achieved. The additional 0-60, 0-100, 100-200 vbox data also backed up the �promise�. However�. Like most things, logic, theory and data mashing is one thing. Doing it on the quarter is something else, and something that isn�t easy to do in my opinion�.. Especially when you�re hunting down those last few 10ths!
If we fast forward to this year I had already visited Santa Pod twice during February. I only ran the car once as the first event (early Feb) would have been a complete waste of time from the off. The track prep was the worst I have ever seen it, with the track being very �green�. All cars were struggling with grip so I gave it a miss.
February 2017
Desperate for a formal drag strip slip (it doesn�t matter how many times I�m able to run on a local airfield for vbox data, a proper formal drag run is the MUST HAVE leveller) I went back down to Santa Pod in very late February.
Not only was the track still �green� (they even had flame throwers on the start line to get heat into the tarmac!!), but on this specific occasion there was a 25+mph headwind!! Headwinds usually play havoc with times, especially speeds. It was stupid of me to even bother running (I had seen the weather forecast), but I was proper desperate.
I did one run and it was ALL so wrong. No grip and a massive headwind.
The result on the one and only run I did was an awful and laughable 12.28s @ 113.76mph!!
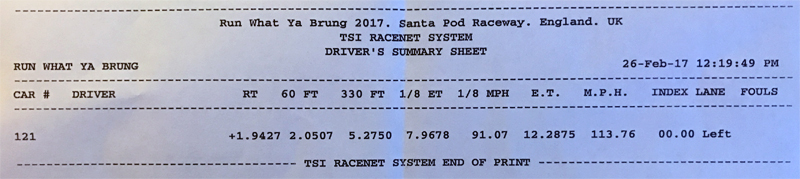
So�. in short make sure the track grip levels are good and that you don�t have a headwind. If you don�t, you could be looking at stock car times! Lol
Fast forward to this weekend�..
March 2017
The sun is shining, it�s a bit warmer and there�s no headwind. What could go wrong!!! If previous outings are anything to go by�.. All of it!!! lol
I set off to Santa Pod as nervous as hell (I�d been up since 5am and the pod is like only 30mins away!!). Every time I do anything performance related on my cars I always get very anxious�. It�s the pressure and expectation I put on myself every time. I think I must have a problem!
I rocked up at the Pod and it looked like the cars were just about to start running. I thought I best just get straight on the end of the queue and quickly get signed on.
As I literally sat back in the car the cars started to run down the strip, so I very quickly connected my VBOX up and started sweating!!!
Quickly got to the front and did all the normal stuff to set the car up for the launch.
Bang off I went. Car felt very good on launch with no real traction issues and just pulled like an Ox up the strip. I kept my eye on the speedo to get an indication of what I was going to trap at. I was very close to 120mph so I knew it was a good run, so I kept my foot in to ensure I could get a 100-200kmh (124mph) data log as well.
I quickly looked over to my VBOX and saw this:
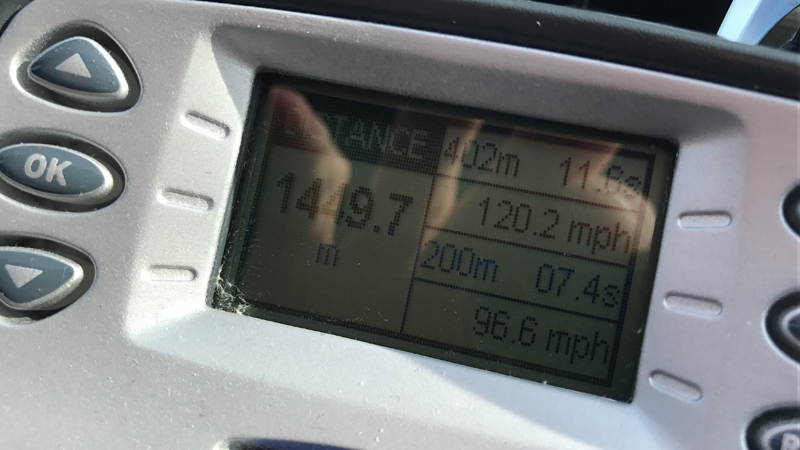
I instantly (swore) thought �Holy Moly� and started to flip through the rest of the screens, assuming that at worst it would be an 11.7x on the official timing slip.
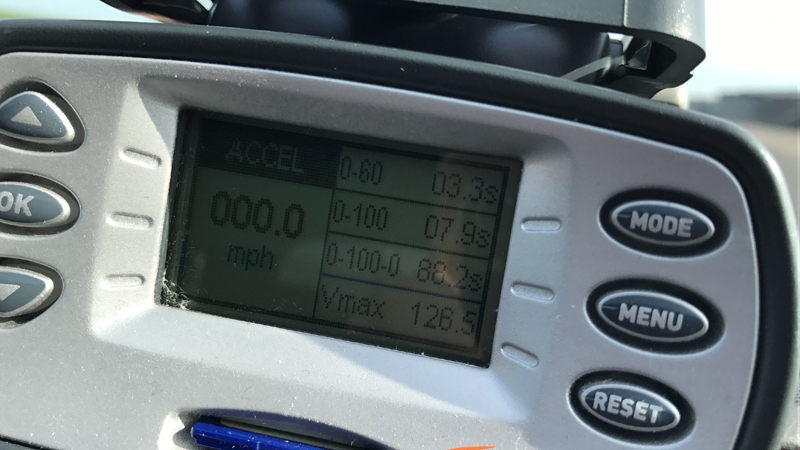
0-60mph in 3.3s
0-100mph in 7.9s
60-100mph in 4.7s
100-200kmh (62-124mph) in 9.0s
Whilst these were only rounded (and uncorrected) VBOX figures, they all alluded to the fact this was a very good run.
I nailed it down to the timing office to pick the slip up.
BOOM!!!!
11.55s @ 118.57mph
The trap speeds I had seen before, so that wasn�t a shock�.. But the ET. That really did surprise me.
If you look at the 60ft time it was a good launch, and to be honest I was hoping for an 11.7 quarter. Thinking if I was lucky I�d get an 11.6�.. But no way did I even think for one minute I�d get an 11.5 (and a good solid one at that).
I�ve never just rocked up and �banged one in� on my first attempt.
I then pulled the card on the VBOX and analysed the corrected data. Santa Pod, like most proper drag strips, is slightly uphill so it would be interesting to see the corrected figures for slope.
0-60mph: 3.26s
0-100mph: 7.91s

60-100mph: 4.63s
100-200kmh (62-124mph): 8.97s
Apart from the 60-100mph measure, these have been the best the car has achieved with Stage 2. To be fair though I haven�t really been able to test the car properly since the blown boost hose was found and replaced in December. It would be logically to suggest that even when I ran the car in October last year down the strip, I already had a boost leak.
The only other change has been the dogbone mount. It�s hard for me to objectively state whether this has helped with the launches, as the track conditions yesterday were good. When I ran in February (dogbone was fitted late last year) the car was all over the place on the launching, but the conditions were poor.
I actually think the car could have gone ever so slightly quicker as I had a higher fuel payload than I normally have when running down the strip. The fuel gauge just ticked down to half full as I turned up for the first run.
I normally run on two bars of fuel.
Sounds pathetic I�m sure�.. But when you may have been able to reduce your time by 6/100ths (to get in the 11.4�s), every little can help.
Stage 2 - The End
I think I can safely say I�ve tested the backside out of Stage 2 and I�m extremely pleased with the results.
As far as I�m currently aware, this car is the quickest down the quarter in the UK for a comparatively tuned 8V RS3 (Stage 2) running on normal pump fuel (Tesco finest!) and full weight (no stripping!).
To highlight as well, this car (apart from the replaced boost hose and dogbone mount) has had NO further performance tuning or remapping since I picked the car up after the Stage 2 work last October.
My Stage 2 is pretty basic in reality, but in my opinion works extremely well.
I have had a number of people ask me offline if I have anything else done to the car that I haven�t disclosed. The answer has/is no.
I�m on stock suspension. Stock (original) tyres. Straight 99 pump fuel. Full weight car (in fact it�s optioned up with pano roof etc, so pretty much as heavy as these things get). Stock launch control map. Stock DSG map. Stock induction. Stock HPFP.
So that�s it for my Stage 2 testing and if these results are anything to go by I really can�t wait to get the Syvecs on alongside a bigger turbo!
Happy days!
As you probably appreciate I like to �tell a story� when key events have taken place�. This update will certainly be no different. lol
So, since Stage 2 has been in place I have put the car under the microscope on several occasions with drag runs, dyno runs and vbox data. Whilst the the car has certainly achieved some impressive performance measures, I was always looking to gain much improved drag strip data.
Last year I had issues with launch traction but the car showed a lot of promise with the trap speeds it achieved. The additional 0-60, 0-100, 100-200 vbox data also backed up the �promise�. However�. Like most things, logic, theory and data mashing is one thing. Doing it on the quarter is something else, and something that isn�t easy to do in my opinion�.. Especially when you�re hunting down those last few 10ths!
If we fast forward to this year I had already visited Santa Pod twice during February. I only ran the car once as the first event (early Feb) would have been a complete waste of time from the off. The track prep was the worst I have ever seen it, with the track being very �green�. All cars were struggling with grip so I gave it a miss.
February 2017
Desperate for a formal drag strip slip (it doesn�t matter how many times I�m able to run on a local airfield for vbox data, a proper formal drag run is the MUST HAVE leveller) I went back down to Santa Pod in very late February.
Not only was the track still �green� (they even had flame throwers on the start line to get heat into the tarmac!!), but on this specific occasion there was a 25+mph headwind!! Headwinds usually play havoc with times, especially speeds. It was stupid of me to even bother running (I had seen the weather forecast), but I was proper desperate.
I did one run and it was ALL so wrong. No grip and a massive headwind.
The result on the one and only run I did was an awful and laughable 12.28s @ 113.76mph!!
So�. in short make sure the track grip levels are good and that you don�t have a headwind. If you don�t, you could be looking at stock car times! Lol
Fast forward to this weekend�..
March 2017
The sun is shining, it�s a bit warmer and there�s no headwind. What could go wrong!!! If previous outings are anything to go by�.. All of it!!! lol
I set off to Santa Pod as nervous as hell (I�d been up since 5am and the pod is like only 30mins away!!). Every time I do anything performance related on my cars I always get very anxious�. It�s the pressure and expectation I put on myself every time. I think I must have a problem!
I rocked up at the Pod and it looked like the cars were just about to start running. I thought I best just get straight on the end of the queue and quickly get signed on.
As I literally sat back in the car the cars started to run down the strip, so I very quickly connected my VBOX up and started sweating!!!
Quickly got to the front and did all the normal stuff to set the car up for the launch.
Bang off I went. Car felt very good on launch with no real traction issues and just pulled like an Ox up the strip. I kept my eye on the speedo to get an indication of what I was going to trap at. I was very close to 120mph so I knew it was a good run, so I kept my foot in to ensure I could get a 100-200kmh (124mph) data log as well.
I quickly looked over to my VBOX and saw this:
I instantly (swore) thought �Holy Moly� and started to flip through the rest of the screens, assuming that at worst it would be an 11.7x on the official timing slip.
0-60mph in 3.3s
0-100mph in 7.9s
60-100mph in 4.7s
100-200kmh (62-124mph) in 9.0s
Whilst these were only rounded (and uncorrected) VBOX figures, they all alluded to the fact this was a very good run.
I nailed it down to the timing office to pick the slip up.
BOOM!!!!
11.55s @ 118.57mph
The trap speeds I had seen before, so that wasn�t a shock�.. But the ET. That really did surprise me.
If you look at the 60ft time it was a good launch, and to be honest I was hoping for an 11.7 quarter. Thinking if I was lucky I�d get an 11.6�.. But no way did I even think for one minute I�d get an 11.5 (and a good solid one at that).
I�ve never just rocked up and �banged one in� on my first attempt.
I then pulled the card on the VBOX and analysed the corrected data. Santa Pod, like most proper drag strips, is slightly uphill so it would be interesting to see the corrected figures for slope.
0-60mph: 3.26s
0-100mph: 7.91s
60-100mph: 4.63s
100-200kmh (62-124mph): 8.97s
Apart from the 60-100mph measure, these have been the best the car has achieved with Stage 2. To be fair though I haven�t really been able to test the car properly since the blown boost hose was found and replaced in December. It would be logically to suggest that even when I ran the car in October last year down the strip, I already had a boost leak.
The only other change has been the dogbone mount. It�s hard for me to objectively state whether this has helped with the launches, as the track conditions yesterday were good. When I ran in February (dogbone was fitted late last year) the car was all over the place on the launching, but the conditions were poor.
I actually think the car could have gone ever so slightly quicker as I had a higher fuel payload than I normally have when running down the strip. The fuel gauge just ticked down to half full as I turned up for the first run.
I normally run on two bars of fuel.
Sounds pathetic I�m sure�.. But when you may have been able to reduce your time by 6/100ths (to get in the 11.4�s), every little can help.
Stage 2 - The End
I think I can safely say I�ve tested the backside out of Stage 2 and I�m extremely pleased with the results.
As far as I�m currently aware, this car is the quickest down the quarter in the UK for a comparatively tuned 8V RS3 (Stage 2) running on normal pump fuel (Tesco finest!) and full weight (no stripping!).
To highlight as well, this car (apart from the replaced boost hose and dogbone mount) has had NO further performance tuning or remapping since I picked the car up after the Stage 2 work last October.
My Stage 2 is pretty basic in reality, but in my opinion works extremely well.
I have had a number of people ask me offline if I have anything else done to the car that I haven�t disclosed. The answer has/is no.
I�m on stock suspension. Stock (original) tyres. Straight 99 pump fuel. Full weight car (in fact it�s optioned up with pano roof etc, so pretty much as heavy as these things get). Stock launch control map. Stock DSG map. Stock induction. Stock HPFP.
So that�s it for my Stage 2 testing and if these results are anything to go by I really can�t wait to get the Syvecs on alongside a bigger turbo!
Happy days!
16 April 2017, 09:18 AM
#47
Scooby Regular
Thread Starter
OK... things have suddenly snowballed since a long conversation yesterday with Iain.
As with most plans, things will undoubtedly change and this stuff will be far from straight forward. I've been down this route before, and it can be painful. Hopefully it will be worth it though.
The plan is:
May
* Test the new v2 Stage 2 map on my car to see how it responds
* Get Syvecs up and running on the current set-up
* Get the pipework made up for a full frame GTX turbo (this might be optimistic for May)
Date TBC
* Start testing turbos, currently looking at three different specs (upper limit will have the potential for well over 700bhp, assuming we can get a specific blower to fit, but obviously not on stock engine)
* Start looking at building a forged bottom end, including custom pistons
* Look at the possibilities of having a billet block made
I'm tentatively looking at getting some serious power out of this lump (as the end goal).
Need to assess costs and logistics first though, so plenty to sort out and a lot to do before even getting to any engine build stage.
Should keep me busy for a bit though.
In the meantime, if any knows or hears of a scrap 2.5 RS3/TTRS block available and a set of stock pistons (even with mild det on the crown for instance), could you please PM me.
Will be looking at starting the piston design, getting a deck plate made up so the cylinder liners can be honed properly, and also look to "section" the block to see how strong it is. Then scan the block for a billet block build.
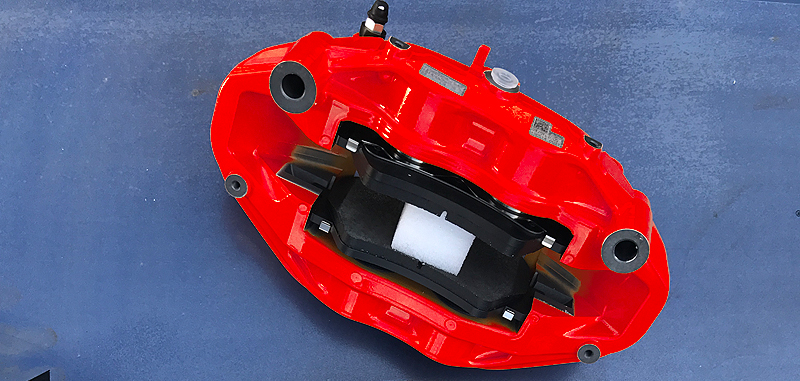
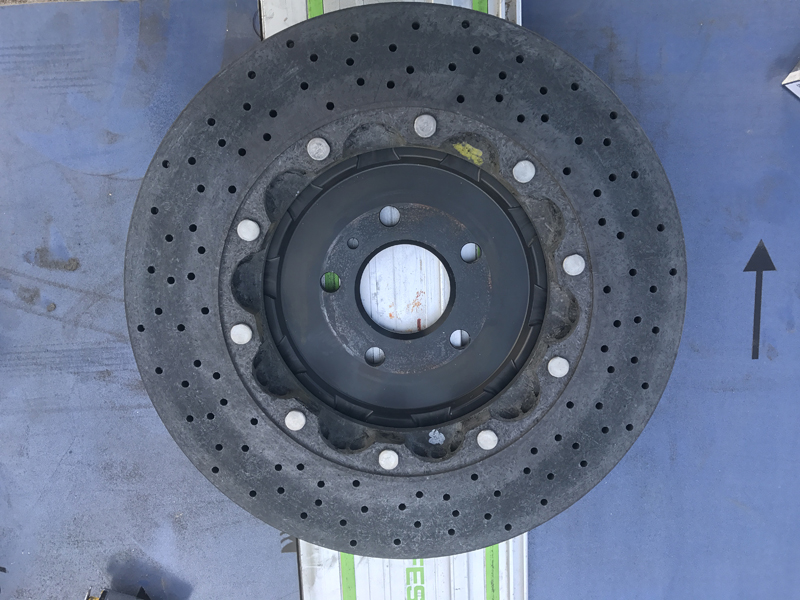
I've also been offered these carbon ceramic puppies..... although I haven't been given a price yet, so need to see if this is going to be stupidly expensive before diving in. Look Gucci though, even if my pocket ends up not being "agile" enough!
Will also need a new set of wheels, which I've also located.
As with most plans, things will undoubtedly change and this stuff will be far from straight forward. I've been down this route before, and it can be painful. Hopefully it will be worth it though.
The plan is:
May
* Test the new v2 Stage 2 map on my car to see how it responds
* Get Syvecs up and running on the current set-up
* Get the pipework made up for a full frame GTX turbo (this might be optimistic for May)
Date TBC
* Start testing turbos, currently looking at three different specs (upper limit will have the potential for well over 700bhp, assuming we can get a specific blower to fit, but obviously not on stock engine)
* Start looking at building a forged bottom end, including custom pistons
* Look at the possibilities of having a billet block made
I'm tentatively looking at getting some serious power out of this lump (as the end goal).
Need to assess costs and logistics first though, so plenty to sort out and a lot to do before even getting to any engine build stage.
Should keep me busy for a bit though.
In the meantime, if any knows or hears of a scrap 2.5 RS3/TTRS block available and a set of stock pistons (even with mild det on the crown for instance), could you please PM me.
Will be looking at starting the piston design, getting a deck plate made up so the cylinder liners can be honed properly, and also look to "section" the block to see how strong it is. Then scan the block for a billet block build.
I've also been offered these carbon ceramic puppies..... although I haven't been given a price yet, so need to see if this is going to be stupidly expensive before diving in. Look Gucci though, even if my pocket ends up not being "agile" enough!
Will also need a new set of wheels, which I've also located.
16 April 2017, 12:17 PM
#49
Scooby Regular
Thread Starter
Mate of mine has just banged a GTX35 turbo on (no where near it's potential but it's kicking out 600bhp). I have his VBOX logs and they're just crazy.
The pull is too strong and I'm too weak!
The pull is too strong and I'm too weak!
17 April 2017, 08:41 PM
#50
Don't go this way Shaun, I have started this way on my EVO and my budget build is out of control
I already have a 1100bhp Norris engine with apt dry sump and full race turbo setup. I never learn

Last edited by stevebt; 17 April 2017 at 08:44 PM.
19 April 2017, 09:57 AM
#51
Scooby Regular
Thread Starter
LOL @ Steve.
My mates car has just achieved the following via VBOX, which I have corrected for slope:
0-60mph: 2.7s (1ft rollout)
0-100mph: 6.0s (1ft rollout)
100-200kmh: 6.3s
30-130mph: 8.8s
1/4m in 10.6 @ 131mph
That is effectively just using a bolt on turbo kit for the stock engine. He even has a leaking wastegate, so more to come even from this current boost levels I suspect.
That is seriously quick for bolt ons and a full weight road car.
I might have finally found the right platform, still exciting to mod, whilst still retaining day to day capability with all mod cons in a small car.
It's a very reasonable conversion as well when you add the parts up. These 2.5's are a great platform.
Best of luck with yours..... hope it spends most of it's life on the black stuff mate!
24 April 2017, 10:02 PM
#53
Scooby Regular
Thread Starter
So… some parts have started to arrive today.
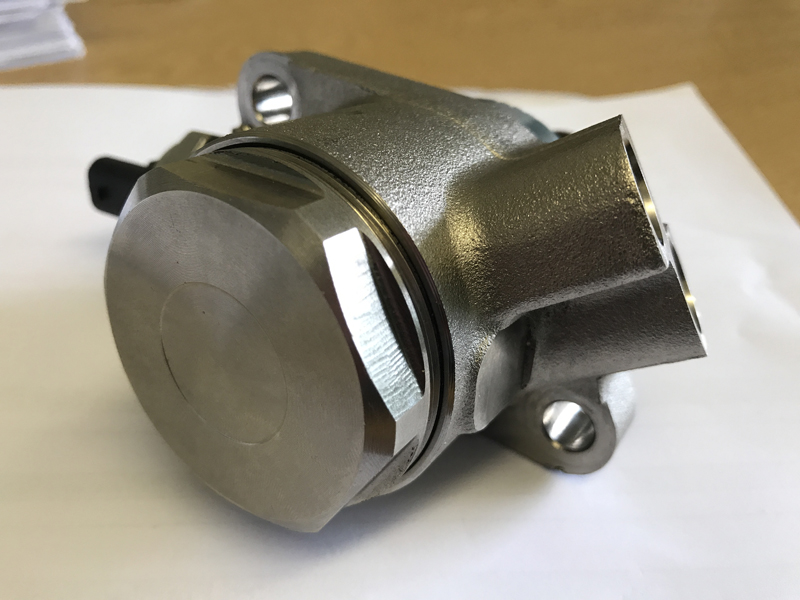
High Pressure Fuel Pump (HPFP)
Whilst I suspect many of you have heard of the term HPFP, some may not know what these are.
Cars that have direct fuel injection (as in our RS3’s) inject fuel direct into the combustion chamber via high-pressure injectors, thus improving combustion cooling and enabling higher engine efficiency which is meant to result in increased fuel efficiency and torque. This requires the use of a HPFP.
Direct injection diesels have been using this method for a number of years now….. Which is probably where you’re aware of the costs associated to these pumps when they fail. They don’t appear to be cheap!
As with any fuel system, it’s about delivering fuel at the requested rate constantly (as required). The OEM HPFP has its limits….. Certainly in respect of where I’m looking to go.
I know a few RS3 owners have had issues with OEM pumps not doing what they should do even on stock cars, let alone cars that have started to go down the Stage 1 & 2 route.
There are a number of options available ranging from �300 - �2200. Quite a difference!
I’ve personally gone for the VIS Motorsport upgrade kit which is a new piston and sleeve. Apparently this kit is the biggest piston available to fit the stock pump housing, enabling this specific kit to deliver enough sustained fuelling for up to 700bhp. It also appears to be the cheapest kit available priced at around �300 delivered (this is the current offer price - normally 450 Euro + delivery).
Luckily I knew someone in the UK who had just bought one and was trying it on his RS3 with big blower. Mapping went fine and the VIS HPFP upgrade kit did exactly what was needed on his car and coped with 600bhp no sweat. That was enough for me to pull the trigger.
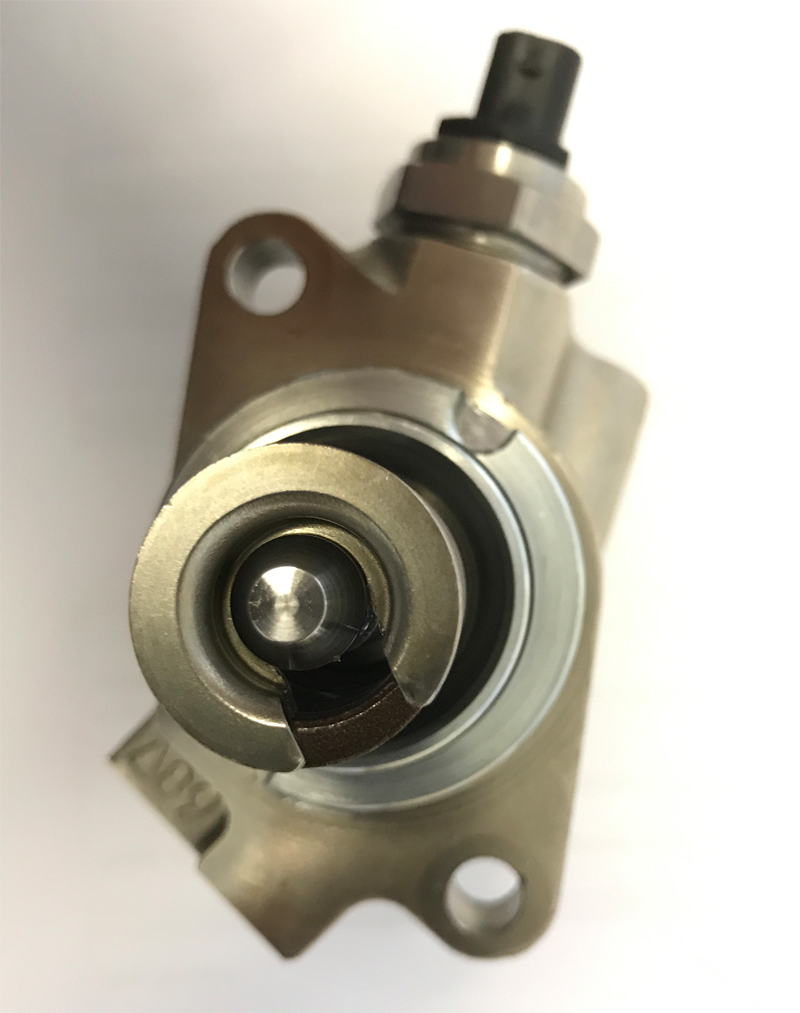
Just in case you didn’t know what the HPFP looks like, you’ll probably notice this when you open your bonnet again!
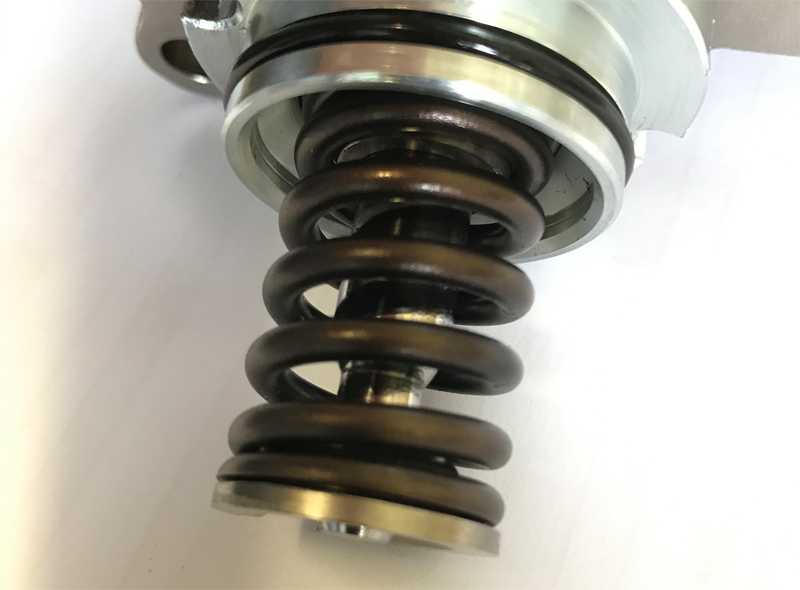
Here is the pump with the new piston and sleeve fitted (not that you can really make out any difference), ready to fit to my car.
So that will be the fuelling side sorted.
Spark Plugs
Hardly exciting but another much needed item for the next stage…. NGK R plugs.
These ones are the 7438-8’s. The last 8 being the heat rating and running one step cooler than the stock OEM plugs which are 7’s.
They look quite different as well in respect of the tips.
I understand these don’t need gapping…. Just bang them straight in.
I bought these from Opieoils at �30 a pop (you can get 10% normally by using anyone of their 10% off codes banging around).
That’s it for now, but should have some further parts arriving later this week.
High Pressure Fuel Pump (HPFP)
Whilst I suspect many of you have heard of the term HPFP, some may not know what these are.
Cars that have direct fuel injection (as in our RS3’s) inject fuel direct into the combustion chamber via high-pressure injectors, thus improving combustion cooling and enabling higher engine efficiency which is meant to result in increased fuel efficiency and torque. This requires the use of a HPFP.
Direct injection diesels have been using this method for a number of years now….. Which is probably where you’re aware of the costs associated to these pumps when they fail. They don’t appear to be cheap!
As with any fuel system, it’s about delivering fuel at the requested rate constantly (as required). The OEM HPFP has its limits….. Certainly in respect of where I’m looking to go.
I know a few RS3 owners have had issues with OEM pumps not doing what they should do even on stock cars, let alone cars that have started to go down the Stage 1 & 2 route.
There are a number of options available ranging from �300 - �2200. Quite a difference!
I’ve personally gone for the VIS Motorsport upgrade kit which is a new piston and sleeve. Apparently this kit is the biggest piston available to fit the stock pump housing, enabling this specific kit to deliver enough sustained fuelling for up to 700bhp. It also appears to be the cheapest kit available priced at around �300 delivered (this is the current offer price - normally 450 Euro + delivery).
Luckily I knew someone in the UK who had just bought one and was trying it on his RS3 with big blower. Mapping went fine and the VIS HPFP upgrade kit did exactly what was needed on his car and coped with 600bhp no sweat. That was enough for me to pull the trigger.
Just in case you didn’t know what the HPFP looks like, you’ll probably notice this when you open your bonnet again!
Here is the pump with the new piston and sleeve fitted (not that you can really make out any difference), ready to fit to my car.
So that will be the fuelling side sorted.
Spark Plugs
Hardly exciting but another much needed item for the next stage…. NGK R plugs.
These ones are the 7438-8’s. The last 8 being the heat rating and running one step cooler than the stock OEM plugs which are 7’s.
They look quite different as well in respect of the tips.
I understand these don’t need gapping…. Just bang them straight in.
I bought these from Opieoils at �30 a pop (you can get 10% normally by using anyone of their 10% off codes banging around).
That’s it for now, but should have some further parts arriving later this week.
25 April 2017, 06:32 PM
#55
Scooby Regular
Thread Starter
25 April 2017, 06:33 PM
#56
Scooby Regular
Thread Starter
And another box arrives……
A P3 air vent gauge.
Being honest I’ve never really liked digital gauges as I’ve always preferred analogue for things like boost. It’s easier to read in analogue in my opinion, however, since these gauges are mega neat on their installation and convenient to use, I got a bit wallet happy and bought one.
It wasn’t until I had pulled the trigger and bought this gauge, did I then realise I can gain access to much more information and functionality via a bluetooth connection between Syvecs and my iPhone. lol Oh well….. This might be up for sale soon then!
If I intend on keeping this gauge I do need to buy the additional analogue boost module, which enables boost to be read from the vacuum system off the engine. The reason for this and my requirement of this, is whilst the gauge out of the box plugs into the ODB port and reads ODB ECU boost, this generic ODB boost reading is capped to 1.55bar…. I’ll be running more boost than that, so will need the additional module.
I hear that P3 are looking to extend the PID’s accessed via ODB, which may allow the gauge to read the proper internal Audi PID’s…. This would mean correct and full boost reading past 1.55bar.
So what’s this thing do? A lot more than just boost display:
Boost: This mode will show vacuum and boost. Depending on settings in the config menu this may be from ECU data or an external analog sensor. Boost is read in PSI by default and Vacuum is inHg. If you configure the gauge to metric boost/vacuum will be in BAR.
Coolant: Coolant temp. Unlike the needle on your dash, this will show you exactly the temp that your engine is currently running at, and is configurable between Celsius & Fahrenheit.
Air: Air intake temperature. This is the reading of the temperature of the air entering the engine, and is configurable between Celsius & Fahrenheit. On most vehicles, this reading is taken from the T-MAP sensor on the charge pipe, before the throttle.
IGNTN: Ignition timing. This mode will show you the spark timing of your engine in real-time.
EGT: Exhaust Gas Temperature. This is the temp of the exhaust gas as calculated by your ECU. (canbus vehicles only)
Throttle: Actual throttle plate position. Use this mode to see how your car changes the actual drive by wire throttle blade in relation to what your foot tells it to do.
rp-Shift: RPM readout. It can be handy to use this mode to see an exact RPM or to record/playback and see your shifts.
Speed: Actual road speed direct from VSS. This is the actual road speed value of the car, uncorrected. This is the raw value; therefore it may not match your cluster which tends to read high in many cars. This value is taken from the left rear wheel on most vehicles.
0-60: Performance Timer, 0-60 timer with auto start / stop.
Batt: Battery Voltage. This is the voltage of your cars power system, anything between 13-14.5 volts while running is normal.
Code Reading: Read and Clear diagnostic codes, this happens automatically at startup. On K-Line vehicles this is disabled by default because it delays startup.
Peak Recall: The gauge offers peak recall of the PEAK VALUE on the selected mode, since the last recall, or since the vehicle was started. In addition to this, for 2008+ model year cars the gauge also stores peaks for EGT, Air, Coolant in the background, so that you can switch to that mode later, after a lap for example, and recall your peak temperatures.
Record/Playback: The 15 seconds record/playback feature is available on canbus vehicles only, and provides a way for you to see 15 seconds of historical data from the current mode. Recording is started when the peak recall button is pressed. Simply tap peak recall, do some acceleration, and then after you are able to look at the gauge again, hold the peak recall button and the gauge will show you the first 15 seconds of data from that mode, as well as RPM scaled onto the bargraph readout.
For something that fits very neatly into the oem vent, it provides a lot of functionality.
The gauge is approximately �315 from p3cars.com.
12 May 2017, 01:16 PM
#58
Scooby Regular
Join Date: Oct 2016
Location: Killin
Posts: 943
Likes: 0
Received 0 Likes
on
0 Posts